Creating a remote EJB client for the AS 7 application server is a bit different compared to other releases of the application server.
As a matter of fact, previous versions of JBoss AS (versions < 7.x) used the JNP project as the JNDI naming implementation so developers are familiar with jnp:// PROVIDER_URL to communicate with the application server.
Starting with AS7, the JNP project is no longer used, neither on the server side or on the client side. The client side of the JNP project has now been replaced by the jboss-remote-naming project (https://github.com/jbossas/jboss-remote-naming). There were various reasons why the JNP client was replaced by the jboss-remote-naming project. One of them was that the JNP project did not allow fine-grained security configurations while communicating with the JNDI server. The jboss-remote-naming project is backed by the jboss-remoting project (https://github.com/jboss-remoting/jboss-remoting); it allows much more and better control over security.
Besides the new naming implementation, in AS7 there is no longer support for binding custom JNDI names to EJBs. So the beans are always bound to the spec's mandated java:global, java:app and java:module namespaces. Therefore, setting the JNDI name for the session bean element via an annotation or configuration file is no longer supported.
So what will be the JNDI name used to invoke a stateless session bean? Here is it:
ejb:<app-name>/<module-name>/<distinct-name>/<bean-name>!<fully-qualified-classname-of-the-remote-interface>
A bit verbose, isn't it? However, the following table will help you to get through it:
|
Element |
Description |
|---|---|
|
|
This is the enterprise application name ( |
|
|
This is the module name ( |
|
|
You can optionally set a distinct name for each deployment unit |
|
|
This is the bean's classname |
|
|
This is the fully qualified classname of the remote interface |
So the corresponding JNDI binding for your TheatreInfo EJB, packaged into a file named ticket-agency-ejb.jar, will be:
ejb:/ticket-agency-ejb//TheatreInfoBean!com.packtpub.as7development.chapter3.ejb.TheatreInfo
On the other hand, stateful EJBs will contain one more attribute—?stateful—at the bottom of the JNDI string; this will result in the following JNDI naming structure:
ejb:<app-name>/<module-name>/<distinct-name>/<bean-name>!<fully-qualified-classname-of-the-remote-interface>?stateful
And here's the corresponding binding for the TheatreBookerBean class:
ejb:/ticket-agency-ejb//TheatreBookerBean!com.packtpub.as7development.chapter3.ejb.TheatreBooker?stateful
Note
If you pay attention to the server logs, you will see that once your application is deployed, a set of JNDI bindings will be displayed on the server console. For example:
java:global/ticket-agency-ejb/TheatreInfoBean!com.packtpub.as7development.chapter3.ejb.TheatreInfo
java:app/ticket-agency-ejb/TheatreInfoBean!com.packtpub.as7development.chapter3.ejb.TheatreInfo
java:jboss/exported/ticket-agency-ejb/TheatreInfoBean!com.packtpub.as7development.chapter3.ejb.TheatreInfo
Some of these bindings reflect the standard bindings as per Java EE specifications plus JBoss custom bindings (java:/jboss). This information, as it is, is not relevant for us but can be used to build our EJB client lookup string by replacing the Java EE (or JBoss-specific prefix) with ejb:/. For example, replace java:/global with ejb:, and you will save yourself the headache of referring to the EJB lookup string.
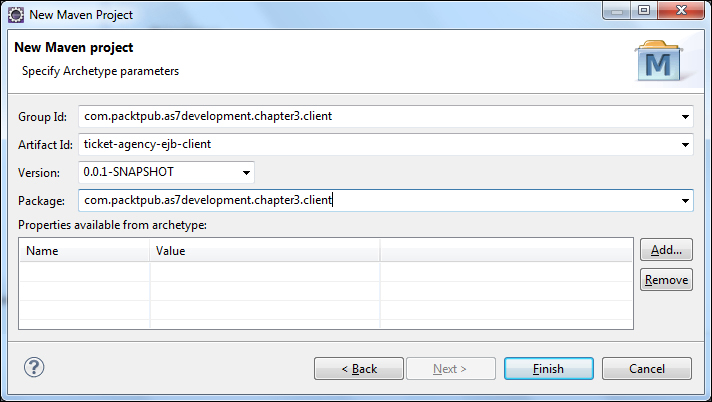
Once we have done with coding the JNDI binding string, we will code our EJB client. The best strategy to achieve this is by creating a separate Maven project for our EJB client so we don't need to pollute the server project with specific client dependencies.
As shown for ticket-agency-ejb, create a new Maven project from the menu (File | New | Maven Project) and, in the next screen, enable the archetype selection. When you reach the specific archetype parameter's screen, enter the following suggested values for your Group Id, Artifact Id, and Package fields:
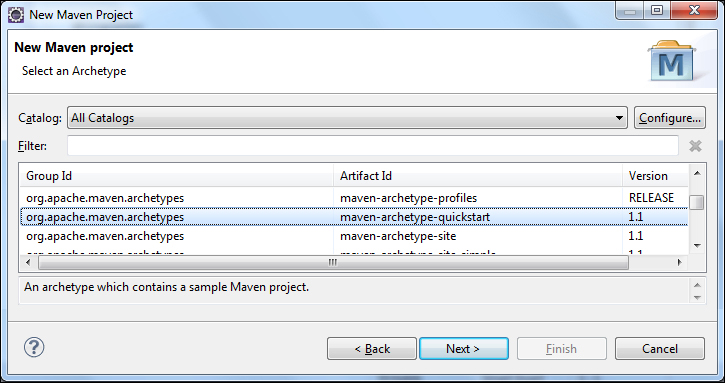
In the next screen, select a very basic archetype, maven-archetype-quickstart, that will generate a generic Maven-compliant project structure:
The next step will be configuring the client's pom.xml file.
Configuring the client dependencies will require basically all the libraries that connect and transport data to the server, along with the required EJB client dependencies. The first thing we will add, just as we did for the server project, is the BOM for the EJB client dependencies:
<dependencyManagement>
   <dependencies>
      <dependency>
         <groupId>org.jboss.as</groupId>
         <artifactId>jboss-as-ejb-client-bom</artifactId>
         <version>7.2.0.Final</version>
         <type>pom</type>
         <scope>import</scope>
      </dependency>
   </dependencies>
</dependencyManagement>
Next, we will add a set of dependencies that are needed to resolve the EJB interfaces (the ticket-agency-ejb artifact), the JBoss' transaction API (needed as EJB are transactional-aware components), the jboss-ejb-api and ejb-client APIs, the org.jboss.xnio and org.jboss.xnio APIs (that provide a low-level input/output implementation), the org.jboss.remoting3 API (the core transport protocol), which in turn requires org.jboss.sasl (for securing the transport), and finally the org.jboss.marshalling API (for serializing the objects that are sent to and received from the server):
<dependencies>
   <dependency>
      <groupId>com.packtpub.as7development.chapter3</groupId>
      <artifactId>ticket-agency-ejb</artifactId>
      <type>ejb-client</type>
      <version>${project.version}</version>
   </dependency>

   <dependency>
      <groupId>org.jboss.spec.javax.transaction</groupId>
      <artifactId>jboss-transaction-api_1.1_spec</artifactId>
      <scope>runtime</scope>
   </dependency>

   <dependency>
      <groupId>org.jboss.spec.javax.ejb</groupId>
      <artifactId>jboss-ejb-api_3.1_spec</artifactId>
      <scope>runtime</scope>
   </dependency>

   <dependency>
      <groupId>org.jboss</groupId>
      <artifactId>jboss-ejb-client</artifactId>
      <scope>runtime</scope>
   </dependency>

   <dependency>
      <groupId>org.jboss.xnio</groupId>
      <artifactId>xnio-api</artifactId>
      <scope>runtime</scope>
   </dependency>
   <dependency>
      <groupId>org.jboss.xnio</groupId>
      <artifactId>xnio-nio</artifactId>
      <scope>runtime</scope>
   </dependency>

   <dependency>
      <groupId>org.jboss.remoting3</groupId>
      <artifactId>jboss-remoting</artifactId>
      <scope>runtime</scope>
   </dependency>

   <dependency>
      <groupId>org.jboss.sasl</groupId>
      <artifactId>jboss-sasl</artifactId>
      <scope>runtime</scope>
   </dependency>

   <dependency>
      <groupId>org.jboss.marshalling</groupId>
      <artifactId>jboss-marshalling-river</artifactId>
      <scope>runtime</scope>
   </dependency>
</dependencies>We are done with the configuration. We will finally proceed with adding a new Java class com.packtpub.as7development.chapter3.client.RemoteEJBClient that will communicate with the Ticket Booking machine's EJB application:
public class RemoteEJBClient {
  private final static java.util.logging.Logger logger = Logger.getLogger(RemoteEJBClient.class .getName());
private final static Hashtable jndiProperties = new Hashtable();

  public static void main(String[] args) throws Exception {
    Logger.getLogger("org.jboss").setLevel(Level.SEVERE); [1]
    Logger.getLogger("org.xnio").setLevel(Level.SEVERE);

    testRemoteEJB();

  }

  private static void testRemoteEJB() throws NamingException {
      jndiProperties.put(Context.URL_PKG_PREFIXES, "org.jboss.ejb.client.naming");
    final TheatreInfo info = lookupTheatreInfoEJB(); [2]
    final TheatreBooker book = lookupTheatreBookerEJB(); [3]
    String command = "";

      /* not included for brevity. Prints out a Welcome message with the available commands */
      dumpWelcomeMessage();

    while (true){

      command = IOUtils.readLine("> "); [4]
      if (command.equals("book")) { [5]

        int seatId = 0;

        try {
          seatId = IOUtils.readInt("Enter SeatId");
        } catch (NumberFormatException e1) {
          logger.info("Wrong seatid format!");
          continue;
        }

        try {
          String retVal = book.bookSeat(seatId-1);
        }

        catch (SeatBookedException e) {
          logger.info(e.getMessage());
          continue;
        }
        catch (NotEnoughMoneyException e) {
          logger.info(e.getMessage());
          continue;
        }
      }
      else if (command.equals("list")) { [6]
        logger.info(info.printSeatList().toString());
        continue;
      }
      else if (command.equals("quit")) { [7]
        logger.info("Bye");
        break;
      }
      else {
        logger.info("Unknown command "+command);
      }
    }

  }

   private static TheatreInfo lookupTheatreInfoEJB() throws NamingException {

  final Context context = new InitialContext(jndiProperties);
  return (TheatreInfo) context.lookup("ejb:/ticket-agency-ejb//TheatreInfoBean!com.packtpub.as7development.chapter3.ejb.TheatreInfo");

   }
   private static TheatreBooker lookupTheatreBookerEJB() throws  NamingException {

  final Context context = new InitialContext(jndiProperties);
  return (TheatreBooker) context.lookup("ejb:/ticket-agency-ejb/TheatreBookerBean!com.packtpub.as7development.chapter3.ejb.TheatreBooker?stateful");

   }

}
Let's see the most interesting points. At first, we set some logging rules [1] in order to avoid mixing the JBoss remoting log messages with the console application information.
Next, we look up the TheatreInfo SLSB [2] and the TheatreBooker SFSB [3] using the JNDI definition rules that we just discussed.
The main application loop reads from the console from input [4] and performs the corresponding actions: it books a ticket [5], lists the theatre tickets [6], and then quits the application [7].
As you can see from the preceding code, there is no indication about the location of the server where the EJBs are running. If you don't want to specify this by code, the simplest thing you can do is add the jboss-ejb-client.properties file in the client's classpath.
Note
By default, Maven's quickstart archetype does not include a resources folder for your project's configuration files. You can just add one by right-clicking on your project and choosing Add new Java Source folder under src/main/resources. Once done, you need to add the jboss-ejb-client.properties file.
The contents of the jboss-ejb-client.properties file are as follows:
endpoint.name=client-endpoint
remote.connectionprovider.create.options.org.xnio.Options.SSL_ENABLED=false
remote.connections=default
remote.connection.default.host=localhost
remote.connection.default.port = 4447
And here's some explanation to this file—the optional endpoint.name property represents the name that will be used to create the client side of the endpoint. If it is not specified, it will default to config-based-ejb-client-endpoint.
The remote.connectionprovider.create.options.org.xnio.Options.SSL_ENABLED property enables the encryption of the XNIO connection, otherwise plain text will be used. (In Chapter 11, Securing JBoss AS 7 Application, we will discuss using SSL to secure the connection between the client and the server.)
The remote.connections property can be used to define a list of logical names that will be used for connection purposes by the remote.connection.[name].host and remote.connection.[name].port attributes. If you'll define more than one connection, as in the following example, the connections will be split across the various destinations:
remote.connections=host1,host2
remote.connection.host1.host=192.168.0.1
remote.connection.host2.host=192.168.0.2
remote.connection.host1.port = 4447
remote.connection.host2.port = 4547
The default port used by the remoting framework is 4447. You can, however, set a custom port using the CLI interface. For example, in order to set it to 4457, you can issue the following command:
/socket-binding-group=standard-sockets/socket-binding=remoting/:write-attribute(name=port,value=4457)
In order to run your client application, the last requirement will be to add the required Maven plugins that are needed to run the remote EJB client:
<build>
   <finalName>${project.artifactId}</finalName>
   <plugins>

      <!-- maven-compiler-plugin here -->

      <plugin>
         <groupId>org.codehaus.mojo</groupId>
         <artifactId>exec-maven-plugin</artifactId>
         <version>${version.exec.plugin}</version>
         <executions>
            <execution>
               <goals>
                  <goal>exec</goal>
               </goals>
            </execution>
         </executions>
         <configuration>
            <executable>java</executable>
            <workingDirectory>${project.build.directory}/exec-working-directory</workingDirectory>
            <arguments>
               <argument>-classpath</argument>
               <classpath />               <argument>com.packtpub.as7development.chapter3.client.RemoteEJBClient</argument>
            </arguments>
         </configuration>
      </plugin>

   </plugins>
</build>
As you can see in the preceding code, besides the maven-compiler-plugin archetype that we have omitted for the sake of brevity (we have discussed it in the server project), we have included exec-maven-plugin that adds the ability to execute Java programs using the exec goal.
Once all the plugins are in place, you can compile and execute your project by issuing the following Maven goal:
mvn install exec:exec
The preceding command can be executed either from a shell (positioned in the project's root folder) or from your Eclipse runtime configuration as shown in the following screenshot:

If executed from the Eclipse environment, you should be able to see the following GUI:
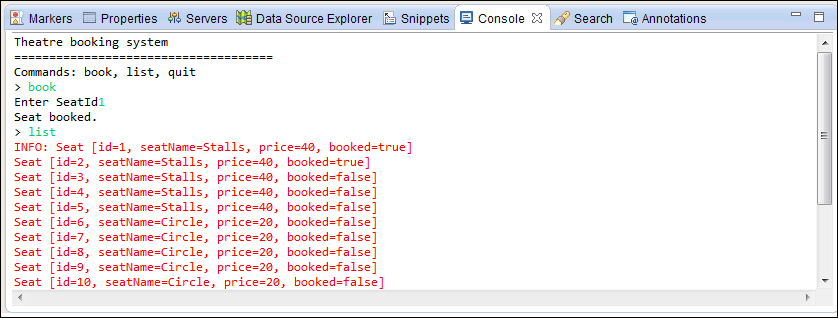
At the moment, our application provides just two functions: book for booking a seat and list for listing all the theatre seats. In the next sections, we will enrich our application by adding some more commands.
If you are running this example from a client that is located on the same machine as the application server, the remoting framework will silently allow communication between the client and your EJBs classes. On the other hand, for a client located on a remote system, you would require to provide authentication for your requests. In order to add an application user, launch the add-user.sh (or add-user.bat) script that is located under JBOSS_HOME/bin:
Here's a transcript of a user creation example:
What type of user do you wish to add?
 a) Management User (mgmt-users.properties)
 b) Application User (application-users.properties)
(a): b

Enter the details of the new user to add.
Realm (ApplicationRealm) :
Username : ejbuser
Password :
Re-enter Password :
What roles do you want this user to belong to? (Please enter a comma separated l
ist, or leave blank for none) :
About to add user 'ejbuser' for realm 'ApplicationRealm'
Is this correct yes/no? yes
Added user 'ejbuser' to file 'C:jboss-as-7.1.1.Finalstandaloneconfigurationapplication-users.properties'
The previous user will be added for you in the application-user.properties file located in your configuration folder.
This file contains the default security realm named ApplicationRealm. This security realm uses the following format to store passwords:
username=HEX( MD5( username ':' realm ':' password))
With the password I've just entered, the fill will contain the following entry:
ejbuser=dc86450aab573bd2a8308ea69bcb8ba9
Now insert the username and password information into jboss-ejb-client.properties:
remote.connection.default.username=ejbuser
remote.connection.default.password=ejbuser123
Now, with all the previous information in the right place, you will be able to connect to your EJB application from a client that is not residing on the same machine as the server.
Applications that model business workflows often rely on timed notifications. The timer service of the enterprise bean container enables you to schedule timed notifications for all types of enterprise beans, except for stateful session beans. You can schedule a timed notification to occur according to a calendar schedule either at a specific time, after a duration of time, or at timed intervals.
There can be two main types of EJB timers:
programmatic timers and automatic timers. Programmatic timers are set by explicitly calling one of the timer creation methods of the TimerService interface. Automatic timers are created upon the successful deployment of an enterprise bean that contains a method annotated with the java.ejb.Schedule or java.ejb.Schedules annotations. Let's see both approaches in the following sections.
To create a timer, the bean invokes one of the create methods of the TimerService interface. These methods allow for either single-action, interval, or calendar-based timers to be created.
The simplest way of getting a TimerService instance is to use resource injection. For example, in the TheatreBox singleton EJB, we will use the @Resource annotation to inject a TimerService object:
@Resource
TimerService timerService;
long duration= 6000;
The duration specifies the time (in ms) when the single timer is fired. The method that will fire the timer will use the TimerService instance to invoke the createSingleActionTimer, passing the duration and an instance of the TimerConfig class as an argument, which may optionally contain some basic information (such as a description of the timer).
public void createTimer(){
    timerService.createSingleActionTimer(duration, new TimerConfig());
}
Next, we will create a callback method named timeout and use the @Timeout annotation on top of the method. In the timeout method, we could, for example, reinitialize our singleton by invoking the setupTheatre method. Nothing fancy; however, this should give you an idea of how to get working with a single action timer.
@Timeout
public void timeout(Timer timer){
  logger.info("Re-building Theatre Map.");
  setupTheatre();
}If you want to schedule timed notifications at fixed intervals, the simplest way is to use the @Schedule annotation. The @Schedule annotation takes a series of comma-delimited settings to express a time or set of times, much as the Unix cron utility does. Each setting corresponds to a unit of time such as an hour or minute. A simple repeating event occurring every minute can be expressed using the @Schedule annotation as follows:
@Schedule(second="0", minute= "*", hour= "*")
You can find some more details about building the time string at http://docs.oracle.com/javaee/6/tutorial/doc/bnboy.html.
For the purpose of our example, we will create a stateless session bean that will act as an automatic buying system and therefore buy tickets at our ticketing store. So we will add one competitor in our quest for the best seat at the theatre!
@Stateless
public class AutomaticSellerBean
{
  private final static Logger logger = Logger.getLogger(AutomaticSellerBean.class.getName());

  @EJB private TheatreBox   theatreBox;

  @Resource
  private TimerService timerService; [1]

  @Schedule(dayOfWeek = "*", hour = "*", minute = "*", second = "*/60",year="*", persistent = false) [2]
  public void automatiCustomer()
  {
     int seatId = findSeat();

       if (seatId == -1) {
         cancelTimers();
         logger.info("Scheduler gone!");
         return ; // No more seats
       }

         theatreBox.buyTicket(seatId); [3]

           logger.info("Somebody just booked seat number "+seatId +1);
  }

  private int findSeat() {
    ArrayList<Seat> list = theatreBox.getSeatList();
    for (Seat s: list) {
      if (!s.isBooked()) {
        return s.getId() -1;
      }
    }
    return -1;
  }
  private void cancelTimers() {    [4]
    for (Timer timer : timerService.getTimers()) {
      timer.cancel();
    }
  }
}
The first thing we should account for is the resource injection of the Timer object [1] that will be used in the cancelTimers method [4] to cancel all the scheduling when the theatre is fully booked.
Next, pay attention to the Schedule annotation [2] we are using that will fire a nonpersistent timer each minute.
Note
Persistent timers (the default option) are able to survive application and server crashes. When the system recovers, any persistent timers will be recreated and missed callback events will be executed.
When a replay of missed timer events is not desired, a nonpersistent timer should be used, as in the preceding example.
When the action is fired, the automaticCustomer method starts scanning the theatre seats for an available seat. (Nothing too complex; findSeat starts looking from the first available seat.)
Finally, if there are seats still available, the buyTicket method [3] of the TheatreBox singleton will be used to short circuit the purchase of the seat (obviously, we won't need to check the money for our automatic customer).
Before the EJB 3.1 specification, the only way to provide asynchronous capabilities to enterprise applications was using message-driven bean recipes. This remains substantially a best practice, and we are going to discuss this in depth in Chapter 7, Developing Applications with JBoss JMS Provider; however, in some cases it might be desirable (and easier) to use these asynchronous features from a component that follows the classical request-reply pattern.
You can make an EJB's method asynchronous by simply tagging it with the @Asynchronous annotation. Each time this method is invoked, it will immediately return, regardless of how long the method actually takes.
This can be used in one of two ways:
- The first technique is a fire-and-forget manner where the request is made up of the EJB and the client is not concerned about the success or failure of the request.
- The second modus operandi invokes the method but does not wait for the method to complete. The method returns a
Futureobject. This object is used later to determine the result of the request.
If you don't care about the async result, you can just have your async method return void. For this purpose, we will add a new method named bookSeatAsync to TheatreBookerBean and simply tag it as @Asynchronous.
@Asynchronous
public void bookSeatAsync(int seatId) {

  Seat seat = theatreBox.getSeatList().get(seatId);

  if (seat.isBooked()) {
    throw new SeatBookedException("Seat Already booked!");    }

  if (seat.getPrice() > money) {
    throw new NotEnoughMoneyException("You don't have enough money to buy this ticket!");  }

  logger.info("Booking issued");
  theatreBox.buyTicket(seat);

  money = money -seat.getPrice();

   logger.info("Booking successful");

}
As you can see, this method does not return anything; we will need to use some other instruments to check if the transaction was completed successfully. For example, we can check from the theatre list if the seat has been booked successfully.
The other available option consists of returning a java.util.concurrent.Future object that can later be inspected by our clients so that they know the outcome of our transaction:
@Asynchronous
public Future<String> bookSeatAsync(int seatId) {

  Seat seat = theatreBox.getSeatList().get(seatId);
  if (seat.isBooked()) {
    return new AsyncResult<String>("Seat "+seatId+" Already booked!");
  }
  if (seat.getPrice() > money) {
    return new AsyncResult<String>("You don't have enough money to buy this ticket!");
  }

  logger.info("Booking issued");
  theatreBox.buyTicket(seat);
  money = money -seat.getPrice();

  return new AsyncResult<String>("Booked seat: "+seat+" - Money left: "+money);
}
In this case, calls to the asynchronous bookSeatAsync method simply result, behind the scenes, in a Runnable Java object being created that wraps the method and parameters you provide. This Runnable object is given to an Executor object that is simply a work queue attached to a thread pool.
After adding the work to the queue, the proxy version of the method returns a Future implementation that is linked to Runnable that is now waiting on the queue.
When Runnable finally executes the bookSeatAsync method, it takes the return value and sets it to Future, making it available to the caller.
When dealing with Future objects, the client code needs to be adapted. As a matter of fact, in standard synchronous calls we used exceptions to intercept some events, such as when the customer does not have enough money to complete the transaction. When using Future calls, there's a change in this paradigm. The call to the asynchronous method is detached from the client; however, we have the option to check if the Future work has been completed with the isDone method issued on the Future return value.
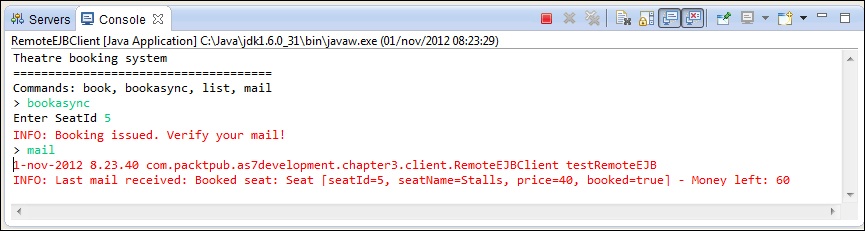
For this purpose, let's add a bookasync command that will issue asynchronous booking and a mail command that will simulate the reading of the outcome by e-mail:
Future<String> futureResult = null; [1]
. . . . .
else if (command.equals("bookasync")) {

  String text = IOUtils.readLine("Enter SeatId ");
  int seatId = 0;

    try {
      seatId = Integer.parseInt(text);
    } catch (NumberFormatException e1) {

      logger.info("Wrong seatid format!");
      continue;
    }
    try {
      Thread.sleep(10000); // Simulate time consuming task
    } catch (InterruptedException e) {

      e.printStackTrace();
    }

    futureResult = book.bookSeatAsync(seatId-1); [2]
    logger.info("Booking issued. Verify your mail!");
  }
  else if (command.equals("mail")) {

      if (futureResult == null || (!futureResult.isDone())) { [3]
      logger.info("No mail received!");
      continue;
    }
    else {
      try {
        String result = futureResult.get();
        logger.info("Last mail received: "+result);

      } catch (InterruptedException e) {
          e.printStackTrace();
      } catch (ExecutionException e) {
          e.printStackTrace();
      }
      continue;
    }
}
As you can see from the previous code snippet, we issue an asynchronous booking [2] and bind it with the futureResult instance [1]. We have introduced a pause of 10 seconds to complete the booking so that later on we can check if the work has been completed by checking the isDone method [3] of the futureResult object.
Here is a snapshot of our richer client application: