
Chapter 3, Beginning Java EE 6 – EJBs, was a challenging chapter, since we had to cover lots of ground, including Java Enterprise enhancements and Maven-specific configuration. If you are still a Maven non-believer, in this chapter, we will give you one more chance to embrace this amazing framework.
This chapter discusses Contexts and Dependency Injection (CDI), which is a new addition to the Java EE specification as of Java EE 6. It provides several benefits that were missing to Java EE developers, such as allowing any JavaBean to be used as a JSF managed bean, including stateless and stateful session beans.
Some of the topics covered in this chapter include:
- What is Context Dependency Injection and how it relates to EJB
- How to rewrite our Ticket Booking example to use CDI and Java Server Faces technology
- How to run the project using Maven
This chapter assumes familiarity with Java Server Faces (JSF), which will be used to provide a graphical interface to our applications. If you are looking for a startup guide for JSF, there are several excellent resources online about JSF, including the relevant sections in the official Java EE 6 tutorial at http://docs.oracle.com/javaee/6/tutorial/doc/bnatx.html.
Contexts and Dependency Injection for the Java EE platform introduces a standard set of component management services to the Java EE platform.
As a component of Java EE 6, CDI is in many ways a standardization of concepts that have been brewing in Spring for a long time, such as dependency injection and interceptors. In fact, CDI and Spring 3 share many similar features.
CDI lets you decouple concerns by what it refers to as loose coupling and strong typing. In doing so, it provides an almost liberating escape from the banalities of everyday Java programming, allowing injections of its objects and controlling their lifetimes.
Tip
Why CDI is for Java EE?
If you have been programming with Java EE 5, you might argue that it already features resources injection of resources. However, this kind of injection can be used only for resources known to the container (for example, @EJB, @PersistenceContext, @PersistenceUnit, and @Resource). CDI, on the other hand, provides a general-purpose dependency injection scheme, which can be used for any component.
The CDI elementary unit is still the bean. Compared with EJBs, CDI features a different, more flexible kind of bean. One of the most important differences between the two approaches is that CDI Beans are contextual that is, they live in a well-defined scope.
Consider the following code snippet:
public class HelloServlet extends HttpServlet {

@EJB EJBSample ejb;
  public void doGet (HttpServletRequestreq,
HttpServletResponse res)
    throws ServletException, IOException
  {
      PrintWriter out = res.getWriter();

      out.println(ejb.greet());
      out.close();
  }
}
Here, the injected EJB proxy just points to a pool of stateless instances (or a single bean instance for stateful beans). There is no automatic association between the HTTP request or HTTP session and a given EJB instance.
The opposite is true for CDI Beans, which live in well-defined scopes. For example, the following CDI Bean lives in a RequestScoped, that is, it will be destroyed at the end of the request:
@RequestScoped
@Named
public class Customer {

    private String name;
    private String surname;

    public String getName(){
        return name;
    }
    public String getSurname(){
        return surname;
    }

}
The above CDI Bean can be safely injected into our former servlet and, at the end of an HTTP session or HTTP request, all instances associated with this scope are automatically destroyed and, thus, garbage collected.
public class HelloServlet extends HttpServlet {

@InjectCustomerServiceservice;

  public void doGet (HttpServletRequest req,
  HttpServletResponse res)
    throws ServletException, IOException
  {
. . . .
  }
}In the earlier section, we have come across the @Named annotation. Named beans allow us to easily inject our beans into other classes that depend on them, and to easily refer to them from JSF pages via the
Unified Expression Language (EL). Recall the earlier example:
@RequestScoped
@Named
public class Customer {

    private String name;
    private String surname;

    public String getName(){
        return name;
    }
    public String getSurname(){
        return surname;
    }

}
This class, decorated with the @Named annotation, can be then referenced from a JSF page.
<?xml version="1.0" encoding="UTF-8"?>
<html xmlns="http://www.w3.org/1999/xhtml" xmlns:h="http://java.sun.com/jsf/html">
   <h:body>
      <h:form>
         <h:panelGrid columns="2">
            <h:outputLabel for="name" value="Name" />
            <h:inputText id="name" value="#{customer.name}" />
            <h:outputLabel for="lastName" value="Surname" />
            <h:inputText id="surname" value="#{customer.surname}" />
            <h:panelGroup />
         </h:panelGrid>
      </h:form>
   </h:body>
</html>
If you want to use a different naming policy for your bean, you could use the @Named annotation as follows:
@Named(value="customNamedBean")
This way, we will be able to reference our CDI Beans using the identified customNamedBean value.
CDI Beans come with a set of predefined scopes and annotations and each CDI Bean has a distinct lifecycle determined by the scope they belong to. The following table describes the built-in CDI scopes and the annotations required to set them:
In this chapter example, we will use the RequestScoped and SessionScoped beans to drive our simple Ticket Booking system. In the next chapter we will further enhance our example using ConversationScoped beans, which are a peculiar scope of CDI Beans. Providing a detailed explanation example of all named beans' scopes is beyond the scope of this book. However, you can quench your thirst for knowledge by having a look at JBoss CDI implementation docs at http://docs.jboss.org/weld/reference/latest/en-US/html/scopescontexts.html.
Weld is the JBoss CDI implementation and is actually being developed as part of the Seam project (http://www.seamframework.org/). Weld provides a complete CDI implementation, which can be safely run on a Java EE 6 container such as JBoss AS or Oracle WebLogic.
Therefore, in order to run CDI-based applications on JBoss AS 7, you don't need to download any extra libraries as Weld is part of the JBoss AS 7 modules and it is included in all server configurations, as stated by the following extension:
<extension module="org.jboss.as.weld"/>
Having your module installed, however, does not mean that you can blindly use it in your applications. The general rule is that on JBoss AS 7, every application module is isolated from other modules; this means, by default, it does not have visibility on the AS modules, nor do the AS modules have visibility on the application.
To be accurate we should state that all JBoss AS 7 modules fall into the following three categories:
- Modules which are implicitly added to your applications: This category includes the most common API such as
javax.activation,javax.annotation,javax.jms,javax.security,javax.transaction,javax.jms, andjavax.xml. Using these modules does not require any extra effort as JBoss AS 7 will add them for you if you are referencing them in your application. - Modules which are added on condition: This category includes
javax.ejb,org.jboss.resteasy,javax.persistenceandorg.hibernate,org.jboss.as.web, and finallyorg.jboss.as.weld. All these modules will be added on the condition that you supply its core annotations (such as@Statelessfor EJB) or its core configuration files; for example,web.xmlfor a web application. - Modules which need to be explicitly enabled by the application deployer: This includes all other modules, such as your custom modules that you can add to the application server. The simplest way to allow visibility to these modules is adding an explicit dependency in your
META-INF/MANIFEST.MFfile. For example, if you want to trigger the log4j dependency, you have to code your manifest file as follows:Dependencies: org.apache.log4j
So if you followed our checklist carefully, you should be aware that in order to let Weld libraries kick in, you should add its core configuration file, which is named beans.xml. This file can be placed in your application at the following locations:
- In your
WEB-INFfolder if you are developing a web application - In your
META-INFfolder if you are deploying a JAR archive
The beans.xml file is based on the following schema reference:
<beans xmlns="http://java.sun.com/xml/ns/javaee"
xmlns:xsi="http://www.w3.org/2001/XMLSchema-instance"
xsi:schemaLocation="
      http://java.sun.com/xml/ns/javaee
      http://java.sun.com/xml/ns/javaee/beans_1_0.xsd">
</beans>
However, it is perfectly legal to place an empty beans.xml file in the correct location, in order to enable CDI in your applications.
Once you have learned the basics of CDI, we will start re-engineering the Ticket Booking system using CDI Beans wherever necessary. We will turn it into a leaner application by dropping a few items such as remote interfaces or asynchronous methods, which are not needed in this example. Therefore, you will be able to focus just on the components that are actually used in the web application.
Let's create, for this purpose, a web application using a new Maven archetype that fits our purpose:
- From the File menu go to New | Maven Project; follow the wizard to the second screen where you will select the
webapp-javaee6 archetype, which will create the structure for a web-based Java EE 6 project: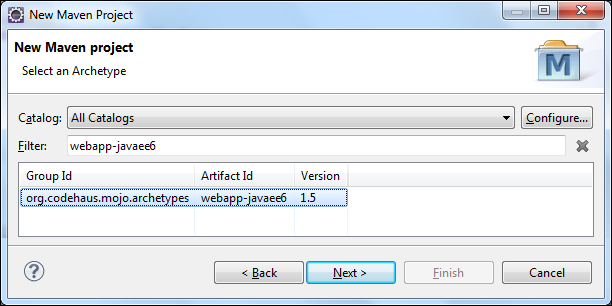
- On the next screen, enter
com.packtpub.as7development.chapter4as Group Id and Package andticket-agency-cdias Artifact Id: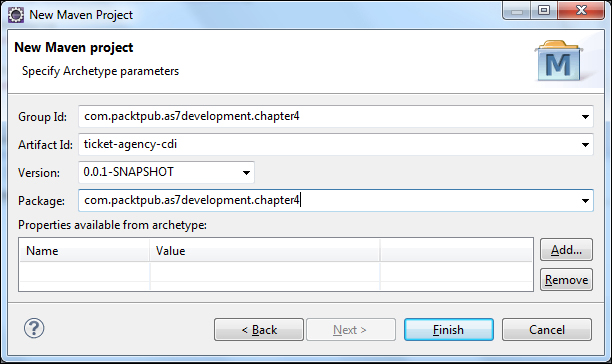
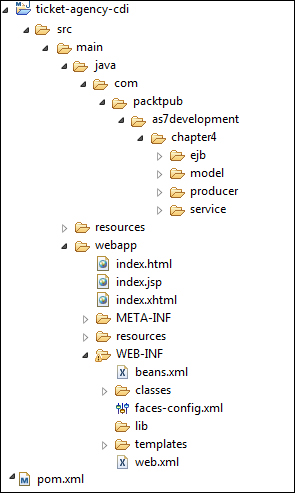
- Click on Finish. The Maven plugin for Eclipse will generate for you the following project structure:
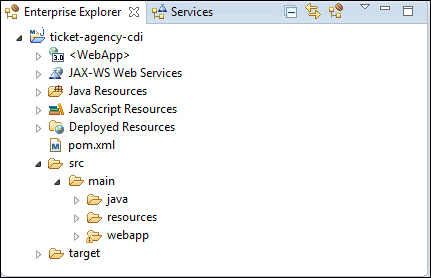
As you can see from the preceding screenshot, we have now, besides the standard
java(for Java classes) andresources(for configuration files) folders, a new directory namedwebappthat will host the web application views.
In order to compile and run the project, our Maven's pom.xml now requires a more complex set of libraries, starting from Java Enterprise CDI API:
<dependency>
   <groupId>javax.enterprise</groupId>
   <artifactId>cdi-api</artifactId>
   <scope>provided</scope>
</dependency>
Next, we need the Common Annotations API (JSR-250) that we have used to annotate our beans:
<dependency>
   <groupId>
      org.jboss.spec.javax.annotation
   </groupId>
   <artifactId>jboss-annotations-api_1.1_spec</artifactId>
   <scope>provided</scope>
</dependency>
Since our project uses JBoss logging API as well to output information, you also need to include:
<dependency>
   <groupId>org.jboss.logging</groupId>
   <artifactId>jboss-logging</artifactId>
   <version>RELEASE</version>
</dependency>
Next in the list is the EJB API, which we are still using in this example:
<dependency>
   <groupId>org.jboss.spec.javax.ejb</groupId>
   <artifactId>jboss-ejb-api_3.1_spec</artifactId>
   <scope>provided</scope>
</dependency>
In order to let Maven publish the application for us, we will include jboss-as-maven-plugin as well, as we did in the last chapter, taking care to specify the correct filename extension (.war):
<build>
    <finalName>${project.artifactId}</finalName>
    <plugins>
      <plugin>
        <groupId>org.jboss.as.plugins</groupId>
        <artifactId>jboss-as-maven-plugin</artifactId>
        <version>${version.jboss.maven.plugin}</version>
        <configuration>
          <filename>${project.build.finalName}.war</filename>
        </configuration>
      </plugin>
  </plugins>
</build>Once your project is properly configured, we can start modeling our beans. The first bean we will upgrade is TheatreBookerBean which will drive the user session, accessing the Ticket list from our TheatreBox bean:
package com.packtpub.as7development.chapter4.service;

import java.io.Serializable;

import javax.annotation.PostConstruct;
import javax.enterprise.context.SessionScoped;
import javax.enterprise.event.Event;

import javax.faces.application.FacesMessage;
import javax.faces.context.FacesContext;
import javax.inject.Inject;
import javax.inject.Named;

import org.jboss.logging.Logger;

import com.packtpub.as7development.chapter4.ejb.TheatreBox;
import com.packtpub.as7development.chapter4.model.Seat;

@Named  [1]
@SessionScoped  [2]
public class TheatreBookerBean implements Serializable {
 private static final Logger logger =
   Logger.getLogger(TheatreBookerBean.class);

 int money;
 @Inject TheatreBox theatreBox; [3]

 @PostConstruct
 public void createCustomer() {
  this.money=100;
 }

 public void bookSeat(int seatId)   {
  FacesContext fc = FacesContext.getCurrentInstance();


  logger.info("Booking seat "+seatId);
  Seat seat = theatreBox.getSeatList().get(seatId-1);

  if (seat.getPrice() > money) {   [4]

   FacesMessage m = new FacesMessage(FacesMessage.SEVERITY_ERROR, "Not enough Money!", "Registration successful");
   fc.addMessage(null, m);
   return;
  }

  theatreBox.buyTicket(seatId-1);

  FacesMessage m = new FacesMessage(FacesMessage.SEVERITY_INFO, "Booked!", "Booking successful");
  fc.addMessage(null, m);
  logger.info("Seat booked.");

  money = money - seat.getPrice();


 }
 public int getMoney() {
  return money;
 }
}
As you can see, the bean has been tagged as Named [1], which means that it can be directly referenced in our JSF pages. The bean is SessionScoped [2] since it stores the amount of money available to the customer during its session.
Finally, notice that we can safely inject EJBs into our CDI Beans using the Inject [3] annotation. Also the reverse is perfectly legal, that is, injecting CDI Beans into EJBs.
Compared with our earlier project, here we don't raise Java Exceptions when the customer is not able to afford a ticket. Since the application is web based, we simply display a warning message to the client, using JSF Faces Messages [4].
The other bean that we still use in our application is TheatreInfoBean, which has been moved to the producer package, as it will actually provide the application with the list of available seats:
package com.packtpub.as7development.chapter4.producer;

import java.util.List;

import javax.annotation.PostConstruct;
import javax.enterprise.event.*;
import javax.enterprise.inject.*;
import javax.inject.*;

import com.packtpub.as7development.chapter4.ejb.TheatreBox;
import com.packtpub.as7development.chapter4.model.Seat;

@Model [1]
public class  TheatreInfoBean   {

@Inject TheatreBox box;

private List<Seat> seats;

@Produces [2]
@Named
public List<Seat>getSeats() {
   return seats;
}

public void onMemberListChanged(@Observes(notifyObserver = Reception.IF_EXISTS) final Seat member) {
   retrieveAllSeatsOrderedByName(); [3]
}

@PostConstruct
public void retrieveAllSeatsOrderedByName() {

   seats = box.getSeatList();

}

}
At first, have a look at the @Model annotation [1], which is an alias for two commonly used annotations: @Named and @RequestScoped. Therefore, this bean will be "named" into our JSF page and will carry a request scope.
Next, pay attention to the method getSeats. This method returns a list of seats, exposing it as a producer method[2].
Note
Producer methods allow control over the production of the dependency objects. As a Java Factory pattern, they can be used as a source of objects whose implementation may vary at runtime, or if the object requires some custom initialization that is not to be performed in the constructor.
It can be used to provide any kind of concrete class implementation; however, it is especially useful to inject Java EE resources into your application.
One advantage of using a @Producer annotation for the getSeats method is that its objects can be exposed directly via JSF Expression Language (EL), as we will see in a minute.
Finally, another feature of CDI that was unleashed in this example is the observer. Observers, just like the name suggests, can be used to observe objects. An observer method is notified whenever an object is created, removed, or updated. In our example, it allows the list of seats to be refreshed whenever they are needed.
Note
To be precise, in our example, we are using a conditional Observer which is denoted by the expression notifyObserver = Reception.IF_EXISTS. This means that in practice the observer method is only called if an instance of the component already exists. If not specified, the default option (ALWAYS) will be that the observer method is always called (If an instance doesn't exist, it will be created).
Whenever a change in our list of seats occurs, we will use the javax.enterprise.event.Event object to notify the observer of changes. This will be done in our Singleton Bean, which gets injected with the seat's event [1] and notifies the observer by firing the event when a seat is booked [2].
package com.packtpub.as7development.chapter4.ejb;

import static javax.ejb.LockType.*;
import javax.ejb.*;import org.jboss.logging.Logger;
import com.packtpub.as7development.chapter4.model.Seat;
import java.util.*;

@Singleton
@Startup

public class TheatreBox {

@Inject Event<Seat>seatEvent;

@Lock(WRITE)
public void buyTicket(intseatId )     {
   Seat seat = getSeatList().get(seatId);

   seat.setBooked(true);
   seatEvent.fire(seat);

}

   // Code stays the same as chapter3
}
The last class we will include in our project is the Seat bean, which will be used as our model without any change in it:
package com.packtpub.as7development.chapter4.model;

import java.io.Serializable;

public class Seat implements Serializable {
   // Code stays the same as chapter3

}Once we have coded the server side of our example, creating the frontend will be quite easy, as we made all our resources available through CDI Beans.
One notable difference between the earlier edition of this book is that Facelets are now the preferred view technology for JSF. Earlier versions of JSF used JSP as their default view technology. As JSP technology predates JSF, sometimes using JSP with JSF felt unnatural or created problems. For example, the lifecycle of JSPs is different from the lifecycle of JSF.
Note
Compared to the simpler request-response paradigm on which the JSP lifecycle is based, the JSF lifecycle is much more complex, since the core of JSF is the MVC pattern, which has several implications. User actions in JSF-generated views take place in a client that does not have a permanent connection to the server. The delivery of user actions or page events is delayed until a new connection is established. The JSF lifecycle must handle this delay between event and event processing. Also, the JSF lifecycle must ensure that the view is correct before rendering it and also that, the JSF system includes a phase for validating inputs and another for updating the model only after all inputs pass validation.
Most of the time Facelets are used to build Java Server Faces views using HTML-style templates and component trees. Templating is a useful feature available with Facelets that allows you to create a page that will act as the template for the other pages in an application (something like Struts tiles). The idea is to obtain portions of reusable code without repeating the same code on different pages.
So here's the main application structure, which contains a template page named default.xhtml that is referenced by views in the template attribute of the page's composition element:
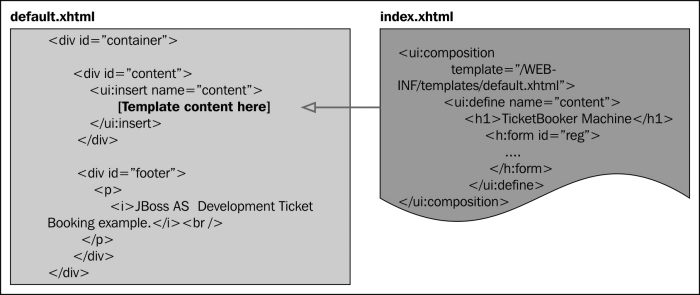
As you can see, the template contains two main HTML div elements that will be used to contain the main application panel (content) and a footer div (footer), which will barely output the application title.
So in order to add the template at first, add a new JSP page in the WEB-INF/templates folder of your application, and name it default.xhtml:
<!DOCTYPE html PUBLIC "-//W3C//DTD XHTML 1.0 Strict//EN"
    "http://www.w3.org/TR/xhtml1/DTD/xhtml1-strict.dtd">
<html xmlns="http://www.w3.org/1999/xhtml"
    xmlns:h="http://java.sun.com/jsf/html"
    xmlns:ui="http://java.sun.com/jsf/facelets">
<h:head>
    <meta http-equiv="Content-Type" content="text/html; charset=utf-8" />
    <h:outputStylesheet   name="style.css"  />
</h:head>
<h:body>
    <div id="container">

        <div id="content">
            <ui:insert name="content">
                    [Template content will be inserted here]
            </ui:insert>
        </div>
        <div id="footer">
            <p>
                <i>JBoss AS 7 Development Ticket Booking example.</i><br />
            </p>
        </div>
    </div>
</h:body>
</html>
Next, we will add the main page view, which will be embedded into your template. For this purpose, add a JSP page named index.xhtml into the webapp folder of your Maven project:
<?xml version="1.0" encoding="UTF-8"?>
<ui:composition xmlns="http://www.w3.org/1999/xhtml"
  xmlns:ui="http://java.sun.com/jsf/facelets"
  xmlns:f="http://java.sun.com/jsf/core"
  xmlns:h="http://java.sun.com/jsf/html"
  template="/WEB-INF/templates/default.xhtml"> [1]
  <ui:define name="content">
    <h1>TicketBooker Machine</h1>
    <h:form id="reg">

      <h3>Money: $ #{theatreBookerBean.money}</h3> [2]
      <h:messages errorClass="error" infoClass="info"globalOnly="true" />
        <h:panelGrid columns="1" border="1" styleClass="smoke">
      <h:dataTable var="_seat" value="#{seats}" [3]
        rendered="#{not empty seats}" styleClass="simpletablestyle">

        <h:column>
          <f:facet name="header">Id</f:facet>
                #{_seat.id}
        </h:column>

        <h:column>
          <f:facet name="header">Name</f:facet>
                #{_seat.seatName}
        </h:column>
        <h:column>
          <f:facet name="header">Price</f:facet>
                #{_seat.price}$
        </h:column>
        <h:column>
          <f:facet name="header">Booked</f:facet>
                #{_seat.booked}
        </h:column>
        <h:column>
          <f:facet name="header">Action</f:facet>
          <h:commandButton id="book"
            action="#{theatreBookerBean.bookSeat(_seat.id)}" [4]
            disabled="#{_seat.booked}"
            value="#{_seat.booked ? 'Reserved' : 'Book'}" />
        </h:column>

      </h:dataTable>
        </h:panelGrid>
    </h:form>
  </ui:define>
</ui:composition>
The ui:composition element is a templating tag that wraps content to be included in another Facelet. Specifically, it will be included in the template default.xhtml[1].
The following sequence explains in detail what the main view will produce:
- First, we will display the customer's money
[2], which is bound to a session variable calledmoney. - The next thing on the checklist is printing, via the messages element, all JSF messages
[3]that are meant to be produced by the application.
The main task of this view is to produce a view of all tickets and let the users purchase them. This is achieved by means of a dataTable object [3] that can be used to produce a tabular list of objects, which are generally stored as java.util.List in your beans.
Pay attention to the value attribute of the dataTable:
<h:dataTable var="_seat" value="#{seats}"
rendered="#{not empty seats}" styleClass="simpletablestyle">
In this case we don't directly reference a CDI Bean, but we reference an object, which has been "produced" by a CDI Bean. To be precise it has been produced by TheatreInfoBean, which as we have seen, has a @Produces and a @Named annotation on our list of seats:
private List<Seat> seats;

@Produces
@Named
public List<Seat>getSeats() {
   return seats;
}
This dataTable will be displayed only if it contains some data in it (as dictated by the not empty seats EL expression). In one of the dataTable columns we have added a commandButton [4], which will be used to book the seat that is displayed on that row. Notice one of the JSF 2 goodies here, as we are calling the bookSeat method of the TheatreBookerBean passing as argument one parameter, which is the seatId field.
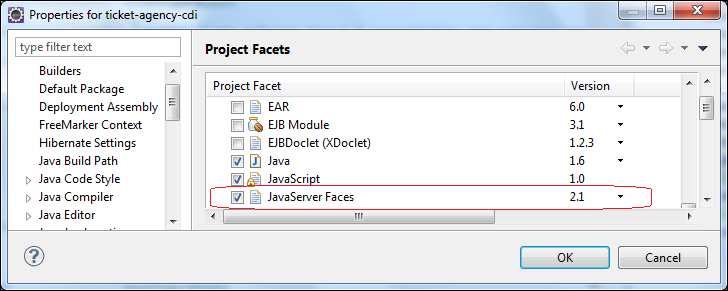
By enabling JSF 2 facets on your project configuration you can enjoy some additional benefits while designing your views.
Enabling JSF 2 project facets takes half a minute from you. Right-click on your project and navigate to Properties | Project Facets. Then select the JSF 2.1 Project facets checkbox and click on the OK button:
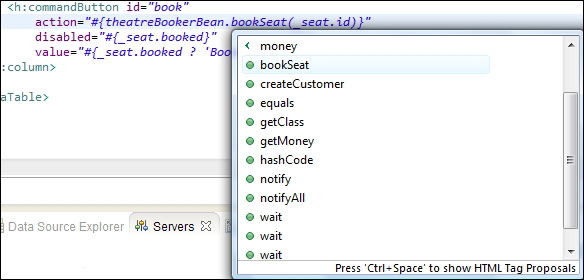
Once the JSF 2 facets are configured, if you press Ctrl+ Space bar before referencing a field or method, a suggestion popup window will let you choose the method or the attribute of the Bean you want to reference:
Ok, now your application is almost ready; we just need to add a welcome page named index.html that redirects to our main page, index.xhtml.
<html>
    <head>
      <meta http-equiv="Refresh" content="0; URL=index.jsf">
    </head>
</html>
Please note that we are triggering JSF pages by using the *.jsf URL pattern, as defined in web.xml:
<web-app>
  <servlet>
    <servlet-name>Faces Servlet</servlet-name>
    <servlet-class>javax.faces.webapp.FacesServlet</servlet-class>
    <load-on-startup>1</load-on-startup>
    <enabled>true</enabled>
    <async-supported>false</async-supported>
  </servlet>
  <servlet-mapping>
    <servlet-name>Faces Servlet</servlet-name>
    <url-pattern>
      *.jsf
    </url-pattern>
  </servlet-mapping>
</web-app>
This will then run the FacesServlet for all pages invoked with the *.jsf suffix.
Finally, as we stated previously, in order to activate CDI we need to add an empty beans.xml file in the WEB-INF folder of your application.
So, if you followed the same naming conventions used in this chapter, you will end up with the following project structure:
At this point you must be familiar with building and deploying your Maven applications from Eclipse or from a shell. Assuming you are managing your application from a shell—start by building up the project using:
mvn install
Then publish it as usual using JBoss' Maven plugin:
mvn jboss-as:deploy
The application will be available at the following URL:
http://localhost:8080/ticket-agency-cdi
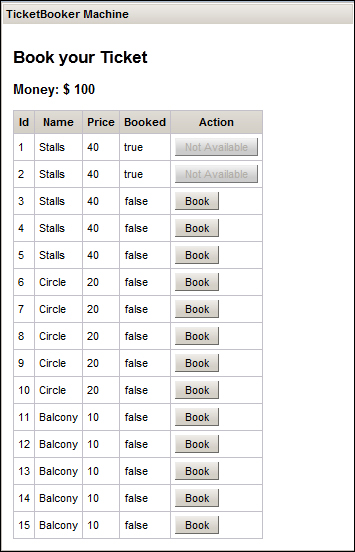
So, after so much work, you will be pleased to have your application happily running on your browser:
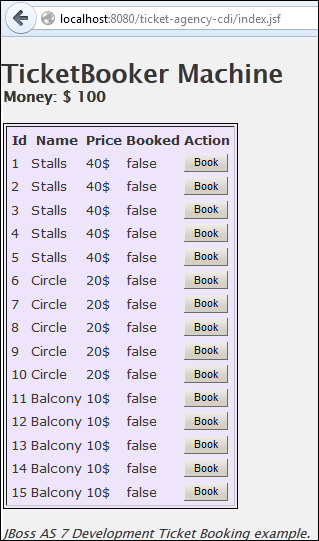
Right now, you will be able to book tickets up to the budget ($ 100) defined in your SessionScoped bean. So enjoy this first taste of JSF and CDI.
Up to now we have not included into our application the scheduler, which was in charge simulating other customers requesting tickets. That was not an oversight; as a matter of fact, introducing an external system in a web application poses some challenges. For example, what if the scheduler updates some data used by the application? How will the user know it?
There are several strategies to address this requirement; however, they all boil down to use some intelligence in your client application. For example, if you are familiar with web scripting languages, you can use the popular jQuery API to poll the server for some updates.
Since not all Java EE developers might be skilled with jQuery, we would rather show a simple and effective way to fulfill our requirement using RichFaces libraries (http://www.jboss.org/richfaces), which provide advanced Ajax support along with a rich set of ready-to-use components.
Installing RichFaces requires a set of core libraries that are generally available from the RichFaces download page.
Additionally, you need to provide a set of third-party dependencies that are used by the RichFaces API. Never mind, that's what Maven is for! Start by adding the latest BOM for RichFaces API in the upper dependency management section:
<dependency>
   <groupId>org.richfaces</groupId>
   <artifactId>richfaces-bom</artifactId>
   <version>4.2.0.Final</version>
   <scope>import</scope>
   <type>pom</type>
</dependency>
Then, it's just a matter of adding the rich UI libraries and the core API:
<dependency>
   <groupId>org.richfaces.ui</groupId>
   <artifactId>richfaces-components-ui</artifactId>
</dependency>
<dependency>
   <groupId>org.richfaces.core</groupId>
   <artifactId>richfaces-core-impl</artifactId>
</dependency>
Once we have installed RichFaces libraries, we will just need to reference them on each XHTML page in your project. Here's the new index.xhtml page using the RichFaces namespaces:
<ui:composition xmlns="http://www.w3.org/1999/xhtml"
  xmlns:h="http://java.sun.com/jsf/html"
  xmlns:f="http://java.sun.com/jsf/core"
  xmlns:ui="http://java.sun.com/jsf/facelets"
  xmlns:a4j="http://richfaces.org/a4j"
  xmlns:rich="http://richfaces.org/rich"
  template="/WEB-INF/templates/default.xhtml">
  <ui:define name="content">
   <f:view>
    <h:form>
      <a4j:poll id="poll" interval="2000"
        enabled="#{pollerBean.pollingActive}" render="grid" />
         <rich:panel header="TicketBooker Machine"style="width:350px">
        <h2>Book your Ticket</h2>
        <h3>Money: $ #{theatreBookerBean.money}</h3>
        <h:messages errorClass="error" infoClass="info" globalOnly="true" />
        <rich:dataTable id="grid" var="_seat" value="#{seats}"
          rendered="#{not empty seats}" styleClass="simpletablestyle">
          <h:column>
            <f:facet name="header">Id</f:facet>
                #{_seat.id}
            </h:column>
          <h:column>
            <f:facet name="header">Name</f:facet>
                #{_seat.seatName}
            </h:column>
          <h:column>
            <f:facet name="header">Price</f:facet>
                #{_seat.price}
            </h:column>
          <h:column>
            <f:facet name="header">Booked</f:facet>
                #{_seat.booked}
            </h:column>
          <h:column>
            <f:facet name="header">Action</f:facet>
            <h:commandButton id="book"
              action="#{theatreBookerBean.bookSeat(_seat.id)}"
              disabled="#{_seat.booked}"
              value="#{_seat.booked ? 'Booked' : 'Register'}" />
          </h:column>
        </rich:dataTable>
      </rich:panel>
    </h:form>
  </f:view>
  </ui:define>
</ui:composition>
</f:view>
</ui:define>
</ui:composition>
We have highlighted the core enhancements added in this page. At first, as we said, we need to reference the RichFaces libraries at the top of the XHTML page.
Next, we have added a rich Ajax component, a4j:poll
, which does a simple but an effective job of polling the server for updates, allowing re-rendering of just one component—the grid component—which contains the main datatable.
Additionally, this component references a JSF managed bean named PollerBean, which acts just as an on/off flag for our poller. We expect to turn off polling as soon as all seats are sold out:
package com.packtpub.as7development.chapter4.service;

import java.io.Serializable;

import javax.faces.bean.ManagedBean;
import javax.faces.bean.ViewScoped;

@ManagedBean
@ViewScoped
public class PollerBean implements Serializable{
  boolean pollingActive=true;

  public boolean isPollingActive() {
    return pollingActive;
  }
  public void setPollingActive(boolean pollingActive) {
    this.pollingActive = pollingActive;
  }
}
The PollerBean
will be injected into our scheduler so that we can turn off polling, once there are no more tickets to sell:
@Stateless
public class AutomaticSellerBean
 {

  @Inject TheatreBox   theatreBox;
  @Inject PollerBean   pollerBean;
  private final static Logger logger = Logger.getLogger(AutomaticSellerBean.class.getName());

  @Resource
  private TimerService timerService;

  public void cancelTimers() {
     for (Timer timer : timerService.getTimers()) {

          timer.cancel();
     }
  }
   @Schedule(dayOfWeek = "*", hour = "*", minute = "*", second = "*/30",year="*", persistent = false)
     public void backgroundProcessing()
      {
         int seatId = findSeat();

         if (seatId == -1) {
           pollerBean.setPollingActive(false);
           cancelTimers();
           logger.info("Scheduler gone!");
           return ; // No more seats
         }

         theatreBox.buyTicket(seatId);

         logger.info("Somebody just booked seat number "+seatId);
      }
    public int findSeat() {
         ArrayList<Seat> list = theatreBox.getSeatList();
         for (Seat s: list) {
         if (!s.isBooked()) {
         return s.getId()-1;
         }
         }

      return -1;
    }
 }
At the end of this chapter, we would like to give our honest opinion about a common question posed by developers, that is, how EJB, JSF Managed Beans, and CDI interact and where the boundary between them lies. Are there redundancies between them? It is indeed a bit confusing since there are now multiple component models in Java EE.
JSF Managed Beans have been, for long, the actual glue between the application view and the business methods. Since the Release 2.0 of JSF, you can declare JSF Managed Beans via an annotation and the scopes are expanded with a view scope and the ability to create custom scopes. However, apart from the view scope, there is very little still going for JSF Managed Beans, which can be replaced by CDI Beans that are much more flexible and allow a better integration with other Java EE components.
On the other hand, EJBs, even using a less flexible injection mechanism, still maintain some unique features such as schedulable timers, asynchronous operations, declarative transactional execution, and pooling, that are essential for throttling and the prevention of denial of service attacks.
So it's likely that EJBs are not disappearing from our code. Rather it is likely (and desirable too) that they will continue to be used for some of their unique features, while for the remaining part, its functionality will be exposed via CDI instead of EJB's own annotations such as @Stateless and @EJB.