
In order to persist data, JPA needs a relational database; we will use the MySQL database, which is pretty popular among developers and can be downloaded for free from http://dev.mysql.com/downloads. It is recommended to download the latest stable release of MySQL 5.x and install it using the simple installation wizard.
We will create a database named appstore; we will then add a user named jboss and assign him all privileges on the schemas.
Open a shell under the bin folder of your MySQL installation and launch the executable mysql. Once logged in, execute the following commands:
CREATE DATABASE ticketsystem;
USE ticketsystem;
CREATE USER 'jboss'@'localhost' IDENTIFIED BY 'jboss';
GRANT ALL PRIVILEGES ON ticketsystem.* TO 'jboss'@'localhost' WITH GRANT OPTION;
Our simple schema will be made up of two tables—the SEAT table, which contains the list of all available seats in the theatre and the SEAT_TYPE table, which is used to categorize the seat types. The two tables are in a 1-n relationship and the SEAT table hosts a foreign key (seat_id) that relates to the ID of the SEAT_TYPE table:
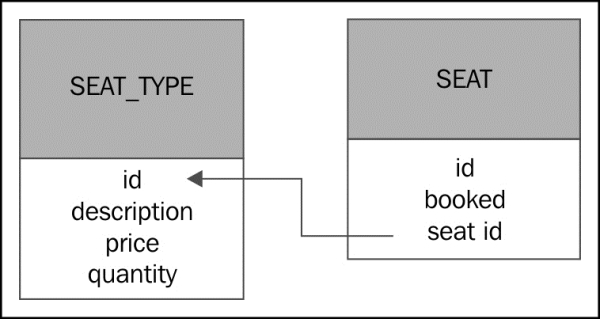
CREATE TABLE seat_type (
id int(10) NOT NULL PRIMARY KEY auto_increment,
description varchar(50) NOT NULL,
price int(10) NOT NULL,
quantity int(10) NOT NULL
) ENGINE=InnoDB;

CREATE TABLE seat (
id int(10) NOT NULL PRIMARY KEY auto_increment,
booked Boolean,
seat_id int(10),
FOREIGN KEY (seat_id) REFERENCES seat_type (id) ON DELETE CASCADE) ENGINE=InnoDB;
Database connectivity is carried out in Java using JDBC drivers, which are used either directly in your applications or behind the scenes in JPA or Hibernate. The MySQL JDBC driver can also be downloaded for free from http://dev.mysql.com/downloads/connector/j/.
Once download is complete, extract the file mysql-connector-java-5.X.XX-bin.jar and place it in a convenient location on your filesystem. We will show now how to install the JDBC driver on JBoss AS 7.
In JBoss AS 5 and 6, you used to install the JDBC driver into the common/lib folder of your server distribution. In the new modular server architecture, you have more than one option to install your JDBC driver. The recommended approach consists of installing the driver as a module.
The procedure for installing a new module requires creating a module path under JBOSS_HOME/modules and placing the .jar libraries and the module.xml file (that declares the module and its dependencies) there.
In our example, we will add the following units to our filesystem:
JBOSS_HOME/modules/com/mysql/main/mysql-connector-java-5.1.24-bin.jarJBOSS_HOME/modules/com/mysql/main/module.xml
If you are using a Linux shell, enter the following commands:
cd $JBOSS_HOME
mkdir modules/com/mysql
mkdir modules/com/mysql/main
Now, in the main folder, add a file named module.xml. This file contains the actual module definition—the most interesting part of it is the module name (com.mysql), which corresponds to the module attribute defined in your data source.
Next, you need to state the path to the JDBC driver resource and finally the module dependencies.
<module xmlns="urn:jboss:module:1.0" name="com.mysql">
  <resources>
    <resource-root path="mysql-connector-java-5.1.24-bin.jar"/>
  </resources>
  <dependencies>
    <module name="javax.api"/>
    <module name="javax.transaction.api"/>
  </dependencies>
</module>
We are done with the module installation. Now we need to define a data source in our configuration that will use this module and hold a pool of connections to our MySQL database. In order to do this, you can edit standalone.xml/domain.xml, adding a driver element into the data source's subsystem.
<subsystem xmlns="urn:jboss:domain:datasources:1.0">
 <datasources>
  <datasource jta="false"
      jndi-name="java:jboss/datasources/jbossas7development"
      pool-name="jbossas7development" enabled="true">
          <connection-url>
           jdbc:mysql://localhost:3306/ticketsystem
          </connection-url>
          <driver-class>com.mysql.jdbc.Driver</driver-class>
          <driver>mysql</driver>
          <security>
               <user-name>jboss</user-name>
               <password>jboss</password>
          </security>
  </datasource>
  <drivers>
         <driver name="mysql" module="com.mysql"/>
  </drivers>
 </datasources>
</subsystem>
As you can see, the new configuration file borrows the same XML schema definition from the earlier JBoss AS configurations, so it should not be difficult to migrate to the new schema. Basically, you would define the connection path to the database using the connection-url string and the JDBC driver class with the driver section.
The application server provides more than one option to add a data source to your configuration. We will just mention the command-line-interface approach, which can be quite useful, especially if you plan to modify your configuration using script files.
Launch the jboss-cli.sh script (or jboss-cli.bat) and connect to the application server.
[disconnected /] connect
[standalone@localhost:9999 /]
Now issue the following command, which actually creates a new data source, accomplishing the same goal we obtained by editing the configuration file:
/subsystem=datasources/data-source=jbossas7development:add(jndi-name=java:jboss/datasources/jbossas7development, driver-name=mysql, connection-url= jdbc:mysql://localhost:3306/as7development ,user-name="jboss",password="jboss")