
The basic building blocks of any JMS application consists of the following:
- Administered objects—connection factories and destinations
- Connections
- Sessions
- Message producers
- Message consumers
- Messages
Some of these elements are explained as follows:
A connection factory object encapsulates a set of connection configuration parameters that have been defined by an administrator. A client uses it to create a connection with a JMS provider. A connection factory hides provider-specific details from JMS clients and abstracts administrative information into objects in the Java programming language.
A destination is the component a client uses to specify the target of messages it produces and the source of messages it consumes. In the point-to-point (PTP) messaging domain, destinations are called queues; in the publish/subscribe (pub/sub) messaging domain, destinations are called topics.
A connection encapsulates a virtual connection with a JMS provider. A connection could represent an open TCP/IP socket between a client and a provider service. You use a connection to create one or more sessions.
A session is a single-threaded context for producing and consuming messages. You use sessions to create message producers, message consumers, and messages. Sessions serialize the execution of message listeners and provide a transactional context with which to group a set of sends and receives into an atomic unit of work.
A message producer
is an object created by a session and is used for sending messages to a destination. The PTP form of a message producer implements the QueueSender interface. The pub/sub form implements the
TopicPublisher interface.
A message consumer
is an object created by a session and is used for receiving messages sent to a destination. A message consumer allows a JMS client to register interest in a destination with a JMS provider. The JMS provider manages the delivery of messages from a destination to the registered consumers of the destination. The PTP form of message consumer implements the QueueReceiver interface. The pub/sub form implements the TopicSubscriber interface.
JBoss AS has used different JMS implementations across its releases. Since JBoss AS 6.0, the default JMS provider is HornetQ (http://www.jboss.org/hornetq), which provides a multiprotocol, embeddable, very high performance and clusterable messaging system.
At its core, HornetQ is designed simply as a set of Plain Old Java Objects (POJOs) , with few dependencies on external JAR files. In fact, the only one JAR dependency is the Netty library, which leverages the Java New Input-Output (NIO) API for building high-performance network applications.
Because of its easily-adaptable architecture, HornetQ can be embedded in your own project, or instantiated in any dependency injection framework such as JBoss Microcontainer, Spring, or Google Guice.
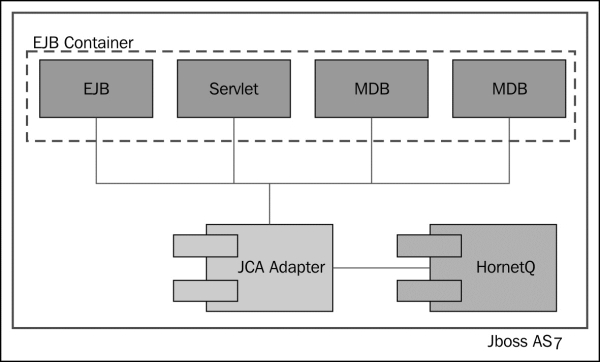
In this book, we will cover a scenario where HornetQ is integrated into JBoss AS subsystem as a module, as shown in the following diagram. This diagram depicts how the JCA Adaptor and the HornetQ server fit in the overall picture:
It is the job of the connection factory, which encapsulates the connection's parameters to create new JMS connections. A connection factory is bound in the Java Naming Directory Index (JNDI) and can be looked up by both local clients and remote clients, provided they supply the correct environment parameters. Since a connection factory can be reused multiple times in your code, it's the kind of object that can be conveniently cached by a remote client or a message-driven bean.
The definition of connection-factory instances is included in the full and full-ha server configurations. You can inspect them in the overall JMS configuration, which is available by surfing the admin console and navigating to Profile | Messaging Provider:
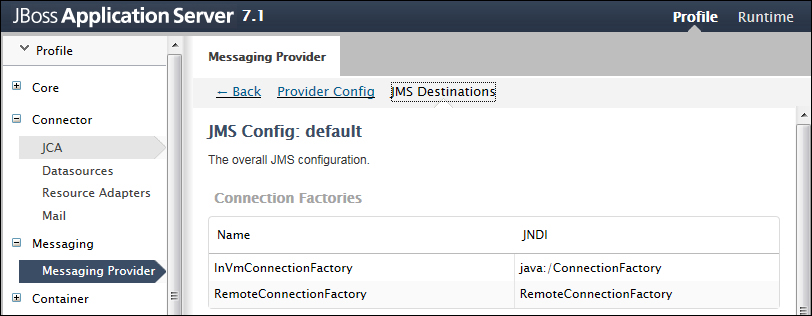
As you can see in the preceding screenshot, there are two out-of-the-box connection factory definitions:
- InVmConnectionFactory: This connection factory is bound under the entry
java:/ConnectionFactory, and is used when the server and client are part of the same process (that is, they are running on the same JVM). - RemoteConnectionFactory: This connection factory, as the name implies, can be used when JMS connections are provided by a remote server, using Netty as the connector.
If you want to change the connection factory's JNDI binding, the simplest choice is to go through the server configuration file (for example, standalone-full.xml for standalone mode):
<connection-factory name="InVmConnectionFactory">
   <connectors>
      <connector-ref connector-name="in-vm"
                       backup-connector-name="netty" />
      </connectors>
      <entries>
          <entry name="java:/ConnectionFactory" />
      </entries>
</connection-factory>
<connection-factory name="RemoteConnectionFactory">
   <connectors>
      <connector-ref connector-name="netty"
                     backup-connector-name="in-vm" />
      </connectors>
      <entries>
         <entry  name="java:jboss/exported/jms/RemoteConnectionFactory"/>
      </entries>
</connection-factory>

<pooled-connection-factory name="hornetq-ra">
   <transaction mode="xa"/>
      <connectors>
         <connector-ref connector-name="in-vm"/>
      </connectors>
      <entries>
          <entry name="java:/JmsXA"/>
      </entries>
</pooled-connection-factory>The connection factory can be injected just like any other Java EE resource; the following code fragment shows how a stateless EJB gets the default connection factory injected:
@Stateless
public class SampleEJB {

       @Resource(mappedName = "java:/ConnectionFactory")
       private ConnectionFactory cf;
}Along with the definition of connection factories, you will need to learn how to configure the JMS destinations (queues and topics).
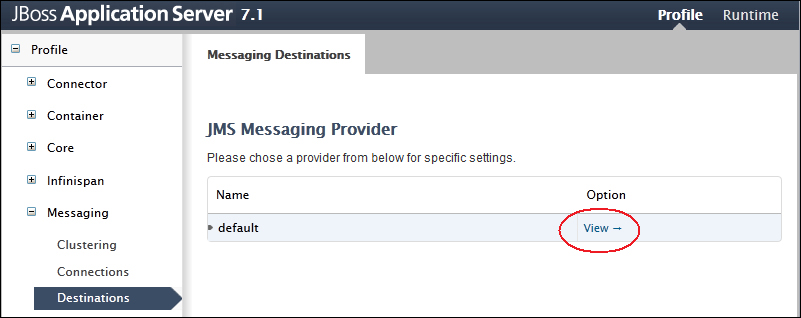
That can be achieved with a variety of instruments. Since we started to deal with the web console, just navigate to the Profile tab and pick the Messaging subsystem from the left panel. Select Destinations and click on the View central link, as shown in the following screenshot:
From there, you can use the upper menu tab that contains a set of options, the first one of which, named Queues/Topics, can be used to configure your JMS destinations:
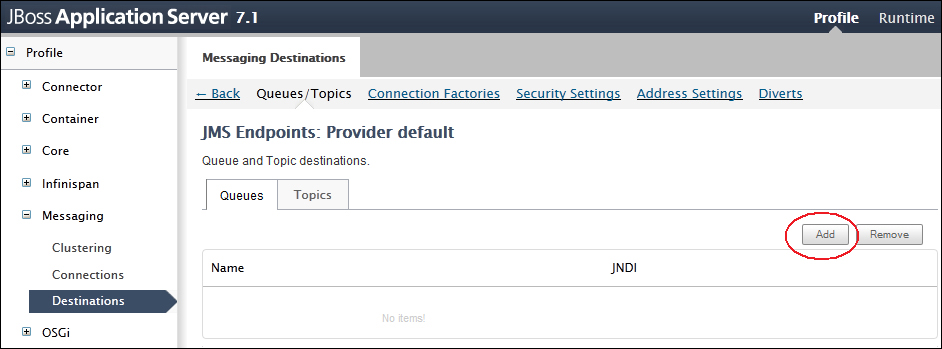
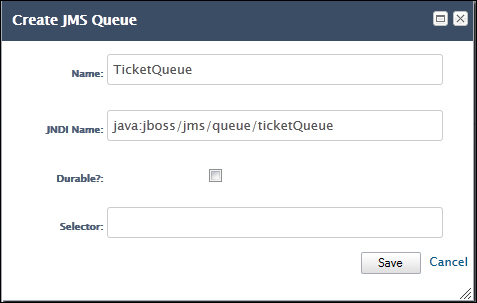
Now click on the Add button and, in the preceding screen, enter the mandatory name for your destination and its JNDI. You can optionally choose to define your JMS destination as either of the following options:
- Durable: This option allows the JMS server to hold on to a message in case the subscriber is temporarily unavailable.
- Selector: This option allows a filter, to the JMS destination.
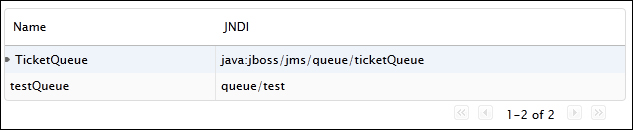
Click on the Save button and verify that the queue has been enlisted among the JMS destinations:
The preceding change will reflect in the server configuration file as follows:
<jms-destinations>
   <jms-queue name="TicketQueue">
      <entry name="java:jboss/jms/queue/ticketQueue"/>
         <durable>false</durable>
   </jms-queue>
</jms-destinations>Once we the configuration, we can start coding a JMS message consumer such as the message-driven bean.
Message-driven beans (MDBs) are stateless, server-side, and transaction-aware components for processing asynchronous JMS messages.
One of the most important aspects of message-driven beans is that they can consume and process messages concurrently. This capability provides a significant advantage over traditional JMS clients, which must be custom-built to manage resources, transactions, and security in a multithreaded environment. The MDB containers manage concurrency automatically, so the bean developer can focus on the business logic of processing the messages. The MDB can receive hundreds of JMS messages from various applications and process them all at the same time, because numerous instances of the MDB can execute concurrently in the container.
From the semantic point of view, an MDB is classified as an enterprise bean, just like a session or entity bean, but there are some important differences. At first, the message-driven bean does not have component interfaces. The component interfaces are absent because the message-driven bean is not accessible via the Java RMI API; it responds only to asynchronous messages.
Just as the entity and session beans have well-defined life cycles, so does the MDB bean. The MDB instance's life cycle has two states: Does Not Exist and Method ready Pool:
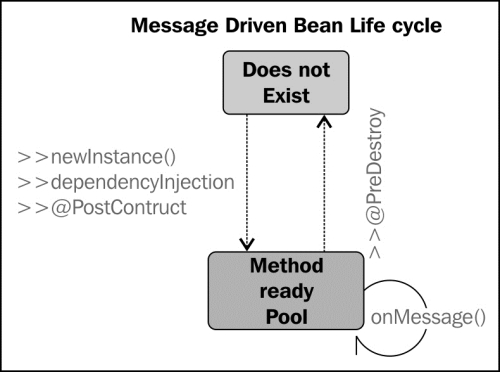
When a message is received, the EJB container checks to see if any MDB instance is available in the pool. If a bean is available in the free pool, JBoss uses that instance. After an MDB instance's onMessage() method returns, the request is complete, and the instance is placed back in the free pool. This results in the best response time, as the request is served without waiting for a new instance to be created.
Note
On the other hand, if all instances in the pool are busy, the new request will be serialized, since it's guaranteed that the same instance will not be allowed to serve multiple clients at the same time. Also, if a client sends out multiple messages to the server containing an MDB, there is no guarantee the same MDB instance will be used for each message or that the messages will be processed in the same order the client sent them. This means that the application should be designed to handle messages arriving out of order.
The amount of MDB in the pool is configured in the EJB pool, which can be reached from the console by going to Profile | Container | EJB 3:
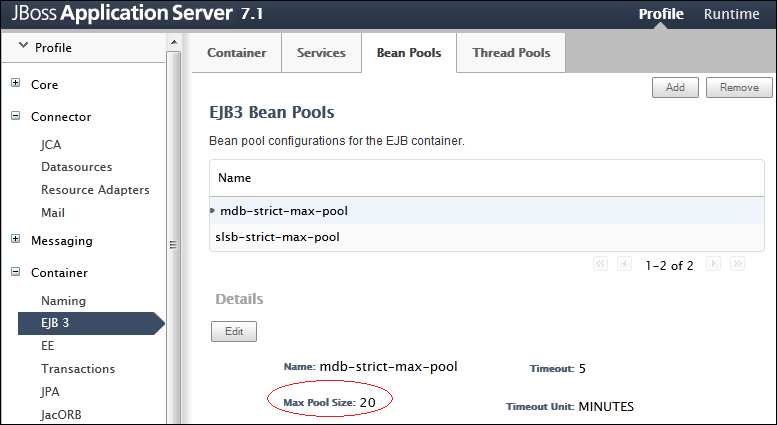
The bean pool's configuration is contained in the bean pool central tab, which holds both the stateless and MDB pool configurations. The default value for the MDB Max Pool Size is 20 units.
If no bean instances are available, the request will be blocked until an active MDB completes a method call or the transaction times out.
We will now add a message-driven bean to our application, which will be used to intercept messages when a new Ticket has been booked. For the purpose of our example, we will just trace that the JMS message has been received; however, you can use it for more complex purposes such as notifying external systems.
So, in the Eclipse menu simply navigate to New | Other | EJB | EJB 3 Message Driven Bean. Create a new Java class MDBService and enter the package name as com.packtpub.as7development.chapter7.service. This will create a bare-bones MDB with just an empty OnMessage method.
Once done, let's add the MDB configuration via annotation as shown here:
package com.packtpub.as7development.chapter7.service;

import java.util.logging.Logger;
import javax.ejb.*;
import javax.inject.Inject;
import javax.jms.*;

@MessageDriven(name = "MDBService", activationConfig = {
                  @ActivationConfigProperty(propertyName = "destinationType", propertyValue = "javax.jms.Queue"),
                  @ActivationConfigProperty(propertyName = "destination", propertyValue = "java:jboss/jms/queue/ticketQueue"),
                  @ActivationConfigProperty(propertyName = "acknowledgeMode", propertyValue = "Auto-acknowledge") }) [1]

public class MDBService implements MessageListener {

  @Inject
  private Logger logger;

  public void onMessage(Message message) {

    TextMessage tm = (TextMessage) message;
    try {
       logger.info("Received message "+tm.getText());
    }  catch (JMSException e) {

       logger.error("Error ! "+e);
    }


  }

}
Here we have connected the MDB to our ticketQueue destination [1] bound at java:jboss/jms/queue/ticketQueue. The purpose of this component will be tracing the message receipt via java.util.Logger.
Once we have finished with the JMS consumer, we need a component that will take care of sending JMS messages. For this purpose we will add an Application Scoped CDI Bean JMSService, which gets injected in the JMS resources:
package com.packtpub.as7development.chapter7.service;

import javax.annotation.Resource;
import javax.enterprise.context.ApplicationScoped;
import javax.jms.*;
import java.util.logging.Logger;

@ApplicationScoped
public class JMSService {

   @Inject
   private Logger logger;


   @Resource(mappedName = "java:/ConnectionFactory")
   private ConnectionFactory cf; [1]
   @Resource(mappedName = "java:jboss/jms/queue/ticketQueue")
   private Queue queueExample;   [2]


   private Connection connection;
   public void sendMessage(String txt) {

   try {

     connection = cf.createConnection();
     Session session = connection.createSession(false, Session.AUTO_  ACKNOWLEDGE);

     MessageProducer publisher = session.createProducer(queueExample);

     connection.start();

     TextMessage message = session.createTextMessage(txt);
     publisher.send(message);


   }
   catch (Exception exc) {
     logger.error("Error ! "+exc);
   }
   finally {


      if (connection != null)   {
        try {
       connection.close();
                     connection = null;
        } catch (JMSException e) { logger.error(e); }

           }
         }
      }
}
Now you can use your service to notify some application-specific actions. For example, we will inject JMSService into the BookerService bean and send a message whenever a user registers:
public class BookerService implements Serializable {


   @Inject JMSService jmsService;

   . . . . .

   public void bookSeat(Long seatId, int price)   {
      FacesContext fc = FacesContext.getCurrentInstance();

      if (price  > money) {

  FacesMessage m = new FacesMessage(FacesMessage.SEVERITY_ERROR, "Not enough Money!", "Registration successful");
  fc.addMessage(null, m);
  return;
      }

      logger.info("Booking seat "+seatId);
      ticketService.bookSeat(seatId);
      money = money - price;

      FacesMessage m = new FacesMessage(FacesMessage.SEVERITY_INFO, "Registered!", "Registration successful");
      if (fc != null)
      fc.addMessage(null, m);

  jmsService.sendMessage("[JMS Message] User registered seat "+seatId);
   }

} The preceding examples can be engineered as part of a webapp-javaee6 Maven project, just like we have done so far in the earlier chapters. The only additional dependency we need to specify in pom.xml includes the JBoss messaging API as follows:
<dependency>
       <groupId>org.jboss.spec.javax.jms</groupId>
       <artifactId>jboss-jms-api_1.1_spec</artifactId>
       <scope>provided</scope>
</dependency>
Now start a JBoss AS 7 configuration, which includes the messaging subsystem such as standalone-full.xml:
standalone.sh –c standalone-full.xml
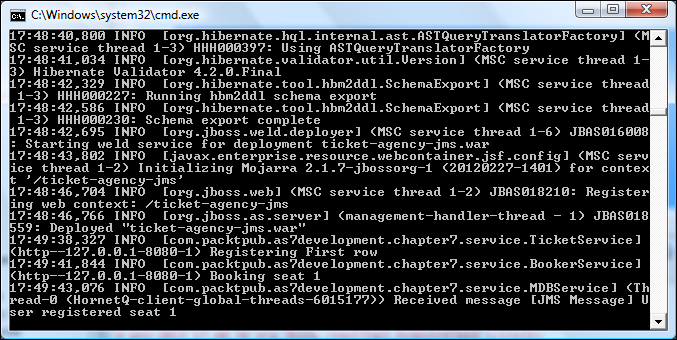
Now deploy your application using either Eclipse's Server view or Maven and access the application at http://localhost:8080/ticket-agency-jms/.
Everything should work just like the earlier JPA project; however, you should notice in your application server console the message shown in the following screenshot, which confirms that a seat has been booked:
Going back to our example, we have used an In-VM connection factory since our client service is a local JMS client:
public class JMSService {


  @Resource(mappedName = "java:/ConnectionFactory")
  private ConnectionFactory cf;
 . . . . .
}
The connection factory is in turn used to create new JMS connections:
public void sendMessage(String txt) {
   . . . .
  connection = cf.createConnection();
}
Although we are using an In-VM connection factory, JMS objects such as connections and sessions are pretty heavyweight objects. Therefore, a common practice for developers is to cache these objects to avoid costly object creation every time.
However, looking at the server configuration, message producers can benefit from a special connection factory such as the pooled connection factory, which is bound in the JNDI at java:/JmsXA:
<pooled-connection-factory name="hornetq-ra">
      <transaction mode="xa"/>
         <connectors>
             <connector-ref connector-name="in-vm"/>
         </connectors>
         <entries>
             <entry name="java:/JmsXA"/>
         </entries>
</pooled-connection-factory>
When using this connection factory, you will be able to leverage the outbound adapter of the HornetQ JCA Resource Adapter. This in turn translates in providing a caching layer for your connection and session objects, which will be acquired from the pool.
Therefore, in order to achieve superior performance for your local clients, the best practice is to use the pooled connection factory inside your message producers:
public class JMSService {


  @Resource(mappedName = "java:/JmsXA ")
  private ConnectionFactory cf;
 . . . . .
}
If you want a fine control over the pool size, you can specify the min-pool-size and max-pool-size elements, which determine the initial and maximum size of the connections stored in the pool:
<pooled-connection-factory name="hornetq-ra">
      <min-pool-size>10</min-pool-size>
      <max-pool-size>50</max-pool-size>
       ...
</pooled-connection-factory>
Message selectors allow an MDB to be more selective about the messages it receives from a particular topic or queue. Message selectors use message properties as a criteria in conditional expressions. Message properties, upon which message selectors are based, are additional headers that can be assigned to a message. They give the application developer the ability to attach more information to a message. This information can be either stored as String or using several primitive values (boolean, byte, short, int, long, float, and double).
For example, let's suppose that we want to process two kinds of messages with the same queue:
- A trace message indicating that a user booked a seat
- A warning message indicating that an error occurred
Hence, our sendMessage method can be changed slightly to include a String property that can be attached to the message:
public void sendMessage(String txt, String priority) {

  try {

     connection = cf.createConnection();
     Session session = connection.createSession(false, Session.AUTO_ACKNOWLEDGE);
     MessageProducer publisher =
                  session.createProducer(queueExample);

     connection.start();

     TextMessage message =
                  session.createTextMessage(txt);
     message.setStringProperty("priority", priority);
     publisher.send(message);

  }
      . . . .
Now, in our application context, we might use the sendMessage method, attaching a LOW value for priority when the user registers:
jmsService.sendMessage("User registered seat "+seatId,"LOW");On the other hand, we could attach a HIGH priority when an error occurs:
jmsService.sendMessage("Error during Transaction","HIGH");From the MDB perspective, all you need to do in order to filter through messages is include the message selector as part of your ActivationConfigProperty as follows:
@MessageDriven(name = "MDBService", activationConfig = {
    @ActivationConfigProperty(propertyName = "destinationType", propertyValue = "javax.jms.Queue"),
    @ActivationConfigProperty(propertyName = "destination", propertyValue = "java:jboss/jms/queue/ticketQueue"),
    @ActivationConfigProperty(propertyName = "messageSelector", propertyValue = "priority = 'HIGH'"),
    @ActivationConfigProperty(propertyName = "acknowledgeMode", propertyValue = "Auto-acknowledge") })

public class MDBHighPriorityService implements MessageListener {
. . . . .
}
At the same time, you can deploy another MDB that is in charge of consuming messages which are sent with a LOW priority:
@MessageDriven(name = "MDBService", activationConfig = {
    @ActivationConfigProperty(propertyName = "destinationType", propertyValue = "javax.jms.Queue"),
    @ActivationConfigProperty(propertyName = "destination", propertyValue = "java:jboss/jms/queue/ticketQueue"),
    @ActivationConfigProperty(propertyName = "messageSelector", propertyValue = "priority = 'LOW'"),
    @ActivationConfigProperty(propertyName = "acknowledgeMode", propertyValue = "Auto-acknowledge") })

public class MDBLowPriorityService implements MessageListener {
. . . . .
}At the beginning of this chapter, we have mentioned that the JCA Adaptor handles the communication between the application server and the HornetQ server.
As a matter of fact, one possible way to perform Enterprise Application Integration (EAI) is via Java Connector Architecture (JCA), which can be used to drive JMS inbound and outbound connections.
Initially, Java connectors were intended to access legacy transaction servers on mainframes in a synchronous request/reply mode, and this is how the majority of the connectors worked in the beginning. The standard is currently evolving toward more asynchronous and two-way connectivity; this is exactly the case of JMS communication, which is inherently asynchronous (but also offers the capability of simulating a synchronous request/response mode). In the next section we will show you how to use a Java Resource Adapter to enable communication between JBoss' HornetQ Messaging system and Apache ActiveMQ integrated with Apache Geronimo.
Tip
JMS/JCA integration versus web services
If we are discussing EAI we cannot help but talk about the difference with web services, which is a de facto standard for integrating heterogeneous systems.
One advantage of using JMS/JCA integration is that it provides support for resource adaptation, which maps the Java EE security, transaction, and communication pooling to the corresponding EIS technology. This makes this technology fairly attractive especially if you are connecting some existing, well-consolidated, and homogeneous systems. (Remember that if you are using JMS as the driver, you are bound to Java-to-Java interaction).
On the other hand, if you are planning to connect different business partners (for example, Java and .NET applications), or you are simply building a new system from scratch with no clear interactions defined, it would be better to use web services for transport and connection.
We will learn more about web services in the Chapter 8, Adding Web Services to Your Applications, which should provide you with a quite complete overview of your EAI alternatives.
In this section we will provide an example scenario, which includes an external component such as Apache ActiveMQ (Apache 2.0 open source licensed) message broker that fully implements the Java Message Service 1.1 (JMS).
Within the ActiveMQ message broker, we have configured a JMS queue named TicketQueue, which can be used to buy our tickets from another Java EE web application deployed on Apache Geronimo:

In order to run this example, we would need to pick up the ActiveMQ resource adapter, activemq-rar-5.7.0.rar, which can be downloaded from the Maven repository at http://repo1.maven.org/maven2/org/apache/activemq/activemq-rar/5.7.0/.
Resource adapters (.rar) can be deployed either using JBoss management instruments or, for standalone servers, by copying the resource adapter into the deployments directory. Before doing that, we need to configure the Resource Adapter in your server configuration. This can be done by adding the configuration in the JCA subsystem, or (suggested choice) by creating a JCA descriptor of the external resource.
JCA descriptors can be created by using an utility contained in JBoss' JCA implementation named IronJacamar (http://www.jboss.org/ironjacamar). Within IronJacamar 1.1 or later distributions (accessible at http://www.jboss.org/ironjacamar/downloads), you can find a resource adapter information tool (rar-info.sh) that can be used to create the resource adapter deployment descriptor by generating a report file containing all the necessary information.
The rar-info.sh tool can be found in the doc/as folder of your IronJacamar distribution. So let's move to this folder:
$ cd doc/as
And now issue the following command, which assumes that you have saved your resource adapter in the /usr/doc folder:
rar-info.sh /usr/doc/activemq-rar-5.7.0.rar
Tip
Troubleshooting rar-info shell
The rar-info command shell includes a set of libraries, which are used to execute the main utility class. In order to inspect the JMS adapter however, you need to manually edit the shell file and add jboss-jms-api_1.1_spec-1.0.0.Final.jar to the classpath. This JAR is contained in the main folder under JBOSS_HOME/modules/javax/jms/api/.
This will generate a file called activemq-rar-5.7.0.txt, which can be used to construct the JBoss' JCA configuration file that needs to be named ironjacamar.xml. The file ironjacamar.xml is pretty verbose so we will just include the core section of it with the changes required to map JMS admin objects (you can download the full ironjacamar.xml file along with the sources of this book):
<ironjacamar>

    <connection-definitions>
        <connection-definition class-name="org.apache.activemq.ra.ActiveMQManagedConnectionFactory" jndi-name="java:jboss/activemq/TopicConnectionFactory" pool-name="TopicConnectionFactory">
. . . .
        </connection-definition>
        <connection-definition class-name="org.apache.activemq.ra.ActiveMQManagedConnectionFactory" jndi-name="java:jboss/activemq/QueueConnectionFactory" pool-name="QueueConnectionFactory">
. . . .
        </connection-definition>
    </connection-definitions>

    <admin-objects>
    <admin-object class-name="org.apache.activemq.command.ActiveMQQueue" jndi-name="java:jboss/activemq/queue/TicketQueue">
        <config-property name="PhysicalName">
               activemq/queue/TicketQueue
           </config-property>
    </admin-object>

    </admin-objects>

</ironjacamar>
As you can see, this file contains the definition of ActiveMQ connection factories along with the mapping of JMS administration objects, which will be imported by the resource adapter. The ironjacamar.xml file needs to be copied into the META-INF folder of activemq-rar-5.7.0.rar.
Along with the ironjacamar.xml file, there is another configuration file, which is contained in the META-INF folder of your activemq-rar-5.7.0.rar file. The file ra.xml is the standard JCA configuration file and describes the resource adapter-related attributes type and its deployment properties:
<connector xmlns="http://java.sun.com/xml/ns/j2ee"
    xmlns:xsi="http://www.w3.org/2001/XMLSchema-instance"
    xsi:schemaLocation="http://java.sun.com/xml/ns/j2ee
    http://java.sun.com/xml/ns/j2ee/connector_1_5.xsd"
    version="1.5">
    <description>ActiveMQ  inbound and outbound JMS ResourceAdapter</description>
    <display-name>ActiveMQ JMS Resource Adapter</display-name>
    <vendor-name>activemq.org</vendor-name>
    <eis-type>JMS 1.1</eis-type>
    <resourceadapter-version>1.0</resourceadapter-version>
    <resourceadapter>
        <resourceadapter-class>org.apache.activemq.ra.ActiveMQResourceAdapter</resourceadapter-class>

            <!--
            Configuration Properties here
            -->
        <outbound-resourceadapter>

. . . . . .

        </outbound-resourceadapter>
        <inbound-resourceadapter>

. . . . . .

        </inbound-resourceadapter>
        <adminobject>
            <adminobject-interface>javax.jms.Queue</adminobject-interface>
            <adminobject-class>org.apache.activemq.command.ActiveMQQueue</adminobject-class>
. . . . . .
        </adminobject>
        <adminobject>
            <adminobject-interface>javax.jms.Topic</adminobject-interface>
            <adminobject-class>org.apache.activemq.command.ActiveMQTopic</adminobject-class>
. . . . . .
        </adminobject>
    </resourceadapter>
</connector>
Now that we have completed the configuration, let's deploy the resource adapter (activemq-rar-5.7.0.rar) into our JBoss AS 7 and check that the JCA factories and objects have been correctly bound to the application server:

Well done! The hardest part is done. Now in order to consume JMS messages sent by ActiveMQ broker, we will add a @ResourceAdapter annotation into a message-driven bean. This MDB will intercept bookings from the web application running on the Apache Geronimo application server:
@MessageDriven(name = "ActiveMqBridgeService", activationConfig = {
    @ActivationConfigProperty(propertyName = "destinationType", propertyValue = "javax.jms.Queue"),
    @ActivationConfigProperty(propertyName = "destination", propertyValue = " java:jboss/activemq/queue/TicketQueue"),
    @ActivationConfigProperty(propertyName = "acknowledgeMode", propertyValue = "Auto-acknowledge") })

@ResourceAdapter(value="activemq-rar-5.7.0.rar")

public class ActiveMqBridgeService implements MessageListener {

@Inject  private Logger logger;

@Inject private BookerService bookerService;

  public void onMessage(Message message) {
        Long seatId = null;
     int price=0;

     TextMessage tm = (TextMessage) message;

     logger.info("Received message from ActiveMQ"+tm.getText());


     try {
        seatId = message.getLongProperty("seatId");
        price = message.getIntProperty("price");
     } catch (JMSException e1) {
        throw new EJBException(e1);
     }
     bookerService.bookSeat(seatId, price);

  }

}
Once a message is received, the seatId properties and price value are extracted from the message header and used to issue a booking request to BookerService. Congratulations! If you have gone successfully through this example, you have just mastered a real-world integration scenario!