
So far we have covered many Java Enterprise examples and deployed them on the application server. We will now dive headlong into the vast and varied ocean of instruments that are available for managing the application server. The ultimate purpose of this chapter is to learn how to use these instruments to administer and monitor all the resources available on the application server.
Here is the list of topics we will cover:
- An introduction to the JBoss Command Line Interface (CLI)
- How to create scripts with the CLI
- How to programmatically manage your server resources using scripting languages and the JBoss' client API
The CLI is a complete management tool, which can be used to start and stop servers, deploy and undeploy applications, configure system resources, and perform other administrative tasks. Operations can be performed in an atomic way or in batch modes, allowing multiple tasks to be run as a group.
You can start the CLI by entering the following command from the JBOSS_HOME/bin folder if you are using Windows:
jboss-cli.bat
Or enter the following command if you are using Linux:
./jboss-cli.sh
Once the CLI has started, you can connect to the managed server instance using the connect command, which by default connects to localhost and the 9999 port:
[disconnected /] connect
Connected to domain controller at localhost:9999
If you want to connect to another address or port, you can simply pass it to the connect command shown as follows:
[disconnected /] connect 192.168.1.1
Connected to domain controller at 192.168.1.1:9999
It is also possible to launch the CLI in the connected mode, which allows it to connect automatically, and possibly to specify commands to execute. For example, the following shell command automatically connects to an AS 7 instance and issues a shutdown command:
jboss-cli.bat --connect command=:shutdown
Starting from the 7.1.0 Beta release of the application server, security is enabled by default on the AS management interfaces to prevent unauthorized remote access to the application server. Although local clients of the application server are still allowed to access the management interfaces without any authentication, remote clients need to enter a username/password pair to access the CLI. Here's an example session that successfully connects to a remote host with the IP address, 10.13.2.255:
[disconnected /] connect 10.13.2.255
Authenticating against security realm: ManagementRealm
Username: administrator
Password:
[[email protected]:9999 /]
Please refer to Chapter 2, What's New in JBoss AS 7 for more information about creating a user with the add-user.sh shell command.
A useful option available for the Command Line Interface is the graphical mode, which can be activated by adding the --gui parameter to the shell script:
jboss-cli.bat --gui
Here's how the CLI looks in the graphical mode:
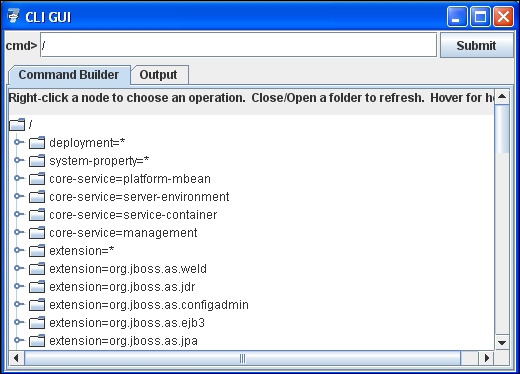
As described in the label, the resource will expand by clicking on a folder; on the other hand, if you can right-click on a node, you can fire an operation on it. The next section discusses constructing CLI commands, which can be executed either in the terminal mode or in the graphical mode.
All CLI operation requests allow for low-level interactions with the server management model. They provide a controlled way to edit server configurations. An operation request consists of three parts:
- An address, which is prefixed with a slash (/)
- An operation name, which is prefixed with a colon (:)
- An optional set of parameters contained within parentheses (())
The server configuration is presented as a hierarchical tree of addressable resources. Each resource node offers a different set of operations. The address specifies the resource node on which to perform the operation. An address uses the following syntax:
/node-type=node-name
The notations are explained as follows:
node-type: This is the resource node type. This maps to an element name in the server configuration.node-name: This specifies the resource node name. This maps to the name attribute of the element in the server configuration.
Separate each level of the resource tree with a slash (/). So, for example, the following CLI expression identifies the HTTP connector, which is part of the web subsystem:
/subsystem=web/connector=http
Once you have identified a resource, you can perform operations on the resource. An operation uses the following syntax:
:operation-name
So in the previous example, you can query the list of available resources for your nodes by adding the read-resource command at the end of it:
/subsystem=web/connector=http/:read-resource()
{
    "outcome" => "success",
    "result" => {
        "enable-lookups" => false,
        "enabled" => true,
        "executor" => undefined,
        "max-connections" => undefined,
        "max-post-size" => 2097152,
        "max-save-post-size" => 4096,
        "name" => "http",
        "protocol" => "HTTP/1.1",
        "proxy-name" => undefined,
        "proxy-port" => undefined,
        "redirect-port" => 8433,
        "scheme" => "http",
        "secure" => false,
        "socket-binding" => "http",
        "ssl" => undefined,
        "virtual-server" => undefined
    }
}
If you want to query for a specific attribute of your node, you can use the read-attribute operation instead. For example, the following code shows how to read the enabled attribute from the HTTP connector:
/subsystem=web/connector=http/:read-attribute(name=enabled)
{
    "outcome" => "success",
    "result" => true
}
Note
Apart from the operations on a specific resource, you can also perform a set of commands, which are available on every path of your AS 7 subsystem, such as the cd or ls commands. These commands are pretty much equivalent to their Unix shell counterparts, and allow navigation through the AS 7 subsystems. Other important additions are the deploy and undeploy commands, which as you might guess, allow you to manage the deployment of applications. These key commands are discussed in the Deploying applications using the CLI section.
The CLI is not however just about querying attributes from the JBoss AS 7 subsystems; you can also set attributes or create resources. For example, if you were to set the HTTP port of the HTTP connector, you have to use the corresponding write-attribute on HTTP's socket binding interface, shown as follows:
/socket-binding-group=standard-sockets/socket-binding=http/:write-attribute(name=port,value=8080)
{
    "outcome" => "success","response-headers" => {
        "operation-requires-reload" => true,"process-state" => "reload-required"}
}
Apart from the operations that we have seen so far, (which can be performed on every resource of your subsystems), there can be special operations that can be performed exclusively on one resource. For example, within the naming subsystem, you are able to issue a jndi-view operation that will display the list of JNDI bindings, as shown in the following code snippet:
/subsystem=naming/:jndi-view
{
    "outcome" => "success",
    "result" => {"java: contexts" => {
        "java:" => {
            "TransactionManager" => {
                "class-name" => "com.arjuna.ats.jbossatx.jta.TransactionManagerDelegate","value" => "com.arjuna.ats.jbossatx.jta.TransactionManagerDelegate@afd978"
            },
     . . . .
}
Getting to know all the available commands in CLI is a pretty hard task; however, since its first release, this management interface includes an essential feature, the tab completion. Suppose the cursor is positioned at the beginning of an empty line, if you type in / and press the Tab key, you will get a list of all the available node types:
[standalone@localhost:9999 /] /

core-service           deployment             extension
interface              path                   socket-binding-group
subsystem              system-property
After selecting the node type, you want to enter into the tree of resources, so type = and press the Tab key again. This will result in a list of all the node names available for the chosen node type:
[standalone@localhost:9999 /] /subsystem=

configadmin          datasources          deployment-scanner
ee                   ejb3                 infinispan
jaxrs                jca                  jdr
jmx                  jpa                  logging
mail                 naming               osgi
pojo                 remoting             resource-adapters
sar                  security             threads
transactions         web                  webservices
weld
After you have finished with the node path, adding a : at the end of the node path and pressing the Tab key will print all the available operation names for the selected node:
[standalone@localhost:9999 /] /subsystem=deployment-scanner/scanner=default:

add                          read-attribute
read-children-names          read-children-resources
read-children-types          read-operation-description
read-operation-names         read-resource
read-resource-description    remove
undefine-attribute           whoami
write-attribute
To see all the parameters of the operation, add a ( after the operation name and press the Tab key:
[standalone@localhost:9999 /] /subsystem=deployment-scanner/scanner=default:read-attribute(

include-defaults=   name=
Choose the parameter you want and specify its value after =. Finally, when all the parameters have been specified, add ) and press Enter to issue the command.
Deploying an application (in the standalone mode) can be easily performed by copying the application's archives into the deployment folder of your server distribution. That's a pretty handy option; however, we would like to stress on the advantage of using the CLI interface, which offers a wide choice of additional options when deploying, and also provides the opportunity to deploy applications remotely.
All it takes to deploy an application's archive is a connection to the management instance, either local or remote, and by issuing the deploy shell command. When used without arguments, the deploy command provides the list of applications that are currently deployed, as shown in the following command:
[disconnected /] connect
Connected to standalone controller at localhost:9999
[localhost:9999 /] deploy
ExampleApp.war
If you feed a resource archive such as a WAR file to the shell, it will deploy it on the standalone server right away:
[standalone@localhost:9999 /] deploy ../MyApp.war 'MyApp.war' deployed successfully.
By default, the CLI uses the JBOSS_HOME/bin file as a source for your deployment archives. You can however, use absolute paths when specifying the location of your archives; the CLI expansion facility (using the Tab key) makes this option fairly simple:
[standalone@localhost:9999 /] deploy c:deploymentsMyApp.war
'MyApp.war' deployed successfully.
Redeploying the application requires an additional flag to the deploy command. Use the -f argument to force the application's redeployment:
[localhost:9999 /] deploy -f ../MyApp.war
'MyApp.war' re-deployed successfully.
Undeploying the application can be done through the undeploy command, which takes as an argument the application that is deployed:
[localhost:9999 /] undeploy MyApp.war
'MyApp.war' undeployed successfully.
By checking the AS 7 configuration file (for example standalone.xml or domain.xml), you will notice that the deployment element for your application has been removed.
When you are deploying an application using the domain mode, you have to specify to which server group the deployment is associated. The CLI lets you choose between two options:
- Deploy to all server groups
- Deploy to a single server group
We will discuss these choices in two separate sections.
If this option is chosen, the application will be deployed to all the available server groups. The --all-server-groups flag can be used for this purpose. For example:
[domain@localhost:9999 /] deploy ../application.ear --all-server-groups
Successfully deployed application.ear
If, on the other hand, you want to undeploy an application from all server groups belonging to a domain, you have to issue the undeploy command, as shown in the following command:
[domain@localhost:9999 /] undeploy application.ear --all-relevant-server-groups
Successfully undeployed application.ear
Note
You might have noticed that the undeploy command uses the --all-relevant-server-groups instead of --all-server-groups. The reason for this difference is that the deployment may not be enabled on all server groups, so by using this option, you will actually undeploy it just from all the server groups in which the deployment is enabled.
The other option lets you perform a selective deployment of your application only on the server groups you have indicated:
[domain@localhost:9999 /] deploy application.ear --server-groups=main-server-group
Successfully deployed application.ear
You are not limited to a single server group, and you can separate multiple server groups with a comma (,). For example:
[domain@localhost:9999 /] deploy application.ear --server-groups=main-server-group,other-server-group
Successfully deployed application.ear
Tab completion will help complete the value for the list of --server-groups selected for deployment.
Now, suppose we want to undeploy the application from just one server group. There can be two possible outcomes. If the application is available just on that server group, you will successfully complete the undeployment:
[domain@localhost:9999 /] undeploy as7project.war --server-groups=main-server-group
Successfully undeployed as7project.war.
On the other hand, if your application is available on other server groups, the following error will be returned by the CLI:
Undeploy failed: {"domain-failure-description" => {"Composite operation failed and was rolled back. Steps that failed:" => {"Operation step-3" => "Cannot remove deployment as7project.war from the domain as it is still used by server groups [other-server-group]"}}}
It seems that something went wrong. As a matter of fact, when you are removing an application from a server group, the domain controller checks that the application is not referenced by any other server group, otherwise the previous command will fail.
You can however, instruct the domain controller to undeploy the application without deleting the content also, as shown in the following command:
[domain@localhost:9999 /] undeploy application.ear --server-groups=main-server-group --keep-content
Successfully undeployed application.ear.
As a program developer, you might be interested to know that the CLI is able to execute commands in a non-interactive way, by adding them in a file, just as a shell script. In order to execute the script, you can launch the CLI with the --file parameter as in the following example (for Windows):
jboss-cli.bat --file=test.cli
The equivalent command for Unix users will be:
./jboss-cli.sh --file=test.cli
In the next section, we will add some useful scripts that can be added to your administrator toolbox.
The earlier JBoss AS releases used to ship with a farm folder, which would trigger a deployment to all nodes that are part of a JBoss cluster. This option is not included anymore with JBoss AS 7, but resurrecting a farm deployment is just a matter of a few CLI instructions.
In the following example, we are deploying an application to the default server address (127.0.0.1 and port 9999) and to another server instance that is bound to the same address but to port 10199:
connect
deploy /usr/data/example.war
connect 127.0.0.1:10199
deploy /usr/data/example.war
A common requirement for the domain administrator is to restart the application server nodes, for example, when some server libraries are updated. The CLI provides a handy shortcut for stopping and starting all the servers that are part of a server group:
connect
/server-group=main-server-group:start-servers
/server-group=main-server-group:stop-servers
If you prefer a more granular approach, you can start the single server nodes as shown in the following example, which shows how you can apply a conditional execution logic in your CLI scripts:
connect
if (result == "STARTED") of /host=master/server-config=server-one:read-attribute(name=status)
/host=master/server-config=server-one:stop
end-if

if (result == "STARTED") of /host=master/server-config=server-two:read-attribute(name=status)
/host=master/server-config=server-two:stop
end-if
/host=master/server-config=server-one:start

/host=master/server-config=server-two:start
In the if end-if section, we are checking for the server's status attribute. If the status is "STARTED", the application servers are stopped and then restarted.
Since the 7.2.0 Alpha release of the application server (downloadable as a snapshot at the time of writing at https://ci.jboss.org/jenkins/job/JBoss-AS-7.x-latest/), you can use the module command in order to install a new module. Therefore, you can fully automate a data source creation as shown in the following example:
connect

module add --name=org.mysql --resources=mysql-connector-java-5.1.18-bin.jar --dependencies=javax.api,javax.transaction.api

/subsystem=datasources/jdbc-driver=mysql:add(driver-module-name=org.mysql,driver-name=mysql,driver-class-name=com.mysql.jdbc.Driver)

/subsystem=datasources/data-source=MySQLDS:add(jndi-name=java:jboss/datasources/MySQLDS, driver-name=mysql, connection-url=jdbc:mysql://localhost:3306/as7development,user-name=root,password=admin)
The first line of the script, after the connection, installs a new module named org.mysql in your server modules' directory, including the MySQL JDBC driver and the required dependencies.
The second line installs the JDBC driver for the org.mysql module into the datasources/jdbc-driver subsystem.
Finally a datasource is added at the jndi java:jboss/datasources/MySQLDS with the required URL and credentials.
Adding a new JMS destination is quite easy since it does not require a lengthy set of commands. However, it is sometimes your application that needs to set up lots of JMS destinations in order to work, so why not create a script for it too? The following is a tiny script that adds a JMS queue to the server configuration:
connect
jms-queue add  --queue-address=queue1 --entries=queues/queue1
And the following is the corresponding script for creating a JMS topic:
connect
jms-topic add  --topic-address=topic1 --entries=topics/topic1