
In this recipe, we will learn how to execute multiple JUnit test cases at the same time by putting them into a JUnit Test Suite.
Imagine a situation when you are developing an application with lots of classes. If you want to test the whole application, you would need to run a JUnit test for every class one by one, which will take you forever. Also note that, often classes need to be called in a particular order. So, if by manually executing test cases you will mix the order, you will need to start manually running test cases from the beginning. This can be easily avoided if you put your JUnit test cases into a JUnit Test Suite. It allows you to not only put your JUnit test cases in one place, but also to specify the order of how test cases should be run and to put specific conditions for every test case. Note that, when you run the JUnit Test Suite class, it will run every JUnit test case one by one.
Before we create a JUnit Test Suite, we will need to create one more class, so that we can see how the tests for each class can be combined.
- Create a
Personclass, the same way as we have created theEmployeeclass in the first recipe, and put it in thehow.to.eclipsepackage. - Your
Personclass will hold only one variable—name. It will also have one getter and one setter function.Your
Personclass should look like the following code:1. package how.to.eclipse; 2. 3. public class Person { 4. 5. private String name; // private variable holding person's name 6. 7. /** 8. * This method sets name 9. */ 10. public void setName (String _name) { 11. if (_name != null && _name.isEmpty() == false){ 12. name = _name; 13. } 14. } 15. 16. /** 17. * @return name 18. */ 19. public String getName () { 20. return name; 21. } 22. } - Create a JUnit test case called
PersonTestsin thehow.to.eclipse.testspackage the same way as we did in the previous recipe.Test your
namevariable of thePersonclass for the following:- The
namevariable does not accept null - The
namevariable accepts a valid string - The
namevariable does not accept an empty string
- The
I have also created a precondition for my Person class where I assign name as unknown.
My PersonTests class looks like the following:
1.  package how.to.eclipse.tests;
2.
3.  import static org.junit.Assert.*;
4.  import how.to.eclipse.Person;
5.  import org.junit.Before;
6.  import org.junit.Test;
7.
8.  public class PersonTests {
9.      Person person = new Person();

10. @Before
11. public void setUp() {
12.     person.setName("unknown");
13. }
14.
15. @Test
16. public void testNameNull() {
17.     person.setName(null);
18.     assertNotNull(person.getName());
19. }
20.
21. @Test
22. public void testNameValid() {
23.     person.setName("Bob");
24.     assertTrue(person.getName().equals("Bob"));
25. }
26.
27. @Test
28. public void testNameEmptyString() {
29.     person.setName("");
30.     assertFalse(person.getName().isEmpty());
31. }
32.
33. }
Thus, now we have two classes called Employee and Person, and two JUnit test cases called EmployeeTests and PersonTests. What we need to do now is to combine them together in a JUnit Test Suite.
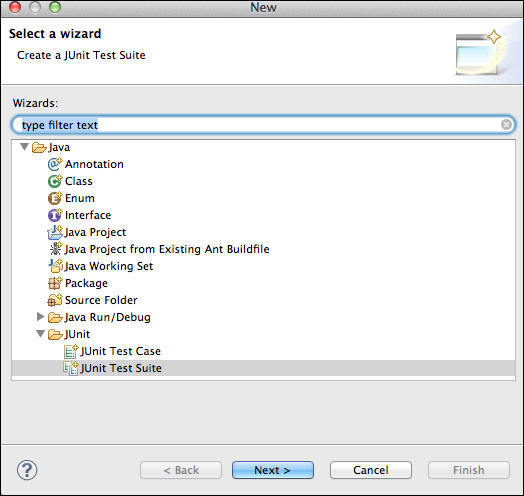
- Right-click on the src directory and select New | Other… | JUnit | JUnit Test Suite. See the following screenshot:
- Click on Next>.
In the next tab you will see that two of your tests are already checked, and the name is also provided as
AllTests(make sure that the package is set tohow.to.eclipse.tests). Eclipse is a very intuitive environment, and as I have already mentioned, some routine tasks are done by Eclipse automatically, thus saving us a lot of time. - Click on the Finish button. As a result, you should see the
AllTestsclass created, and it should look like the following:1. package how.to.eclipse.tests; 2. 3. import org.junit.runner.RunWith; 4. import org.junit.runners.Suite; 5. import org.junit.runners.Suite.SuiteClasses; 6. 7. @RunWith(Suite.class) 8. @SuiteClasses({ EmployeeTests.class, PersonTests.class }) 9. public class AllTests { 10. 11. }As you can see, we have the @SuiteClasses annotation containing a list of the classes included in the JUnit Test Suite. If you want to add some more classes, just put them into the list separated by a comma.
- Run the
AllTestsclass.
If you did everything correctly, you should see that 14/14 tests passed, which means that 11 tests from EmployeeTests and three tests from PersonTests were executed together. Go to the JUnit tree view and expand everything. You should see the whole list of your tests as shown in the following screenshot:
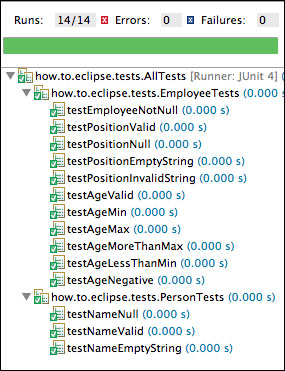
If one of the tests contained an error, you would see it exactly as it was in the list, and by double-clicking on the test, you would be navigated directly to the test that fails. Thus, with the JUnit Test Suite, you are able to see your whole project and debug any issues that occur effectively. Moreover, as you have learned in this recipe, creating a JUnit Test Suite is a very easy task as Eclipse does most of the job for you.