
In this section, we're mostly going to apply FreeMarker to a real-world task in order to see what it can do and how to use its features effectively. We will build an expanded version of the HelloFreemarker application that produces a plain-text e-mail. Why would we do this instead of creating web pages?
First of all, FreeMarker does not really "create web pages," it creates text. That text can certainly be the content of a web page, but it can also be the content of an e-mail. The goal of this section is to explore how FreeMarker converts our model data into the text we want, so it makes more sense to look directly at that text rather than looking at the way a web browser interprets that text. Rest assured that everything we do will be useful for creating HTML as well.
In this section, we will be creating the following e-mail newsletter for a hypothetical DVD retailer.
------ FEATURED SCREEN WRITER: JOSS WHEDON ----------------
This month, Movie Club is highlighting the work of screen
writer Joss Whedon.  Whedon is known for witty dialog, rich
story lines and strong female characters.  He both wrote
and directed the 2012 blockbuster "The Avengers."

Joss Whedon on IMDB: http://www.imdb.org/name/nm0923736

Featured Film:
------ THE AVENGERS ---------------------------------------
Click for more: http://movieclub/movie/848228

A team of Marvel comics super-heroes including Iron Man,
Thor, and Captain America join forces to defeat an invasion
lead by Thor's brother Loki.

Directed By: Joss Whedon
Written By: Joss Whedon
Starring: Robert Downey Jr., Chris Evans, Scarlett Johansson
Release Date: May 4, 2012
$24.49 (Blu-Ray/DVD Combo)
IMDB: http://www.imdb.org/title/tt0848228

Other films written by Joss Whedon that you might enjoy:

------ SERENITY -------------------------------------------
Click for more: http://movieclub/movie/379786

The crew of a small cargo starship agree to transport a
fugitive only to find themselves battling powerful
government and military forces intent on recapturing her.

Directed By: Joss Whedon
Written By: Joss Whedon
Starring: Nathan Fillion, Alan Tudyk, Summer Glau
Release Date: Sep 30, 2005
*** Sale! $6.99 (Regularly $8.49 -- you save $1.50) (Blu-Ray)
IMDB: http://www.imdb.org/title/tt0379786

------ BUFFY THE VAMPIRE SLAYER ---------------------------
Click for more: http://movieclub/movie/103893

Buffy Summers, a popular highschool cheerleader finds
herself thrust into a double life when she discovers that
her destiny is to become a vampire slayer.

Directed By: Fran Rubel Kuzui
Written By: Joss Whedon
Starring: Kristy Swanson, Donald Sutherland, Paul Reubens
Release Date: Jul 31, 1992
$2.99 (DVD)
IMDB: http://www.imdb.org/title/tt0103893
The newsletter is plain text and is truncated to a maximum line-length of 60 characters.
We are going to create a simple set of value objects of types Actor, Director, ScreenWriter, and Title. All of these inherit a common superclass, IMDBEntry:
public class IMDBEntry {
  private final String name;
  private final int imdbId;
  private final String description;
  private final boolean isPerson;

  public IMDBEntry(String name,
      int imdbId,
      String description,
      boolean isPerson) {
    this.name = name;
    this.imdbId = imdbId;
    this.description = description;
    this.isPerson = isPerson;
  }

  public boolean isPerson() { return isPerson; }
  public String getDescription() { return description; }
  public String getName() { return name; }
  public int getImdbId() { return imdbId; }
}
The ScreenWriter class is a simple subclass:
public class ScreenWriter extends IMDBEntry {
  public ScreenWriter(String name, Integer imdbId, String desc) {
    super(name, imdbId, desc, true);
  }
}
In order to create a realistic set of value objects, I've created a utility which instantiates simple objects by reading values from a text file. This isn't intended to be of use other than for testing. Here is the utility:
import java.io.*;
import java.lang.reflect.Constructor;
import java.util.*;

public class ValueObjectUtil {

  public static <T> List<T> loadObject(Class<T> cls, String file) throws Exception {
    List<T> list = new ArrayList<T>();
    BufferedReader br = new BufferedReader(new FileReader(file));
    T obj;
    while((obj = loadObject(cls, br)) != null) {
      list.add(obj);
    }
    br.close();
    return list;
  }

  private static <T> T loadObject(Class<T> cls, BufferedReader br) throws Exception {
    Constructor<?> cstrct = cls.getConstructors()[0];
    Class<?>[] paramClasses = cstrct.getParameterTypes();
    Object[] params = new Object[paramClasses.length];
    for (int i = 0; i < paramClasses.length; i++) {
      Constructor<?> paramCstrct =
              paramClasses[i].getConstructor(String.class);
      String line = getLine(br, br.readLine());
      if (line == null) { return null; }
      params[i] = paramCstrct.newInstance(line.trim());
    }
    return (T)cstrct.newInstance(params);
  }

  private static String getLine(BufferedReader br, String line) throws Exception {
    if ((line == null) || !line.endsWith("\")) {
      return line;
    }
    return line.substring(0, line.length() - 1)
          + getLine(br, br.readLine());
  }
}
The utility creates a list of as many objects as it can from the supplied text file and allows us to concatenate several lines in the file by ending them with a backslash (). Just to keep a little order, I've created a subdirectory called data where our value text files will live. In the data directory, create a writers.txt file containing the lines for a single instance of ScreenWriter:
Joss Whedon
923736
Whedon is known for witty dialog, rich story lines
and strong female characters. He both wrote
and directed the 2012 blockbuster "The Avengers."
The Actor and Director objects are even simpler:
public class Actor extends IMDBEntry {
  public Actor(String name) { super(name, 0, null, true); }
}
public class Director extends IMDBEntry {
  public Director(String name) { super(name, 0, null, true); }
}
Next, we create the director.txt file in the data directory:
Joss Whedon
Fran Rubel Kuzui
Here is the actors.txt file that should also be placed in the data directory:
Robert Downey Jr.
Chris Evans
Scarlett Johansson
Nathan Fillion
Alan Tudyk
Summer Glau
Kristy Swanson
Donald Sutherland
Paul Reubens
The Title object represents a movie that Movie Club has in stock. It is more complicated than the other value objects, as it contains pricing, disc format, and people associated with the film. Here is the class:
import java.math.BigDecimal;
import java.text.*;
import java.util.*;

public class Title extends IMDBEntry {
  private final Date releaseDate;
  private final FormatType format;
  private final BigDecimal price;
  private final BigDecimal discount;

  private ScreenWriter writer;
  private Director director;
  private List<Actor> stars;

  public Title(String name,
      Integer imdbId,
      String description,
      String releaseDate,
      String format,
      String discount,
      BigDecimal price) throws Exception {
    super(name, imdbId, description, false);
    this.price = price;
    this.format = FormatType.valueOf(format);
    DateFormat fmt = new SimpleDateFormat("yyyy-MM-dd");
    this.releaseDate = fmt.parse(releaseDate);
    this.discount = discount.isEmpty()
         ? null : new BigDecimal(discount);
  }

  public ScreenWriter getWriter() { return writer; }
  public Director getDirector() { return director; }
  public List<Actor> getStars() { return stars; }
  public Date getReleaseDate() { return releaseDate; }
  public FormatType getFormat() { return format; }
  public BigDecimal getPrice() { return price; }
  public BigDecimal getDiscount() { return discount; }

  public void setPeople(Director director, ScreenWriter writer,
                  List<Actor> stars) {
    this.director = director;
    this.writer = writer;
    this.stars = stars;
  }
}
This class refers to an enumeration, FormatType. Here is that class:
public enum FormatType {
  DVD, BLU_RAY, DVD_BLU_RAY_COMBO
}
Here is the base data for three movies that we will put in movies.txt in the data directory:
The Avengers
848228
A team of Marvel comics super-heroes including Iron Man, Thor,
and Captain America join forces to defeat an invasion lead by
Thor's brother Loki.
2012-05-04
DVD_BLU_RAY_COMBO

24.49
Serenity
379786
The crew of a small cargo starship agree to transport a fugitive
only to find themselves battling powerful government and military
forces intent on recapturing her.
2005-09-30
BLU_RAY
1.50
8.49
Buffy the Vampire Slayer
103893
Buffy Summers, a popular highschool cheerleader finds herself
thrust into a double life when she discovers that her destiny
is to become a vampire slayer.
1992-07-31
DVD

2.99
We're going to create a class called RunFreemarker that will create our model and execute a template against the data. This class will be very similar to the classes from the previous section, but we're going to make the template file a command-line parameter. This will allow us to run different templates against the model without changing the code. Here is the source for RunFreemarker:
import java.io.*;
import java.util.*;
import freemarker.template.*;

public class RunFreemarker {
  public static void main(String[] args)
  throws Exception {
    Configuration cfg = new Configuration();
    cfg.setObjectWrapper(new DefaultObjectWrapper());
    cfg.setDirectoryForTemplateLoading(new File("."));
    Map<String, ?> model = createModel();
    Template template = cfg.getTemplate(args[0]);
    template.process(model,
                 new OutputStreamWriter(System.out));
  }

  private static Map<String, Object> createModel() throws Exception {
    HashMap<String, Object> model = new HashMap<String, Object>();
    model.put("nlType", "screen writer");
    model.put("nlPhrase", "written by");
    List<ScreenWriter> writerList =
         ValueObjectUtil.loadObject(ScreenWriter.class,
                                    "data/writers.txt");
    model.put("subject", writerList.get(0));
    List<Actor> actorList =
         ValueObjectUtil.loadObject(Actor.class, "data/actors.txt");
    List<Director> directorList =
         ValueObjectUtil.loadObject(Director.class,
                                    "data/directors.txt");
    List<Title> titleList =
         ValueObjectUtil.loadObject(Title.class, "data/movies.txt");
    titleList.get(0).setPeople(directorList.get(0),
         writerList.get(0), actorList.subList(0,3));
    titleList.get(1).setPeople(directorList.get(0),
         writerList.get(0), actorList.subList(3,6));
    titleList.get(2).setPeople(directorList.get(1),
         writerList.get(0), actorList.subList(6,9));
    model.put("movies", titleList);
    model.put("featuredId", 848228);
    model.put("enumTool",
                 BeansWrapper.getDefaultInstance().getEnumModels());
    return model;
  }
}
We place our list of titles into the model as "movies". We put our lone screenwriter, Joss Whedon, into the model as "subject". In order to indicate which film is "featured" this month, we place its ID number into the model as the value featuredId.
There are a couple of pieces of text in the newsletter that depend on whether the subject is a writer, actor, or director. We populate a couple of variables with these text fragments.
Note
If we were localizing this newsletter, we would populate the variables with the i18n key of the phrases. For example, you might set nlType to screen.writer and use that as a key to an entry in a resource bundle. FreeMarker provides a class, ResourceBundleModel that assists in using resource bundles in templates. You can see some sample code in the freemarker.testcase.TestBeans unit test in the FreeMarker source.
Sometimes you will need to provide some utility functionality in your model, and that is what is being set in enumTool. This is a facility provided by FreeMarker that allows you to work with Java 5 enumeration types inside FTL.
All in all, we set only five values and one utility class into the model and these give us everything we need to generate the newsletter.
We've already seen how to access the top-level variables in the model, but now we need to dig down into the object graph. Let's start with getting the name out of our subject.
Create a template called expressions.ftl with the following lines:
${subject.name}
${subject["name"]}
${subject.getName()}
${subject["getName"]()}
Now run the template against it:
java -cp .;freemarker.jar RunFreemarker expressions.ftl
You should see the name "Joss Whedon" printed out four times because all four lines access the same data.
In the first line, FreeMarker looks for a Java bean "getter" called getName. If it had not found that, it would have looked for a method called get that takes a String argument, and it would pass the value "name" to get.
The first two approaches work because FreeMarker's bean wrapper has packaged our ScreenWriter instance as a hash. A hash is an associative array that binds string keys to values. In this case, the key "name" is bound to a call to getName on the instance.
The second line explicitly treats the variable as a hash by using an associative array lookup. The syntax in the two lines is interchangeable, and should be immediately familiar to JavaScript programmers.
The last two lines call getName explicitly. The syntax of the third line resembles a method call in Java, but the version used in the fourth line might look a little strange.
While the hash that FreeMarker built around our object binds the key "name" to the return of getName, it binds the key "getName" to the method itself. In other words, looking up "name" returns a string, and looking up "getName" returns a method. More precisely, both the dot syntax and the array syntax return a reference to a TemplateMethod object.
A TemplateMethod object expects a set of zero or more parameters to be given in a set of parentheses. In this example, it takes no arguments and returns a String value, which can be evaluated and outputted directly.
If you find this confusing, just look at the example on the fourth line and understand that you can call methods on your model objects. This can be a key capability when you have a Boolean method such as isPerson. The bean mapper will bind the return from isPerson to the attribute person, as long as the return type is the primitive boolean.
If the return type is the object type Boolean, it will not do this. Also, if the method does not start with "is" (for example, a hasDiscount method) the bean mapper will not map it to an attribute. In these cases, you must call the method. Add the following line to expressions.ftl and run it again:
${subject.person?string}
${subject.isPerson()?string("person", "title")}
The fifth and sixth lines should output the following because subject.isPerson() returns true:
true
person
When the value in square brackets is a String, FreeMarker does an associative lookup. When it is a number (integer), FreeMarker does an indexed lookup. This is used to select items from arrays or collections. FreeMarker wraps both as a sequence. In our model, "movies" is a sequence containing three Title objects. Each Title instance also contains a sequence containing Actor instances. Let's create a new template called sequences.ftl:
${movies[0].name}
${movies[0].stars[2].name}
Running our program against this should output the following:
The Avengers
Scarlett Johansson
The Avengers is the 0th element in the "movies" sequence and Scarlett Johansson is the second element in its list of stars.
We've already seen some built-ins. Most of those built-ins transformed values into strings. We also saw the time built-in which converted a "date/time" value to a "time" value which FreeMarker converted to a string using a default formatting.
When we use built-ins, we need to consider the type that the built-in creates, and also the type on which it operates. FreeMarker built-ins frequently operate only on a certain type and not all of them transform that type into a String. In fact, the number built-in converts a string into a number. Applying a built-in the wrong type will cause your template rendering to fail.
Let's look at some built-ins that operate on sequences by adding this line to the sequences.ftl template:
${movies?last.stars?sort_by("name")?first.name}Using built-ins, we get the last element of the movie list: Buffy the Vampire Slayer. We then get the list of stars, and sort that list by their complete name. Finally, we get the name of the first element of the sorted list. The output for this line should be Donald Sutherland.
There's not much more you need to learn about using built-ins. There are too many to explore in this book, but the FreeMarker documentation contains examples for all of them. In our example project, we'll use some of the most common ones.
So far we've been careful to perform expression evaluations based on defined values. This is good because FreeMarker reacts very badly when a template references an undefined value. In actual projects, we often need to deal with situations where data that should be provided is missing. In our example, we have simulated this with actors and directors, neither of which have values for description.
Let's create a new template called error.ftl with the following content:
${movies[0].stars[2].description}When you run RunFreemarker against this template, you should see copious error information in the output. Much of this is sent to stderr, but it also appears in your template output. As you might imagine, this mass of error text could seriously corrupt your web pages. When you aren't sure that data will be defined, use the default operator !. Now we'll create a template in the file defaults.ftl with the following lines:
${movies[0].stars[2].description!"The actor has no description"}
${(movies[0].producer.name)!"Something missing"}
<#if movies[0].director??>This if movie[0] has a director.</#if>
Running the defaults.ftl program again produces this output:
The actor has no description
Something missing
This if movie[0] has a director
When the expression preceding the ! is undefined, it substitutes the expression after the !. If there is no expression after the !, it substitutes an empty string ("").
Sometimes we have a sequence of nested lookups that may be undefined in several places. This is the case with the movies[0].producer.name expression. If movies[0] had a producer, that producer would certainly have a name, but our Title object doesn't even have a getProducer method. We successfully handled the error by providing the expression a blanket default by placing parentheses around it.
Sometimes you need more than just a default to deal with missing values. The third line demonstrates the ?? operator. This evaluates to true when the preceding value is defined and false if it is undefined. Parentheses can be used with ?? the same way they are used with !.
This line also utilizes the #if directive, so let's discuss directives.
Directives are used to add active control elements to FreeMarker templates. There are about three dozen supplied directives. We won't use all of them, but we will cover the ones we're most likely to use.
Directives come in two flavors:
- FreeMarker-supplied, which start with
# - User-defined, which start with
@
As you would expect, we use FTL directives to define user directives. Most user-defined directives are macros.
Macros are small scripts that insert content into the output stream as they execute. In this respect, they are just like JSP tags. One major difference is that macros can be written on an ad-hoc basis, so there is very little cost to creating one, even if you only use it once.
Let's see how easy it is to define a macro by creating a macro that generates the dashed-line section headers for our newsletter. Open up newsletter-macros.ftl file and put this definition into it:
<#assign lineLimit = 60>
<#-- Output a dashed-line headline -->
<#macro section title>
  ------ <#t>
  ${(title + " ")?upper_case?right_pad(lineLimit-8, "-")}<#lt>
  <#nested><#lt>
</#macro>
The first line is not actually part of our macro, but something it requires. It is a directive that assigns the lineLimit variable to the value 60, which is the line-length limit in our newsletter.
Below the #assign directive is a comment header for our macro. FreeMarker comments do not generate any output. If you are writing an HTML template, using FreeMarker comments will prevent your comments from being sent to the client.
The #macro directive is used to define the section macro. We're giving section a single argument: title.
For readability, we want to indent the body of the macro. We also want to break long lines apart. We do not, however, want these indentations and extraneous line breaks to show up in the output. Whitespace can be controlled with the following directives:
#t("trim")#rt("right trim")#lt("left trim")
Whitespace in HTML documents is usually of little consequence, so you probably won't use the whitespace directives much in those templates. If you want to learn more detail, they are covered in the FreeMarker manual.
The first couple of lines in the macro use a combination of static text, interpolations, expressions, and built-ins to form our dash-line header. What does the #nested directive do? This outputs the content that is nested in the macro invocation. Thus, this macro not only outputs the section header, but the section body as well.
You can see how the #nested directive would be very useful when composing HTML. Frequently, we have boilerplate HTML markup such as a set of <div> tags that can surround varying content. This allows us to easily turn this repeated HTML pattern into a user-defined directive.
User-defined directives are invoked using the @ sign and must use closing tags, like XML syntax. We can add this line temporarily to newsletter-macros.ftl and run the program against it:
<@section title="title">
Section content
</@section>
This should output:
------ TITLE ----------------------------------------------
Section content
This macro outputs the nested content Section content with a dotted line header. Now remove these lines from the file, as they are not part of our final system.
Functions provide another way to create reusable logic. Functions do not insert anything in the output, but provide their results as a return value. For the benefit of our readers, we will provide links to the IMDB website, so let's create a function to compose those URLs. IMDB URLs come in two flavors:
- Name URLs
- Title URLs
Each follows a predictable form and ends with a seven-digit number. In order to produce the expected URL, we define this function in newsletter-macros.ftl:
<#-- Create IMDB URL -->
<#function imdbUrl imdbEntry>
    <#return "http://www.imdb.org/"
            + imdbEntry.person?string("name","title")
            + "/"
            + imdbEntry.person?string("nm", "tt")
            + imdbEntry.imdbId?string("0000000")>
</#function>
This macro will use attributes of the supplied IMDBEntry instance, including the value of isPerson() to build the appropriate URL structure.
None of the sophistication of macros and functions would be useful without some kind of conditional flow control. Let's look at one of our newsletter features that requires flow control: wrapping text to the line limit.
If we were to wrap the text in Java, we would probably employ a while loop to slice up the text. FreeMarker doesn't have a while loop, but we can implement the same logic using recursion. Add this macro to newsletter-macros.ftl:
<#-- Wrap lines to a limit -->
<#macro linewrap text>
  <#if text?length gt lineLimit>
    <#local wrap = text?substring(0, lineLimit)?last_index_of(" ")>
    ${text?substring(0,wrap)}<#lt>
    <@linewrap text=text?substring(wrap + 1)/><#lt>
  <#else>
    ${text}<#lt>
  </#if>
</#macro>
If the text length is greater than the line limit, the macro determines the position of the last space character within the line length and outputs the text up to that point. It then invokes itself recursively with the remaining text.
This uses the #if and #else directives for basic flow control. Notice that in the predicate of the #if statement, we use the operator gt for "greater than." FreeMarker recognizes > as "greater than," but in this case it confuses the parser which interprets the > as the end of the directive tag.
The #local directive works exactly like the #assign directive, but limits the scope of the assignment to the macro itself. Used in this context, an #assign directive would create a variable that was visible outside the macro. It could also change an existing variable previously defined outside the macro.
The #import directive parses an external template and attaches its functions and macros to a hash. We can go ahead and start our newsletter templates by importing our macro and function file. Open a file called newsletter-intro.ftl and put the following lines into it:
<#import "newsletter-macros.ftl" as nl>
<@nl.section title="FEATURED ${nlType}: ${subject.name}">
    <#assign intro>
        This month, Movie Club is highlighting the work of <#t>
        ${nlType}<#t>
        ${subject.name}.  ${subject.description}<#lt>
    </#assign>
    <@nl.linewrap text=intro/><#lt>
    ${subject.name} on IMDB: ${nl.imdbUrl(subject)}<#lt>
</@nl.section>
The first line uses the #import directive and assigns the functions and macros to the namespace nl, which is just a hash. In order to call these, we need to preface them with the namespace, for example, nl.section and nl.imdbUrl.
We need to wrap the text of the first paragraph, but that text is composed of some static text and some dynamic content. We use the #assign directive in a way that captures its content into a variable. We then pass that variable to the linewrap macro.
All of our macros and functions are at play here. The linewrap macro wraps the text collected by the #assign directive. The imdbUrl function creates an IMDB URL for our newsletter subject. Finally, the section macro places a header on the introduction and puts the text under it.
Note
Note that the second line evaluates an expression inside a string literal. You can do this evaluation wherever text expressions are allowed. It can be confusing to figure out when you should use variable references and when to use interpolations. Just remember, if it's a text value, you can put expression evaluations into it. If you are dealing with number or Booleans or other non-text values, use the bare variables.
If you run RunFreemarker against the newsletter-intro.ftl, you should get this output:
------ FEATURED SCREEN WRITER: JOSS WHEDON ----------------
This month, Movie Club is highlighting the work of screen
writer Joss Whedon.  Whedon is known for witty dialog, rich
story lines and strong female characters.  He both wrote
and directed the 2012 blockbuster "The Avengers."

Joss Whedon on IMDB: http://www.imdb.org/name/nm0923736
Open the newsletter-macros.ftl file and add the following code. This converts the FormatType enumeration into output text.
<#-- Convert FormatType to text -->
<#assign FormatType = enumTool["FormatType"]>
<#function dvdFormat fmt>
    <#switch fmt>
        <#case FormatType.DVD>
            <#return "DVD">
        <#case FormatType.BLU_RAY>
            <#return "Blu-Ray">
        <#case FormatType.DVD_BLU_RAY_COMBO>
            <#return "Blu-Ray/DVD Combo">
    </#switch>
</#function>
The function uses the #switch directive to select a #case based on the value of the fmt variable, which is a FormatType enumeration. FreeMarker expressions can't refer to static members, so a helper function was introduced to allow FTL templates to work with enumeration types.
The enumTool variable was assigned to a FreeMarker hash which returns hashes for working with enumerations. To access a set of values, you use the fully-qualified name of the Java enumeration type as an associative lookup.
Before the function, we assign a variable named after the class FormatType. This will be populated with a hash that maps the string returned by the enumeration name() method to the actual enumeration instance. For example, the text value "BLU_RAY" will be mapped to FormatType.BLU_RAY object instance. Therefore, the FTL expression FormatType.BLU_RAY will end up referring to the same thing as the Java expression FormatType.BLU_RAY.
The following code we will add to newsletter-macros.ftl is a macro for outputting names from a list of people. We want the names to be separated by commas, so we will put a comma and space after all except the last name in the list. Here is the FTL code for our macro:
<#-- List a set of names -->
<#macro listNames people>
    <#list people as person>
        ${person.name}<#t>
        <#if person_has_next>, </#if><#t>
    </#list>
</#macro>
The #list directive tells FreeMarker to iterate over the people sequence placing each iteration element in the loop variable person. FreeMarker helps us with our comma logic by creating a loop variable person_has_next. This will be false on the final iteration.
Because macros are so easy to create, sometimes it is worth creating a one-time-use macro just to encapsulate some messy logic. Not only does putting the code in a macro clean up the main FTL, but also allows you to give it some context that makes it easier to understand what it's doing. Let's look at an example.
If you look carefully at the sample newsletter, you'll notice that the price display for a title on sale is much more complicated than the standard price display. Open newsletter-macros.ftl and add this macro:
<#-- Format price with discount (if necessary) -->
<#macro displayPrice price discount=0>
    <#if discount != 0>
    *** Sale! <#t>
    </#if>
    ${(price - discount)?string.currency}<#t>
    <#if discount != 0>
    <#lt> (Regularly ${price?string.currency} -- <#rt>
    you save ${discount?string.currency})<#t>
    </#if>
</#macro>
When a movie title has no discount, its discount attribute is undefined. As noted earlier, FreeMarker doesn't allow undefined values, so you can't pass undefined values as macro arguments. In order to handle this, we assign a default of 0 to the discount parameter. When the discount parameter is undefined, it will be set to the default. This default value is used to detect the absence of a discount.
As you can see, this macro performs this data-driven formatting. It's not pretty or easy to follow, but the name displayPrice makes it clear what it's doing. It also makes it easy to change the display when marketing changes its mind about what it wants.
We have two more macros to add to newsletter-macros.ftl. We are going to create a macro that displays a movie in a section, and another macro that loops through a list of movies, displaying the list elements that we want to display. Here is the code:
<#-- Output a movie -->
<#macro displayMovie title>
    <@section title=title.name>
      Click for more: http://movieclub/movie/${title.imdbId?c}<#lt>

      <@linewrap text=title.description/><#lt>

      Directed By: ${title.director.name}<#lt>
      Written By: ${title.writer.name}<#lt>
      Starring: <@listNames people=title.stars/><#lt>
      Release Date: ${title.releaseDate?date?string.medium}<#lt>
      <@displayPrice price=title.price discount=title.discount/> <#t>
      (${dvdFormat(title.format)})<#lt>
      IMDB: ${imdbUrl(title)}<#lt>
    </@section>
</#macro>

<#-- Output movies matching or not matching the selected movie -->
<#macro movieList movies featuredId isFeatured>
    <#list movies as movie>
        <#if isFeatured>
            <#if movie.imdbId == featuredId>
                <@displayMovie title=movie/>
                <#break>
            </#if>
        <#else>
            <#if movie.imdbId != featuredId>
                <@displayMovie title=movie/>
                <#if movie_has_next>

                </#if>
            </#if>
        </#if>
    </#list>
</#macro>
The displayMovie macro is very straightforward and doesn't introduce anything we haven't gone over before. The movieList macro could use a little explanation.
The newsletter contains two movie lists. The first list contains a single entry: the featured film. The second list contains all of the movies except the featured film. The macro parameters are the list of movies, the ID of the featured selection, and a flag indicating whether to include the feature or exclude it.
The movieList uses loop and flow control directives to implement both cases. In the case of the featured film, we are done once we find it in the list. The macro uses a #break directive to short-circuit the loop after it finds the matching movie.
With all of the functions and macros created, we can now put them together in a main template. Here is the content of newsletter.ftl:
<#setting locale="en_US">
<#import "newsletter-macros.ftl" as nl>
<#-- Movie Club Newsletter text -->
<#include "newsletter-intro.ftl">

Featured Film:
<@nl.movieList movies=movies featuredId=featuredId isFeatured=true/>

Other films ${nlPhrase} ${subject.name} that you might enjoy:

<@nl.movieList movies=movies featuredId=featuredId isFeatured=false/>
This last bit of FTL introduces a couple more important directives:
- The
#includedirective does exactly what it sounds like: it incorporates the content of another template.You may have realized that the included
newsletter-intro.ftlfile also imports thenewsletter-macros.ftl. This isn't a problem. The#importdirective only parses a given file the first time it is invoked for that file. Subsequent imports of the same file are just assigned to the same parse results. The bottom line is that there is no penalty for importing a file multiple times. - The
#settingdirective allows the template to alter various global parameters and defaults. For example, you can set the default number format with a#settingdirective.The one
#settingdirective that you should always set islocale. This controls the way that numbers and dates are shown, unless you adjust more settings or use explicit formatting. In our movie listing, we show a price using the default currency format. The price is in US dollars. If we render the template in a different locale, the currency may be displayed incorrectly. For example, it may incorrectly indicate that the prices are in Euros.
Now that everything is in place, you can go ahead and run RunFreemarker against the newsletter.ftl template. The output should be exactly that was seen in the sample newsletter.
There are two kinds of errors you are likely to encounter when using FreeMarker:
- FTL parsing errors
- Missing values
The most effective way to deal with these is to make sure they don't happen.
The first problem should be fairly easy to avoid. Make sure every one of your FTL files is loaded successfully before you release your system.
The second problem is a little bit more difficult, particularly when the data you collect in your model isn't completely under your control. When you don't have confidence in your data, you can use the ?? operator and the ! operator to protect your template execution from missing values.
By now, you should have seen what happens when there is an error in your FTL. FreeMarker creates a detailed and informative error message describing the location and circumstances of the failure. This is appended with a stack trace. This is great when you're debugging, but is rather messy in production. Not only does the error throw an exception, but the error text is outputted into the template result.
Can this behavior be changed? Yes, but what would you rather have it do? If you can't program your FTL to do something appropriate when there is a missing value, how is generic error-handling logic going to fare any better? The other problem is that these errors are likely to occur during the production of web content.
There is usually no "do over" in web page rendering. If an error occurs while outputting a web page, you are likely going to end up with a half-finished web page already sent to the client, and no way to take it back. This would be the case regardless of what you are using to generate the page. The best approach is to plan for an error-free rendering which means making sure that your controller produces a complete model. It also means making sure that your template is prepared for cases where the controller can't guarantee defined data.
The #attempt and #recover directives change this by giving you a try/catch structure in FTL. Unlike try in Java, everything that happens inside the #attempt block is rolled back if an error occurs. If there is an error, control is transferred to the #recover block.
My personal view on these directives is that you should never use them and, in fact, I have never seen anyone use them. The only conditions under which they seem like an appropriate error-handling technique is when your data is so unpredictable that your FTL is overloaded with defensive coding. Rather than bullet-proofing your templates with #attempt/#recover, you might be better served examining your controller layer and figuring out why it is so unreliable.
Hardening your templates against errors is a lot easier if you can test them thoroughly with a framework such as JUnit. It can be difficult to test code that generates a web page because the text is large and complex. However, if we break the view logic into small pieces as we have here, we can test it. Here is a JUnit class that tests the small "listNames" macro in newsletter-macros.ftl:
import static org.junit.Assert.assertEquals;
import java.io.*;
import java.util.*;
import org.junit.*;
import freemarker.cache.*;
import freemarker.ext.beans.BeansWrapper;
import freemarker.template.*;

public class MacroTest {
  private Map<String, Object> model = new HashMap<String, Object>();
  private Configuration cfg = new Configuration();
  private StringTemplateLoader stringLoader =
      new StringTemplateLoader();
  private FileTemplateLoader fileLoader;

  @Before
  public void setUp() throws Exception {
    cfg.setObjectWrapper(new DefaultObjectWrapper());

    fileLoader = new FileTemplateLoader(new File("."));
    TemplateLoader[] loaders =
         new TemplateLoader[] { stringLoader, fileLoader };
    MultiTemplateLoader multiLoader =
         new MultiTemplateLoader(loaders);
    cfg.setTemplateLoader(multiLoader);
    model.put("enumTool",
        BeansWrapper.getDefaultInstance().getEnumModels());
  }

  @Test
  public void testListNames() throws Exception {
    stringLoader.putTemplate("listNamesTest",
        "<#import "newsletter-macros.ftl" as nl>"
        + "<@nl.listNames actors/>");
    model.put("actors", Arrays.asList(new Actor("Alice"),
        new Actor("Bob"), new Actor("Clare")));
    StringWriter out = new StringWriter();
    Template template = cfg.getTemplate("listNamesTest");
    template.process(model, out);
    assertEquals("Alice, Bob, Clare", out.toString());
  }
}
There is a lot of set-up code in this test class that can be reused to test other macros. Pay particular attention to what the code does with template loading. The setUp method sets a MultiTemplateLoader variable into the Configuration file to load templates.
The MultiTemplateLoader is set up to first try a StringTemplateLoader and then try a FileTemplateLoader. The StringTemplateLoader allows us to define templates using String literals. The template we create, listNamesTest, loads the newsletter-macro.ftl template and executes the listNames macro. Since the StringTemplateLoader doesn't know about a template called newsletter-macro.ftl, that template is loaded by the FileTemplateLoader.
You can see how to test the remaining elements in newsletter-macro.ftl, but how would you test the main template, newsletter.ftl? The invocations of nl.movieList are going to output a lot of text and checking all of it would be arduous. In order to avoid this, we employ another unit-testing trick: stubbing.
We should have already tested the movieList macro itself, so all we need to know is that newsletter.ftl calls it the way we expect. In order to do this, we define a "stub" version of newsletter-macro.ftl in the StringTemplateLoader. The #import in newsletter.ftl will load the stub version instead of the file version. The stub version of movieList might look like this:
<#macro movieList movies featureId isFeatured>
movieList:[${movies?size} ${featureId?c} ${isFeatured?string}]
</#macro>
This macro will put a one-line signature into the output that can be easily tested in a JUnit test.
Congratulations, you've gone from start to finish of an FTL project that might actually occur in the real world. We explored a lot of FreeMarker capabilities, but I hope that you also absorbed a couple of design rules which will help you keep your enterprise application development manageable.
Employ macros and functions to encapsulate reusable template logic. Don't forget that macros can have parameters that customize their behavior, so multiple uses of the same macro do not need to produce the exact same results.
If you have the experience of writing large, complex applications, you might be familiar with what happens when you put too much functionality in one file. You end up with a huge mess that is difficult to understand and even harder to maintain.
FreeMarker isn't any different in this respect. If you start creating templates without a plan to organize them, you end up with what software architects call "a big ball of mud".
Split FTL projects into multiple files. Don't even put all your macros in one giant "macros" file. Use macros and functions to simplify your FTL logic by breaking it into small chunks.
If the process of encapsulating logic into small, manageable chunks seems familiar, it is probably because it is fundamental to Test Driven Design (TDD). We have seen how straightforward it can be to produce JUnit tests for your view logic, which is the "Holy Grail" of enterprise web application development.
Another side effect of this rule, is that it helps maintain adherence to the first two rules. No one is going to want to write large, repetitive blocks of FTL if they are also required to fully test those blocks.
In this section, we applied FreeMarker features to produce the text we wanted. While following the code examples, you may have thought of different ways of doing the same thing. In many cases, those approaches are fine, as are several others you might think of. In fact, the best approach is the one that makes the most sense to you and your colleagues.
The downside of so many options is that different code developed with different styles may create confusion. FTL developers should communicate to maintain a semblance of consistency across templates to keep them maintainable.
Now that you have some FreeMarker skills, we can finally do what you probably wanted to do in the first place: create web pages. This section is intended to illustrate the mechanics of integrating FreeMarker with a web application. You may notice that we are breaking some of the design rules laid down previously, but this is only a quick example.
At this point, you may have already thought about how to incorporate FreeMarker into a servlet. You would create a Configuration object in the servlet init(). In the service() method you would populate your model and instantiate the template. Finally, you would evaluate it, directing the output to the servlet's PrintWriter. In fact, you would only need one servlet with this behavior; other servlets could place their model object on the request, as attributes, and the request could be dispatched to the FreeMarker-rendering servlet.
Whether or not you thought of this design on your own, the good news is that FreeMarker already ships with a servlet that does this. All you need to do is configure it and dispatch to it.
We'll employ the FreeMarker servlet to create a very simple application that prompts the user for a message and echoes that message below the entry form. In order to follow along, you'll need to create a servlet project. Setting this up is outside the scope of this book. I used Eclipse to create a project, and this is what my directory structure looks like:
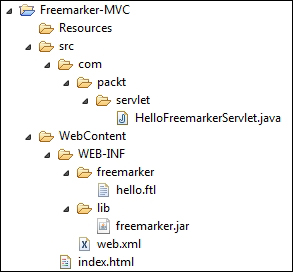
You can set up a different directory structure. We'll be talking in terms of what goes into the WEB-INF directory of your WAR.
You can start by placing the FreeMarker JAR file into the WEB-INF/lib directory.
Next, we'll create the FreeMarker template, hello.ftl:
<html>
    <head>
        <title>Freemarker MVC Example</title>
    </head>
    <body>
        <form action="HelloFreemarkerServlet" method="post">
            Message: <input type="text" name="message"><br/>
            <button type="submit">Submit</button>
        </form>
        <br/>
        <#if message??>${message?html}</#if>
    </body>
</html>
As you can see, this is extremely simple. The only FTL this template includes is a conditional inclusion of a "message" value escaped for HTML. Above that is a simple form that allows you to post a value to be placed in the message model element. All our servlet needs to do is take this message parameter, and put it in the model. Here is the servlet code:
package com.packt.servlet;

import java.io.IOException;
import javax.servlet.ServletException;
import javax.servlet.http.*;

public class HelloFreemarkerServlet extends HttpServlet {
  private static final long serialVersionUID = 1L;

  @Override
  protected void service(HttpServletRequest request,
                          HttpServletResponse response)
  throws ServletException, IOException {
    // Populated model in request attributes
    request.setAttribute("message",
         request.getParameter("message"));
    // Dispatch to Freemarker Servlet
    request.getRequestDispatcher("hello.ftl").forward(request,
          response);
  }
}
We override the service() method of the HttpServlet, so that all requests are handled with the same code. The servlet takes the "message" request parameter and places it on the request as an attribute. The next line dispatches the request to the FreeMarker servlet. The FreeMarker servlet will take the "message" attribute from the request and places it into the model for the template.
All that's left is the web.xml configuration:
<?xml version="1.0" encoding="UTF-8"?>
<web-app xmlns="http://java.sun.com/xml/ns/javaee"
      xmlns:xsi="http://www.w3.org/2001/XMLSchema-instance"
      xsi:schemaLocation="http://java.sun.com/xml/ns/javaee http://java.sun.com/xml/ns/javaee/web-app_3_0.xsd"
      version="3.0">
    <welcome-file-list>
        <welcome-file>index.html</welcome-file>
    </welcome-file-list>

  <!-- FREEMARKER SERVLET CONFIGURATION -->
  <servlet>
    <servlet-name>freemarker</servlet-name>
    <servlet-class>
freemarker.ext.servlet.FreemarkerServlet</servlet-class>
    <init-param>
      <param-name>TemplatePath</param-name>
      <param-value>/WEB-INF/freemarker</param-value>
    </init-param>
    <init-param>
      <param-name>NoCache</param-name>
      <param-value>true</param-value>
    </init-param>
    <init-param>
      <param-name>ContentType</param-name>
      <param-value>text/html; charset=UTF-8</param-value>
    </init-param>
    <load-on-startup>1</load-on-startup>
  </servlet>
  <servlet-mapping>
    <servlet-name>freemarker</servlet-name>
    <url-pattern>*.ftl</url-pattern>
  </servlet-mapping>
  <servlet>
    <servlet-name>HelloFreemarkerServlet</servlet-name>
    <servlet-class>
com.packt.servlet.HelloFreemarkerServlet</servlet-class>
  </servlet>
  <servlet-mapping>
    <servlet-name>HelloFreemarkerServlet</servlet-name>
    <url-pattern>/HelloFreemarkerServlet</url-pattern>
  </servlet-mapping>
</web-app>
Most of this web.xml is used to set up the FreeMarker servlet. It is configured to serve any URL ending in .ftl.
Note
Even though our template directory is in /WEB-INF/freemarker, this mapping allows browsers to request the templates directly. The result is that the template is rendered with an empty model. In most real-world cases, a browser will be rewarded with an error page. If you wish to block this entirely, you can add a security-constraint to your web.xml to deny external access to ".ftl" URLs.
The web.xml also specifies a welcome file of index.html. Here is what needs to be in that file:
<html>
<head>
<title>Freemarker MVC Integration Test Page</title>
</head>

<body>
  <a href="HelloFreemarkerServlet">Servlet Example</a><br/>
</body>
</html>
You can now run this application inside your favorite servlet container. Make sure that it supports a recent level of servlet technology. I used Tomcat 7.
Many people turn to a FreeMarker view seeking to simplify development after years of working with JSP. In the best case, they can leave JSP behind and never speak of it again, but sometimes a clean break isn't possible. FreeMarker offers a couple of options for integrating with JSP.
For demonstration purposes, we are going to use a simple third-party JSP tag library called "Display Tags" available at http://sourceforge.net/projects/displaytag/files/display%20tag%20library/1.2/.
Download and unzip the binary distribution, extract displaytag-1.2.jar, and place it in the WEB-INF/lib directory of your project. Extract META-INF/displaytag.tld from the JAR file and place it in WEB-INF.
We will also be using a FreeMarker tag library. The TLD file is in the examples that you should have unpacked from the FreeMarker download. Copy the freemarker-2.3.19/examples/jsp-webapp/WEB-INF/fmtag.tld file into your WEB-INF directory.
Finally, you will need some additional libraries from the Apache Commons project. Copy these into your WEB-INF/lib directory:
commons-beanutilscommons-collectionscommons-lang(Version 2.6)
The FreeMarker JSP tag allows you to embed FTL logic inside of a JSP. Generally, this is not something you should do. It may prove useful if you want to incrementally refactor JSP logic into FTL. It allows you to have an intermediate version that spans both. Under WEB-INF, let's create freemarker.jsp:
<%@ page language="java" contentType="text/html; charset=UTF-8" pageEncoding="ISO-8859-1"%>
<%@ taglib uri="/WEB-INF/fmtag.tld" prefix="freemarker" %>
<freemarker:template>
  <#assign message = request.message>

  <p>This is a message from a Freemarker template embedded in JSP:<br>
    ${message}</p>
</freemarker:template>
This JSP should require little explanation. Inside the freemarker:template tag we switch into FTL. However, you might wonder why would the assignment be in the highlighted line.
The tag creates five hashes containing the attributes of the various JSP contexts. These are:
pagerequestsessionapplicationany
If our intention is to migrate the FTL from the JSP to FTL files, we will want to remove reference to these JSP-specific tags in the body of the logic.
FreeMarker also allows you to incorporate your legacy JSP into FTL. We are going to use the Display Tags tag library to create an HTML table from a list of objects.
Inside WEB-INF/freemarker, let's create an FTL file jsp-integration.ftl. Here are the contents:
<#assign display=JspTaglibs["/WEB-INF/displaytag.tld"]>
<html>
<head>
<style type="text/css">
table { border-collapse:collapse; }
table,th, td { border: 1px solid black; }
tr.odd { background-color: yellow; }
</style>
<title>Freemarker JSP Example</title>
</head>
<body>
<@display.table name="locales">
<@display.column property="country" />
<@display.column property="displayCountry"
title="Country" />
<@display.column property="displayLanguage"
title="Language" />
</@display.table>
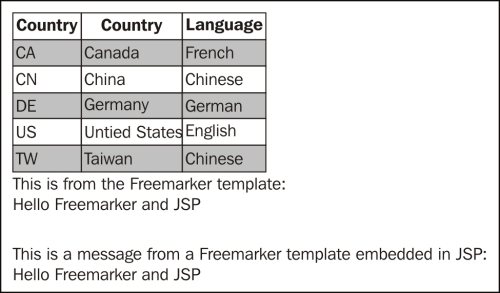
This is from the Freemarker Template:<br>
${message}
<@include_page path="WEB-INF/freemarker.jsp"/>
</body>
</html>The first line of this FTL file assigns the hash display to the results of doing a lookup on the special hash JspTagLibs. We do an associative lookup using the path to the Display Tags TLD. As a result, the display hash will contain user-defined directives corresponding to the tags defined in the TLD, and we can call them almost exactly like the JSP tags.
In addition to the standard HTML page mark-up, we add some style information for our table. Display Tags adds the "odd" class to odd-numbered <tr> tags, so we make those rows have a yellow background.
In the body of the page, we use the display.table directive/tag to create a table based on a collection of objects attached to the request as "locales." The display.column directive chooses some attributes of those objects and provides column titles.
Below that, we insert some text from a message variable. We then invoke the freemarker.jsp using a @include_page directive. This special directive behaves much like <jsp:include> in the way it invokes an external JSP. It is placed in the model by the FreeMarker servlet and is not available in other contexts.
Let's create a new servlet: com.packt.servlet.FreemarkerAndJSPServlet. Here is the code:
package com.packt.servlet;
import java.io.IOException;
import java.util.*;
import javax.servlet.ServletException;
import javax.servlet.http.*;

public class FreemarkerAndJSPServlet extends HttpServlet {
  private static final long serialVersionUID = 1L;

  @Override
  protected void service(HttpServletRequest request,
                          HttpServletResponse response)
  throws ServletException, IOException {
    // Populated model in request attributes
    request.setAttribute("locales",
           Arrays.asList(Locale.CANADA_FRENCH,
        Locale.CHINA,
        Locale.GERMANY,
        Locale.US,
        Locale.TAIWAN));
    request.setAttribute("message", "Hello Freemarker and JSP");
    // Dispatch to Freemarker Servlet
    request.getRequestDispatcher("jsp-integration.ftl")
          .forward(request, response);
  }
}
This is no different from the other servlet. It places two attributes on the request. The first, locales, is a list of Java Locale instances. The second is a simple String.
We also need to add this configuration to web.xml:
    <servlet>
        <servlet-name>FreemarkerAndJSPServlet</servlet-name>
        <servlet-class>
com.packt.servlet.FreemarkerAndJSPServlet</servlet-class>
    </servlet>
    <servlet-mapping>
        <servlet-name>FreemarkerAndJSPServlet</servlet-name>
        <url-pattern>/FreemarkerAndJSPServlet</url-pattern>
    </servlet-mapping>
Finally, for convenience, let's add a link to our front page in index.html:
    <a href="FreemarkerAndJSPServlet">JSP Integration
        Example</a><br/>
Now you can re-run the application in your servlet container. You should get a page that looks like this:
Spring MVC provides a very clean separation of model, view, and controller. In fact, controller logic is in objects explicitly designated controllers either by XML declaration or annotation. The controller classes produce ModelAndView instances containing a model (which is just a Map instance). Spring looks at the "model" part of this ModelAndView and uses a mapping to find a "view renderer" that will combine the named view with the model to produce output.
Rather than creating an entirely new project, we can simply add Spring into the one we've already started. You don't need the entire set of Spring libraries, but you need to put at least the following libraries into the WEB-INF/lib directory:
spring-asmspring-beansspring-contextspring-context.supportspring-corespring-expressionspring-webspring-webmvc
Once those libraries have been added, we can configure Spring MVC by adding the following section to our web.xml file:
<!-- SPRING MVC CONFIGURATION -->
<servlet>
    <servlet-name>springmvc</servlet-name>
        <servlet-class>
           org.springframework.web.servlet.DispatcherServlet
        </servlet-class>
        <load-on-startup>1</load-on-startup>
    </servlet>

    <servlet-mapping>
        <servlet-name>springmvc</servlet-name>
        <url-pattern>/springmvc/*</url-pattern>
    </servlet-mapping>
This maps a subset of URLs to a servlet named springmvc. By convention, the Spring context configuration for this will be in WEB-INF/springmvc-servlet.xml. This is what we put in there:
<?xml version="1.0" encoding="UTF-8"?>
<beans xmlns="http://www.springframework.org/schema/beans"
    xmlns:xsi="http://www.w3.org/2001/XMLSchema-instance"
    xmlns:context="http://www.springframework.org/schema/context"
    xmlns:mvc="http://www.springframework.org/schema/mvc"
    xsi:schemaLocation="http://www.springframework.org/schema/mvc http://www.springframework.org/schema/mvc/spring-mvc-3.0.xsd
        http://www.springframework.org/schema/beans http://www.springframework.org/schema/beans/spring-beans-3.0.xsd
        http://www.springframework.org/schema/context http://www.springframework.org/schema/context/spring-context-3.0.xsd">
    <!-- Setup Spring Annotations -->
    <context:component-scan base-package="com.packt.spring" />
    <mvc:annotation-driven />

  <!-- Freemarker Configuration -->
  <bean id="freemarkerConfig"
  class="org.springframework.web.servlet.view.freemarker.FreeMarkerConfigurer">
    <property name="templateLoaderPath" value="/WEB-INF/freemarker/" />
  </bean>

  <bean id="viewResolver"
  class="org.springframework.web.servlet.view.freemarker.FreeMarkerViewResolver">
    <property name="cache" value="true" />
    <property name="prefix" value="" />
    <property name="suffix" value=".ftl" />
  </bean>
</beans>
This context configuration enables Spring to scan our components for annotations to find controllers, components, and perform auto-wiring. The bottom half of the configuration sets up the FreeMarker view renderer. As of Spring 3.0, you can even do this configuration with annotated classes, but this FreeMarker configuration can be used with older versions of Spring.
Now that Spring is ready, we can add a controller class, HelloController, to our Java source:
package com.packt.spring;

import java.util.*;
import org.springframework.stereotype.Controller;
import org.springframework.web.bind.annotation.*;
import org.springframework.web.servlet.ModelAndView;

@Controller
public class HelloController {

  @RequestMapping
  public ModelAndView hello(@RequestParam(value="message",
                             required=false) String message) {
    Map<String, Object> model = new HashMap<String, Object>();
    model.put("message", message);
    return new ModelAndView("hello-spring", model);
  }
}
As you can see, this controller does pretty much exactly the same thing as our HelloFreemarkerServlet did, just using Spring MVC constructs. You might also have noticed that the view is hello-spring. We need a hello-spring.ftl to match. You can just copy hello.ftl and change the opening <form> tag to have a different action:
<form action="hello" method="post">
You might also want to change the contents of the <title> tag.
Finally, we can add a line to our index.html file to provide a link to the Spring version:
<a href="springmvc/hello">Spring Example</a><br/>
Java Portlets have been around for years, but they have only recently started getting much attention. Spring supports Portlets, but in keeping with their "still gaining acceptance" status, the Portlet functionality seems like an afterthought. Spring uses its Servlet view rendering to support Portlets, so it requires a bridge between Portlet objects and Servlet objects. It uses a Servlet called ViewRenderServlet to accomplish this.
The net result is that you need to declare a Spring Servlet in a web.xml file in addition to your Portlets in your portlet.xml file. What the Spring documentation doesn't tell you is that you'll need to include Spring configuration for that Servlet if you intend to use a FreeMarker view. You can place your FreeMarker view renderer configuration in the default applicationContext.xml file.
The Struts framework centers on actions and results. In MVC terms, the actions, and the rules that dispatch actions, are the controller layer, and the results are the view. The dispatch rules are usually provided in a struts.xml file. Obviously, you will need to add the requisite libraries for Struts2:
commons-fileuploadcommons-iocommons-lang3commons-loggingcommons-logging-apijavassistognlstruts2-corexwork-core
We'll put our struts.xml file in the Resources directory we created earlier. Here are the contents:
<?xml version="1.0" encoding="UTF-8" ?>
<!DOCTYPE struts PUBLIC
    "-//Apache Software Foundation//DTD Struts Configuration 2.0//EN"
    "http://struts.apache.org/dtds/struts-2.0.dtd">

 <struts>
    <package name="default" extends="struts-default" namespace="/struts2">
        <action name="HelloBean" class="com.packt.HelloBean">
            <result type="freemarker" name="SUCCESS">/WEB-INF/freemarker/hello-struts2.ftl</result>
        </action>
    </package>
</struts>
Again, we've referenced a new FTL file. In this case, we'll make some more substantial changes. Struts provides a lot of support to the view layer in the form of a JSP tag library. Because these tags are so integral in using Struts, the FreeMarker support automatically loads these in the namespace s. Let's look at hello-structs2.ftl:
<html>
    <head>
        <title>Struts 2 and Freemarker Example</title>
    </head>
    <body>
        <@s.form action="HelloBean" method="post">
            <@s.textfield label="Message" name="message"/>
            <@s.submit value="Submit"/>
        </@s.form>
        <br/>
        <#if message??>${message?html}</#if>
    </body>
</html>
This is very similar to the other FTL files we've created, but the use of Struts tags allows simpler integration with Struts. When you run this sample, you will also find a presentation that is a little more polished with no extra effort.
Finally, we need an action bean. Our action bean just needs to capture the "message" value posted by the form:
package com.packt;

public class HelloBean {
  private String message;

  public String execute() { return "SUCCESS"; }
  public String getMessage() { return message; }
  public void setMessage(String message) { this.message = message; }
}
One thing we can see from the bean and the corresponding FTL, is that Struts will automatically take the attributes of the action bean and put them into the model as top-level attributes.
You are now ready to start coding on a FreeMarker-based project. You have seen all of the directives and most of the built-ins that you will need for a typical web application project.
What have you missed? There are a few built-ins that you might use, but we didn't have a chance to cover here. Some of the built-ins we didn't use include:
- Built-ins that mimic
Stringmethods, such asends_with,length,split - Built-ins that escape text in useful ways, such as
j_string,json_string, andurl - Advanced built-in such as
evalandtemplate, that allow you to evaluate strings as FreeMarker expressions - Add extended functionality using custom
TemplateModelobjects
All of these and more are documented in the Built-in Reference section of the FreeMarker manual. You will want to bookmark this as you will find yourself referring to it frequently. This reference, combined with what you have learned here, should provide everything you need to know for most FreeMarker projects.