
This recipe explains how you can actually develop drozer modules by demonstrating the practical steps that make up drozer module development. The following device information enumerator grabs information about some of the hardware and the OS build.
Let's get started writing a drozer device enumeration module:
- Open a text editor and type in the following code:
from drozer.modules import Module class Info(Module): name = "Get Device info" description = "A module that returns information about the device and hardware features" examples = "run ex.device.info" date = "10-11-13" author = "Keith Makan" license = "GNU GPL" path = ["ex","device"] def execute(self,arguments): build = self.new("android.os.Build") self.stdout.write("Getting device info... ") self.stdout.write("[*] BOARD : %s " % (build.BOARD)) self.stdout.write("[*] BOOTLOADER : %s " % (build.BOOTLOADER)) self.stdout.write("[*] BRAND : %s " % (build.BRAND)) self.stdout.write("[*] CPU_ABI : %s " % (build.CPU_ABI)) self.stdout.write("[*] CPU_ABI2 : %s " % (build.CPU_ABI2)) self.stdout.write("[*] DEVICE : %s " % (build.DEVICE)) self.stdout.write("[*] DISPLAY : %s " % (build.DISPLAY)) self.stdout.write("[*] FINGERPRINT : %s " % (build.FINGERPRINT)) self.stdout.write("[*] HARDWARE : %s " % (build.HARDWARE)) self.stdout.write("[*] MANUFACTURER : %s " % (build.MANUFACTURER)) self.stdout.write("[*] MODEL : %s " % (build.MODEL)) self.stdout.write("[*] TAGS : %s " % (build.TAGS)) - Save that file as
ex.device.info. - Create a directory for all your future drozer modules and save the
ex.device.infofile in it. - Fire up the drozer console and execute the following command:
dz> module repository create [path-to-your-module-dir]/repo - Then execute the following command:
dz> module install [path-to-your-module-dir]/ex.device.info - drozer should have installed your new module if there were no syntax errors or faults. You can now execute it using the following command:
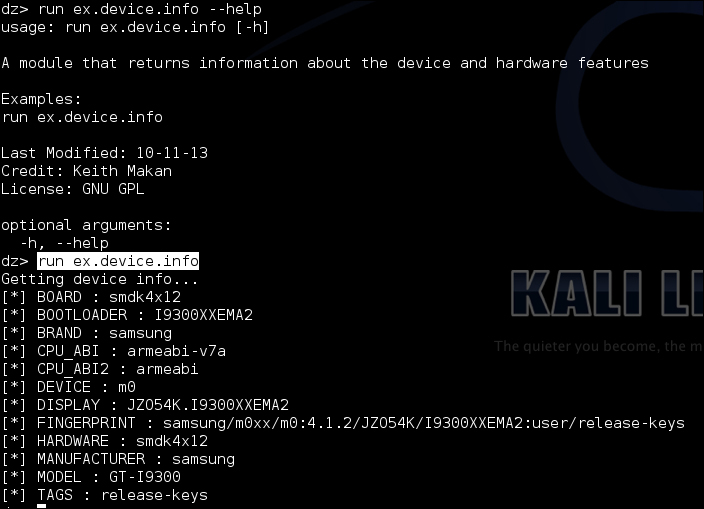
dz> run ex.device.infoThe output for the previous command should be similar to the output in the following screenshot:
The next few recipes are all about writing some useful modules to extend your drozer framework; in each, I'll demonstrate some key module development skills that you'll find useful later in the book.
To start off with this explanation, I thought I'd discuss the code you just wrote for your new drozer module and how on earth it manages to extract information about your device.
Well, first of all, I'd like to talk about the structure of a drozer module. Every module you write will start with the following line:
import drozer.modules import Module
class Info(Module)
The first line is essentially an inclusion of some code from the modules library and it gives drozer modules access to all the magic methods and attributes they need to operate. The second line is called the header of a class declaration and marks the beginning of an object definition in Python. You may notice the (Module) part of the header; this is how the Info class manages to adopt the attributes of the Module class, and semantically this works a lot like inheritance in Java.
The next couple of lines are as follows:
name = ""
description = ""

license = ""
These are just variables drozer uses to associate some metadata to the module and to make documentation a bit more standardized and easy to perform—nothing technical to see here. Moving on:
def execute(self, arguments):
This particular piece of code is called a function header and marks the beginning of the definition of a Python function. What's special about this function is that it's the method that gets called to do all the hard work for the module, analogous to the Main method in a Java class. Let's talk about the arguments the execute method expects to be passed:
self: This is an instance of the class being defined. Its parsed to each function in the class so that they have access to the class instance.arguments: This is a dictionary of the arguments parsed to the drozer module from the console.
And then lastly we have the following piece of code:
build = self.new("android.os.Build")Well, besides dereferencing the self object and using some magic method called new, we see a string value of android.os.Build being passed as an argument. This string is the name of a Java class in the Android Java API, and the new method uses something called Java Reflection to instantiate the Build class that holds all the information we want to print to the screen.
The rest of the code looks something like the following:
self.stdout.write("[*] BOARD : %s
" % (build.BOARD))
The preceding code simply prints out the device information.
- The Build Class reference – Android Developer webpage at http://developer.android.com/reference/android/os/Build.html
- The Writing a Module webpage at https://github.com/mwrlabs/drozer/wiki/Writing-a-Module