
Before we can start smashing stacks and hijacking instruction pointers on Android devices, we need a way to prepare some sample vulnerable applications. To do this, we need to be able to compile native executables and to do that we need to use some of the awesome applications packaged into the Android native development kit.
To cross-compile your own native Android components, you need to do the following:
- Prepare a directory to develop your code. All this requires is that you make a directory named whatever you'd like to name your "module"; for example, you could call the directory
buffer-overflow, as I do in the example here. Once you've created that directory, you then need to make a subdirectory calledjni/. It's imperative that you name it this because the compilation scripts in the NDK will specifically look for this directory. - Once you have your directories, you can create an
Android.mkfile. Create this file inside yourjnidirectory. TheAndroid.mkfile is basically a Make file that prepares some of the properties of your compilation; here's what it should contain:LOCAL_PATH := $(call my-dir) include $(CLEAR_VARS) # give module name LOCAL_MODULE := buffer-overflow #name of folder # list your C files to compile LOCAL_SRC_FILES := buffer-overflow.c #name of source to compile # this option will build executables instead of building library for Android application. include $(BUILD_EXECUTABLE)
- Once you have both your required
jnidirectory structure andAndroid.mkset up properly, you can start writing some C code; here's an example you can use:#include <stdio.h> #include <string.h> void vulnerable(char *src){ char dest[10]; //declare a stack based buffer strcpy(dest,src); printf("[%s] ",dest); //print the result return; } void call_me_maybe(){ printf("so much win!! "); return; } int main(int argc, char **argv){ vulnerable(argv[1]); //call vulnerable function return (0); }Please make sure this file appears in the
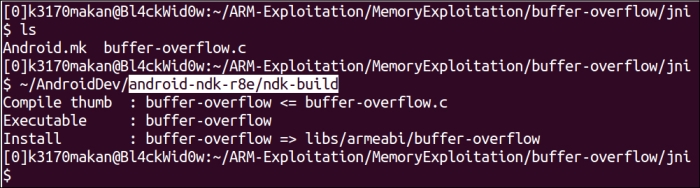
jnidirectory along with theAndroid.mkfile. - Here's the fun part; you can now compile your code. You can do this by invoking the NDK build script, which surprisingly is done by executing the following command:
[path-to-ndk]/ndk-buildHere,
[path-to-ndk]is the path of your Android NDK.
If all goes well, you should see output similar to the following:
Just compiling is not enough; we need to be able to modify the way normal executables are compiled so that we can exploit and study certain vulnerabilities. The protection we will remove here is something that protects the function stack from being corrupted in a way that allows exploitation—most exploitation. Before removing this protection, it will be useful to detail how this protection actually works and show you the difference when the protection is removed. Brace yourself—ARMv7 assembler code is coming!
So we can dump the assembler code for this executable using the objdump tool that comes bundled with the NDK; naturally you would expect the standard objdump tool that comes bundled with any run-of-the-mill Linux or Unix distribution to work fine, but these executables are cross-compiled specifically for embedded ARM devices. This means the endianness may be different; the structure of the executable may also be one that a normal objdump doesn't understand.
To make sure we can use the correct objdump tool, the Android guys made sure versions that are compatible with ARM executables come packaged with the NDK. You should find it under the /toolchains/arm-linux-androideabi-[version]/prebuilt/linux-x86-64/bin/ path of the NDK; you could use any one of the arm-linux-androideabi versions, though it's always simpler to try to stick to the latest version.
The objdump binary will be named something like arm-linux-androideabi-objdump inside the aforementioned folder.
To use it, all you need to do is point it at the binary in the root of the /buffer-overflow/obj/local/armeabi/ directory, which should appear in your jni directory and execute this command:
[path-to-ndk]/toolchains/arm-linux-Androideabi-[version]/prebuilt/linux-x86_64/bin/arm-linux-Androideabi-objdump –D /[module name]/obj/local/armeabi/[module name] | less
For our example, the command will look something like this:
[path-to-ndk]/toolchains/arm-linux-Androideabi-4.8/prebuilt/linux-x86_64/bin/arm-linux-Androideabi-objdump –D /buffer-overflow/obj/local/armeabi/buffer-overflow | less
This will produce quite a bit of output; what we are interested in are the functions compiled around the "vulnerable" function. I've piped the output into less, which allows us to scroll and search through the text; what you should do next is press the / character while less is open with the objdump output and type in <vulnerable> and then press Enter.
If you've done this properly, your screen should display the following output:
00008524 <vulnerable>:
    8524:  b51f        push  {r0, r1, r2, r3, r4, lr}
    8526:  4c0a        ldr  r4, [pc, #40]  ; (8550 <vulnerable+0x2c>)
    8528:  1c01        adds  r1, r0, #0
    852a:  4668        mov  r0, sp
    852c:  447c        add  r4, pc
    852e:  6824        ldr  r4, [r4, #0]
    8530:  6823        ldr  r3, [r4, #0]
    8532:  9303        str  r3, [sp, #12]
    8534:  f7ff ef7e   blx  8434 <strcpy@plt>
    8538:  4806        ldr  r0, [pc, #24]  ; (8554 <vulnerable+0x30>)
    853a:  4669        mov  r1, sp
    853c:  4478        add  r0, pc
    853e:  f7ff ef80   blx  8440 <printf@plt>
    8542:  9a03        ldr  r2, [sp, #12]
    8544:  6823        ldr  r3, [r4, #0]
    8546:  429a        cmp  r2, r3
    8548:  d001        beq.n  854e <vulnerable+0x2a>
    854a:  f7ff ef80   blx  844c <__stack_chk_fail@plt>
    854e:  bd1f        pop  {r0, r1, r2, r3, r4, pc}
    8550:  00002a7c   andeq  r2, r0, ip, ror sl
    8554:  00001558   andeq  r1, r0, r8, asr r5

00008558 <main>:
    8558:  b508        push  {r3, lr}
    855a:  6848        ldr  r0, [r1, #4]
    855c:  f7ff ffe2   bl  8524 <vulnerable>
    8560:  2000        movs  r0, #0
    8562:  bd08        pop  {r3, pc}
Tip
Just a little tip
In the preceding objdump output, the far-left column shows the offsets of the instructions; the column after that, delimited by the : character, holds the actual hex representation of the code; and the column after that shows the human-readable mnemonics for the associated assembler instructions.
Pay attention to the emboldened code in the previous objdump output. The instruction at the 8526 offset loads the contents of memory found 0x40 addresses away from the current value in the program counter (pc) register; this address holds a special value called the stack canary
.
This value is placed on the stack between the local variables and the saved instruction and base pointer; this is done so that if an attacker or erroneous instructions were to corrupt the stack far enough to influence the values saved there, it would need to destroy or change the stack canary as well, meaning the program would be able to check if the value changed. This value is generated from a cryptographically secure—supposedly so—pseudorandom number generator, and it's stuck in the memory of the program during runtime to avoid reliably predicting this value.
Moving on, we see that the instructions at offsets 852c-8530 stick the stack canary in the r3 and r4 registers. The following instruction at offset 8532 makes sure the stack canary is placed on the stack before the dangerous strcpy call at offset 8534. So far, all the code has accomplished was to place the value on the stack after the strcpy call—actually, closer to the printf function. From offset 8542 to offset 8544, the stack canary values are fetched from register r4 and the position it was placed on the stack, loaded into the r2 and r3 registers, and then compared at offset 8546. If they don't match, we see that the instruction at 854a will be executed, which will basically cause the program to abort and not exit normally. So, in summary, it grabs the stack canary from some offset in the file, places it in a register and another copy on the stack, and checks for any changes before exiting.
One thing you may notice is that though this prevents the saved instruction pointer from being corrupted it does not protect the local variables at all! It is still possible to maliciously corrupt the other variables on the stack depending on their layout in memory—where they appear in relation to the canary and the other stack buffers. This could in some very special circumstances still be abused to maliciously influence the behavior of a process.
So now how do we remove this annoying protection such that we can smash some stack properly and gain the ability to control the instruction pointer? Well, seeing that stack canaries are a compiler-based protection—meaning that it's something the executable compiler enforces—we should be able to modify the way NDK executables are compiled so that stack protection is not enforced.
Though this may seldom be a practical situation for the binaries on the Android system, it is still something that may very well happen. We are removing this protection in order to simulate a stack-based overflow vulnerability.
To remove the protection, you'll need to change some of the GCC compiler extensions that the NDK uses. To do this, you'll need to:
- Navigate to the
/toolchains/arm-linux-Androideabi-4.9/directory and locate a file calledsetup.mk. Please note, your NDK may use a different version ofarm-linux-androideabi. If the following steps don't work or have the desired effect, you should try removing the stack protection:
- The next thing you may want to do is back up the
setup.mkfile. We're about to change the default compilation configuration for the NDK, so it's always good to back it up. You can create a makeshift back up by copying the script to another file named slightly differently. For instance, you can back up thesetup.mkfile by executing this command:cp setup.mk setup.mk.bk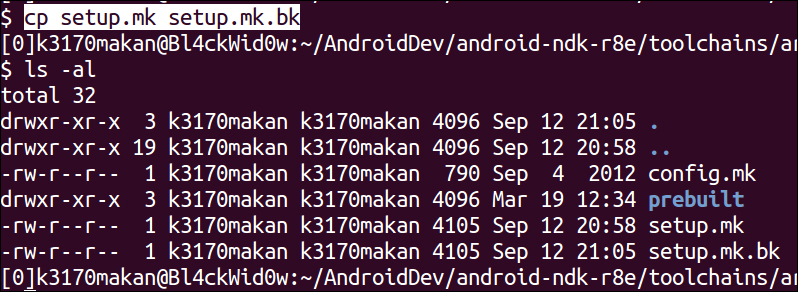
- After backing it up, you should open the
setup.mkfile in your favorite text editor and remove the flags, specifically the one containing the-fstack-protectorswitch; see the following screenshots for more clarity: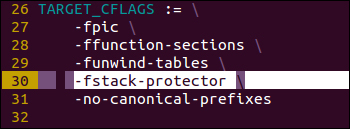
After removing the specified flag, your
setup.mkfile should look something like this: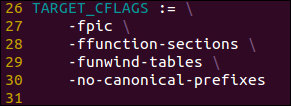
- Once you've done that, you can use the
ndk-buildscript to compile a fresh copy of your executable and then pass it toandroideabi-objdump. Without stack protection, your code should look like this:000084bc <vulnerable>: 84bc: b51f push {r0, r1, r2, r3, r4, lr} 84be: 1c01 adds r1, r0, #0 84c0: a801 add r0, sp, #4 84c2: f7ff ef8a blx 83d8 <strcpy@plt> 84c6: 4803 ldr r0, [pc, #12] ; (84d4 <vulnerable+0x18>) 84c8: a901 add r1, sp, #4 84ca: 4478 add r0, pc 84cc: f7ff ef8a blx 83e4 <printf@plt> 84d0: b005 add sp, #20 84d2: bd00 pop {pc} 84d4: 0000154a andeq r1, r0, sl, asr #10 000084d8 <main>: 84d8: b508 push {r3, lr} 84da: 6848 ldr r0, [r1, #4] 84dc: f7ff ffee bl 84bc <vulnerable> 84e0: 2000 movs r0, #0 84e2: bd08 pop {r3, pc}
Notice how there are none of the instructions that were in the previous version of the executable. This is because the -fstack-protector compiler flag that we removed tells GCC to autonomously look for any instance of any function that may potentially corrupt the function stack.
- The ARM and Thumb Instruction Set Quick Reference Card document by ARM infocenter at http://infocenter.arm.com/help/topic/com.arm.doc.qrc0001l/QRC0001_UAL.pdf
- The ARM Instruction Set document at http://simplemachines.it/doc/arm_inst.pdf
- The ARM v7-M Architecture Reference Manual document by the department of Electrical Engineering and Computer Science, University of Michigan at http://web.eecs.umich.edu/~prabal/teaching/eecs373-f10/readings/ARMv7-M_ARM.pdf
- Exploiting Arm Linux Systems, An Introduction by Emanuele Acri at http://www.exploit-db.com/wp-content/themes/exploit/docs/16151.pdf
- The Procedure Standard for the ARM Architecture document at http://infocenter.arm.com/help/topic/com.arm.doc.ihi0042e/IHI0042E_aapcs.pdf
- The ARM Instruction Set document at http://bear.ces.cwru.edu/eecs_382/ARM7-TDMI-manual-pt2.pdf
- The ARM Developer Suite Version 1.2 Assembler Guide document by ARM infocenter at http://infocenter.arm.com/help/topic/com.arm.doc.dui0068b/DUI0068.pdf
- The DLMalloc Implementation library at the Android Platform Bionic GitHub page at https://github.com/android/platform_bionic/blob/master/libc/upstream-dlmalloc/malloc.c
- The
ok_magiccall in the DLMalloc implementation at the Android Platform Bionic GitHub page at https://github.com/android/platform_bionic/blob/master/libc/upstream-dlmalloc/malloc.c#L4715 - The Bionic source code at the Android Source code repository at https://android.googlesource.com/platform/bionic/
DLMalloc.c, Android Platform Bionicjb-mr0-releaseat the Android Official GitHub repository at https://android.googlesource.com/platform/bionic/+/jb-mr0-release/libc/bionic/dlmalloc.c