In this section, we'll start to put together all of the things you learned in the preparation section to actually create the menu that you saw for the Prezi about Bloom's Taxonomy.
Tip
Coding shortcut
If you don't want to type the code yourself, refer to the example hosted at http://jjsylvia.com/blooms.html. You can visit the site and view the source, where you can then copy and paste the code for your own use and adaptation.
Go to the text editor that you've chosen to use on your own computer, and create a new blank HTML file similar to the one we saw earlier, but this time with only a title and no heading or content:
<html>
<head>
<title>Using Bloom's Taxonomy to Assess Social Media</title>
</head>
<body>
</body>
</html>
HTML makes up the core content of your page, while we will use CSS, similar to what we covered in Chapter 3, Consistent Branding for Business, to change the style of the page.
You can save your file as blooms.html.
The next step is to use JavaScript, a web-based programming language, to access and load the Prezi Player from the Prezi API site. This step allows you to embed the player into your own site. The most convenient way to do this is to load the Player directly from the Prezi API site, which can be accomplished with just a couple of lines of code.
Looking at the HTML code you've already created, simply insert the following code between the <body> and </body> tags:
<script src="http://prezi.github.io/prezi-player/lib/PreziPlayer/prezi_player.js"></script>
This code loads the actual player from prezi.github.io. Next, we'll use this newly loaded code to embed the Prezi Player into our page. Add the following code immediately after the previous code, before your </head> tag:
<script type="text/javascript">
var player = new PreziPlayer('prezi-player', {
  preziId: "sk845xdbl9dn",
  width: 640,
  height: 480,
  controls: true,
  explorable: true
});
</script>
Let's look a little closer at what each piece of this code does, and how you can change it to meet your own needs.
The first thing that you'll notice is that some of the lines are indented and included on their own separate line. If you close the line breaks, the code will not run correctly. These lines are indented as a visual cue to allow us to easily see that we are operating inside the {} symbols.
The first two lines tell the browser that it will be processing JavaScript code and loading the PreziPlayer. The variables between the two {} symbols are the options that will be set when opening the Player.
preziId is probably the most important variable here, as it tells the player exactly which presentation from Prezi it should open. This must be a Prezi that has been saved onto the Prezi site, and not just locally on your computer or tablet. Additionally, the Prezi must be set to the public privacy setting.
In order to find the preziId for any Prezi, you simply need to look at the URL. For example, the URL for my Prezi about Bloom's Taxonomy is: https://prezi.com/sk845xdbl9dn/using-blooms-taxonomy-to-assess-social-media/. The string of letters and numbers that appears after prezi.com/ is the preziId, which, in this case is sk845xdbl9dn.
If you're creating your own embedded example, you simply need to insert your own preziId in the preceding code.
The next two variables, width and height, tell the Prezi Player how large the Prezi should appear on the screen. The value is measured in pixels, and defaults to 640 wide by 480 high. However, you can set this to any number that you'd like. The trick is that it should be large enough for the viewers to see and interact with the Prezi, but small enough to fit the entire Prezi on the screen.
Tip
Average screen size
If you visit http://www.w3schools.com/browsers/browsers_display.asp, you can browse the statistics of the average screen resolution, in pixels, of most Internet users. Although there is a wide range of sizes in use, over 99 percent of users have a resolution greater than 800 x 600, so you should be able to safely make your Prezi that large without it making it too big to fit the screens of most viewers.
Here's an example of what it might look like if the size of the Prezi is set to be larger than the user's screen size:
As you can see, it's hard to use the menu and see the Prezi.
The controls variable determines whether or not the built-in Prezi controls are displayed on screen. These would include elements such as the next and previous path point buttons and the progress bar. In our example, this is set to true, which means that these controls will be visible. If you change the setting to false instead, the controls will not be visible.
Finally, the explorable variable is also set to true. This will enable users to manually click and drag around your Prezi canvas using their mouse. In other words, they can deviate from the predetermined path points if they desire. You can prevent this exploration by changing this value to false.
In order to actually make the Prezi Player visible, we need to insert one more bit of HTML, this time just after the opening <head> tag and before the JavaScript we just added:
<div id="prezi-player" class="player"></div>
If you've been following the instructions, your full code should now look like this:
<html>
<head>
<title>Using Bloom's Taxonomy to Assess Social Media</title>
</head>
<body>
<div id="prezi-player" class="player"></div>
<script src="http://prezi.github.io/prezi-player/lib/PreziPlayer/prezi_player.js"></script>
<script type="text/javascript">
var player = new PreziPlayer('prezi-player', {
preziId: "sk845xdbl9dn",
width: 640,
height: 480,
controls: true,
explorable: true
});
</script>
</body>
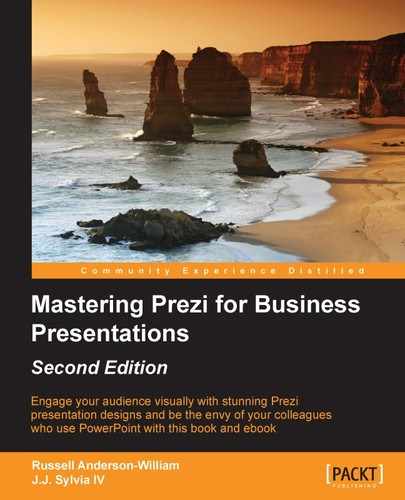
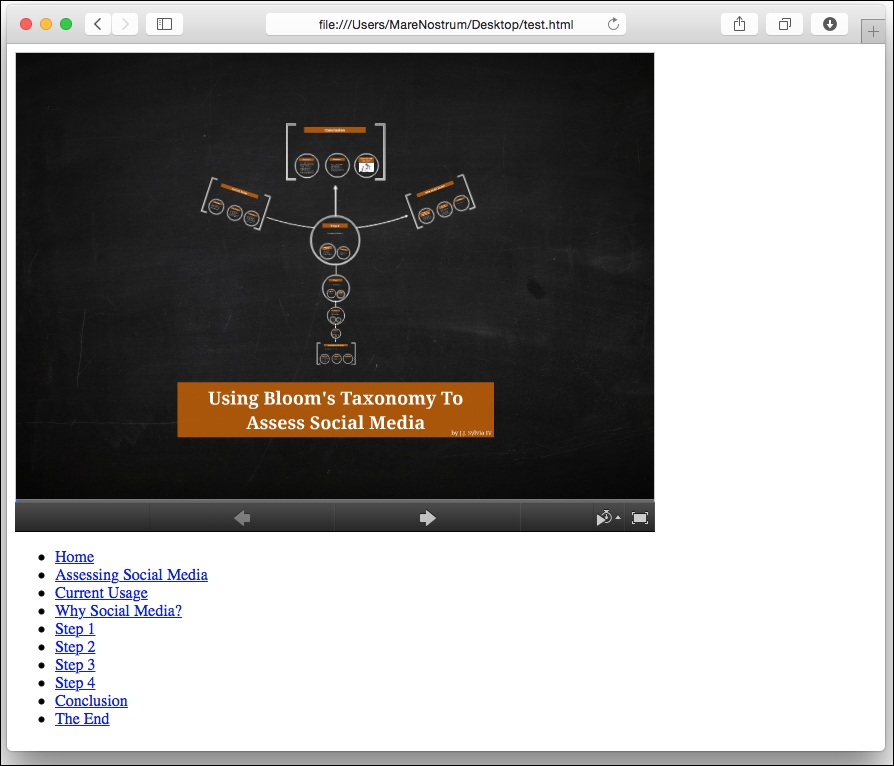
</html>Save this file and then load it in your browser using the File… Open File command from your browser. You should see the Prezi, as in the following screenshot:
Tip
You might have noticed in the preceding image that I've opened this file locally on my own computer rather than through a page saved on the Internet via my webhosting service. Although the Prezi API documentation says that it will not work locally, this is only true if you are using callbacks, which are special parts of the code that interact with the Prezi website. We're not using these in our example.
Now that we've got the player itself loading on our website, we can move on to create the actual menu that will accompany it. This is where we really move into the functionality of the API in order to do something that's not possible on the prezi.com website.
We will add the code for the menu after the <div> tag, which we created at the end of the last section. Let's take a look at the full code for the menu, and then break down what it means and what each section does:
<div id="menu">
<ul id="nav">
<li><a href="javascript:player.flyToStep(0)">Home</a></li>
  <li><a href="javascript:player.flyToStep(1)">Assessing Social Media</a></li>
  <li><a href="javascript:player.flyToStep(6)">Current Usage</a></li>
  <li><a href="javascript:player.flyToStep(10)">Why Social Media?</a></li>
  <li><a href="javascript:player.flyToStep(15)">Step 1</a></li>
  <li><a href="javascript:player.flyToStep(18)">Step 2</a></li>
  <li><a href="javascript:player.flyToStep(22)">Step 3</a></li>
  <li><a href="javascript:player.flyToStep(25)">Step 4</a></li>
  <li><a href="javascript:player.flyToStep(28)">Conclusion</a></li>
  <li><a href="javascript:player.flyToStep(33)">The End</a></li>
  </ul>
</div>
The <div id="menu"> code creates a new section of the website, which we identify as the menu. We do this so that we can apply CSS styles to our menu later on.
The <ul id="nav"> code is an HTML command that creates a new unordered list (ul), or in other words, a bulleted list. We will identify this list as nav. Each new <li> (list) tag creates a new bullet point in our list.
After each bullet point, we create a link that, when clicked, will cause the Prezi to navigate to a specific step in the path. Normally, an HTML link would look something like <a href="http://www.prezi.com">Prezi</a>. This HTML would display the word Prezi as a link, that when clicked on, would load the prezi.com website.
Our links will work a little differently than this because we aren't linking to another website. Instead, we're going to use JavaScript to move to a specific point in our Prezi. Rather than the URL, we're using the code from the Prezi API, javascript:player.flyToStep(0). This code tells the player to move to 0 in the Prezi.
Tip
Learn to count
Although we typically start counting with the number 1, most programming languages actually start with the number 0. In the preceding example, you can see that our first flyToStep code is for step 0. This is actually the first path point we have created for our Prezi. This can be a little confusing because when you're editing your Prezi, it labels the path points starting with 1. Just remember that when you're coding the path point you want to move to, always subtract 1 from the number that's displayed in the path preview in the Prezi Editor!
Finally, we put in the text that we want to display for the actual clickable link, and then we close our link and our bullet point with the </a> and </li> tags. Once we've created all of our bullet points, we can close the entire list with the </ul> tag.
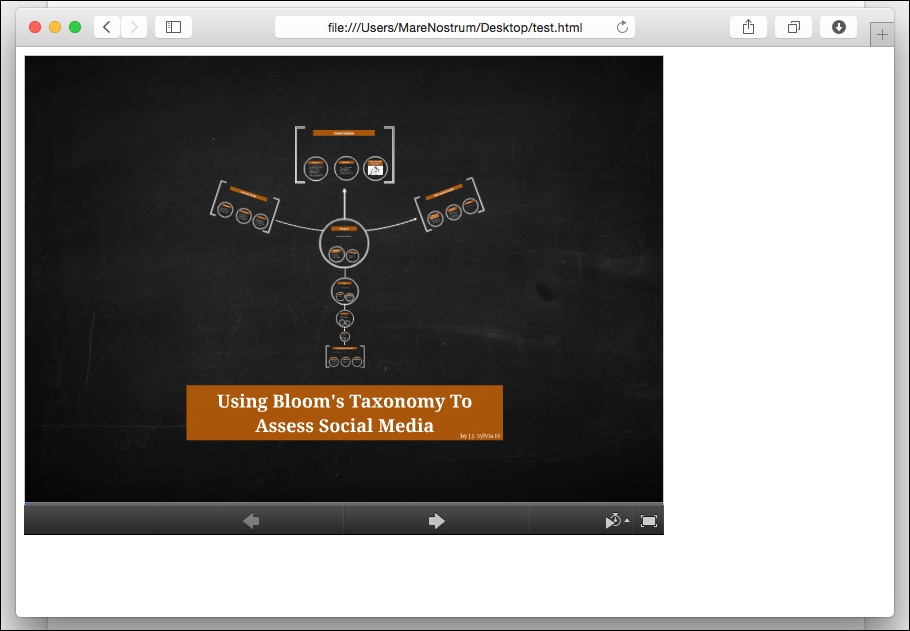
In this example, I've used each of the major headings in my presentation to create a menu item. For example, the second path step, flyToStep(1), is the entire section for Assessing Social Media:
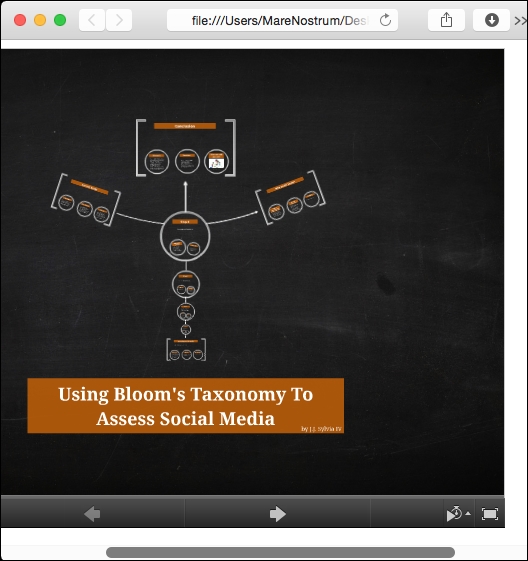
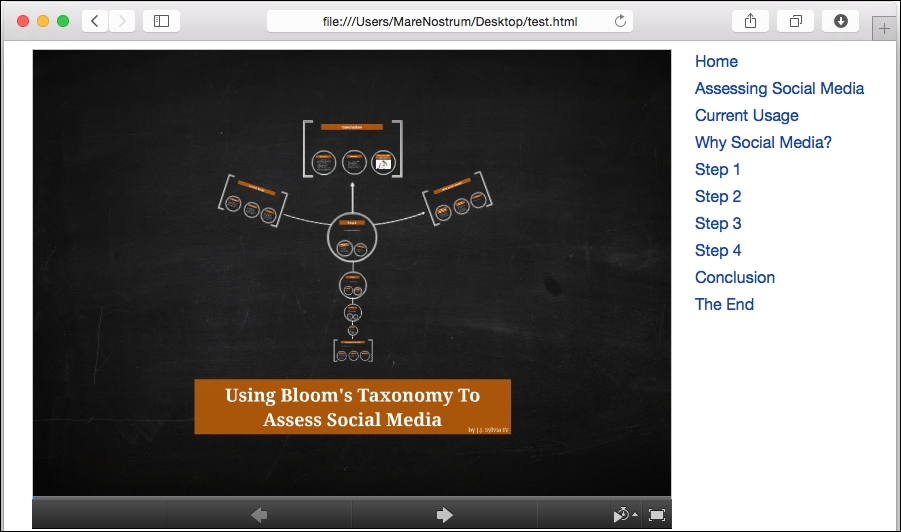
If you save your file and reload the page in your browser, you will now see the newly created menu:
In the previous screenshot, you might have noticed that the menu we created appears below the Prezi Player by default. Although this will function just fine, it may be off the visible screen for many users and they will have to scroll to use the links. Also, it doesn't look very good. In this section, we will use CSS to move the menu to the right of our Prezi and add some additional style elements to make it look even better.
In order to insert the CSS code, we're going to add a <style></style> tag set to the <head> section of our document, just after the </title> tag.
Just as we did earlier, let's look at all of the code we will insert first, and then break down what each piece means:
<style>
#prezi-player {
  width: 640px;
  float: left;
  margin-left: 20px;
}
#menu {
  width: 250px;
  margin-left: 640px;
  font-family: "Helvetica Neue", Helvetica, Arial, sans-serif;
}
#nav {
  list-style-type: none;
}
#nav li a {
  display: block;
  color: #0645AD;
  padding: 3px;
  margin-bottom: 3px;
  text-decoration: none;
}
#nav li a:hover {
  background-color: #d6d6d6;
  color: #003e5c;
}
</style>
The <style> tag alerts the browser that the content between it and the </style> tag will contain CSS code.
If you've been paying close attention to the <div> tags that we created as we constructed this document, you'll notice that the IDs that we associated with those tags are listed here after the hashtag sign in each section. So for example, where we had <div id="prezi-player"> as an HTML tag, we now have #prezi-player { as CSS code. This naming scheme tells the browser that the style for #prezi-player should be applied to the content within the <div id="prezi-player"> tags.
The { opens up the settings for each section and allows us to set values using variables, much like we did with the JavaScript code when we were loading the Prezi Player earlier.
The width variable sets how large this section of the page should be. In this case, we want to match the width of the page with the width of the player we embedded earlier. Recall that we set it to the default 640 pixels. Here, width: 640px; designates this in the CSS code. This decision is based on our earlier discussion of the ideal screen size.
float: left; means that the section will float outside the normal flow of HTML content, and in this case, we want to align it to the left-hand side of the page. We're asking that appear 20 pixels away from the very left edge of the browser with the code margin-left: 20px;.
Tip
More about CSS
Although we're explaining what each bit of CSS code actually does in our example, we're not elaborating on all of the possible ways in which we can change the CSS code to make the menu display differently. If you're interested in experimenting with different settings, you can visit http://www.w3schools.com/cssref/ to see a list of the variable settings available in CSS along with a description of how each setting will modify the appearance of your web page.
We see some similar variables for our #menu settings as well. You'll notice that we are making our menu 250 pixels wide, and giving it a margin of 640 pixels. Why are we using this margin? As our previous section was 640 pixels wide, this margin will ensure that this section for the menu appears just to the right of the previous Prezi Player section.
Additionally, using the font-family variable, we're telling the browser what fonts we would like used for the text in our menu.
Note
Fonts are stored locally on each user's computer rather than on the Internet. Although many fonts are standard across different operating systems, there are many fonts that some users may have and others won't. For this reason, we can list several fonts in our style settings. The browser will try the first one, and if it's not available, move on to the next until it finds a match. You can define a particular font using quotation marks, or a font family without the quotation marks.
Tip
It's fine to customize your menu with a font that you like, but ensure that you select fonts that your viewers are likely to have on their own computers! A great resource for this is https://www.google.com/fonts.
When we coded our menu, we used the HTML for the unordered list to create bullet points for each menu item. However, the menu actually looks much better without the bullet points. Luckily, we can use CSS to hide these, which is exactly what we will do with the list-style-type: none; code in the #nav section. This tells the browser not to use any marker for our unordered list.
Within the #nav section, we can also define the style of particular HTML elements. For example, #nav li a { allows us to change the settings for all of the links (a) that are part of lists (li) in our <div id="nav"> section.
display: block; tells the browser to display each element as its own paragraph.
color: #0645AD sets the color of the text. The #0645AD text is a color represented in hexadecimal. Don't panic if you don't know anything about hexadecimal. There are plenty of free tools available that allow you to select a color and then report the hexadecimal value to use.
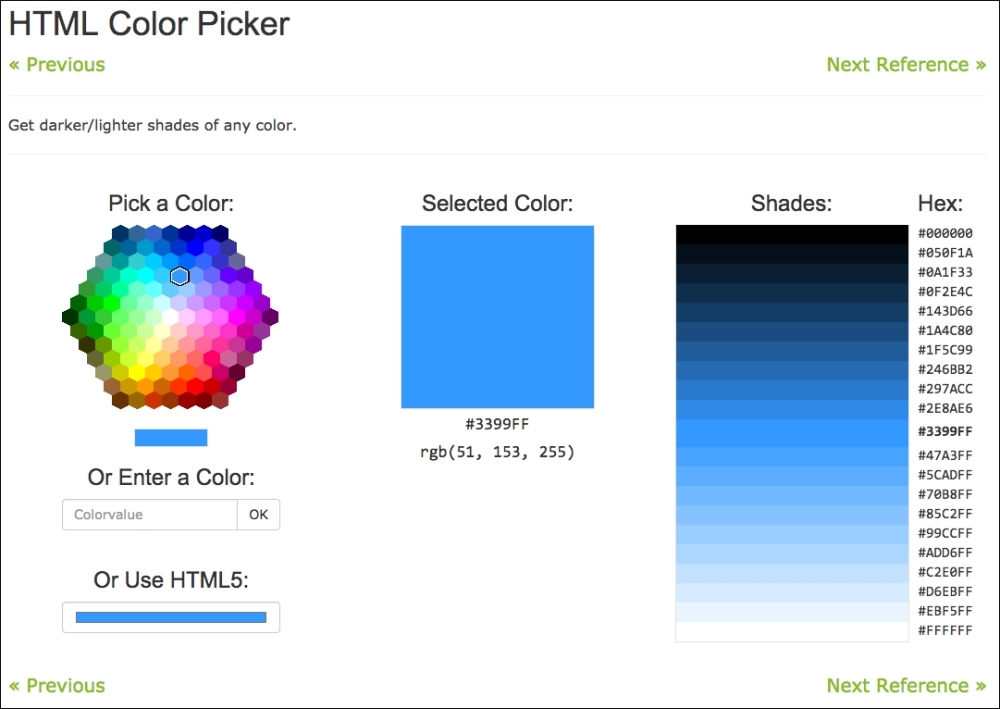
This color picker is available at http://www.w3schools.com/tags/ref_colorpicker.asp
The padding setting clears an area around the content. You can set how large you would like this cleared area to be in pixels. In our example, we set a 3px padding area.
text-decoration: none; removes any added decoration to the text. We use this setting because browsers usually underline all links by default. Using this code, we can remove the underline from our menu links.
The #nav li a:hover { section defines settings for what should happen while the mouse is hovering over the links that are part of the list. In our example, we're changing both the background color and color of the text, again using hexadecimal color settings.
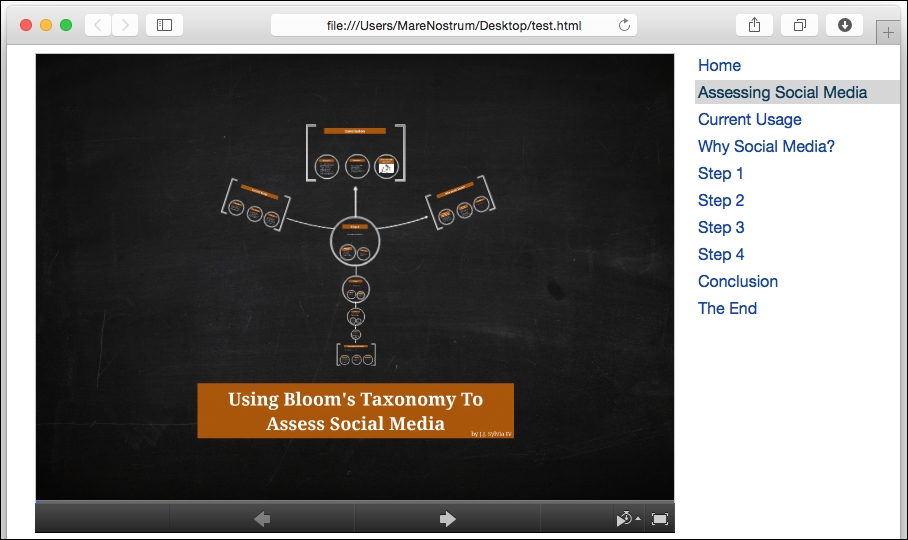
If you save your file and reload it in the browser, you should now see an updated and much more aesthetically pleasing menu:
Additionally, you can see that when the mouse hovers over one of the menu items, it gets highlighted due to the hover CSS code that we added:
Finally, let's add some submenus to our current menu. The easiest way to do this is to create what's called nested lists. This means we have lists inside our other lists. For this example, let's say I want to add in each path step contained within my "Why Social Media?" section. This will not only allow users to jump directly to that section, but it will also give them a preview of what's in that section.
This code can be inserted under the <li></li> tags for "Why Social Media?":
  <ul>
        <li><a href="javascript:player.flyToStep(11)">Student Satisfaction and Learning Outcomes</a></li>
        <li><a href="javascript:player.flyToStep(12)">Student Engagement</a></li>
        <li><a href="javascript:player.flyToStep(13)">Flexibility</a></li>
   </ul>
We can continue to add these submenus to each of our points on the list if we desire. Remember that you want to use each of the subheadings in your presentation to create these menu items. Let's see what this looks like:
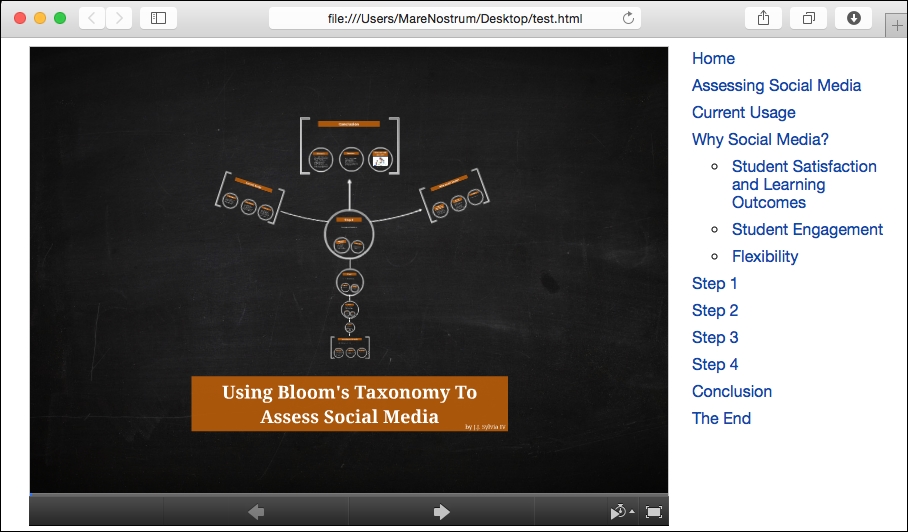
Immediately, you'll notice that our new list has bullet points again! This is because our CSS code only applies to our main list, and not our nested list. To correct this, we can add the following CSS code:
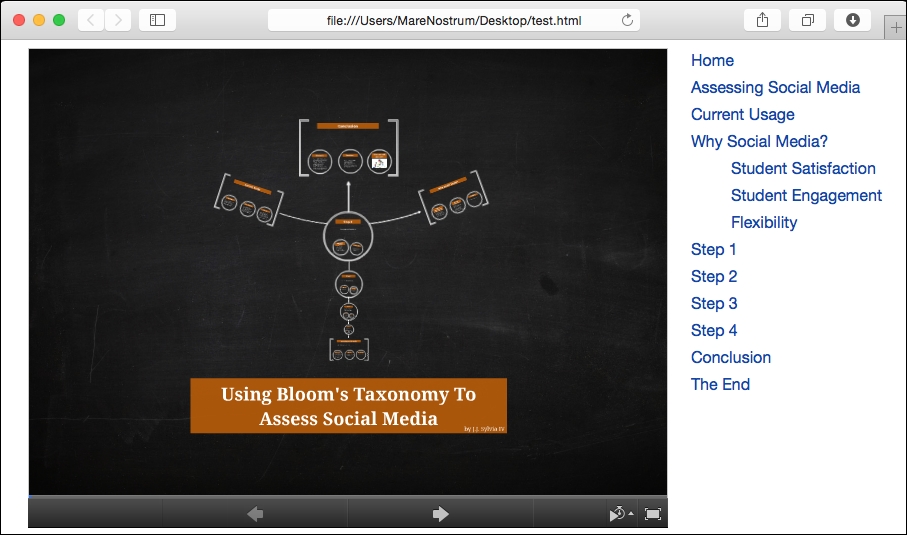
#nav li {
    list-style-type: none;
}
This affects the second level of li in the nav section.
I'm also going to shorten the rather long Student Satisfaction and Learning Outcomes to simply Student Satisfaction to improve the way it looks. Now, our menu looks like this:
And with this, we have a fully working and interactive menu for our Prezi!
The full code should look like this:
