
If you want to keep one or more guest VMs in an internal network or isolated network, then this mode is the most suitable one. In this mode, VirtualBox ensures that all traffic on the network stays within the host and is only visible to the guest VMs on that virtual network. The network is shown in the following figure. This mode is similar to bridged networking, apart from the fact that it's secured compared to the bridged mode, because in the bridged mode all the traffic passes through the same physical interface of the host system. This mode is great if you have a requirement to keep two or more guest VMs on the same machine and only communicate with each other, or even hide their data from the host system where it's running and also from the outside world.
The following figure depicts how it works:
This mode allows the guest VMs to work even if the host computer is not connected to any network. There are two ways you can configure this mode:
- On the VirtualBox GUI, click on the guest VM Settings dialog. In the Networking category, select Internal Networking from the drop-down list of networking modes. Now select the name of an existing internal network from the list.
- The following command can also be used to configure this:
VBoxManage modifyvm "VM name" --nic<x> intnet
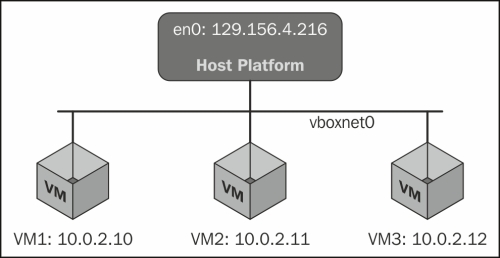
In this mode, you define which network the guest sits on, and the guest VMs in that network can talk to each other. This is a kind of hybrid between the internal and bridge networking modes.
To configure it, click on the Network tab, select Host-only Adapter from the drop-down list of networking modes, and select the name. This name is the network name, and the guest VMs in that network can see each other. But the external machines can't talk to these guest VMs.
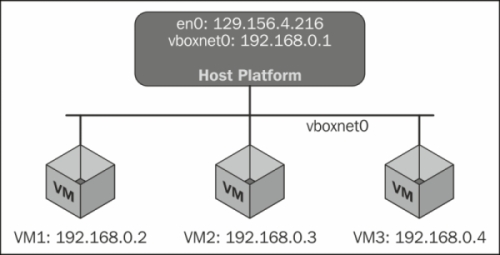
In this example, vboxnet0 is the network on which the guest VMs are.
VirtualBox helps in limiting the maximum bandwidth used for network transmission. The VBoxManage command can be used to set the limit.
The following example creates a bandwidth group named BandwidthLimit, sets the limit to 10 Mbit/s, and assigns the group to the first and second network adapters of the VM named LinuxVM:
VBoxManage bandwidthctl "LinuxVM" add  BandwidthLimit --type network --limit 10m
VBoxManage modifyvm " LinuxVM " --nicbandwidthgroup1 BandwidthLimit
VBoxManage modifyvm " LinuxVM " --nicbandwidthgroup2 Limit BandwidthLimit
The following command can be used to change the limits for each group while VM is running:
VBoxManage bandwidthctl "LinuxVM" set Limit --limit 50k
To disable shaping for the second adapter of VM, use the following command:
VBoxManage modifyvm "LinuxVM" –nicbandwidthgroup2 none