
Selecting an area will give you the ability to isolate an area. Once you have the area selected, you can cut it out from your image, remove anything not selected, add an effect to the selected area, or change it in some way.
In the previous chapter, we learned about making selections with the selection tools. Now that you have learned how to make selections, let's get to work and see what you can do with them.
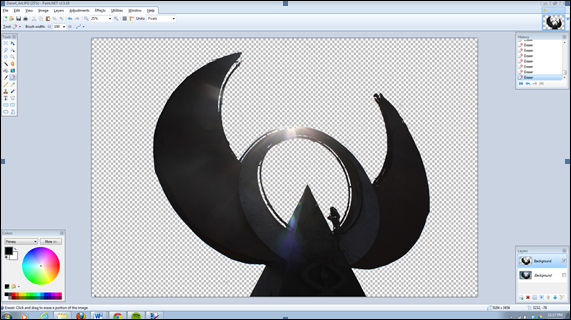
The following screenshot shows an image of a piece of art from the 2012 Symbiosis Festival:

Let's say that we would like to isolate just the artwork and erase the background to use on a flyer. There are a few ways to do this.
You could use something like the Rectangle Select tool to select just the artwork and the surrounding area and then navigate to Image | Crop. However, you will still have the sky in the background; this might be the time to use the Magic Wand tool.
Because there is so much contrast between the artwork and the background, we'll use the Magic Wand tool to select the areas that are lighter, like the sky.
This can be done by performing the following simple steps:
- Select the Magic Wand tool (shortcut key S).
- In the Selection Mode, select Add.
- Select your desired value for Tolerance.
- Start clicking on the lightest areas and continue doing this until the desired area is selected.
- If the value of Tolerance is too high and you need to undo a selection, simply hit the Undo button or use the Ctrl + Z shortcut, select a lower tolerance, and select the area again.
- If you inadvertently select an area you don't want to remove, select Remove from Selection Mode and select that area.
If you want to select a simple circle or square, just select one of the selection tools: Square or Circle. Considering you want to remove a round part of the sculpture, the following steps could be followed:
Once you have selected the area you want to augment, you can also use the Select Pixels tool. It will automatically cut that selection out for you. Then you can drag it to another part of the image.
Sometimes you may need to select an area freehand when Magic Wand doesn't work. This can be done easily using the Lasso tool.
To use the Lasso tool, perform the following steps:
- Select the Zoom tool (shortcut key Z).
- Select the Lasso tool. (shortcut key S).
- Right-click and drag your cursor around the edge of the area you want to select.
- Once the area is selected, you can cut it (Edit | Cut or Ctrl + X), which will remove the selected parts, or crop it (Image | Crop to Selection or Ctrl + Shift + X), which will remove everything but the selected parts.
Once you have your selection, you can use this as a layer that you can manipulate and add to other layers.
In the next chapter, we will go over how layers work and how you can use them to give depth to your compositions.