
Patrolling is a simple extension to pathfinding. Instead of just having a single target in mind, we might have two or more points. We might go back and forth between them, or travel in a never-ending loop.
In this chapter, you will learn about:
- How patrolling works
- Patrolling in Quick Path, React, and RAIN AI packages
- Getting to know more about behavior trees
- Creating patrols that go to different points in a level by not always following the same path
Patrolling is a way to get an object from point A to point B and then to point C, and so on. Pathfinding is still required to get from one waypoint to another, but here, we daisy-chain them into a larger, more meaningful path.
Quick Path is back again, with built-in capabilities to handle patrol. With its simple approach to AI, only a few straightforward steps are needed to get a scene finished. Here is a breakdown of these steps:
- Making the world ready for patrol
- Setting up the patrol script
We'll start by expanding on our world from Chapter 1, Pathfinding the quick path demo. Stretch out a couple of the blocks to make a larger surface area. Then, click on the terrain object (the parent of all the cubes forming the terrain), and in the Inspector, click on the Bake button. You can see what happens next in the following screenshot:

If the Bake function isn't covering all the areas, you'll need to check its grid dimensions. X remains the same in the world space, but Y is actually the Z axis. You might need to increase or decrease these numbers to cover everything in the scene:

Quick Path converts the values of the Y or Z axis values internally. By default, it is set to Y as the Up/Down axis, but you can change this with the Up Direction parameter.
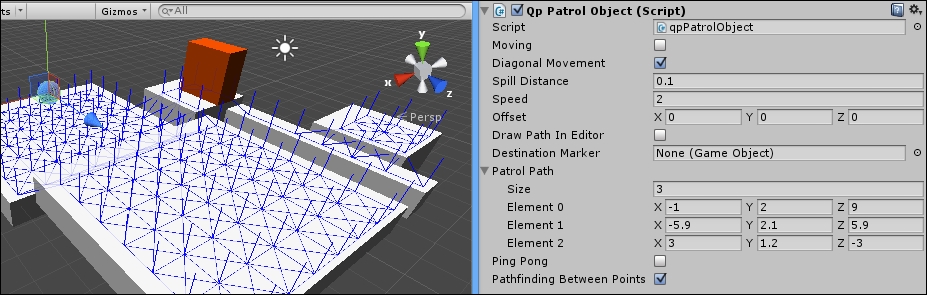
Now that we have a larger surface area to work with, we'll get the NPC object set up to patrol. If the object still has the following script, you will need to remove it, but then add the Quick Path patrol script. Then, the first thing to do in the Inspector panel for the patrol script is change the speed to 2, as its default of 10 was rather fast.
Next, set Spill Distance to 0.1. Spill Distance is how close you have to be to a waypoint before it picks the next waypoint as your target. If Ping Pong is checked, the NPC will stop at the end of its path and backtrack. If it is unchecked, at the end of its path, it will target the first position and start over.
Pathfinding Between Points is an option that helps it navigate around obstacles between waypoints. If your path is already clear, then you can keep this option off and save extra processing.
Finally, we have Patrol Path, which houses the waypoints for the NPC to travel on. Increase this to 3, and then set the waypoints. A trick to figure out the values is to move your NPC in the scene to the waypoint positions that you want and then copy its position to one of the waypoints. So, select three points for your NPC to travel on. You can refer to the following screenshot for the settings:
Now, your game is ready to run, with your NPC navigating a course that you just set up.