
Now that we know about the different nodes we can use, we'll create a demo that shows how to use the action and decision nodes. The demo will show how to have a character perform multiple tasks. We will have an entity, an enemy spaceship, patrolling an area, but only for a given amount of time; then, the ship will return to its home base. The steps for this example might seem overly complicated and we could do a similar AI ourselves without behavior trees with a simple script by hardcoding the different states. However, remember that behavior trees are easily extendible and scalable. With this demo, instead of two behaviors, we could take time to create a more complex character, going up to about 30 behaviors easily, but extending a script to do that would be pretty complicated and hard to maintain.
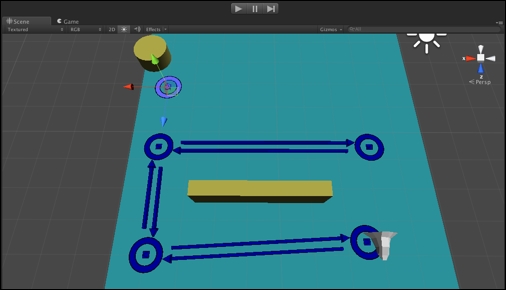
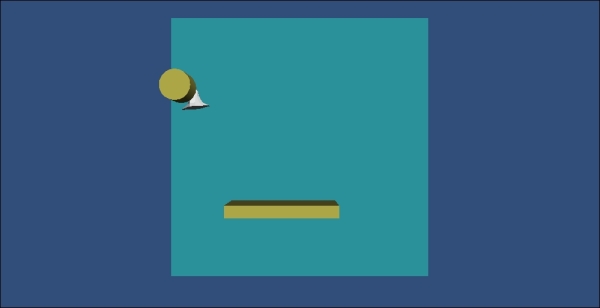
The start of this is similar to the pathfinding and patrol RAIN demos, except we will use a spaceship model instead of a walking character. You'll need to create a simple scene with a ship model (the examples have a ship.blend model you can use) and an object for the home base. The initial setup should look something like this:
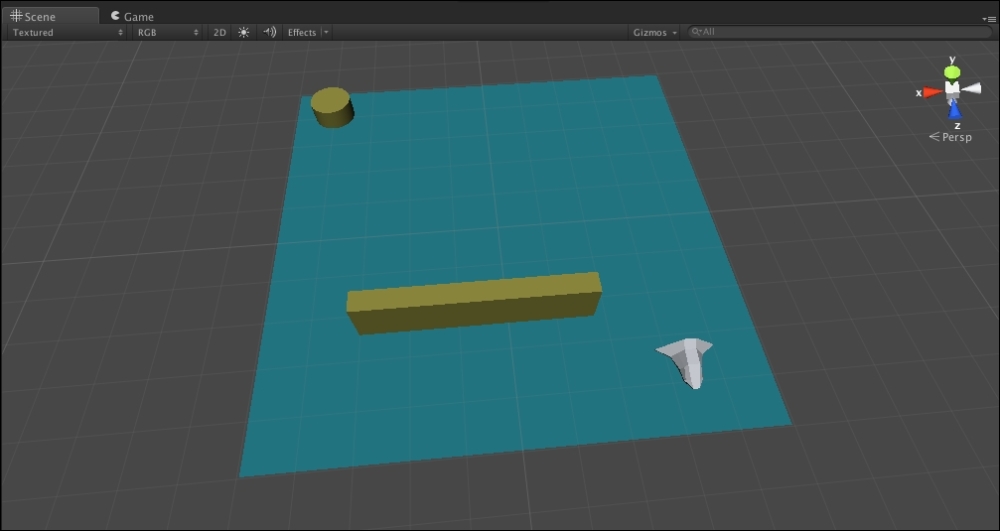
Then, add RAIN to the scene, create a waypoint route to patrol the block, create a navigation mesh, and add an AI to the ship. Remember that the ship model should not interfere with the navigation mesh creation; you can set it to a different layer, such as Ignore Raycast, and then in RAIN's navigation mesh menu, deselect this layer from the Included Layers dropdown:
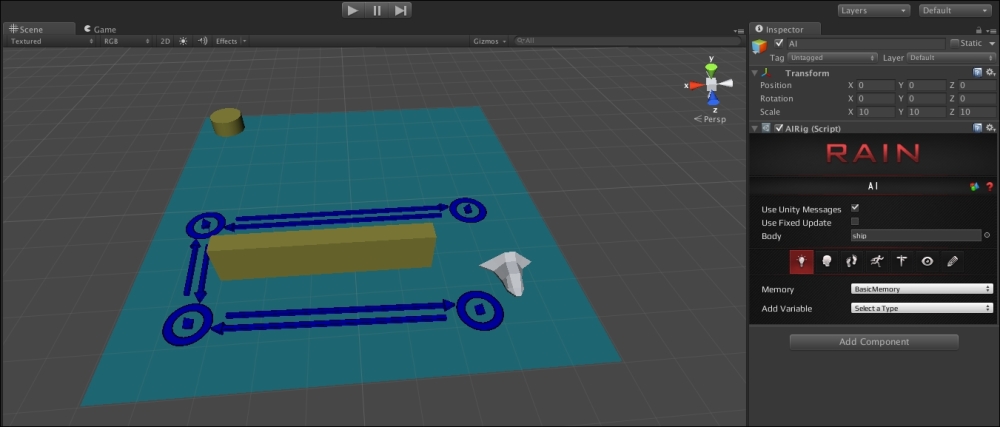
The scene after performing the given steps
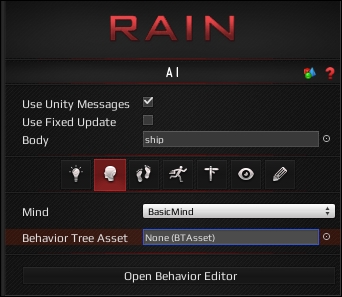
In the AI for the ship, there is no behavior tree yet, so click on the Mind button in the RAIN menu (the little head icon) and then click on Open Behavior Editor and create a new behavior tree called ship:
Just like with the pathfinding demos, first we need to set up the behavior tree to have a basic waypoint route follow system. Under the root node in the behavior tree, we need to create a waypointpatrol node and a move node, with the waypointpatrol node set to use our waypoint route and setting its move variable to the move node. Do this by right-clicking on the root node and navigating to Create | Actions | Choose Patrol Waypoints. Then, right-click on the new waypointpatrol node and navigate to Create | Actions | Move. Then, set the waypointpatrol waypoint to Patrol Route (with quotes), the Move Target Variable field to move the target, and the Repeat type to Forever. The behavior tree should look like the following:
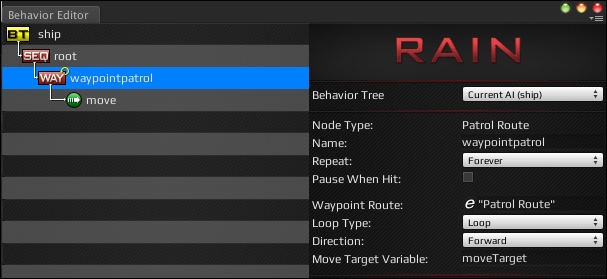
We'll speed up the ship movement, so select the move node and set the Move Speed value to 5.
When we run the demo now, the ship will patrol around the block, similar to our pathfinding demos. To extend this, we'll add an additional functionality of moving to a home base after a given number of seconds. However, two things need to be added to the scene before we make additions to the behavior tree. First, we need to create a navigation point for the home base so that the RAIN AI system can know where it is. In Unity, navigate to RAIN | Create Navigation Target. Rename both the GameObject and the target name in the RAIN menu for it to gameBase, and place it under our cylinder that visualizes our game base. This creates a new point RAIN can navigate to:
For our character logic, as we said we will have the entity patrol for a given number of seconds, then return to the home base. We'll use a Boolean variable to track whether the patrolling is done, but instead of just storing the variable in a script, we will have RAIN's memory system to store it. The memory for a character is what it remembers or knows. It is a way to store values that will be accessible to the other AI systems on a character. The possible values for memory are basic primitive variables such as bool, int, float, or vector, for example, Vector2, Vector3, Vector4, or a GameObject. We'll use two memory variables for this demo. Select the AI component of the ship and click on the Memory icon, which looks like a little light bulb, which you can see in the following screenshot:
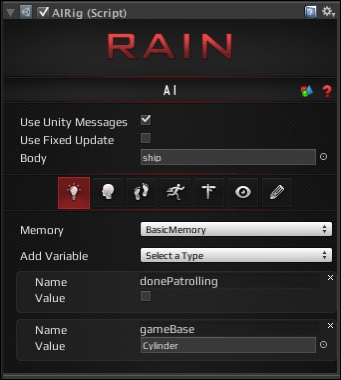
Then, add two variables for the memory. The first is a Boolean called donePatrolling, which will initially be false but will become true when the 5-second timer runs out, signaling the ship to return to the base. The second is a GameObject variable that will store the navigation waypoint for the game base. Create gameBase and set it to the game base GameObject.
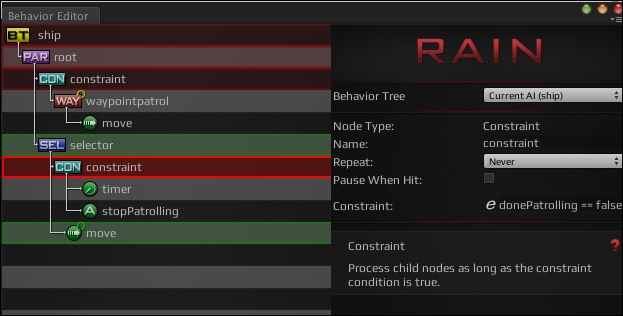
Now that we have a memory set up, we can start modifying our behavior tree. We already have part of the behavior tree set up that patrols the waypoint route. So, as a next step, we will only let the ship continue to patrol if our donePatrolling Boolean variable is false. Add a constraint node above the waypointpatrol node. The recall constraint is the node that uses a logical expression and can evaluate success or failure. Add the donePatrolling == false line to the constraint field in the Constraint node. The Constraint node will look like this:
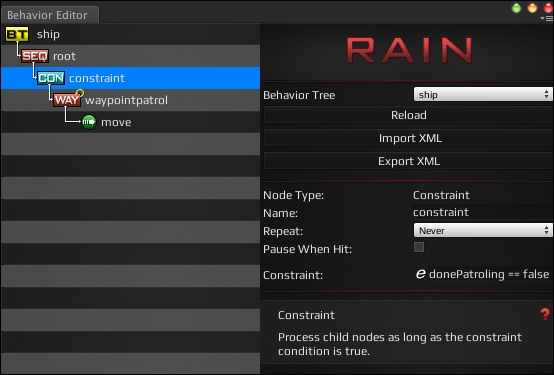
The little e symbol in the Constraint field means that it can take an expression, a one-line statement. This is done for simple checks and saves us from writing the code for a custom action node. Besides the basic Boolean test in this example, many other simple expressions can be created, for example, if we had an integer for an enemy's ammo amount, it can do a check to see how much ammo the character has, and if it is empty, it can stop attacking and instead go get more ammo. We can also have a check on an entity's health or HP, and if it's too low, a character can run away instead of fighting with the player. However, let's get back to our demo.
If we run the demo now, the ship will behave the same as before, but if we go into the memory for the character and change donePatrolling to true, the ship will do nothing when we start the demo:

The check in the preceding screenshot shows the Constraint node in action; however, go ahead and change the value of donePatrolling back to false.
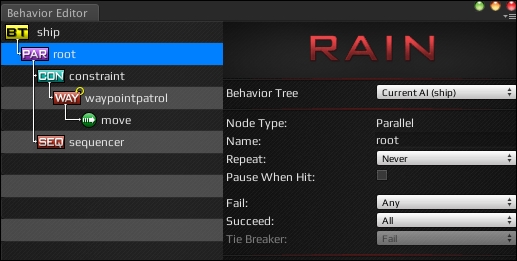
Our additional logic for the ship's behavior tree is to return home after 5 seconds of patrolling. While the ship is patrolling, we want a timer running to 5 seconds. When the timer is complete, the donePatrolling variable will be set to false, stopping the patrol and the ship will start to move back to the gameBase navigation point. The first step for this is to right-click on the root node and navigate to Switch To | Parallel. Then, create a new sequencer node and add it to the root. The tree should look like this:
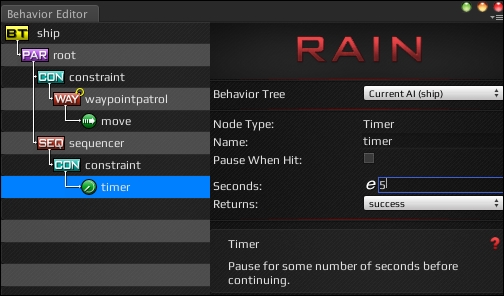
With the parallel node at every update, both of its children will be updated, allowing us to continue patrolling while we have a timer running. We want two things to happen if donePatrolling is false: the ship should continue to patrol and the timer should start to run. RAIN supports copying and pasting of nodes, so right-click on the Constraint node and select Copy, then right-click on the sequencer node and click on Paste. The node will be copied with its children, so delete the newly copied waypointpatrol and the move node. Then, add a timer action node below the second Constraint node, and set the time to 5 seconds. Now, the screen should look like this:
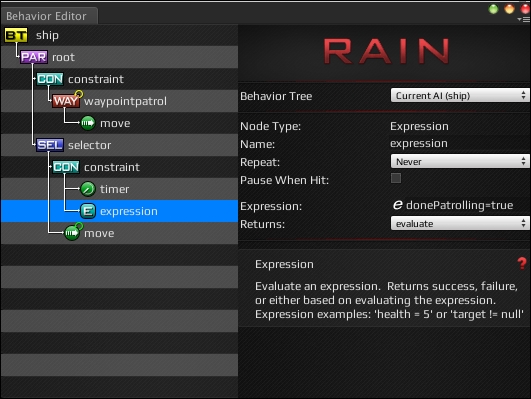
After the timer node, we need a node that will set the donePatrolling variable to true. We can do this using an expression node and using its Expression value to set donePatrolling to true. We use as shown in the next screenshot:
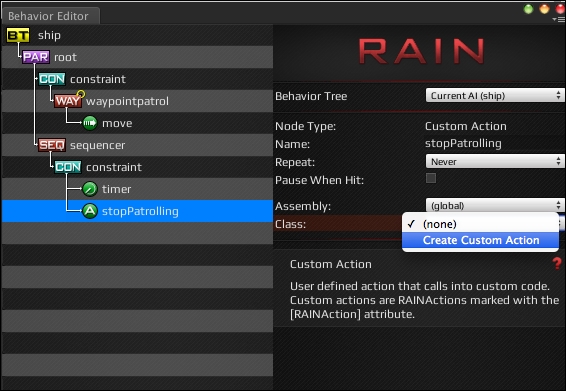
However, the ability to customize AI nodes is important, so instead of using an expression node again, we will use a Custom Action node. To create a Custom Action node, right-click on the lower Constraint node and navigate to Create | Actions | Custom Action. Change the name of the node (via the name field in the node editor) to StopPatrolling. For the Class value, choose Create Custom Action. The following screenshot will guide you through:
Set the name of Custom Action Name to StopPatrolling and leave the script type to C Sharp. Then, close the behavior tree editor and open the StopPatrolling.cs script from Assets | AI | Actions. The script contains an outline for an action that the user can define. The code is as follows:
using UnityEngine;
using System.Collections;
using System.Collections.Generic;
using RAIN.Core;
using RAIN.Action;

[RAINAction]
public class StopPatrolling : RAINAction
{
    public StopPatrolling()
    {
        actionName = "StopPatrolling";
    }

    public override void Start(AI ai)
    {
        base.Start(ai);
    }

    public override ActionResult Execute(AI ai)
    {
        return ActionResult.SUCCESS;
    }

    public override void Stop(AI ai)
    {
        base.Stop(ai);
    }
}
This contains the three basic methods you would expect to see in an action: one to call when the action is started, another when it is stopped, and an Execute method that is called when running the action that returns the state of the action node: success, failure, or running. With this outline, you can create all kinds of custom actions, but for now, all you need to do is set the donePatrolling variable in the memory to true. Change the Start method to the following:
public override void Start(AI ai)
{
     base.Start(ai);

     ai.WorkingMemory.SetItem("donePatrolling", true);
}
This code does what we need, setting the donePatrolling variable to true. The AI object in this code, just called ai, is the AI for the character. It contains access to various AI classes, such as the AI's mind and senses. Here, we access WorkingMemory and can get the different memory items as well as set values for them. That is all the action needs to do so that ActionResult can leave returning success.
If we run the project now, we should see the ship patrol for 5 seconds, but instead of moving back to the game base, the ship just stops. The last thing we need to add is a move node to the home base. Set the move target to "gameBase" (RAIN requires the quotes), and as we want the ship to return home faster than it patrols, change the speed to 10. And since we want the ship to stop as soon as it is near the base, change the Repeat dropdown to Until Success and set a Close Enough distance to 0.1. This will make the ship go to the gameBase target and stop. The screen should look as shown:
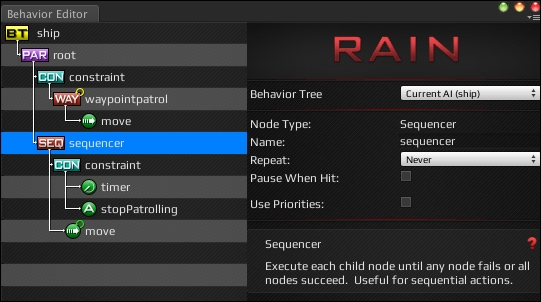
If we run the demo now, the ship will patrol for 5 seconds and then just stop again. The issue here is the Sequencer node: it goes through its children returning on the first fail. After the stopPatrolling node is activated, the constraint nodes will return failure, so when the sequencer calls, it stops after the first constraint. To remedy this, right-click on the sequencer node and change its type to Selector and rename it to selector.
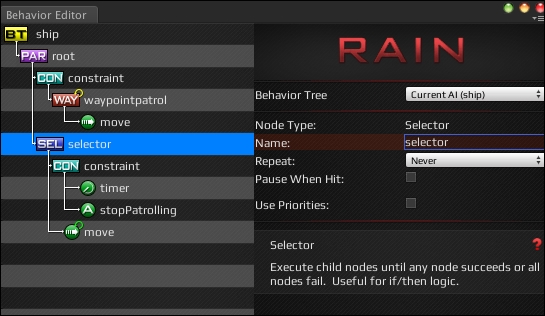
As you can see in the preceding screenshot, recalling the selector node works by going through its children returning on the first success instead of failure. So, after patrolling is done and the constraint node under the selector returns false, instead of the tree stopping, the move node can be called. If you run the demo now, everything should work as expected: the ship will patrol for 5 seconds and then quickly return to the game base as shown:
If you didn't end up with this result, try not to get frustrated. Setting up behavior trees is pretty precise, and a misnamed variable or wrong node placement will cause interruptions.
If things are not working for you, open the RAIN behavior tree editor while the game is running (or paused). It will highlight the nodes with red for failure, green for success, and yellow for running:
This is how the RAIN behavior tree editor will display the status of all the nodes.