
For this demo, we will duplicate the path-following behavior demo in React from Chapter 1, Pathfinding, and then update it to see some emergent behavior develop from it. We will need to complete the following:
- Create a world with some walls
- Create target markers in the scene
- Create a script with a custom editor to find the targets
- Create the behavior
- Create NPCs and assign the behavior
To start out with, we will need a basic environment for characters to walk in. Create a plane, call it Floor, and add some cubes, shaping them into walls. These will need to be static so that Unity's navigation mesh can find them. Then, we'll need to select the floor and add the navigation mesh. If you've forgotten how to do any of this, it is all covered in the React tutorial in Chapter 1, Pathfinding.
Next, we need some targets. We'll use a different approach for this from our previous demos and let GameObjects mark the targets. Create an empty GameObject and call it Targets. Underneath it, add more empty GameObjects. Give them all a tag, NpcActivityTarget, which you might need to create. Distribute these targets to different locations on the screen like this:
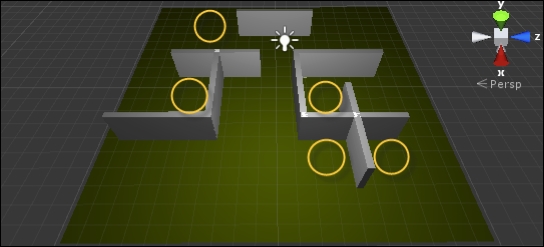
The preceding screenshot shows how our basic React scene setup with targets should look like.
Now, we need a script that can find these locations. It will be based on our earlier scripts and will contain three methods: one to find a target, one to move to a target, and another to hang around.
You can find the completed script at Disk | Scripts | React AI | LookBusy.cs. To get the tags to show up as a dropdown, we've also provided a custom editor, which is also available at Disk | Scripts | React AI | TagOption.cs. You will need to put this under Assets/Editor for it to work in Unity. TagOptions is a script that does nothing more than give a drop-down selector for the tag to be used. LookBusy uses the selected tag to find objects that are targets in the game.
Here are a couple of the methods inside the script. These are easy to reproduce or modify on your own:
GameObject[] targets = GameObject.FindGameObjectsWithTag(this.SelectedTag);
// If there are not at least two targets to choose from return an error
if(targets.Length < 2)
{
  Debug.LogWarning("LookBusy.cs:FindTarget() --> There are less than 2 targets with the tag, '" + this.SelectedTag + "'. This script wants more positions.");
  yield return NodeResult.Failure;
  yield break;
}
// From the targets randomly select one and if it is closer than our minimum distance return it, otherwise keep trying a constant number of times before failing
int attempts = 0;

while(Vector3.Distance(this.Destination.transform.position, this.transform.position) < this.MinimumDistance)
{
  this.Destination = targets[Random.Range(0, targets.Length)];
if(attempts >= 25)
{
    Debug.LogWarning("LookBusy.cs:FindTarget() --> Could not find a target farther than the mininum distance. Either lower the mininum distance or space the targets farther apart.");
    yield return NodeResult.Failure;
  }
}
yield return NodeResult.Success;
}
In this script, we first check whether we have at least two targets in the game tagged to select from, and if we don't have them, the script reports an error. You'll notice that the error doesn't break the game, it just gives a specific warning on the log of what you need and where the log was posted from. Next, the script selects a random position from the list of nodes, and if the position within a character's minimum distance (and not the same target the character is already on), the script returns the position. This random position is chosen from the list of nodes no more than a constant number of times, that is, 25 times. This random choosing method doesn't guarantee success, but it is a quick and easy way to choose a random target.
Besides picking a random place for a character to walk to, we also need a random amount of time for the NPC to stay at the location they go to. The HangAround method does this:
public Action HangAround()
{
  // Choose a random time to wait
  float randomtime = Random.Range(this.ShortWaitTime, this.LongWaitTime);
  while(totalTime < randomtime)
  {
    totalTime += UnityEngine.Time.deltaTime;
    yield return NodeResult.Continue;
  }
  totalTime = 0;
  yield return NodeResult.Success;
}
The HangAround function just makes us wait a few seconds. First, it selects how long to wait, and then, once this amount of time passes, returns a success. Notice that we return NodeResult.Continue. This tells the script to wait until the next update and then try to get, then see if it is finished yet. (Yield is used so the game doesn't freeze up.)
The MoveToTarget function isn't given here as it is nearly identical to the function we used in Chapter 1, Pathfinding, except that now we are going after the target specified randomly from FindTarget.
Now that we have our behavior methods, we can build the behavior tree. Right-click on your project's Assets folder and navigate to Create | Reactable. Rename it to LookBusyReactable. Then, right-click on it and select Edit Reactable:
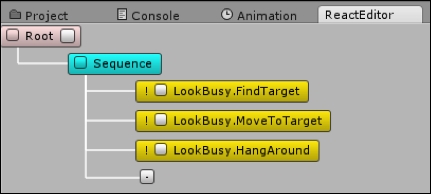
The preceding is a screenshot of the behavior tree editor completed. Right-click on Root and navigate to Add | Branch | Sequence. This is so it completes each step before moving on to the next. Right-click on Sequence and navigate to Add | Leaf | Action. Do this three times:
- For the first one, click on the empty checkbox and navigate to Scripts | LookBusy | FindTarget. This is part of the
LookBusy.csscript that we added earlier. - For the second one, do the same but instead navigate to Scripts | LookBusy | MoveToTarget.
- For the third one, navigate to Scripts | LookBusy | HangAround.
The AI will find a random target from the list of GameObjects with the correct tag, NpcActivityTarget, as we set in the LookBusy script. Then, it moves to that target and hangs around for 2 to 4 seconds.
Finally, we will create the NPCs and assign a behavior. For this, you can use a character similar to the first, just a sphere stretch 2x tall, with a small cube on the front of it so that we can see the direction it is facing. Add the LookBusy script to the NPC:
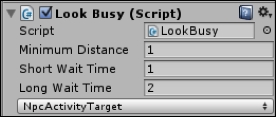
This is how the LookBusy script options look like.
Minimum Distance is how far away you can be from the target and still be satisfied that you reached it. Short Wait Time and Long Wait Time are time ranges (in seconds) you hang around for, and NpcActivityTarget is the tag that the GameObjects have to identify as targets.
Next, add Nav Mesh Agent to the NPC so that it can navigate around the level. Finally, add the Reactor script and set its Reactable property to LookBusyReactable, which is the behavior tree we created earlier.
This completes all the steps needed to have NPC characters wander around in a game using React. You should now be able to create as many characters as you like and have them walk around a level.