
In the previous chapters on pathfinding and behavior trees, we had AI characters moving through our AI environments and changing states, but they didn't really react to anything. They knew about the navigation mesh and different points in the scene, but there was no way for them to sense different objects in the game and react to them. This chapter changes that; we will look at how to tag objects in the game so that our characters can sense and react to them.
In this chapter, you will learn about:
- Sensors and tagging game objects so that they can be sensed
- AI characters that use sensors in RAIN
- Advanced configuration of sensors in RAIN
- Having AI characters react to different objects and perform different activities once they are sensed
A part of having good game AI is having the AI characters react to other parts of the game in a realistic way. For example, let's say you have an AI character in a scene searching for something, such as the player to attack them or items to collect (as in the demo in this chapter). We could have a simple proximity check, for example, if the enemy is 10 units from the player, it starts attacking. However, what if the enemy wasn't looking in the direction of the player and wouldn't be able to see or hear the player in real life? Having the enemy attack then is very unrealistic. We need to be able to set up more realistic and configurable sensors for our AI.
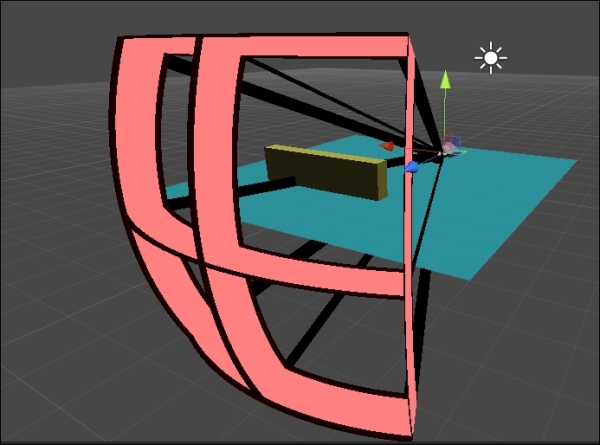
To set up senses for our characters, we will use RAIN's senses system. You might assume that we will use standard methods to query a scene in Unity, such as performing picking through Unity's ray casting methods. This works for simple cases, but RAIN has several advanced features to configure sensors for more realism. The senses RAIN supports are seeing and hearing. They are defined as volumes attached to an object, and the AI might be able to sense objects only inside the volume. Not everything in the volume can be sensed because there might be additional restrictions such as not being able to see through walls. A visualization illustrates this volume in the editor view to make configuring them easier. The following figure is based on the visualization of a sense in a RAIN AI:
Note
The early versions of RAIN included additional senses, such as smell, with the idea that more senses meant more realism. However, adding more senses was confusing for users and was used only in rare cases, so they were cut from the current versions. If you need a sense such as smell for something like the ant demo we saw in Chapter 5, Crowd Control, try modifying how you use vision or hearing, such as using a visual for smell and have it on a layer not visible to players in game.
While setting up characters to sense game objects in their environment, you might think that the AI system would automatically analyze everything in the scene (game objects and geometry) to determine what is sensed. This will work for small levels but as we've seen before, we run into the problem of scaling if we have a very large scene with many objects. Larger scenes will mostly have background items that our AI doesn't care about, and we will need a more complex system to analyze all the objects to be efficient. Typically, AI systems work using a simplified version of the level, for example, how pathfinding uses navigation meshes to find a path instead of using the geometry from the level directly because it is much more efficient. Similarly, our senses don't work on everything; for an object to be sensed, it needs to be tagged.
In RAIN, the AI characters we create have an AIRig object, but for items we want to detect in the scene, we add a RAIN Entity component to them. The RAIN menu in Unity has a Create Entity option that is used to add an Entity component. The tags that you can set on the entities are called aspects, and the two types of aspects correspond to our two sensor types: visual aspects and audio aspects. So, a typical workflow to make your AI characters sense the environment is to put Entity components on game objects to detect, add aspects to those entities with the different tags a sensor can detect, and create sensors on your AI characters. We will look at a demo of this, but first let's discuss sensors in detail.
We've heard stories of people setting up their sensors—especially visual ones—and starting the game, but nothing happens or it seems to work incorrectly. Configuring the senses' advanced settings can help avoid issues such as these and make development easier.
To see visual sensor settings, add a RAIN AI to a game object and click on the eye icon, select Visual Sensor from the Add Sensor dropdown, and then click on the gear icon in the upper-right corner and select Show Advanced Settings. The following screenshot shows the Visual Sensor section in RAIN:

Here are some of the properties of the sensor:
- Show Visual / Sensor Color: These are used to show how the sensor will look in the Unity editor, not in the game.
- Is Active: This flag determines whether the sensor is currently trying to sense aspects in the scene or whether it is disabled.
- Sensor Name: This shows the name of the sensor. This is useful when using the sensor in behavior trees, which we will see in this chapter's demo.
- Mount Point: This is the game object the sensor is attached to.
- Horizontal Angle / Vertical Angle / Range: These three define the volume of the sense; nothing outside of it will be picked up. The visualization of the sense matches these dimensions. You will want to customize these settings for different characters in your game. Unexpected behavior can occur from setting these up incorrectly.
- Require Line of Sight: This flag requires a line from the character to the aspect without intersecting other objects for the aspect to be seen. Without this flag, a character could appear to have X-Ray vision.
- Can Detect Self / Line of Sight Ignores Self: These flag if the sensor should ignore the AI character. This is important as it prevents a common problem. For example, we can have several soldier characters with a soldier aspect and then add a soldier from a different team that attacks the other soldiers. However, the attacking soldier when sensing might pick up its own aspect and try to start attacking itself, and this is definitely not what we want.
- Line of Sight Mask: To further help control what can be seen, layer masks can be used. These work the same as Unity's ray casting masks.
The properties for the audio sensor is similar to that of the visual sensor, except it doesn't have any line of sight properties and the volume of the sense is a radius and doesn't have vertical or horizontal angle limits. The important properties are:
- Range: This specifies how far the sensor can detect
- Volume Threshold: When listening for aspects, this is the lowest volume that the sensor can hear
Now that we understand all of our sensor options, let's start the demo.