
Now, we'll start setting up our driving demo that will have a car driving along a road and avoiding obstacles.
Besides needing Smart Car, we'll need an environment for our AI cars to drive in. We'll use Car Tutorial v1.3 that is made by Unity, which you can download for free from the Asset Store. Import the project and open TheTrack scene from the imported Scenes folder. Next, add a car to the scene. The car prefab that comes with Car Tutorial doesn't have the complete wheel physics setup, so you can configure it using the steps in the last section or use the EnemyAICar prefab from Smart Car. To make the car work better with the Tutorial scene, extend the rays a little, set Wide and Tight Ray Distance both to 40 and Long Ray Distance to 50. This keeps the car from hitting obstacles when going too fast and missing tight turns. Once you have a car in the scene configured for Smart Car, select the Main_Camera object and set your car to Target for the Car Camera script.
If you start the demo now, the car still won't run but the main camera in the scene will follow it:
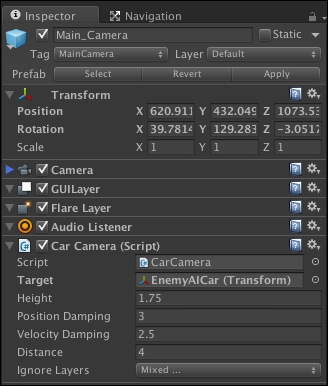
This screenshot is of the Main_Camera game object of Car Tutorial. These are the settings for the TheTrack scene with Target set to the Smart Car prefab.
The next thing we need for our car demo is a navigation mesh. Smart Car uses Unity's built-in system. Unity's system is similar to RAIN's but we haven't used it much yet as unlike other plugins, Unity does not have a built-in behavior tree system. Fortunately, we don't need behavior trees for our car demos, so navigate to Window | Navigation.
This brings up the Navigation tab with three subtabs to help configure the NavMesh:
- Object: This helps you filter what objects in the scene are part of the navigation mesh. Any objects that are tagged with Navigation Static will be included in the mesh as a walkable area.
- Bake: This has options to bake the mesh. The two most important options are Radius and Height, which are dimensions for the character to navigate on the mesh.
- Layers: This allows you to customize the placement of different navigation meshes on different layers.
For our demo, we want only the roads to be navigable. Select the other building and miscellaneous objects in the scene and set their static property (which is to the right of their name in Inspector) to not have Navigation Static set. Then, for the different road objects, such as Road_Coll, Road_Coll01, and so on, make sure that they have Navigation Static checked. Then, go back to the Navigation tab and click on Bake. If you have everything set correctly after you bake, you should see the navigation mesh in the same area as the road:
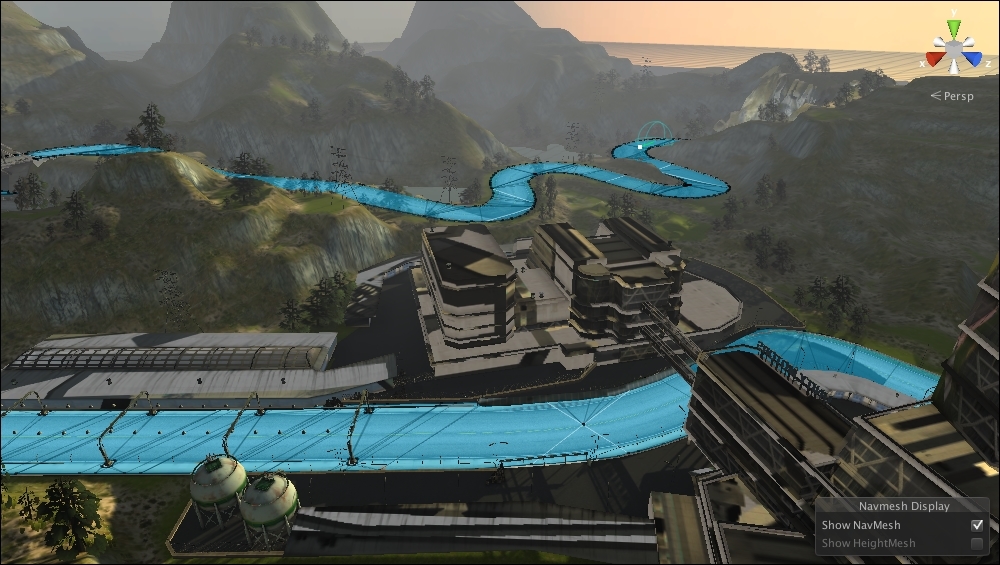
This is how the road navigation mesh setup should look.
This should have been pretty quick to recreate, but depending on the character size settings and the amount of geometry in the scene, this can take a bit of time. We will discuss navigation meshes more and the algorithm behind how they are generated in Chapter 11, Advanced NavMesh Generation.
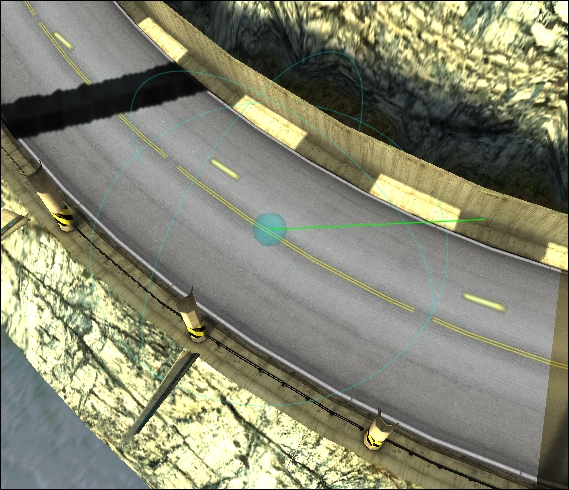
The final step to get a car driving is to set up waypoints for the car to follow. The NavMesh we created defines the area that the car can navigate to and the waypoints define the general path the car should follow. Create a new empty game object and name it Road Waypoints. Then, create a few more empties with the names waypoint 1, waypoint 2, waypoint 3, and so on. Place the waypoint empties at different parts along the road. Note that the NavMesh for the road will define how to get from one waypoint to the next, so the line between waypoints doesn't have to go through the road. For instance, you could have one waypoint at the start of a curve and the second at the end and the car would still go around the curve through the waypoints. In the Smart AICar script, set the empties to the Waypoints field. After doing this, the waypoints will be visualized in the edit or view to make adjusting their locations easier. Refer to the following screenshot, and you can see how the visualization of Smart car AI waypoints looks:
If you run the demo after setting the waypoints, the car drives realistically across the road. If you want to fine-tune the car more, remember there are many physics settings with Smart Car that can be adjusted to change how the car acts.
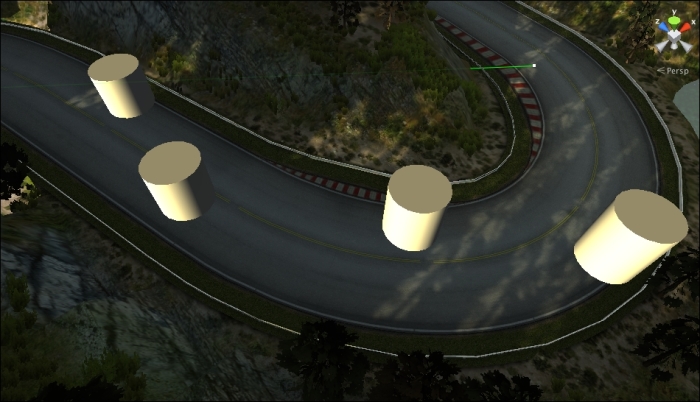
As Smart Car uses a combination of a NavMesh and ray casting, you can add objects dynamically to the scene, and as long as they have colliders attached (and are on a car's Recast Layers), the car will avoid them. To try this out, add a few large cylinders to the road, as shown in the following screenshot:
Then, in the Recast Layers dropdown for your car, make sure that it is set to ray cast on the same layer as the obstacles. Select a Cylinder object and in Inspector, select Add Layer. We need to create an obstacles layer, so select the dropdown and in the first slot for User Layer, set it to obstacles.
Then, for each cylinder, set its layer to obstacles:

This is how the Inspector window should look after creating the obstacle layer.
Then, for Smart Car in the Raycast Layers dropdown, make sure that the obstacles layer is selected. Once you have this set up, if you run the demo, the car will drive and avoid the obstacles. The car still uses physics for its control, and sometimes if you place the obstacles too close to one another, the car will run into one. Fortunately, in this case, the car will back up and then drive past it, which is a nice touch Smart Car has.
The cylinders are static objects in our scene, but as ray casting is used, there is no reason why you cannot script dynamic objects and the car will still avoid them. To see this, run the demo and in the scene view, grab one of the obstacles and move it around to block the car; the car will try to avoid it.