
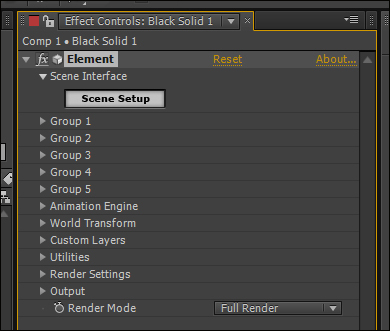
So, let's dive in! Start up After Effects and create a new HD 1080p30 (29.97) composition (it only needs to be a couple of seconds long). Then add a black solid layer and apply the Element plugin to that layer (Effect | Video Copilot | Element). Now you'll want to open your effect controls and hit the Scene Setup button. This will open the Element 3D interface. The following screenshot shows you the location of the Scene Setup button within the AEX interface:
Tip
Downloading the example project files and colored images
You can download the example project files and colored images for this book you have purchased from your account at http://www.packtpub.com. If you purchased this book elsewhere, you can visit http://www.packtpub.com/support and register to have the files e-mailed directly to you.
You're now presented with the Element 3D interface. To give you a tour of the interface, let's load an object into it. On the right side, toward the top, you'll see a window labeled Model Browser. Click on the Primitives heading within that window and you'll see a bunch of objects appear in the lower-right window. Click on the capsule image. Congratulations! You've just loaded your first Element 3D object, and your window should look like the following screenshot:
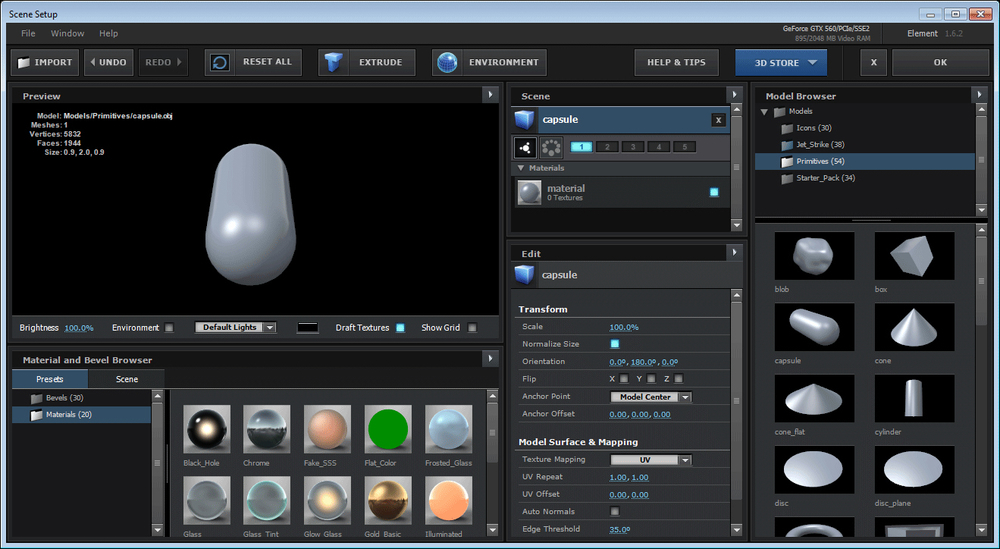
The Element 3D interface
Since you already know where the Model Browser window is, let's start there and move clockwise around the interface.
The Model Browser window is where you'll locate your existing Element 3D models to be used in your scene. They are contained in folders (such as Primitives). Stock folders are grey, and add-on packs are blue (for example, in the preceding screenshot, you'll notice that the Jet_Strike folder is blue, therefore, an expansion pack set). This is important for portability. If you're rendering on a render farm, it's important to let them know that you are not only using Element 3D, but also using add-on assets.
Directly below the hierarchy view (the tree of folders) is the model list. Each model is represented by a preview image in the perspective view with the model name directly below it.
This window can be likened to the Effect Controls window in AEX. This is where all of the parameters can be edited for your object or any of its components (shaders, orientation, and so on). In the screenshot that shows you the Element 3D screen, you can clearly see the Transform and Surface attributes for the capsule model that we have loaded into the interface.
The Material and Bevel Browser window allows you to not only see all of the preset materials and bevels that are available as a starting point, but it also gives you a focused view of the materials and bevels within your scene (by clicking on the Scene tab at the top of this window). Similar to the Model Browser window, there is both a hierarchical view (using folders along the left-hand side) and a Preview window (using folders along the right-hand side). In the screenshot that shows you the Element 3D interface, we can look at all of the presets available for the materials.
The Preview window is filled with a plethora of information. Obviously, there is a perspective view of your current model. You can rotate the object by left-clicking on your mouse, move it by clicking on the middle button, zoom in/out using the mouse wheel, and rotate the environment/lights by right-clicking on your mouse.
The statistics of your scene are in the upper-left section of the window. These include the relative path of your model, number of models, number of vertices (points), faces (polygons), and size of your object. The vertex and face statistics will be important in terms of rendering. More of these means slower rendering times, fewer means less quality. (We'll dive more into this in Chapter 8, Optimizing Performance.)
Along the bottom of the Preview window are controls. With these controls (from left to right), you can change the brightness of the preview, show the environment map, change the lighting scheme, edit the background color, change the quality of your textures, and show a grid. The Element 3D interface's screenshot shows these options as set by default.
The Scene window allows the selection of objects and some property adjustments (such as assigning objects to groups). Element 3D animates from within After Effects (AEX), and group assignments will be important when we actually move on to animate our scenes. Whatever is selected from within the Scene window will then alter the Edit window to show you that object/material's properties for editing. Our capsule is currently selected in the Element 3D interface's screenshot and assigned to group 1.
The toolbar covers most of the major operations of Element 3D. The IMPORT button is how you'll bring objects in from your 3D modeling software. UNDO and REDO are self-explanatory, while RESET ALL resets all your edits to their default values. EXTRUDE is used mostly for bringing in logos and text to be animated in 3D (you'll extrude and bevel these, and we'll be covering this functionality later in this book). ENVIRONMENT changes the panoramic image assigned to your texturing maps and reflections. Your standard HELP button is also there.
Clicking on the 3D STORE button will open a web browser to the Video Copilot add-on store for Element 3D (where you can buy more packages, such as Jet Strike).
Clicking on the X button will make you lose all the changes that were made in the interface. This is a cancel button. On the other hand, clicking on OK commits all changes and pipes them into AEX.