
Now that we know what Element 3D is (and isn't)—and I'm sure you have a ton of ideas of how you're going to use it—let's cover our final step of groundwork before we turn you into a 3D pro! It's extremely important to set up your projects from the ground level.
As any professional knows, you never have enough time to make everything perfect. This is precisely why it's important to take the time at the beginning of a project to set up everything in an ultra-organized manner. This will make it much easier for you to distribute your renders across multiple machines, take your work to another machine, or ship everything out to a render farm.
If you've ever had to pick up a project from another artist, you know well what a nightmare a poor directory structure can be. An extremely organized directory structure is the key. Projects (especially when you start using 3D) can get very complex very fast. You can quickly set up a template directory structure of your own using the following three principals:
- K.I.S.S. (Keep it simple, stupid): Sorry for the last word, but that's what it really stands for. Make your directories are simple so that someone with absolutely no idea about what he/she is looking at can figure it out. This way, if you have to come back to a project months from creation, you don't have to relearn everything.
- Everything within one root directory: I know you can get into a hurry and use an image that you downloaded to your
downloadsdirectory. Don't ever do that! Take the extra second to copy that image to your project directory. You won't ever regret it. With that in mind, at the end of the day, back up that root directory to another drive. You won't regret this either. - Descriptive naming: Come up with a naming convention so you not only know what you're working on, but also know what the version (and maybe even the date) is. For instance, if I'm modeling a human head, I start with
HumanHead.v1.010113.obj. This means that it's a human head, Version one, and started on January 1, 2013.The following screenshot displays an extremely organized directory structure:
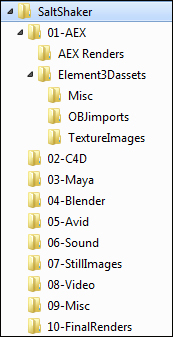
Directory structure
In the preceding screenshot, you can see how I have set up my directory's structure. At a glance, you can tell where assets are to go and later, where to find them. A good directory structure is the foundation of a project that can meet deadlines. For the upcoming project, set up your directory's structure mimicking the structure from the preceding screenshot. You can exchange Avid for whatever editing software you use.