
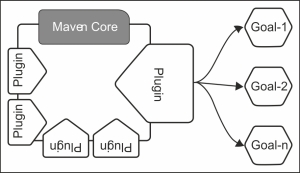
The roots of Maven go back to the Jakarta Turbine project. It was started as an attempt to simplify the build process of Jakarta Turbine. The beauty of Maven is its design. It does not try to do everything itself, but rather delegate the work to a plugin framework. When you download Maven from its website, it's only the core framework and plugins are downloaded on demand. All the useful functionalities in the build process are developed as Maven plugins. You can also easily call Maven a plugin execution framework.
Maven plugins can be executed on their own or can be executed as a part of a Maven lifecycle. Maven lifecycles were discussed in Chapter 4, Build Lifecycles. Each plugin has its own set of goals. Let's see how to execute the clean goal of the Maven clean plugin, as follows. The clean goal will attempt to clean the working directory and the associated files created during the build:
$ mvn clean:clean
The same clean plugin can be executed via the clean lifecycle. The clean goal of the Maven clean plugin is associated with the clean phase of the clean lifecycle. One difference here is that when you execute a Maven plugin on its own, it only runs the goal specified in the command; however, when you run it as a part of a lifecycle, Maven executes all the plugins associated with the corresponding lifecycle up until the specified phase (including that phase). The command is as follows:
$ mvn clean
In this chapter, we will be discussing the following topics:
- Commonly used Maven plugins and their usage
- Plugin discovery and execution process
- Inversion of Control frameworks—Plexus and Google Guice (pronounced as juice)
- Custom Maven plugins
Maven plugins are mostly developed under the Apache Maven project itself as well as under the Codehaus and Google Code projects. The next sections list out a set of commonly used Maven plugins and their usage.
As discussed before, the clean plugin executes the clean goal of the Maven clean plugin to remove any of the working directories and other resources created during the build, as follows:
$ mvn clean:clean
The Maven clean plugin is also associated with the clean lifecycle. If you just execute mvn clean, the clean goal of the clean plugin will get executed.
You do not need to explicitly define the Maven clean plugin in your project POM file. Your project inherits it from the Maven super POM file. Chapter 2, Demystifying Project Object Model, discussed the Maven super POM file in detail. The following configuration in the super POM file associates the Maven clean plugin with all the Maven projects:
<plugin>
  <artifactId>maven-clean-plugin</artifactId>
  <version>2.5</version>
  <executions>
    <execution>
      <id>default-clean</id>
      <phase>clean</phase>
      <goals>
        <goal>clean</goal>
      </goals>
    </execution>
  </executions>
</plugin>
Note
The Maven default lifecycle includes the phases: validate -> initialize -> generate-sources -> process-sources -> generate-resources -> process-resources -> compile -> process-classes -> generate-test-sources -> process-test-sources -> generate-test-resources -> process-test-resources -> test-compile -> process-test-classes -> test -> prepare-package -> package -> pre-integration-test -> integration-test -> post-integration-test -> verify -> install -> deploy.
By default, the clean goal of the clean plugin runs under the clean phase of the Maven clean lifecycle. If your project wants the clean plugin to run by default, then you can associate it with the initialize phase of the Maven default lifecycle. You can add the following configuration to your application POM file:
<project>
  [...]
  <build>
    <plugins>
      <plugin>
        <artifactId>maven-clean-plugin</artifactId>
        <version>2.5</version>
        <executions>
          <execution>
            <id>auto-clean</id>
            <phase>initialize</phase>
            <goals>
              <goal>clean</goal>
            </goals>
          </execution>
        </executions>
      </plugin>
    </plugins>
  </build>
  [...]
</project>
Now, the clean goal of the clean plugin will get executed when you execute any of the phases from the initialize phase in the Maven default lifecycle; no need to explicitly execute the clean phase of the clean lifecycle. For example, mvn install will run the clean goal in its initialize phase. This way, you can override the default behavior of the Maven clean plugin. A complete Maven sample project with the previous plugin configuration is available at https://svn.wso2.org/repos/wso2/people/prabath/maven/chapter05/jose.
The compiler plugin is used to compile the source code. This has two goals: compile and testCompile. The compile goal is bound to the compile phase of the Maven default lifecycle. When you type mvn clean install, Maven will execute all the phases in the default lifecycle up to and including the install phase, which also includes the compile phase. This in turn will run the compile goal of the compiler plugin.
The following command shows how to execute the compile goal of the compiler plugin by itself. This will simply compile your source code:
$ mvn compiler:compile
All the Maven projects inherit the compiler plugin from the super POM file. As shown in the following configuration, the super POM defines the compiler plugin. It associates the testCompile and compile goals with the test-compile and compile phases of the Maven default lifecycle:
<plugin>
  <artifactId>maven-compiler-plugin</artifactId>
  <version>3.1</version>
  <executions>
    <execution>
      <id>default-testCompile</id>
      <phase>test-compile</phase>
      <goals>
        <goal>testCompile</goal>
      </goals>
    </execution>
    <execution>
      <id>default-compile</id>
      <phase>compile</phase>
      <goals>
        <goal>compile</goal>
      </goals>
    </execution>
  </executions>
</plugin>
By default, the Maven compiler plugin assumes JDK 1.5 for both the source and target elements. JVM identifies the Java version of the source code via the source configuration parameter and the version of the compiled code via the target configuration parameter. If you want to break the assumption made by Maven and specify your own source and target versions, you need to override the compiler plugin configuration in your application POM file, as shown in the following code:
<project>
  [...]
    <build>
      [...]
        <plugins>
          <plugin>
            <groupId>org.apache.maven.plugins</groupId>
            <artifactId>maven-compiler-plugin</artifactId>
            <version>3.1</version>
            <configuration>
              <source>1.7</source>
              <target>1.7</target>
            </configuration>
          </plugin>
        </plugins>
      [...]
    </build>
  [...]
</project>
Not just the source and target elements, you can pass any argument to the compiler plugin under the compilerArgument element. This is more useful when the Maven compiler plugin does not have an element defined for the corresponding JVM argument. For example, the same source and target values can also be passed in the following manner:
<project>
  [...]
    <build>
      [...]
        <plugins>
          <plugin>
            <groupId>org.apache.maven.plugins</groupId>
            <artifactId>maven-compiler-plugin</artifactId>
            <version>3.1</version>
            <configuration>
              <compilerArgument>-source 1.7 –target .7</compilerArgument>
            </configuration>
          </plugin>
        </plugins>
      [...]
    </build>
  [...]
</project>
The install plugin will deploy the final project artifacts into the local Maven repository defined under the localRepository element of MAVEN_HOME/conf/settings.xml. The default location is USER_HOME/.m2/repository. The install goal of the install plugin is bound to the install phase of the Maven default lifecycle. When you type mvn clean install, Maven will execute all phases in the default lifecycle up to and including the install phase.
The following command shows how to execute the install goal of the install plugin by itself:
$ mvn install:install
All Maven projects inherit the install plugin from the super POM file. As shown in the following configuration, the super POM defines the install plugin. It associates the install goal with the install phase of the Maven default lifecycle:
<plugin>
  <artifactId>maven-install-plugin</artifactId>
  <version>2.4</version>
  <executions>
    <execution>
      <id>default-install</id>
      <phase>install</phase>
      <goals>
        <goal>install</goal>
      </goals>
    </execution>
    <execution>
      <id>default-install-1</id>
      <phase>install</phase>
      <goals>
        <goal>install</goal>
      </goals>
    </execution>
  </executions>
</plugin>
The install goal of the install plugin does not have any configurations to be overridden at the project level.
The deploy plugin will deploy the final project artifacts into a remote Maven repository. The deploy goal of the deploy plugin is associated with the deploy phase of the default Maven lifecycle. To deploy an artifact via the default lifecycle, mvn clean install is not sufficient; it has to be mvn clean deploy. Any guesses why?
The deploy phase of the default Maven lifecycle comes after the install phase. Executing mvn clean deploy will execute all the phases of the default Maven lifecycle up to and including the deploy phase, which also includes the install phase. The following command shows how to execute the deploy goal of the deploy plugin by itself:
$ mvn deploy:deploy
All the Maven projects inherit the deploy plugin from the super POM file. As shown in the following configuration, the super POM defines the deploy plugin. It associates the deploy goal with the deploy phase of the Maven default lifecycle:
<plugin>
  <artifactId>maven-deploy-plugin</artifactId>
  <version>2.7</version>
  <executions>
    <execution>
      <id>default-deploy</id>
      <phase>deploy</phase>
      <goals>
        <goal>deploy</goal>
      </goals>
    </execution>
  </executions>
</plugin>
Before executing either mvn deploy:deploy or mvn deploy, you need to set up the remote Maven repository details in your project POM file, under the distributionManagement section, as follows. We will discuss Maven repositories in detail in Chapter 8, Maven Repository Management:
[...]
  <distributionManagement>
    <repository>
      <id>wso2-maven2-repository</id>
      <name>WSO2 Maven2 Repository</name>
      <url>scp://dist.wso2.org/home/httpd/dist.wso2.org/maven2/</url>
    </repository>
  </distributionManagement>
[...]
In this example, Maven connects to the remote repository via scp. Secure Copy (scp) defines a way of securely transferring files between two nodes in a computer network, which is built on top of the popular SSH. To authenticate to the remote server, Maven provides two ways. One is based on the username and password. The other one is based on SSH authentication keys. To configure username/password credential against the Maven repository, we need to add the following <server> configuration element to USER_HOME/.m2/settings.xml under the <servers> parent element. The value of the id element must carry the value of the remote repository hostname:
<server>
  <id>dist.wso2.org</id>
  <username>my_username</username>
  <password>my_password</password>
</server>
If the remote repository only supports SSH authentication keys, then we need to specify the location of the private key, as follows:
<server>
  <id>dist.wso2.org</id>
  <username>my_username</username>
  <privateKey>/path/to/private/key</privateKey>
</server>
The deploy goal of the deploy plugin does not have any configurations to be overridden at the project level.
The surefire plugin will run the unit tests associated with the project. The test goal of the surefire plugin is bound to the test phase of the default Maven lifecycle. When you type mvn clean install, Maven will execute all the phases in the default lifecycle up to and including the install phase, which also includes the test phase.
The following command shows how to execute the test goal of the surefire plugin by itself:
$ mvn surefire:test
All the Maven projects inherit the surefire plugin from the super POM file. As shown in the following configuration, the super POM defines the surefire plugin. It associates the test goal with the test phase of the Maven default lifecycle:
<plugin>
  <artifactId>maven-surefire-plugin</artifactId>
  <version>2.12.4</version>
  <executions>
    <execution>
      <id>default-test</id>
      <phase>test</phase>
      <goals>
        <goal>test</goal>
      </goals>
    </execution>
    <execution>
      <id>default-test-1</id>
      <phase>test</phase>
      <goals>
        <goal>test</goal>
      </goals>
    </execution>
  </executions>
</plugin>
As the surefire plugin is defined in the super POM file, you do not need to add it explicitly to your application POM file. However, you need to add a dependency to junit, shown as follows:
<dependencies>
  [...]
    <dependency>
      <groupId>junit</groupId>
      <artifactId>junit</artifactId>
      <version>4.8.1</version>
      <scope>test</scope>
    </dependency>
  [...]
</dependencies>
The surefire plugin is not just coupled to JUnit; it can also be used with other testing frameworks as well. If you are using TestNG, then you need to add a dependency to testng, shown as follows:
<dependencies>
  [...]
    <dependency>
      <groupId>org.testng</groupId>
      <artifactId>testng</artifactId>
      <version>6.3.1</version>
      <scope>test</scope>
    </dependency>
  [...]
</dependencies>
The surefire plugin introduces a concept called test providers. You can specify a test provider within the plugin itself; if not, it will be derived from the dependency JAR file. For example, if you want to use the junit47 provider, then within the plugin configuration, you can specify it as shown in the following configuration. The surefire plugin supports, by default, four test providers, which are surefire-junit3, surefire-junit4, surefire-junit47, and surefire-testng:
<plugins>
  [...]
    <plugin>
      <groupId>org.apache.maven.plugins</groupId>
      <artifactId>maven-surefire-plugin</artifactId>
      <version>2.17</version>
      <dependencies>
        <dependency>
          <groupId>org.apache.maven.surefire</groupId>
          <artifactId>surefire-junit47</artifactId>
          <version>2.17</version>
        </dependency>
      </dependencies>
    </plugin>
  [...]
</plugins>
As all the Maven projects inherit the surefire plugin from the super POM file, you do not override its configuration in the application POM file unless it's an absolute necessity. One reason for this could be to override the default test provider selection algorithm.
The site plugin generates static HTML web content for the project, including the reports configured in a project. This defines eight goals, where each goal runs in one of the four phases defined in the Maven site lifecycle: pre-site, site, post-site, and site-deploy. The eight goals are:
site:site: This goal generates a site for a single Maven projectsite:deploy: This goal deploys the generated site via the Wagon-supported protocol to the site URL specified in the<distributionManagement>section of the POM filesite:run: This goal starts the site with the Jetty web serversite:stage: This goal generates a site in a local staging or mock directory based on the site URL specified in the<distributionManagement>section of the POM filesite:stage-deploy: This goal deploys the generated site to a staging or mock directory to the site URL specified in the<distributionManagement>section of the POM filesite:attach-descriptor: This goal adds the site descriptor (site.xml) to the list of files to be installed/deployedsite:jar: This goal bundles the site output into a JAR file so that it can be deployed to a repositorysite:effective-site: This goal calculates the effective site descriptor after inheritance and interpolation ofsite.xml
All the Maven projects inherit the site plugin from the super POM file. As shown in the following configuration, the super POM defines the site plugin. It associates the site and deploy goals with the site and site-deploy phases of the Maven default lifecycle:
<plugin>
  <artifactId>maven-site-plugin</artifactId>
  <version>3.3</version>
  <executions>
    <execution>
      <id>default-site</id>
      <phase>site</phase>
      <goals>
        <goal>site</goal>
      </goals>
      <configuration>
        <outputDirectory>
        PROJECT_HOME/target/site</outputDirectory>
        <reportPlugins>
          <reportPlugin>
            <groupId>org.apache.maven.plugins</groupId>
            <artifactId>
              maven-project-info-reports-plugin
            </artifactId>
          </reportPlugin>
        </reportPlugins>
      </configuration>
    </execution>
    <execution>
      <id>default-deploy</id>
      <phase>site-deploy</phase>
      <goals>
        <goal>deploy</goal>
      </goals>
      <configuration>
        <outputDirectory>
        PROJECT_HOME/target/site</outputDirectory>
        <reportPlugins>
          <reportPlugin>
            <groupId>org.apache.maven.plugins</groupId>
            <artifactId>
              maven-project-info-reports-plugin
            </artifactId>
          </reportPlugin>
        </reportPlugins>
      </configuration>
    </execution>
  </executions>
  <configuration>
    <outputDirectory>
    PROJECT_HOME/target/site</outputDirectory>
    <reportPlugins>
      <reportPlugin>
        <groupId>org.apache.maven.plugins</groupId>
        <artifactId>
          maven-project-info-reports-plugin
        </artifactId>
      </reportPlugin>
    </reportPlugins>
  </configuration>
</plugin>
As defined in the previous configuration, when you run mvn site or mvn site:site, the resultant HTML web content will be created inside the target/site directory under the project home. The site goal of the site plugin only generates the HTML web content; to deploy it, you need to use the deploy goal. To deploy the generated website to a remote application server, you need to specify the remote machine details under the distributionManagement section of your application POM file, as follows:
<project>
  ...
  <distributionManagement>
    <site>
      <id>mycompany.com</id>
      <url>scp://mycompany/www/docs/project/</url>
    </site>
  </distributionManagement>
  ...
</project>
To configure credentials to connect to the remote computer, you need to add the following <server> configuration element to USER_HOME/.m2/settings.xml under the <servers> parent element:
<server>
  <id>mycompany.com</id>
  <username>my_username</username>
  <password>my_password</password>
</server>
The generated site or the web content can be deployed to the remote location by executing the deploy goal of the Maven site plugin, as follows:
$ mvn site:deploy
In most of the cases, you do not need to override the site plugin configuration.
The jar plugin creates a JAR file from your Maven project. The jar goal of the jar plugin is bound to the package phase of the Maven default lifecycle. When you type mvn clean install, Maven will execute all the phases in the default lifecycle up to and including the install phase, which also includes the package phase.
The following command shows how to execute the jar goal of the jar plugin by itself:
$ mvn jar:jar
All the Maven projects inherit the jar plugin from the super POM file. As shown in the following configuration, the super POM defines the jar plugin. It associates the jar goal with the package phase of the Maven default lifecycle:
<plugin>
  <artifactId>maven-jar-plugin</artifactId>
  <version>2.4</version>
  <executions>
    <execution>
      <id>default-jar</id>
      <phase>package</phase>
      <goals>
        <goal>jar</goal>
      </goals>
    </execution>
    <execution>
      <id>default-jar-1</id>
      <phase>package</phase>
      <goals>
        <goal>jar</goal>
      </goals>
    </execution>
  </executions>
</plugin>
In most of the cases, you do not need to override the jar plugin configuration, except in a case, where you need to create a self-executable jar file.
Note
Details on how to create a self-executable JAR file with maven-jar-plugin can be found at http://maven.apache.org/shared/maven-archiver/examples/classpath.html.
The source plugin creates a JAR file with the project source code. It defines five goals: aggregate, jar, test-jar, jar-no-fork, and test-jar-no-fork. All these five goals of the source plugin will run under the package phase of the default lifecycle.
Unlike any of the plugins we discussed before, if you want to execute the source plugin with the Maven default lifecycle, it has to be defined in the project POM file, shown as follows. The super POM file does not define the source plugin; it has to be within your Maven project itself:
<project>
...
  <build>
    <plugins>
      <plugin>
        <groupId>org.apache.maven.plugins</groupId>
        <artifactId>maven-source-plugin</artifactId>
        <version>2.3</version>
        <configuration>
          <outputDirectory>
            /absolute/path/to/the/output/directory
          </outputDirectory>
          <finalName>filename-of-generated-jar-file</finalName>
          <attach>false</attach>
        </configuration>
      </plugin>
    </plugins>
  </build>
...
</project>
What is the difference between the jar and source plugins? Both create JAR files; however, the jar plugin creates a JAR file from the binary artifact, while the source plugin creates a JAR file from the source code. Small-scale open source projects use this approach to distribute the corresponding source code along with the binary artifacts.
The resources plugin copies the resources associated with the main project as well as the tests to the project output directory. The resources goal of the resources plugin copies the main resources into the main output directory, and it runs under the process-resources phase of the Maven default lifecycle. The testResources goal copies all the resources associated with the tests to the test output directory, and runs under the process-test-resources phase of the Maven default lifecycle. The copyResources goal can be configured to copy any resource to the project output directory, and this is not bound to any of the phases in the Maven default lifecycle.
All the Maven projects inherit the resources plugin from the super POM file. As shown in the following configuration, the super POM defines the resources plugin. It associates resources and testResources goals with the process-resources and process-test-resources phases of the Maven default lifecycle. When you type mvn clean install, Maven will execute all the phases in the default lifecycle up to and including the install phase, which also includes the process-resources and process-test-resources phases:
<plugin>
  <artifactId>maven-resources-plugin</artifactId>
  <version>2.6</version>
  <executions>
    <execution>
      <id>default-resources</id>
      <phase>process-resources</phase>
      <goals>
        <goal>resources</goal>
      </goals>
    </execution>
    <execution>
      <id>default-testResources</id>
      <phase>process-test-resources</phase>
      <goals>
        <goal>testResources</goal>
      </goals>
    </execution>
    <execution>
      <id>default-resources-1</id>
      <phase>process-resources</phase>
      <goals>
        <goal>resources</goal>
      </goals>
    </execution>
    <execution>
      <id>default-testResources-1</id>
      <phase>process-test-resources</phase>
      <goals>
        <goal>testResources</goal>
      </goals>
    </execution>
  </executions>
</plugin>
In most of the cases, you do not need to override the resources plugin configuration, unless you have a specific need to filter resources.
Note
More details about resource filtering with maven-resources-plugin can be found at http://maven.apache.org/plugins/maven-resources-plugin/examples/filter.html.
Releasing a project requires a lot of repetitive tasks. The objective of the Maven release plugin is to automate them. The release plugin defines the following eight goals, which are executed in two stages, which are preparing the release and performing the release:
release:clean: This goal cleans up after a release preparationrelease:prepare: This goal prepares for a release in Software Configuration Management (SCM)release:prepare-with-pom: This goal prepares for a release in SCM and generates release POMs by fully resolving the dependenciesrelease:rollback: This goal rolls back to a previous releaserelease:perform: This goal performs a release from SCMrelease:stage: This goal performs a release from SCM into a staging folder/repositoryrelease:branch: This goal creates a branch of the current project with all versions updatedrelease:update-versions: This goal updates the versions in POM(s)
The preparation stage will complete the following tasks with the release:prepare goal:
- Verify that all the changes in the source code are committed.
- Make sure that there are no SNAPSHOT dependencies. During the project development phase we use SNAPSHOT dependencies; however, at the time of the release, all the dependencies should be changed to a released version.
- The version of the project POM file will be changed from SNAPSHOT to a concrete version number.
- The SCM information in the project POM file will be changed to include the final destination of the tag.
- Execute all the tests against the modified POM files.
- Commit the modified POM files to SCM and tag the code with the version name.
- Change the version in POM files in the trunk to a SNAPSHOT version and commit the modified POM files to the trunk.
Finally, the release will be performed with the release:perform goal. This will check out the code from the release tag in the SCM and run a set of predefined goals: site and deploy-site.
The maven-release-plugin is not defined in the super POM file; it should be explicitly defined in your application POM file. The releaseProfiles configuration element defines the profiles to be released and the goals configuration element defines the plugin goals to be executed during release:perform, as follows:
<plugin>
  <artifactId>maven-release-plugin</artifactId>
  <version>2.5</version>
  <configuration>
    <releaseProfiles>release</releaseProfiles>
    <goals>deploy assembly:single</goals>
  </configuration>
</plugin>