
RabbitMQ provides an extension of the default clustering mechanism that allows the replication of the contents of a queue over one or more nodes. It takes the active-active approach for establishing a highly available cluster, and you can select how many nodes to replicate a queue in a master-slave configuration (one node is designated as the master and all other nodes as the slaves):
- Replicate to all nodes in the cluster
- Replicate to a certain number of nodes in the cluster
- Replicate to certain nodes in the cluster (specified as a list of node names)
In terms of RabbitMQ, this extension is called mirrored queues.
Note that there is an opportunity to establish an active-passive RabbitMQ cluster using helper technologies that allow you to use redundant servers in order to establish that type of clustering; this was the preferred approach in most production scenarios before built-in support for mirrored queues was provided. However, mirrored queues are now the preferred approach since they are way faster and easier to configure than custom active-passive high availability configurations using third-party solutions. However, they inherit the drawbacks of the RabbitMQ built-in clustering mechanism on top of which they step:
- It cannot be applied across instances in distant locations (for example, datacenters in different regions in the world) due to the fact that it is very sensitive to latency issues. Such issues cause communication failures in the cluster. One solution could be to ensure that only high-bandwidth leased lines are available across the datacenters, thus eliminating the risk of latency problems.
- Even if a queue on a node is marked as durable, its contents cannot be directly copied over to another node in case the current one fails unless the mirrored queue policy you define matches the queue name. You should make sure that any new durable queues you add to the cluster (and need to be mirrored) are matched by a proper policy that specifies the nodes on which to replicate the contents of that queue. Otherwise, if no policy is in effect and if the node on which the durable queue is defined fails, then it should be restored again in order to be able to use that queue.
Having regard to the fact that RabbitMQ clustering is not proper for nodes over a WAN, queue mirroring must be supported with additional mechanisms that provide such distribution of queue contents. The federation and shovel plugins come to the rescue in that scenario. The federation plugin allows you to replicate messages between exchanges or between queues, while the shovel plugin allows you to send messages from a queue in one broker instance to an exchange in another broker instance. Apart from the fact that this provides a mechanism for establishing custom message broker topologies, it provides for a more resilient mechanism for communication between instances in an unreliable network environment, and also the possibility of running different versions of the RabbitMQ broker on each instance. Moreover, the different instances remain completely independent of each other.
In regard to the fact that there is a policy matching each queue we want to mirror, we must always consider testing either manually or automatically that our setup is correct by intentionally bringing down one or more nodes.
The steps for creating a mirrored queue are pretty straight-forward based on the fact that we already know how to configure a RabbitMQ cluster:
- Create the RabbitMQ cluster
- Create the mirroring policy over the particular queue from the cluster (this can be done from any node in the cluster)
The node on which the queue is created becomes the master and all other nodes matched by the mirroring policy become the slaves. When the master node fails then one of the slave nodes is designated as the new master; typically, this is the eldest slave node. The following diagram outlines a node with three nodes (the one we already described when we discussed clustering) and one mirrored queue called mirrored_queue defined on the rabbit node:

Assuming the rabbit node is already running, we will add the instance1 DISK node (that persists metadata on disk) and the instance3 RAM node (that persists metadata in-memory) to the cluster in the same way we did in the previous chapter:
set RABBITMQ_NODENAME=instance1 & set RABBITMQ_NODE_PORT=5701 &  rabbitmq-server –detached
rabbitmqctl –n instance1 stop_app
rabbitmqctl –n instance1 join_cluster rabbit@DOMAIN
rabbitmqctl –n instance1 start_app
set RABBITMQ_NODENAME=instance3 &  set RABBITMQ_NODE_PORT=5703 & rabbitmq-server –detached
rabbitmqctl –n instance3 stop_app
rabbitmqctl –n instance3 join_cluster --ram rabbit@DOMAIN
rabbitmqctl –n instance3 start_app
Let's declare the mirrored_queue on the instance1 node:
rabbitmqadmin.py declare queue name="mirrored_queue"
And finally let's make the queue mirrored on all nodes:
rabbitmqctl set_policy ha-all "mirrored_queue" "{""ha-mode"":""all""}"If you go to the RabbitMQ management console and click on the Queues tab you will notice that mirrored_queue now has a +2 under node, indicating that there are two slaves, and under Features you can see a ha-all feature, which indicates the mirrored queue policy:

If you click on mirrored_queue you see further information about the queue along with the slave nodes on which the queue is mirrored:

Each time a message is sent to a node in the RabbitMQ cluster, the channel routes the message directly to the master node, which passes it over to the slave instances. However in the event a new slave is created for the queue (for example, if a new node is joined to the cluster and we have a mirrored queue policy that replicates queue contents over all nodes), then it must be synchronized with the already existing messages in the master queue. Another scenario when synchronization is necessary is when the node of a durable slave queue is shut down and later restored; in that case, the contents of the durable queue are cleared by RabbitMQ and it behaves as if a new slave is joined to the master that needs synchronization. The master queue blocks until it synchronizes with the slave(s). Synchronization must be triggered either manually (which is the default behavior) or automatically (which can be defined as part of the mirrored queue policy).
Let's assume we have added a new node to the cluster we have. In that case we have to trigger synchronization manually using the following command:
rabbitmqctl sync_queue mirrored_queue
If you don't want to perform synchronization each time a new slave joins you can reconfigure your policy as follows:
rabbitmqctl set_policy ha-all "mirrored_queue" "{""ha-mode"":""all"", ""ha-sync-mode"":""automatic""}"You may be wondering whether replication of messages and queue synchronization impact the performance of the cluster; the short answer is, yes they do. However this performance hit can be minimized by carefully defining the topology of your cluster. Let's assume that we have a large cluster with several queues defined on each node and each queue is mirrored over all other nodes in the cluster. This implies a lot of communication between the nodes in the cluster, which may introduce severe delays in message senders or receivers. One strategy that can be incorporated in order to avoid this is to have only one slave queue. You can do this by defining that you only want to replicate messages to one (random) node using the following policy:
rabbitmqctl set_policy ha-exactly "mirrored_queue" "{""ha-mode"":""exactly"",""ha-params"":2,""ha-sync-mode"":""automatic""}"The ha-exactly policy replaces the ha-all policy in effect for the mirrored_queue queue (although both policies exist in the cluster metadata), as visible from the RabbitMQ management console:


The instance1 node is selected by RabbitMQ as the slave queue node. If you want to specify a concrete node for that purpose (let's say instance3), you can set the following policy:
rabbitmqctl set_policy ha-by-name "mirrored_queue" "{""ha-mode"":""nodes"",""ha-params"":[""rabbit@DOMAIN"", ""instance3@Domain""],""ha-sync-mode"":""automatic""}"In that case, the rabbit node is designated as the master and the instance3 node as the slave. You should be careful with the names you specify in the nodes policy (also consider case-sensitivity); RabbitMQ will ignore invalid nodes and set master/slave nodes wrongly. Moreover, if you specify nodes that do not contain the current master node (the node where the queue is originally created), the policy will enforce the first node synchronized with the master slave node in the list to become the new master. If no such node is present in the list, RabbitMQ will continue using the current master until a node from the list is synchronized with it. You should be careful when changing mirroring policies and having unsynchronized slaves; this may cause unexpected behavior. Consider the following scenario where the master queue on the rabbit node has two messages that must be synchronized with the slaves on the other two nodes (instance1 and instance3):

If the master queue node (in this case rabbit) fails, then RabbitMQ will try to elect a new master from one of the synchronized slaves (for example, from new or restored nodes that joined the cluster). Since we don't have such a slave, RabbitMQ will behave as if there are no slaves and processing on that queue will fail. If we don't want that to happen, we can additionally set the ha-promote-on-shutdown parameter to always on the mirroring policy; this will, however, impose the risk of losing messages in regard to the increased degree of high availability.
Mirrored queues are great for establishing high availability. However, the following questions remain open due to the fact that mirrored queues make use of the RabbitMQ clustering mechanism:
- How can we establish high availability over long distances since the clustering mechanism is not cooperative over the WAN?
- How can we upgrade cluster nodes both in terms of Erlang and RabbitMQ versions?
- How can we create a cluster of geographically distributed RabbitMQ clusters?
The Federation and Shovel plugins provide the answers to the preceding questions.
The RabbitMQ federation plugin allows messages to be sent from an exchange in one host to an exchange in another or from a queue in one host to a queue in another. This is done by upstream links defined over the federated exchanges/queues in the upstream host (the host that receives the messages). The mechanism provided by the Federation plugin is not dependent upon RabbitMQ clustering but is cooperative with it, meaning that messages can be federated between exchanges or queues in different clusters. The Federation plugin must be enabled on the RabbitMQ nodes that participate in the message federation. All nodes in a RabbitMQ cluster must have the Federation plugin enabled in case replication of messages using the plugin happens between RabbitMQ clusters. To enable the plugin on a particular node execute the following command:
rabbitmq-plugins enable rabbitmq_federation
rabbitmq-plugins enable rabbitmq_federation_management
The rabbitmq_federation_management plugin enables management of the federation uplinks from the RabbitMQ management console.
Let's assume that we want to create a federated exchange and a federated queue defined in a new three-node cluster that link respectively to an upstream exchange and an upstream queue in our existing three-node cluster, as shown in the following diagram:

The following commands define our new local cluster:
set RABBITMQ_NODENAME=remote1 &
set RABBITMQ_NODE_PORT=5711 &
set RABBITMQ_SERVER_START_ARGS=-rabbitmq_management listener [{port,55555}] &
rabbitmq-server.bat –detached
rabbitmq-plugins.bat -n remote1 enable rabbitmq_management
rabbitmq-plugins.bat -n remote2 disable rabbitmq_management
rabbitmq-plugins.bat -n remote3 disable rabbitmq_management
set RABBITMQ_NODENAME=remote2 &
set RABBITMQ_NODE_PORT=5712 &
rabbitmq-server.bat –detached
rabbitmqctl.bat -n remote2 stop_app
rabbitmqctl.bat -n remote2 join_cluster remote1@Martin
rabbitmqctl.bat -n remote2 start_app
set RABBITMQ_NODENAME=remote3 &
set RABBITMQ_NODE_PORT=5713 &
rabbitmq-server.bat –detached
rabbitmqctl.bat -n remote3 stop_app
rabbitmqctl.bat -n remote3 join_cluster remote1@Martin
rabbitmqctl.bat -n remote3 start_app
Essentially, the steps we perform in order to start a second cluster on a local machine are as follows:
- We start the
remote1node and specify additionallyRABBITMQ_SERVER_START_ARGS, which specifies the port on which we want to start the RabbitMQ management plugin (we are already using the management plugin for the initial cluster on default port 15672 and so we won't be able to enable its use for the management plugin UI in the second cluster). Another option is to specify a different configuration file for theremote1node before starting it using theRABBITMQ_CONFIG_FILEenvironment variable and specify the management plugin port inside that specific node configuration file. - We enable the management plugin on the
remote1node. - We disable the management plugin on the
remote2andremote3nodes (this is just a precaution in case RabbitMQ tries to start the management plugin by default on the nodes). Note that so far we have been using the defaultenabled_pluginsfile that stores the configuration of each plugin that must be enabled and so far we have been modifying the file using therabbitmq-pluginsutility before starting each node. However, it is better to specify a separatedenabled_pluginsfile for each node, which can be achieved by setting theRABBITMQ_ENABLED_PLUGINS_FILEenvironment variable prior to starting each RabbitMQ node. - We start the
remote2andremote3nodes and join them in the same cluster using theremote1node in the usual manner we use to set up a cluster.
We need to enable the Federation plugin on the nodes in the cluster, create the upstream links, and set the proper federation policies on the remote1 and remote3 nodes, as shown in the preceding diagram. You can think of the later process as creating a "subscription" from the federated_exchange exchange in the remote cluster to the upstream_exchange in the initial cluster and a "subscription" from the federated_queue queue in the remote cluster to the upstream_queue queue in the initial cluster. The following enables the Federation plugin on the remote3 node in the remote cluster:
rabbitmq-plugins -n remote1 enable rabbitmq_federation
rabbitmq-plugins -n remote1 enable rabbitmq_federation_management
To verify the cluster is successfully created, try opening http://localhost:55555 and verify that you see the three cluster nodes in the management UI:

Let's define the exchanges and clusters in our clusters. We will define the exchanges as direct and bind additionally the federated_queue queue refined in the remote3 node to the federated_exchange exchange defined in the remote1 node:
rabbitmqadmin.py -N instance1 declare exchange name=upstream_exchange type=direct
rabbitmqadmin.py -N instance3 declare queue name=upstream_queue durable=false
rabbitmqadmin.py -N remote1 -P 55555 declare exchange name=federated_exchange type=direct
rabbitmqadmin.py -N remote3 -P 55555 declare queue name=federated_queue durable=false
rabbitmqadmin.py -N remote1 -P 55555 declare binding source=federated_exchange destination=federated_queue routing_key=federated
Note that when creating the nodes using the rabbitmqadmin utility, we must specify the port of the RabbitMQ management plugin (here, 55555) since the utility uses the HTTP API of the management plugin. If we omit the port, the items will be created in the first cluster (since the default management plugin port of 15672 is used).
The final configuration we should make is to actually create the federation links by creating upstreams in the remote cluster and binding them to the target federated exchange or queue using policies:
rabbitmqctl -n remote1 set_parameter federation-upstream upstream "{""uri"":""amqp://localhost:5672"",""expires"":3600000, ""exchange"":""upstream_exchange"", ""queue"":""upstream_queue""}"

rabbitmqctl -n remote1 set_policy federate-exchange--apply-to exchanges "federated_exchange""{""federation-upstream"":""upstream""}"

rabbitmqctl -n remote1 set_policy federate-queue--apply-to queues "federated_queue""{""federation-upstream"":""upstream""}"
We first create an upstream that points to the rabbit node in the first cluster (amqp://localhost:5672) and specifies upstream_exchange and upstream_queue as an upstream exchange and a queue. We can omit them from the definition of the upstream link, but in that case the policy would expect that their names should match those of the federated exchange and queue. After that, we define a federation policy for the federated_exchange that references the upstream link (thus retrieving messages from the upstream_exchange). Lastly, we define a policy for the federated_queue that references the upstream link (thus retrieving messages from the upstream exchange).
You may be wondering how the federation link authenticates against the upstream cluster or how we specify a vhost in which our upstream exchanges and queues reside. The answer to both of these question is related to the capabilities of the amqp URI scheme. We can additionally provide a username and password along with the vhost; by default, the guest user and the default vhost are assumed by the federation links.
We have already enabled the federation_management_agent on the remote cluster so we can observe the federation configuration in the management UI. If we navigate to Federation Upstreams under the Admin tab, we can see what federation upstreams we have configured, along with the attributes we have assigned to them (in our particular case a one-hour buffer for queuing messages from the upstream):

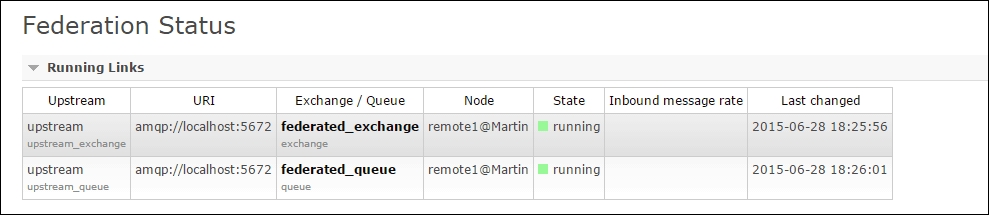
We can also check the status of the federation links from Federation Status under the Admin tab:
If we navigate to the Exchanges tab, we will observe the federate-exchange policy present as a feature on our federated_exchange exchange:

If we navigate to the Queues tab we will observe similar behavior for the federated_queue queue:

If we navigate to the management UI of the first cluster (running on port 15672) we will observe that a generic exchange and queue are created for the exchange federation link in the upstream cluster configuration:


In order to verify that the federation links work, we will send two messages, one to the upstream_exchange with the federated binding key (earlier we created a binding with that key between federated_exchange and federated_queue) and one to the default exchange with the upstream_queue key:
rabbitmqadmin.py publish exchange=upstream_exchange routing_key=federated payload="first test message"
rabbitmqadmin.py publish exchange=amq.default routing_key=upstream_queue payload="second test message"
If you subscribe to the federated_queue in the remote cluster using the ClusterReceiver Java class from the previous chapter, you will notice that in both cases the subscriber instance receives the test messages. In the first case, the upstream_exchange exchange sends the message to the federated_exchange exchange in the remove cluster and the federated_exchange exchange routes the message to the federated_queue queue, using the federated routing key matching the binding key defined between the exchange and the queue in the remote cluster. In the second case, the federated link sends the message from the upstream_queue queue directly to the federated_queue.
You can play around with the cluster by bringing down nodes from one of the clusters and investigating how the exchange/queue federation behaves in certain scenarios; since the federation plugin is aware of RabbitMQ clusters, it will try to migrate exchange/queue federation links in case a node in the upstream/downstream cluster fails. What would happen if the instance3 node that is the node for the upstream_queue queue fails? If we bring down the node and send the two test messages again we will find that both of them arrive successfully at the federated_queue queue.
The Federation plugin is not the only mechanism that allows for successfully sending messages between RabbitMQ instances over the WAN. The shovel plugin can be used to send a message from a queue defined in a single RabbitMQ instance to an exchange defined in another RabbitMQ instance located possibly in a different geographic location. This means that the shovel plugin can also be used to transfer messages over the WAN and moreover, it is also cooperative in clustered configurations. The Shovel plugin works at a lower level than the Federation plugin and can be defined either statically (in the RabbitMQ configuration file) or dynamically, via parameters similarly to how federation upstreams are created. Dynamic shovels are a newer addition to the Shovel plugin (introduced with the release 3.3.0 of RabbitMQ). Having regard to static shovels, which provide only the option to send messages from a source queue to a destination exchange, dynamic shovels provide all scenarios for queue/exchange-to-queue/exchange message sending in addition to a simplified configuration.
In order to use the Shovel plugin you must enable it on the target nodes along with the management plugin extensions (if needed). The following commands enable a dynamic shovel between the upstream_queue in the source cluster and the federated_exchange in the target cluster (the same configuration can be achieved using static shovels but without the benefits of dynamic configuration):
rabbitmq-plugins -n remote1 enable rabbitmq_shovel
rabbitmq-plugins -n rabbit enable rabbitmq_shovel_management

rabbitmqctl -n remote1 set_parameter shovel test_shovel
"{""src-uri"": ""amqp://localhost:5672"", ""src-queue"": ""upstream_queue"", ""dest-uri"": ""amqp://localhost:5712"", ""dest-exchange"": ""federated_exchange""}"
If you open localhost:55555 (the management web interface for the remote cluster) in the browser and navigate to Shovel Management, when clicking the Admin tab you will notice that there is one dynamic shovel configured:

You can also inspect the status of the shovel when navigating to the Shovel Status under the Admin tab and verify that the shovel is up-and-running:

In fact, we can specify the dynamic shovel in the upstream cluster with regard to the federation plugin where we need to specify the upstreams and the federation policies in the node where the federated exchanges/queues reside.
To verify that the shovel works, we can create a second binding between the federation_upstream and the federation_queue with a binding key of upstream_queue, and send a test message to the default exchange in the first cluster (the routing key of the message is passed along from the upstream_queue queue in the source cluster to the federated_exchange exchange in the destination cluster):
rabbitmqadmin.py -N remote1 -P 55555 declare binding source=federated_exchange destination=federated_queue routing_key=upstream_queue
rabbitmqadmin.py publish exchange=amq.default routing_key=upstream_queue payload="second test message"
If we subscribe to the federation_queue queue, we will notice that the message is successfully received.
The following table provides a summary of the different options supported by the Federation and Shovel plugins:

So far we have been looking at high availability mostly in terms of node redundancy. What about network connections? Network failures introduce another degree of uncertainty when transferring messages via a single RabbitMQ node or an entire cluster of nodes. Let's refer to the cluster we created originally:

What happens if the sender sends a message to the default exchange with a key of test (the name of the test queue defined in instance3) By default, both publisher and subscriber do not expect any acknowledgements. Remember that performance is by default the target priority for the broker. Here is what happens:
- The sender sends a message and does not await a confirmation that the broker has successfully processed the message (delivered it to the
testqueue) - The broker receives the message and routes it to the
testqueue, which may or may not persist it on disk or replicate it among the other nodes in the cluster (depending on how durability and mirroring are configured) - The broker sends the message to the receiver without awaiting acknowledgement from the receiver (by default the queue is created with
autoAck=true, meaning that the message is discarded from the queue once sent to the receiver without awaiting a confirmation)
The preceding message flow does not take into account reliable delivery. In particular:
- If the sender has sent the message (the first step is completed) but the broker instance fails while processing the message, then the message is lost and publishing is unsuccessful.
- If however the message is successfully sent to the broker (the second step is completed) and the
testqueue is created withautoAck=false, then the receiver must send an acknowledgement/rejection of the message. Only when the queue receives an explicit acknowledgement from the receiver will it discard the message. If the receiver gets the message but the broker node that hosts the queue fails before processing the acknowledgement from the queue, then it may send the message a second time to the receiver once up-and-running again (assuming the message is lost and hence consumption is unsuccessful).
In both of the preceding scenarios we need a mechanism that will guarantee that publishing/acknowledging messages is successful at the broker. This is possible via AMQP transactions.
The AMQP 0-9-1 specification defines the tx class of protocol operation that allows us to establish transactions with the broker:
tx.select, for starting a transaction with the brokertx.commit, for committing a transaction at the brokertx.rollback, for rolling back a transaction at the broker
A transaction is initiated by the client using the tx.select AMQP command and then committed or rolled-back depending on the particular use case. The TransactionalSender class provides an example of a sender that uses transactions (queue, exchange, or binding declarations are omitted for the sake of simplicity):
import java.io.IOException;
import org.slf4j.Logger;
import org.slf4j.LoggerFactory;
import com.rabbitmq.client.Channel;
import com.rabbitmq.client.Connection;
import com.rabbitmq.client.ConnectionFactory;


public class TransactionalSender {

    private final static Logger LOGGER = LoggerFactory.getLogger(TransactionalSender.class);

    public void send(String exchange, String key, String message){
        Connection connection = null;
        Channel channel = null;
        try {
            ConnectionFactory factory = new ConnectionFactory();
            factory.setHost("localhost");
            connection = factory.newConnection();
            channel = connection.createChannel();

            channel.txSelect();channel.basicPublish(exchange, key, null,
                 message.getBytes());
            channel.txCommit();
        } catch (IOException e) {
            LOGGER.error(e.getMessage(), e);
            if (channel != null) {
                try {
                    channel.txRollback();
                } catch (IOException re) {
                    LOGGER.error("Rollback failed: " +                      re.getMessage(), re);
                }
            }
        } finally {
            if(connection != null) {
                try {
                    connection.close();
                } catch (IOException e) { LOGGER.warn("Failed to close connection: " +
                    e.getMessage(), e);
                }
            }
        }
    }
}
In the preceding example, you can publish as many messages as you want between txSelect() and txCommit() and all of them are committed/rolled back at once. This means that AMQP transactions are very suitable for creating batch publishing of messages. In practice, this can improve the performance of our application if we need to guarantee that messages are successfully processed by the broker and we decide to use AMQP transactions for the purpose.
The following example demonstrations using AMQP transactions with subscriber acknowledgements:
import java.io.IOException;
import org.slf4j.Logger;
import org.slf4j.LoggerFactory;
import com.rabbitmq.client.Channel;
import com.rabbitmq.client.Connection;
import com.rabbitmq.client.ConnectionFactory;
import com.rabbitmq.client.ConsumerCancelledException;
import com.rabbitmq.client.QueueingConsumer;
import com.rabbitmq.client.ShutdownSignalException;

public class TransactionalReceiver {

    private final static Logger LOGGER = LoggerFactory.getLogger(TransactionalReceiver.class);

    private static final String REQUEST_QUEUE = "tx_queue";

    public void receive() {
        Connection connection = null;
        Channel channel = null;
        try {
            ConnectionFactory factory = new ConnectionFactory();
            factory.setHost("localhost");
            connection = factory.newConnection();
            channel = connection.createChannel();
   QueueingConsumer consumer = new QueueingConsumer(channel);
            channel.basicConsume(REQUEST_QUEUE, false, consumer);
            QueueingConsumer.Delivery delivery =                      consumer.nextDelivery();
            String message = new String(delivery.getBody());
            LOGGER.info("Request received: " + message);
            channel.txSelect();
            channel.basicAck(delivery.getEnvelope().getDeliveryTag(),
                false);
            channel.txCommit();
        } catch (IOException e) {
            LOGGER.error(e.getMessage(), e);
            if (channel != null) {
                try {
                    channel.txRollback();
                } catch (IOException re) {                         LOGGER.error("Rollback failed: " + re.getMessage(), re);
                }
            }
        } catch (ShutdownSignalException e) {
            LOGGER.error(e.getMessage(), e);
        } catch (ConsumerCancelledException e) {
            LOGGER.error(e.getMessage(), e);
        } catch (InterruptedException e) {
            LOGGER.error(e.getMessage(), e);
        } finally {
            if(connection != null) {
                try {
                    connection.close();
                } catch (IOException e) {
                    LOGGER.warn("Failed to close
                        connection: " +                                     e.getMessage(), e);
                }
            }
        }
    }
}
In the preceding example, we set autoAck to false when we bind the consumer to the queue and then we use the basicAck method to acknowledge that the message is processed successfully by the consumer.
While AMQP transactions provide a reliable mechanism for ensuring that the broker has processed a message upon publishing, it is quite heavyweight. There are two reasons for this:
- Transactions make publishing messages synchronous; the publisher cannot send a message over the same channel until the previously sent message has been confirmed
- Transactions are onerous operations on their own.
For that reason, the broker introduces an extension called publisher confirms (not defined in the AMQP spec). Publisher confirms work by creating a channel in publish model, thus making the broker responsible for sending acknowledgements upon successful processing of messages over the channel. Moreover, confirms are asynchronous, meaning that multiple messages can be sent and confirmed independently by the broker. In order to enable publisher confirms you can modify the TransactionalPublisher class as follows:
- Use the confirmSelect() method instead of txSelect() on the channel in order to enable publisher confirms
- Register a handler for message acknowledgements/rejections from the broker
The following snippet demonstrates the preceding points:
channel.addConfirmListener(new ConfirmListener() {     public void handleNack(long deliveryTag, boolean multiple) throws IOException {
            LOGGER.warn("Message(s) rejected.");
    }

    public void handleAck(long deliveryTag,      boolean multiple)
        throws IOException {
            LOGGER.warn("Message(s) confirmed.");
    }});

channel.confirmSelect();
channel.basicPublish(exchange, key, null, message.getBytes());