So far, we have been looking at what features does RabbitMQ provide in terms of fast and reliable message sending—from message patterns and broker administration to clustering and high availability. In this chapter, we will go further by providing an overview of how the broker integrates with other systems and how the other systems integrate with the broker.
The following topics will be covered in the chapter:
- Spring framework integrations
- Integration with ESBs
- Integration with databases
- RabbitMQ integrations
- RabbitMQ deployment options
- Testing RabbitMQ applications
Let's take a look at the standard setup that we have been discussing so far (including a producer, consumer, and three-node RabbitMQ cluster):
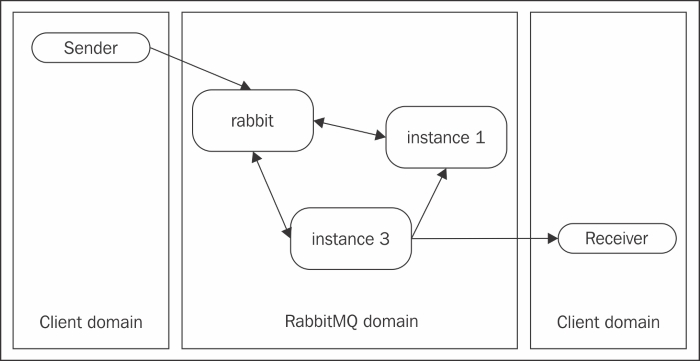
If we consider the client domain (publisher/subscriber), we can perform the following:
- We can use a client AMQP library written in any programming language (thus integrating RabbitMQ with a particular programming language). We are already using the out-of-the-box RabbitMQ Java client. As RabbitMQ supports a multitude of AMQP clients, you can use one that best suits your application or write your own AMQP client in your programming language of choice, if one is missing.
- We can use a wrapper library written on top of a client library. Many applications that use RabbitMQ as a message broker are deployed as part of a web or dependency injection container. For this reason, there are wrappers around the client libraries for different containers, such as the ones provided by the Spring framework and implemented on top of the RabbitMQ Java client library and Spring AMQP library.
If we consider the RabbitMQ domain (the RabbitMQ cluster), we can perform the following:
- We can send messages via other protocols such as STOMP, MQTT, or HTTP.
- We can send messages via AMQP from an ESB (enterprise service bus) such as Mule ESB or WSO2 that integrate with a number of other protocols.
- We can persist messages by subscribing to the broker directly from a database (either relational or NoSQL) using the utilities provided by the database rather than a separate application that subscribes to the broker and persists to the database. For example, this could be a PL/SQL stored procedure that subscribes directly to the message broker (in case of an Oracle relational database management system).
Many applications that are deployed along with a dependency injection container such as Spring make use of the additional utilities provided by the container in order to use a variety of features out of the box. In terms of RabbitMQ, these features are as follows:
- Spring AMQP: This provides you with an abstraction layer and core library on top of the AMQP protocol. The Spring RabbitMQ library uses it to provide utilities for interaction with the RabbitMQ message broker.
- Spring Integration: The framework provides an implementation of the enterprise integration patterns as defined by Gregor Hohpe and Bobby Wolfe in their book on this topic. As such, the Spring integration framework serves the purpose of providing a convenient Spring-based DSL for the configuration of an enterprise integration bus that enables different systems to communicate with each other. In this regard, the framework provides producer/consumer adapters for RabbitMQ.
- Spring XD (extreme data): The framework provides capabilities for easier handling and analytics on big data from a variety of sources—RabbitMQ message broker being one of them.
The Spring AMQP framework along with the more concrete Spring RabbitMQ support that builds on top of that framework provides the biggest portion of RabbitMQ in the Spring framework. There are three main building blocks behind Spring RabbitMQ:
- The RabbitTemplate class that provides a convenient utility to publish messages or subscribe to a RabbitMQ broker
- The RabbitAdmin class that provides a convenient utility to create/remove exchanges, queues, and bindings
- The message listener containers that provide a convenient mechanism to create asynchronous listeners that bind to a RabbitMQ message queue
Each of these can be used either directly or configured via a Spring XML or annotation-based configuration. In order to include the Spring Rabbit library in your application, you need to add the following Maven dependency to the pom.xml file of your project:
<dependency>
<groupId>org.springframework.amqp</groupId>
    <artifactId>spring-rabbit</artifactId>
    <version>1.4.5.RELEASE</version>
</dependency>
The following snippet demonstrates the use of the RabbitTemplate class to send a message to a queue named sample-queue via the default exchange:
CachingConnectionFactory factory = null;
try {
    factory = new CachingConnectionFactory("localhost");
    RabbitTemplate template = new RabbitTemplate(factory);
    template.convertAndSend("", "sample-queue",                 "sample-queue test message!");
} finally {
    If(factory != null) {
        factory.destroy();
    }
}
Initially, we create an instance of the CachingConnectionFactory class provided by Spring RabbitMQ that, by default, caches a predefined number of channels (and is very convenient to use in a concurrent environment), but the cache mode can be set to cache connections rather than channels and the cache size of the factory can be changed as well. We can specify a number of additional properties on a CachingConnectionFactory instance such as the host and port against which to connect (or multiple addresses, in case of a RabbitMQ cluster), a virtual host, username, password, or even a different thread pool implementation (implementation of the Java ExecutorService, Spring-based or a custom one) used by the factory when it creates connections/channels. We then use convertAndSend() of the RabbitTemplate class to send a message by specifying an exchange and routing key. In the final block, we destroy the connection factory.
The following example demonstrates the use of the RabbitAdmin class to create a queue called sample-queue and bind it to an exchange called sample-topic-exchange
using the
sample-key binding key:
CachingConnectionFactory factory = new CachingConnectionFactory("localhost");
RabbitAdmin admin = new RabbitAdmin(factory);
Queue queue = new Queue("sample-queue");
admin.declareQueue(queue);
TopicExchange exchange = new TopicExchange("sample-topic-exchange");
admin.declareExchange(exchange);
admin.declareBinding(BindingBuilder.bind(queue).
to(exchange).with("sample-key"));
factory.destroy();
The RabbitTemplate and RabbitAdmin classes are convenient utilities that allow you to send/retrieve messages from the broker and create broker items. If you want to listen asynchronously for messages sent to a queue, you can create one using a listener container as follows:
CachingConnectionFactory factory = new CachingConnectionFactory("localhost");
SimpleMessageListenerContainer container = new SimpleMessageListenerContainer(factory);
Object listener = new Object() {
public void handleMessage(String message) {
System.out.println("Message received: " + message);
    }
};
MessageListenerAdapter adapter = new MessageListenerAdapter(listener);
container.setMessageListener(adapter);
container.setQueueNames("sample-queue");
container.start();
First, we create SimpleMessageListenerContainer that is used to manage the listener's life cycle; it allows the listener to bind to more than one queue. Then we create an instance of the listener by supplying the handleMessage() method; we can also use an instance of the MessageListener interface from the Spring AMQP library in order to avoid the usage of MessageListenerAdapter from the preceding example. After we have set the listener and queue names on the listener container instance, we can bind the listener asynchronously using the start() method.
All of these examples demonstrate the use of the utilities provided by the Spring RabbitMQ library without using any additional Spring configuration.
We can decouple the configuration of RabbitTemplate, RabbitAdmin, and listener container instances using the Spring configuration. The additional benefit is that the source code becomes even more concise. The following sample Spring XML configuration file demonstrates how to configure the Spring RabbitMQ utilities:
<beans xmlns=http://www.springframework.org/schema/beans xmlns:xsi="http://www.w3.org/2001/XMLSchema-instance" xmlns:rabbit=http://www.springframework.org/schema/rabbit
xsi:schemaLocation="http://www.springframework.org/schema/rabbit
http://www.springframework.org/schema/rabbit/spring-rabbit.xsd
http://www.springframework.org/schema/beans
http://www.springframework.org/schema/beans/spring-beans.xsd">

<rabbit:connection-factory id="connectionFactory" host="localhost" /><rabbit:template id="amqpTemplate" connection-factory="connectionFactory" exchange="" routing-key="sample-queue-spring"/>

<rabbit:admin connection-factory="connectionFactory" />
<rabbit:queue name="sample-queue-spring" />
<rabbit:topic-exchange name="sample-spring-exchange">
<rabbit:bindings>
<rabbit:binding queue="sample-queue-spring"                 pattern="sample-key-spring" />
</rabbit:bindings>
</rabbit:topic-exchange>

<rabbit:listener-container
    connection-factory="connectionFactory">
    <rabbit:listener ref="springListener" method="receiveMessage" queue-names="sample-queue-spring" />
</rabbit:listener-container>
<bean id="springListener" class="ContainerListenerSpringExample" />
</beans>
We first declare the connection factory instance and then use it to create a RabbitTemplate instance, RabbitAdmin instance, and listener container. The RabbitTemplate instance is configured to use the default exchange with a sample-queue-spring routing key by default. On the creation of a connection to the broker, a topic exchange called sample-spring-exchange will be defined. A new asynchronous listener that binds to the sample-queue-spring queue will be created.
Here is a sample usage of the RabbitTemplate class using the preceding configuration (Note that the asynchronous listener is also created and bound upon context initialization.):
AbstractApplicationContext context = new ClassPathXmlApplicationContext("configuration.xml");
RabbitTemplate template = context.getBean(RabbitTemplate.class);
template.convertAndSend("Sample Spring test message.");
context.destroy();The Spring integration framework provides support for RabbitMQ by means of proper adapters to send a message or subscribe to a queue. In order to use the Spring integration AMQP adapters, you have to include the following dependencies in the build configuration of your Maven project:
<dependency>
    <groupId>org.springframework.integration</groupId>
    <artifactId>spring-integration-core</artifactId>
    <version>4.0.4.RELEASE</version>
</dependency>
<dependency>
    <groupId>org.springframework.integration</groupId>
    <artifactId>spring-integration-amqp</artifactId>
    <version>4.0.4.RELEASE</version>
</dependency>
We will implement the following simple Spring integration message bus:

First, we subscribe to a queue in the RabbitMQ broker using a Spring integration AMQP inbound channel adapter. The inbound channel adapter is bound to a Spring integration channel that routes messages to a Spring integration AMQP outbound channel adapter from where it is sent to a RabbitMQ message broker. (We will use the same RabbitMQ broker as the one to which the inbound channel adapter binds.) Note that the channel works with a common representation of a message—the purpose of the adapters is to convert that representation to/from the AMQP representation of a message. The following Spring configuration describes the preceding components and the connection between them using the test-queue queue as a source queue and the test-destination-queue queue as a destination queue:
<?xml version="1.0" encoding="UTF-8"?>
<beans:beans
xmlns=http://www.springframework.org/schema/integration
xmlns:xsi=http://www.w3.org/2001/XMLSchema-instance
xmlns:beans=http://www.springframework.org/schema/beans
xmlns:amqp=http://www.springframework.org/schema/integration/amqp
xmlns:rabbit=http://www.springframework.org/schema/rabbit
xmlns:context=http://www.springframework.org/schema/context
xmlns:stream=http://www.springframework.org/schema/integration/streamxsi:schemaLocation="http://www.springframework.org/schema/beanshttp://www.springframework.org/schema/beans/spring-beans.xsdhttp://www.springframework.org/schema/contexthttp://www.springframework.org/schema/context/spring-context.xsd
http://www.springframework.org/schema/rabbit
http://www.springframework.org/schema/rabbit/spring-rabbit.xsd
http://www.springframework.org/schema/integration
http://www.springframework.org/schema/integration/spring-integration-4.1.xsd
http://www.springframework.org/schema/integration/stream
http://www.springframework.org/schema/integration/stream/spring-integration-stream-4.1.xsd
http://www.springframework.org/schema/integration/amqp
http://www.springframework.org/schema/integration/amqp/spring-integration-amqp.xsd">
    <rabbit:connection-factory id="connectionFactory" host="localhost" />
    <channel id="test-channel" />

    <rabbit:queue name="test-queue" />
    <rabbit:queue name="test-destination-queue" />

    <rabbit:template id="amqpTemplate" connection-factory="connectionFactory" exchange="" routing-key="test-queue" />
    <rabbit:admin connection-factory="connectionFactory" />

    <amqp:inbound-channel-adapter channel="test-channel" queue-names="test-queue" connection-factory="connectionFactory" />

    <amqp:outbound-channel-adapter channel="test-channel" exchange-name="" routing-key="test-destination-queue" amqp-template="amqpTemplate" />

    <rabbit:connection-factory id="connectionFactory" host="localhost" />
</beans:beans>
The following example demonstrates the use of the preceding configuration to send a message to the test-queue queue that is delivered via the Spring integration channel to the test-destination-queue queue:
AbstractApplicationContext context = new ClassPathXmlApplicationContext("configuration-int.xml");
RabbitTemplate template = context.getBean(RabbitTemplate.class);
template.convertAndSend("test message ...");Various ESBs also provide features to integrate with a RabbitMQ message broker. In the previous example, we saw how to use Spring integration as an ESB that provides RabbitMQ adapters. In the following section, we will take a look at the Mule and WSO2 ESBs that also provide integration with RabbitMQ.
The Mule ESB provides you with a runtime and development environment based on the Eclipse IDE called Anypoint Studio that allows you to create integration workflows easily using either a graphical editor or directly from the XML configuration file of your Mule ESB project. The AnypointStudio comes with a preinstalled runtime of the Mule ESB enterprise edition but you can also set up a community edition of MuleESB with the development studio. The first step is to download the trial version of the AnypointStudio from the official MuleSoft website and install it. Start the studio and create a new project by clicking on the Create a Project button:

Then specify the name and Maven settings for the new project:

Specify the location and JDK version of your project; specify an already installed JDK by clicking on the Configure JREs link, and finally, click on the Finish button:

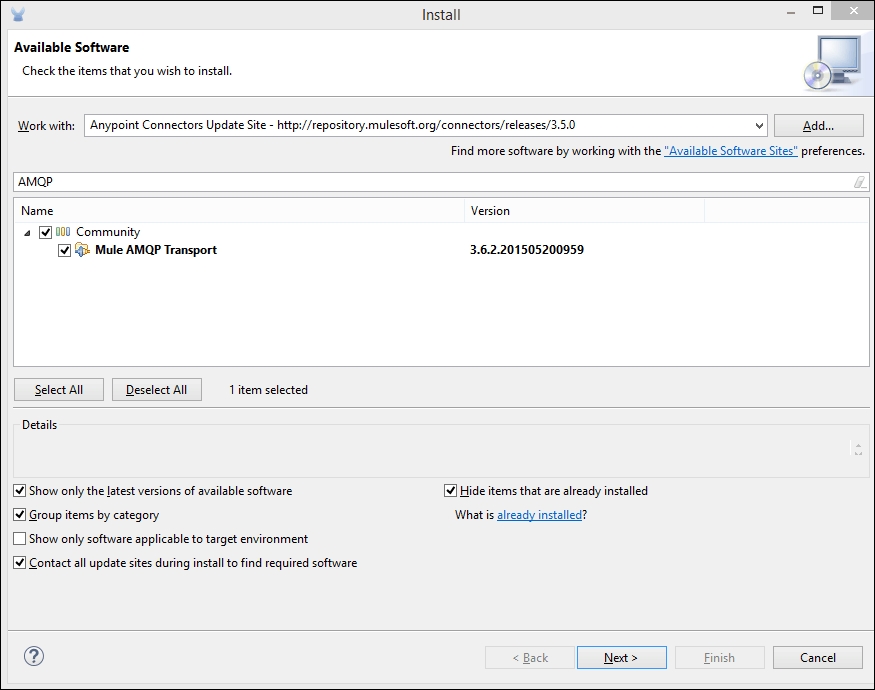
After you create the new Mule project, you will notice that a graphical editor appears, where you can specify the integration flow of your application using the drag-and-drop items on the right-hand side of the editor. You can see a number of preinstalled connectors on the right-hand side. However, an AMQP/RabbitMQ connector is missing and must be installed separately. To install this, navigate to Help -> Install New Software … in the AnypointStudio; select Anypoint Connectors Update Site from the Work With drop down; type in the Search AMQP
and select Mule AMQP Transport, as shown in the following screenshot:
We will create the same flow that we created with Spring integration without the need to specify a channel. (It is implicitly represented by the Mule ESB.) From the Endpoints section, drag and drop an AMQP-0-9 item to the workspace. Select a second AMQP-0-9 item and drag-and-drop it in the Process area of the workspace, next to the first item:

Double-click on the flow window that contains the two items and change the name to rabbitmq-sample-flow. Click on the first AMQP endpoint and specify the following (this will be our inbound endpoint that will subscribe to the test-queue queue):
- Display Name:
rabbitmq-inbound-endpoint - Queue Name:
test-queue - Queue Durable:
enabled - Advanced -> Exchange Patterns -> One Way:
default
You need to specify explicitly on the queue-related attributes so that Mule precreates the specified queue in the endpoint in case it is missing. In the preceding case, we specify that the test-queue queue is durable (but we can explicitly specify queue durability as false in the Mule XML configuration and the queue will still be created).
Click on the second AMQP endpoint and specify the following (this will be our outbound endpoint that will send messages to the test-destination-queue queue):
- Display Name:
rabbitmq-outbound-endpoint - Queue Name:
test-destination-queue - Routing Key:
test-destination-queue - Queue Durable:
enabled - Advanced -> Exchange Patterns -> One Way:
default
Apart from the endpoints, you also need to specify an AMQP connector configuration in your Mule configuration, and specify it for both endpoints using the connector-ref attribute so that they connect to the designated RabbitMQ broker. The Mule configuration for the projects is the following:
<?xml version="1.0" encoding="UTF-8"?>
<mule xmlns:tracking="http://www.mulesoft.org/schema/mule/ee/tracking" xmlns:http="http://www.mulesoft.org/schema/mule/http"
xmlns:amqp="http://www.mulesoft.org/schema/mule/amqp" xmlns="http://www.mulesoft.org/schema/mule/core" xmlns:doc="http://www.mulesoft.org/schema/mule/documentation"
xmlns:spring="http://www.springframework.org/schema/beans" version="EE-3.7.0"
xmlns:xsi="http://www.w3.org/2001/XMLSchema-instance"
xsi:schemaLocation="http://www.mulesoft.org/schema/mule/http http://www.mulesoft.org/schema/mule/http/3.1/mule-http.xsd
http://www.mulesoft.org/schema/mule/core http://www.mulesoft.org/schema/mule/core/3.1/mule.xsd
http://www.mulesoft.org/schema/mule/amqp http://www.mulesoft.org/schema/mule/amqp/3.1/mule-amqp.xsd
http://www.mulesoft.org/schema/mule/ee/tracking http://www.mulesoft.org/schema/mule/ee/tracking/3.1/mule-tracking-ee.xsd
http://www.springframework.org/schema/beans http://www.springframework.org/schema/beans/spring-beans-current.xsd">
   <amqp:connector name="localhostAMQPConnector" activeDeclarationsOnly="true" doc:name="AMQP-0-9 Connector"/>

    <flow name="rabbitmq-sample-flow">
<amqp:inbound-endpoint responseTimeout="10000" doc:name="rabbitmq-inbound-endpoint" queueName="test-queue" queueDurable="true" connector-ref="localhostAMQPConnector"/>
<amqp:outbound-endpoint responseTimeout="10000" doc:name="rabbitmq-outbound-endpoint" queueName="test-destination-queue" routingKey="test-destination-queue" queueDurable="true" connector-ref="localhostAMQPConnector"/>
</flow>
</mule>
In order to use the AMQP transport, you need to provide the Mule AMQP transport and RabbitMQ Java client on your classpath. The Maven dependency for the transport library is as follows:
<dependency>
    <groupId>org.mule.transports</groupId>
    <artifactId>mule-transport-amqp</artifactId>
    <version>3.3.0</version>
</dependency>
However, Anypoint studio can dynamically deploy the AMQP client and Mule AMQP transport dependencies to your Mule ESB at runtime, and so, you need to copy them manually to the runtime libraries in the following path:
<anypoint_install_path>pluginsorg.mule.tooling.server.<version>mulelibmule
If you are using version 3.4.1 of the Mule AMQP transport and version 3.2.1 of the client, copy mule-transport-amqp-3.4.1.jar and amqp-client-3.2.1.jar files from the local Maven repository to that directory. If you don't do this, you may get an error that states Mule ESB fails to find a namespace handler for the AMQP transport declarations in your Mule configuration.
Mule ESB uses byte array representation of messages, so if you want to convert the byte array into a string, you can either use a proper AMQP transformer and register it in the Mule runtime or convert the byte array manually in your application. To test your setup, you can send a test message to the test-queue queue using the RabbitTemplateExample class with that queue and bind a listener such as the one specified by the ContainerListenerExample class to test-destination-queue. However, the handleMessage() method should be refactored a little bit in order to accept a byte array as a message:
public void handleMessage(Object message) {
    System.out.println("Message received: " + new String((byte[])message));
}
WSO2 is an open source ESB that is used by a number of enterprises including eBay. It also provides integration with the AMQP protocol. There is also an Eclipse-based IDE for WSO2 (WSO2 Developer Studio) to develop WSO2 applications. Download the WSO2 distributable that contains the WSO2 ESB along with an administrative web interface and unzip it to a proper location. Navigate to the bin directory and execute the following command to start the WSO2 message broker (assuming that we are running a Windows OS):
wso2server.bat --run
After the server has successfully started, you should be able to open the administrative web from the https://localhost:9443 URL and log in with the admin/admin default credentials. A screen similar to the following will be displayed:

The WSO2 ESB steps on the WSO2 carbon platform, which is an OSGi-based middleware. The WSO2 carbon platform provides support for the provisioning of dependencies (OSGi bundles) from an Equinox p2 repository. The WSO2 RabbitMQ AMQP transport is also provided in a p2 repository that can be downloaded locally from the WSO2 website. After you download the p2 repository of the AMQP transport bundles and unzip it, navigate to Configure -> Features from the administrative interface and specify the path to the local repository along with a proper name from the repository, and click on Add. Then, specify the newly added repository, unselect Group features by category, click on Find Features, specify the
Axis2 Transport RabbitMQ AMQP feature, click on the Install button, and follow the steps from the installation process. Add the following to the listeners configuration in <wso2_install_path>/repository/conf/axis2/axis2.xml in order to create a RabbitMQ transport listener for WSO2:
<transportReceiver name="rabbitmq"
class="org.apache.axis2.transport.rabbitmq.RabbitMQListener">
<parameter name="AMQPConnectionFactory" locked="false"> <parameter name="rabbitmq.server.host.name" locked="false">localhost</parameter>
<parameter name="rabbitmq.server.port" locked="false">5672</parameter> <parameter name="rabbitmq.server.user.name" locked="false">guest</parameter>
<parameter name="rabbitmq.server.password" locked="false">guest</parameter>
</parameter>
</transportReceiver>
The locked attribute specifies that the parameters cannot be overridden by a WSO2 service. Add the following to configure the RabbitMQ transport sender in the axis2.xml configuration file:
<transportSender name="rabbitmq" class="org.apache.axis2.transport.rabbitmq.RabbitMQSender"/>
Apart from this, the ESB runtime may not need to load the RabbitMQ transport libraries (even though they have been installed from the p2 repository), and so you may need to copy them from the p2 repository to the <wso2_install_path>
epositorycomponentslib directory. As the libraries might be a little outdated with regard to the version of RabbitMQ that you are using, you can also download the source code of the WSO2 transports from GitHub, build the Maven project for the RabbitMQ transport, and replace the old version in the preceding directory. You need to make sure that the version of the transport library works with your version of the RabbitMQ broker.
After you have installed the RabbitMQ AMQP transport and added the configuration for the sender and receiver, restart the WSO2 server in order to load the new feature along with the configured transports.
Now, we are ready to configure a proxy service that will allow us to transfer messages from test-queue to test-destination-queue using the WSO2 ESB.
First, create an endpoint that will be used by the RabbitMQ transport sender by navigating to Main -> Endpoints -> Add Endpoint -> Address Endpoint:

Specify the following settings:
- Name:
rabbitmq_sender_endpoint - Address:
rab-bitmq:/rabbitmq_proxy_service?rabbitmq.server.host.name=127.0.0.1 & rab-bitmq.server.port=5672 & rabbitmq.server.user.name=guest&rabbitmq.server.password=guest&rabbitmq.queue.name=test-destination-queue - Click on the Save & Close button. Click on the Switch Off link under the Action menu in order to enable the endpoint. The address uses the RabbitMQ transport that we defined in the Apache Axis2 configuration along with the
rabbitmq_proxy_serviceproxy service that uses the specified RabbitMQ parameters to send a message to thetest-destination-queuequeue. The samerabbitmq_proxy_serviceservice will be used to retrieve messages from the test-queue queue, and if the two queues are missing, they will be created from the RabbitMQ transport. Create the proxy service by clicking on Add -> Proxy Service -> Custom Proxy, and click on Switch to Source View in order to provide the service configuration without using the wizard:<?xml version="1.0" encoding="UTF-8"?> <proxy xmlns="http://ws.apache.org/ns/synapse" name="rabbitmq_proxy_service" transports="rabbitmq" statistics="disable" trace="disable" startOnLoad="true"> <target endpoint="rabbitmq_sender_endpoint"> <inSequence> <log level="full"/> <property name="OUT_ONLY" value="true"/> <property name="FORCE_SC_ACCEPTED" value="true" scope="axis2"/> </inSequence> </target> <parameter name="rabbitmq.queue.name"> test-queue</parameter> <parameter name="rabbitmq.connection.factory"> AMQPConnectionFactory</parameter> <description/> </proxy>
The proxy uses the RabbitMQ transport in order to subscribe to the test-queue queue using AMQPConnectionFactory to create an AMQP connection. The inSequence section specifies how a message received from the test-queue queue is processed. We enable full logging (that also prints the message in the WSO2 console) and we specify that we do not expect a response once we forward the message to an endpoint (using the OUT_ONLY attribute). FORCE_SC_ACCEPTED is used to indicate that the ESB must send an acknowledgement after the message was successfully received. We also provide a reference to the rabbitmq_sender_endpoint endpoint so that received messages are sent using the RabbitMQ transport sender to this endpoint. Click on the Save button in order to save and deploy the proxy service. In order to check whether your setup works fine, you can use the Java client library or Spring framework in order to send a message to the test-queue queue and subscribe to the test-destination-queue queue as shown earlier. As the WSO2 endpoint is exposed as an Apache Axis2 SOAP web service, you need to send a SOAP message to the RabbitMQ broker and additionally specify the content type as text/xml and content encoding as utf-8 along with a SOAP_ACTION message header that specifies the SOAP action you are specifying in the message. The following snippet uses the Java client library in order to create an AMQP message in the proper format to be handled by the WSO2 proxy service:
String soapMessage = "<soapenv:Envelope " + "xmlns:soapenv="http://schemas.xmlsoap.org/soap/envelope/">
" + <soapenv:Header/>
" + <soapenv:Body>
" + <p:test xmlns:p="http://test.service.sample.com">
" +
<in>" + "sample message" + "</in>
" +
</p:test>
" + "</soapenv:Body>
" + </soapenv:Envelope>";
BasicProperties.Builder props  = new BasicProperties.Builder();
props.contentType("text/xml");
props.contentEncoding("utf-8");

Map<String, Object> headers = new HashMap<String, Object>();
headers.put("SOAP_ACTION", "test");
props.headers(headers);
channel.basicPublish(DEFAULT_EXCHANGE, QUEUE_NAME,
props.build(), message.getBytes());
In case you don't want to format and parse SOAP messages as this can introduce unnecessary complexity in your integration scenario, then you can use the WSO2 message broker that handles AMQP messages and integrates with the WSO2 ESB via JMS.
Most relational and NoSQL databases provide a built-in language to create programs directly at the database level. Whether this is PL/SQL or Java for the Oracle database, T/SQL for the MSSQL server, or JavaScript for MongoDB, most of them can leverage the use of the client utilities provided by RabbitMQ in order to establish a direct connection to the message broker and persist data from AMQP messages. In many cases, it might be easier and more proper to use a database API along with a RabbitMQ client library written in the same language via a proper application running outside the database. In this section, we will look at how to integrate the RabbitMQ broker with several widely used databases.
If you decide to use PL/SQL, you will have to supply your own PL/SQL AMQP client implementation, which can turn out to be a lot of work unless you manage to find a publicly available implementation. (At the time of writing this, no such free or commercial distribution is available.) As the Oracle database provides support for multiple languages, we can use Java stored procedures in the database. In order to create a publisher or subscriber as a stored procedure, we can use the following procedure:
- Load the RabbitMQ Java client library in the database
- Load the Java stored procedures to publish/subscribe (static Java methods)
- Define PL/SQL procedures that call the loaded Java stored procedures
We will use Oracle database 12c. The loadjava
command-line utility supplied by the Oracle database allows us to load Java classes, source files, or resource files in a database schema. We can use the utility to load the RabbitMQ Java client library along with the additional required libraries using the utility as follows (assuming that we are retrieving the libraries from the local Maven repository in a Windows operating system):
cd %userprofile%/.m2
loadjava -u c##demo -resolve -resolver "((* C##DEMO) (* PUBLIC))" repositorylog4jlog4j1.2.16log4j-1.2.16.jar
loadjava -u c##demo -resolve -resolver "((* C##DEMO) (* PUBLIC))" repositorycommons-loggingcommons-logging1.2commons-logging-1.2.jar
loadjava -u c##demo -resolve -resolver "((* C##DEMO) (* PUBLIC))" repositoryorgslf4jslf4j-api1.6.1slf4j-api-1.6.1.jar
loadjava -u c##demo -resolve -resolver "((* C##DEMO) (* PUBLIC))" repositoryorgslf4jslf4j-log4j121.6.1slf4j-log4j12-1.6.1.jar
loadjava -u c##demo -resolve -resolver "((* C##DEMO) (* PUBLIC))" repositorycom
abbitmqamqp-client3.4.1amqp-client-3.4.1.jar
We used the resolve option in order to try resolving the loaded Java classes from the specified JAR files. In case there is a resolution failure, a console output will provide information on the resolution error. In case there are missing classes during the loading of libraries, you must find and load the libraries that contain these classes first. We are also specifying resolver, which serves as CLASSPATH to resolve dependencies from database schemas. In this particular case, we are using the C##DEMO user schema and the PUBLIC schema, which contains the core Java classes.
Navigate to the directory of your compiled Java classes created in Chapter 2, Design Patterns wi
th RabbitMQ, and load them using the loadjava utility:
loadjava -u c##demo -resolve -resolver "((* C##DEMO) (* PUBLIC))" Sender.class
loadjava -u c##demo -resolve -resolver "((* C##DEMO) (* PUBLIC))" DefaultExchangeSenderDemo.class
loadjava -u c##demo -resolve -resolver "((* C##DEMO) (* PUBLIC))" CompetingReceiver.class
loadjava -u c##demo -resolve -resolver "((* C##DEMO) (* PUBLIC))" CompetingReceiverDemo*.class
Note the * operator after the name of the CompetingReceiverDemo class. This will also load the inner classes defined in the CompetingReceiverDemo class.
Now, you can bind the static methods from the sender and receiver demo classes to the PL/SQL stored procedures using a tool such as SQL*Plus or SQLDeveloper:
CREATE OT REPLACE PROCEDURE RABBITMQ_SENDER AS
 LANGUAGE JAVA NAME 'org.packt.rabbitmq.book.samples.chapter2.DefaultExchangeSenderDemo.sendToDefaultExchange()';

CREATE OT REPLACE PROCEDURE RABBITMQ_RECEIVER AS
 LANGUAGE JAVA NAME 'org.packt.rabbitmq.book.samples.chapter2.CompetingReceiverDemo.main(java.lang.String[])';
To test the stored procedures, you can first enable DBMS_OUTPUT. In SQLDeveloper, you can do this from the Dbms Output view or use the SET SERVEROUTPUT ON command in SQL*Plus. In order to enable the mapping of System.out and logger output to DBMS_OUTPUT, invoke the set_output() stored procedure with a buffer size of 2,000 bytes as follows:
EXECUTE DBMS_JAVA.SET_OUTPUT(2000);
To test your RabbitMQ sender stored procedure, execute the following:
EXECUTE RABBITMQ_SENDER;
To test your RabbitMQ receiver stored procedure, execute the following and send some test messages to the event_queue queue used by the sender and receiver:
EXECUTE RABBITMQ_RECEIVER;
You can observe the loaded Java classes from the current user schema using the following query:
SELECT * FROM USER_OBJECTS WHERE object_type LIKE '%JAVA%';
In case any of the loaded Java classes fails to resolve (in case we were not using the resolve option with the loadjava utility), then our class would be marked as INVALID in the Status column. If this happens, you can try to reload the proper libraries by first dropping them (using the dropjava utility with the same parameters) and then loading them again using the loadjava utility.
MongoDB is a document store that stores data hierarchically in a JSON format (compiled by the database to a binary JSON format called BSON). MongoDB is used in a variety of scenarios where performance and eventual consistency are favored with regard to the transactional consistency provided by relational databases such as Oracle. In order to integrate RabbitMQ with MongoDB, it may be more appropriate to use the NodeJS MongoDB driver along with a NodeJS AMQP client implementation to establish the integration using server-side JavaScript or creating a Java application that uses the MongoDB Java driver along with the RabbitMQ Java library either directly or via the Spring framework (using Spring Data for MongoDB and Spring AMQP for RabbitMQ).
To integrate with a Hadoop cluster, you can use a Java application that serves as a mediator between the Hadoop cluster and RabbitMQ instance/cluster. Another option is to use the Apache Flume project, which provides a mechanism to aggregate data from multiple sources in a Hadoop database. Apache Flume has an AMQP plugin that can be used to create a RabbitMQ source from which to retrieve data for further processing and storage in a Hadoop cluster.