A pipeline is nothing more than a sequence of operations where the output of one operation is used as the input to another operation. We have seen it used in several examples in previous chapters but they have been relatively short. In particular, we saw how the Stanford StanfordCoreNLP class, with its use of annotators objects, supports the concept of pipelines nicely. We will discuss this approach in the next section.
One of the advantages of a pipeline, if structured properly, is that it allows the easy addition and removal of processing elements. For example, if one step of the pipeline converts token to lowercase, then it can be easy to simply remove this step with the remaining elements of the pipeline left untouched.
However, some pipelines are not always this flexible. One step may require a previous step in order to work properly. In a pipeline, such as the one supported by the StanfordCoreNLP class, the following set of annotators is needed to support POS processing:
props.put("annotators", "tokenize, ssplit, pos");If we leave out the ssplit annotator, the following exception is generated:
java.lang.IllegalArgumentException: annotator "pos" requires annotator "ssplit"
Although the Stanford pipeline does not require a lot of effort to set up, other pipelines may. We will demonstrate the latter approach in the Creating a pipeline to search text section.
In this section, we will discuss the Stanford pipeline in more detail. Although we have used it in several examples in this book, we have not fully explored its capabilities. Having used this pipeline before, you are now in a better position to understand how it can be used. Upon reading this section, you will be able to better assess its capabilities and applicability to your needs.
The edu.stanford.nlp.pipeline package holds the StanfordCoreNLP and annotator classes. The general approach uses the following code sequence where the text string is processed. The Properties class holds the annotation names as shown here:
String text = "The robber took the cash and ran.";
Properties props = new Properties();
props.put("annotators",
    "tokenize, ssplit, pos, lemma, ner, parse, dcoref");
StanfordCoreNLP pipeline = new StanfordCoreNLP(props);
The Annotation class represents the text to be processed. The constructor, used in the next code segment, takes the string and adds a CoreAnnotations.TextAnnotation instance to the Annotation object. The StanfordCoreNLP class' annotate method will apply the annotations specified in the property list to the Annotation object:
Annotation annotation = new Annotation(text);
pipeline.annotate(annotation);
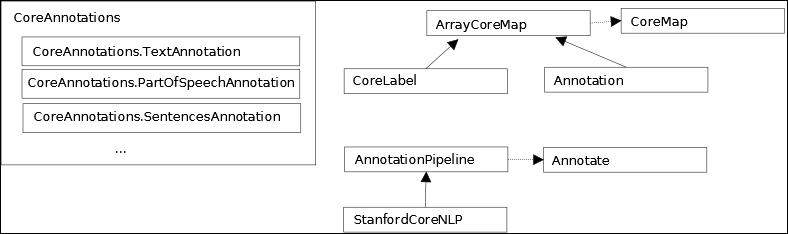
CoreMap interface is the base interface for all annotable objects. It uses class objects for keys. The TextAnnotation annotation type is a CoreMap key for the text. A CoreMap key is intended to be used with various types of annotations such as those defined in the properties list. The value depends on the key type.
The hierarchy of classes and interfaces is depicted in the following diagram. It is a simplified version of the relationship between classes and interfaces as they relate to the the pipeline. The horizontal lines represent interface implementations and the vertical lines represent inheritance between classes.
To verify the effect of the annotate method, we will use the following code sequence. The keyset method returns a set of all of the annotation keys currently held by the Annotation object. These keys are displayed before and after the annotate method is applied:
System.out.println("Before annotate method executed ");
Set<Class<?>> annotationSet = annotation.keySet();
for(Class c : annotationSet) {
    System.out.println("	Class: " + c.getName());
}

pipeline.annotate(annotation);

System.out.println("After annotate method executed ");
annotationSet = annotation.keySet();
for(Class c : annotationSet) {
    System.out.println("	Class: " + c.getName());
}
The following output shows that the creation of the Annotation object resulted in the TextAnnotation extension being added to the annotation. After the annotate method is executed, several additional annotations have been applied:
Before annotate method executed
  Class: edu.stanford.nlp.ling.CoreAnnotations.TextAnnotation
After annotate method executed
  Class: edu.stanford.nlp.ling.CoreAnnotations.TextAnnotation
  Class: edu.stanford.nlp.ling.CoreAnnotations.TokensAnnotation
  Class: edu.stanford.nlp.ling.CoreAnnotations.SentencesAnnotation
  Class: edu.stanford.nlp.dcoref.CorefCoreAnnotations.CorefChainAnnotation
The CoreLabel class implements the CoreMap interface. It represents a single word with annotation information attached to it. The information attached depends on the properties set when the pipeline is created. However, there will always be positional information available such as its beginning and ending position or the whitespace before and after the entity.
The get method for either CoreMap or CoreLabel returns information specific to its argument. The get method is overloaded and returns a value dependent on the type of its argument. For example, here is the declaration of the SentencesAnnotation class. It implements CoreAnnotation<List<CoreMap>>:
public static class CoreAnnotations.SentencesAnnotation
    extends Object
    implements CoreAnnotation<List<CoreMap>>
When used in the following statement, the SentencesAnnotation class returns a List<CoreMap> instance:
List<CoreMap> sentences =
    annotation.get(SentencesAnnotation.class);
In a similar manner, the TokensAnnotation class implements CoreAnnotation<List<CoreLabel>> as shown here:
public static class CoreAnnotations.TokensAnnotation
    extends Object
    implements CoreAnnotation<List<CoreLabel>>
Its get method returns a list of CoreLabel objects that are used within a for-each statement:
for (CoreLabel token : sentence.get(TokensAnnotation.class)) {In previous chapters, we have used the SentencesAnnotation class to access the sentences in an annotation, as shown here:
List<CoreMap> sentences =
    annotation.get(SentencesAnnotation.class);
The CoreLabel class has been used to access individual words in a sentence as demonstrated here:
for (CoreMap sentence : sentences) {
    for (CoreLabel token:
            sentence.get(TokensAnnotation.class)) {
        String word = token.get(TextAnnotation.class);
        String pos = token.get(PartOfSpeechAnnotation.class);
    }
}
Annotator options can be found at http://nlp.stanford.edu/software/corenlp.shtml. The following code example illustrates how to use an annotator to specify the POS model. The pos.model property is set to the model desired using the Property class' put method:
props.put("pos.model",
  "C:/.../Models/english-caseless-left3words-distsim.tagger");
A summary of the annotators is found in the following table. The first column is the string used in the properties' list. The second column lists only the basic annotation class, and the third column specifies how it is typically used:
|
Property name |
Basic annotation class |
Usage |
|---|---|---|
|
tokenize |
|
Tokenization |
|
cleanxml |
|
Remove XML tokens |
|
ssplit |
|
Splits tokens into sentences |
|
pos |
|
Creates POS tags |
|
lemma |
|
Generates lemmas |
|
ner |
|
Creates NER tags |
|
regexner |
|
Creates NER tags based on regular expressions |
|
sentiment |
|
Sentiment analysis |
|
truecase |
|
True case analysis |
|
parse |
|
Generates a parse tree |
|
depparse |
|
Syntactic dependency parser |
|
dcoref |
|
Performs coreference resolution |
|
relation |
|
Relation extractor |
Consider the following sequence to create a pipeline:
String text = "The robber took the cash and ran.";
Properties props = new Properties();
props.put("annotators",
    "tokenize, ssplit, pos, lemma, ner, parse, dcoref");
StanfordCoreNLP pipeline = new StanfordCoreNLP(props);
We get the following output for the annotation process. We can see each annotator as it is applied:
Adding annotator tokenize
TokenizerAnnotator: No tokenizer type provided. Defaulting to PTBTokenizer.
Adding annotator ssplit
edu.stanford.nlp.pipeline.AnnotatorImplementations:
Adding annotator pos
Reading POS tagger model from edu/stanford/nlp/models/pos-tagger/english-left3words/english-left3words-distsim.tagger ... done [2.5 sec].
Adding annotator lemma
Adding annotator ner
Loading classifier from edu/stanford/nlp/models/ner/english.all.3class.distsim.crf.ser.gz ... done [6.7 sec].
Loading classifier from edu/stanford/nlp/models/ner/english.muc.7class.distsim.crf.ser.gz ... done [5.0 sec].
Loading classifier from edu/stanford/nlp/models/ner/english.conll.4class.distsim.crf.ser.gz ... done [5.5 sec].
Adding annotator parse
Loading parser from serialized file edu/stanford/nlp/models/lexparser/englishPCFG.ser.gz ...done [0.9 sec].
Adding annotator dcoref
When the annotate method is applied, we can use the timingInformation method to see how long each step of the process took, as shown here:
System.out.println("Total time: " + pipeline.timingInformation());The output of the previous pipeline is as follows:
Total time: Annotation pipeline timing information:
TokenizerAnnotator: 0.0 sec.
WordsToSentencesAnnotator: 0.0 sec.
POSTaggerAnnotator: 0.0 sec.
MorphaAnnotator: 0.1 sec.
NERCombinerAnnotator: 0.0 sec.
ParserAnnotator: 2.5 sec.
DeterministicCorefAnnotator: 0.1 sec.
TOTAL: 2.8 sec. for 8 tokens at 2.9 tokens/sec.
The annotate method can also take advantage of multiple cores. It is an overloaded method where one version uses an instance of an Iterable<Annotation> as its parameter. It will process each Annotation instance using the processors available.
We will use the previously defined pipeline object to demonstrate this version of the annotate method.
First, we create four Annotation objects based on four short sentences, as shown here. To take full advantage of the technique, it would be better to use a larger set of data:
Annotation annotation1 = new Annotation(
    "The robber took the cash and ran.");
Annotation annotation2 = new Annotation(
    "The policeman chased him down the street.");
Annotation annotation3 = new Annotation(
    "A passerby, watching the action, tripped the thief "
    + "as he passed by.");
Annotation annotation4 = new Annotation(
    "They all lived happily ever after, except for the thief "
    + "of course.");
The ArrayList class implements the Iterable interface. We create an instance of this class and then add the four Annotation objects to it. The list is then assigned to an Iterable variable:
    ArrayList<Annotation> list = new ArrayList();
    list.add(annotation1);
    list.add(annotation2);
    list.add(annotation3);
    list.add(annotation4);
    Iterable<Annotation> iterable = list;
The annotate method is then executed:
pipeline.annotate(iterable);
We will use annotation2 to show the results by displaying the word and it's POS, as shown here:
List<CoreMap> sentences =
    annotation2.get(SentencesAnnotation.class);

for (CoreMap sentence : sentences) {
    for (CoreLabel token :
            sentence.get(TokensAnnotation.class)) {
        String word = token.get(TextAnnotation.class);
        String pos = token.get(PartOfSpeechAnnotation.class);
        System.out.println("Word: " + word + " POS Tag: " + pos);
    }
}
The output is as follows:
Word: The POS Tag: DT
Word: policeman POS Tag: NN
Word: chased POS Tag: VBD
Word: him POS Tag: PRP
Word: down POS Tag: RP
Word: the POS Tag: DT
Word: street POS Tag: NN
Word: . POS Tag: .
As demonstrated, this is an easy way of achieving concurrent behavior using the Stanford pipeline.