The easiest way to create a Spark cluster and run our Spark jobs in a truly distributed mode is Amazon EC2 instances. The ec2 folder inside the Spark installation directory wraps all the scripts and libraries that we need to create a cluster. Let's quickly go through the steps that entail the creation of our first distributed cluster.
This recipe assumes that you have a basic understanding of the Amazon EC2 ecosystem, specifically how to spawn a new EC2 instance.

We'll have to ensure that we have the access key and the Privacy Enhanced Mail (PEM) files for AWS before proceeding with the steps. In fact, we are required to have these before launching any EC2 instance if we intend to log in to the machines.
Instructions for creating a key pair and the pem key are available at http://docs.aws.amazon.com/AWSEC2/latest/UserGuide/ec2-key-pairs.html. Anyway, the following are the relevant screenshots.
Select Security Credentials from the user menu, like this:

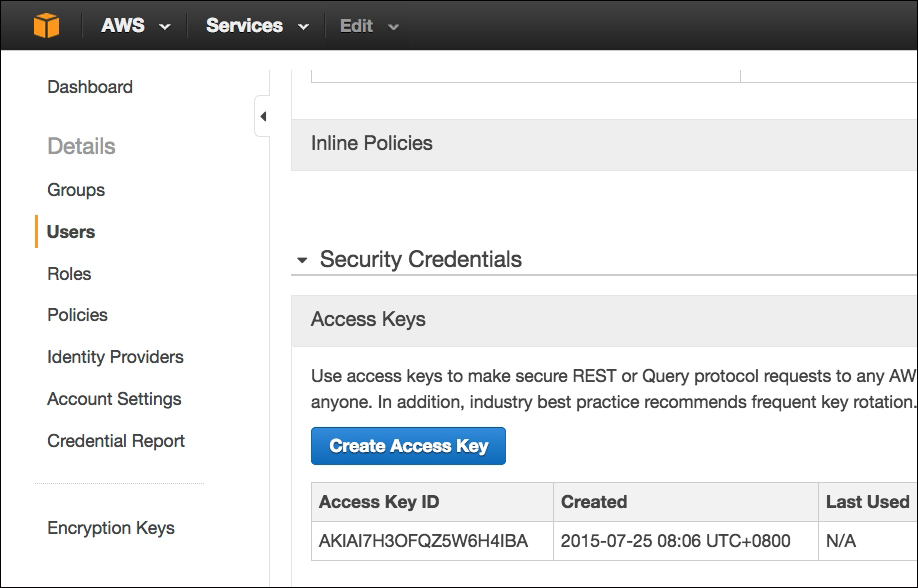
Click on the Users menu and create an access key, as shown in the following screenshot. Download the credentials. We'll be using this to create the EC2 instances for the Spark master and the worker nodes:

The key pair can be created from inside the EC2 instances page using the Key Pairs menu, as shown in the next screenshot. Your browser will automatically download the pem file once you create a pair:

Once you have the pem file, ensure that the file permission for the pem file is 400. Otherwise, an error message stating that your pem file's permissions are too open will be shown:
chmod 400 spark.pem
Launching and running our Spark application involves the following steps:
- Setting the environment variables.
- Running the launch script.
- Verifying installation.
- Making changes to the code.
- Transferring the data and job files.
- Loading the dataset into HDFS.
- Running the job.
- Destroying the cluster.
As the first step, let's export the access and the secret access keys as environment variables. The ec2 script for launching our instances will use these commands:
export AWS_ACCESS_KEY_ID=AKIAI7H3OFQZ5W6H4IBA
export AWS_SECRET_ACCESS_KEY=[YOUR SECRET ACCESS KEY]
I have also copied the pem file to the spark installation root directory, just to make the launch command shorter (by not specifying the entire path of the pem file), as marked here:

Now that we have the access key (and the secret key) exported and the pem file in the root folder, let's spawn a new cluster:
cd spark-1.4.1-bin-hadoop2.6

./ec2/spark-ec2 --key-pair=scalada --identity-file=scalada.pem --slaves=2 --instance-type=m3.medium --hadoop-major-version=2 launch scalada-cluster
The parameters, as is clearly evident, represent the following:
key-pair: This is the name of the user to whom the access key and the secret access key you exported as environment variables belong.identity-file: This is the location of thepemfile.slaves: This is the number of worker nodes.instance-type: This is one of the AWS instance types (http://aws.amazon.com/ec2/instance-types/). M3 medium has one core and 3.75 GB in memory.hadoop-major-version: This is the version of Hadoop that we want Spark to be bundled with. The spark version itself is derived from our local installation (which is 1.4.1).
We can also confirm this from the EC2 console, as shown in the following screenshot:

Let's log in to the Master to see the services that are running on each node:
ssh -i scalada.pem [email protected]
Doing a jps on the master node shows that the Spark Master, the HDFS name node, and the Secondary name node are running on the Spark master node, as depicted in this screenshot:

Similarly, on the worker nodes, we see that the Spark Worker and the HDFS data nodes are running, as follows:

There is a small change that is required in our code in order to make it run on this cluster—the location of the dataset in HDFS. This, however, is not the recommended way of doing it, and the URL should be sourced from an external configuration file:
 val conf = new SparkConf().setAppName("BinaryClassificationSpamEc2")
  val sc = new SparkContext(conf)
  val sqlContext = new SQLContext(sc)

  val docs = sc.textFile("hdfs://ec2-54-159-166-156.compute-1.amazonaws.com:9000/scalada/SMSSpamCollection").map(line => {
    val words = line.split("	")
    Document(words.head.trim(), words.tail.mkString(" "))
})As the next step, let's copy the dataset and the assembly JAR to the master node for execution from the directory where you have the pem file:
scp -i scalada.pem <REPO_DIR>/chapter5-learning/SMSSpamCollection [email protected]:~/.

scp -i scalada.pem  <REPO_DIR>/chapter6-scalingup/target/scala-2.10/scalada-learning-assembly.jar [email protected]:~/.
An ls on the home folder of the master confirms this, as shown in the following screenshot:

Now that we have uploaded our dataset to the master's local folder, let's push it to HDFS. As we saw earlier when we verified the installation, the Spark EC2 script creates and runs an HDFS cluster for us. Let's go to the ephemeral-hdfs folder in the root and format the filesystem. Note that the files in this HDFS, as the name indicates, will be wiped off upon restarting the cluster. Ideally, we should be installing a separate HDFS cluster on these nodes instead of depending on the ephemeral installation that was created by the Spark EC2 script.
Just as in our previous recipe, let's push the SMSSpamCollection dataset into the /scalada folder in HDFS:
root@ip-10-150-76-158 ephemeral-hdfs] $ ./bin/hdfs namenode -format
root@ip-10-150-76-158 ephemeral-hdfs] $ ./bin/hadoop fs -mkdir /scalada
root@ip-10-150-76-158 ephemeral-hdfs] $ ./bin/hadoop fs -put ../SMSSpamCollection /scalada/


root@ip-10-150-76-158 ephemeral-hdfs]$ ./bin/hadoop fs -ls /scalada
Found 1 items
-rw-r--r--   3 root supergroup     477907 2015-08-08 05:24 /scalada/SMSSpamCollection
As with the previous recipe, we'll use the spark-submit script to submit the job to the cluster. Let's enter the spark home directory (/root/spark) and execute the following lines:
./bin/spark-submit
  --class com.packt.scalada.learning.BinaryClassificationSpamEc2
  --master spark://ec2-54-161-176-58.compute-1.amazonaws.com:7077
  --executor-memory 2G
  --total-executor-cores 2
  ../scalada-learning-assembly.jar
We can see that the job runs on both worker nodes of the cluster, as shown in this screenshot:

We can also see the various stages of this Job from the Stages tab, as shown in the following screenshot:

Not surprisingly, the accuracy measure is approximately the same, except that now we can use this cluster to handle much bigger data.


