
We are not using any MVC, MVP, or MVVM paradigms because that is not the purpose of this book, so our Activity class will contain all the logic we need to create and show our list of users.
We will set up SwipeRefreshLayout and RecyclerView in our onCreate() method; we have a refreshList() method to handle the fetching and showing of our list of users and showRefreshing() to manage the ProgressBar and RecyclerView visibility.
Our refreshList() function looks like this:
private void refreshList() {
    showRefresh(true);
    mSeApiManager.getMostPopularSOusers(10)
            .subscribe(users -> {
                showRefresh(false);
                mAdapter.updateUsers(users);
            }, error -> {
                App.L.error(error.toString());
                showRefresh(false);
            });
}
We show ProgressBar, and observe the list of users from the StackExchange API manager. The moment the list comes in, we show it and update the Adapter content and the RecyclerView visibility.
After we have obtained the data from the REST API, we need to bind it to the View, populating our layout with an adapter. Our RecyclerView adapter is pretty standard. It extends RecyclerView.Adapter and specifies its own ViewHolder:
public static class ViewHolder extends RecyclerView.ViewHolder {

    @InjectView(R.id.name)
    TextView name;

    @InjectView(R.id.city)
    TextView city;

    @InjectView(R.id.reputation)
    TextView reputation;

    @InjectView(R.id.user_image)
    ImageView user_image;

    public ViewHolder(View view) {
        super(view);
        ButterKnife.inject(this, view);
    }
}
The moment we receive the data from the API manager, we can set all the labels on the view: name, city, and reputation.
To display the user image, we are going to use Universal Image Loader by Sergey Tarasevich (https://github.com/nostra13/Android-Universal-Image-Loader). UIL is a pretty famous and well-tested image-management library. We could use Picasso by Square, Glide, or Fresco by Facebook as well. It's just a matter of your personal preference. The important thing is not to reinvent the wheel: libraries facilitate developers' lives and allow them to achieve goals faster.
In our adapter, we have:
@Override
public void onBindViewHolder(SoAdapter.ViewHolder holder,  int position) {
    User user = mUsers.get(position);
    holder.setUser(user);
}
In ViewHolder, we have:
public void setUser(User user) {
name.setText(user.getDisplayName());
city.setText(user.getLocation());
reputation.setText(String.valueOf(user.getReputation()));
ImageLoader.getInstance().displayImage(user.getProfileImage(), user_image);
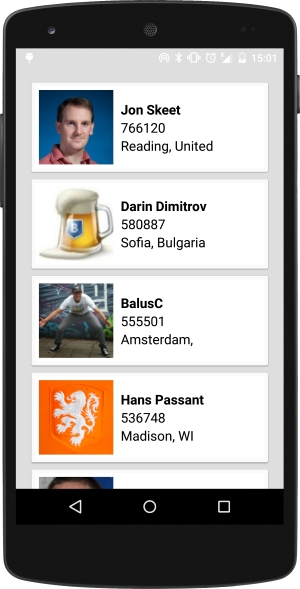
}At this point, we can run the code and obtain a list of users, as shown in the following screenshot:
Let's raise the stakes and bring the current city's weather into our list. OpenWeatherMap is a handy web service with a public API that we can query to retrieve lots of useful forecast information.
As usual, we will use Retrofit to map the API and access it via RxJava. As for the StackExchange API, we are going to create interface, RestAdapter, and a handy manager:
public interface OpenWeatherMapService {

    @GET("/data/2.5/weather")
    Observable<WeatherResponse> getForecastByCity(@Query("q")  String city);
}
This method will provide the current forecast using the city name as a parameter. We are going to bind this interface to our RestAdapter class like this:
 RestAdapter restAdapter = new RestAdapter.Builder()
        .setEndpoint("http://api.openweathermap.org")
        .setLogLevel(RestAdapter.LogLevel.BASIC)
        .build();
mOpenWeatherMapService = restAdapter.create(OpenWeatherMapService.class);
As before, we are only setting the API endpoint and the log level: the only two things we need right now.
Our OpenWeatherMapApiManager class will then provide the method:
public Observable<WeatherResponse> getForecastByCity(String city) {
    return mOpenWeatherMapService
           .getForecastByCity(city)
            .subscribeOn(Schedulers.io())
            .observeOn(AndroidSchedulers.mainThread());
}
Right now, we have a list of users, and we can query OpenWeatherMap to receive the weather forecast by the city name. The next step is to modify our ViewHolder class to retrieve and use the weather forecast for every user and display a weather icon according to the status.
We first validate the user's profile and get a valid city name using these utility methods:
private boolean isCityValid(String location) {
    int separatorPosition = getSeparatorPosition(location);
    return !"".equals(location) && separatorPosition > -1;
}

private int getSeparatorPosition(String location) {
    int separatorPosition = -1;
    if (location != null) {
        separatorPosition = location.indexOf(",");
    }
    return separatorPosition;
}

private String getCity(String location, int position) {
    if (location != null) {
        return location.substring(0, position);
    } else {
        return "";
    }
}
With a valid city name, we can use the following command to obtain all the data we need for the weather:
OpenWeatherMapApiManager.getInstance().getForecastByCity(city)
Using the weather response, we can obtain the URL of the weather icon with:
getWeatherIconUrl(weatherResponse);
With the icon URL, we can retrieve the icon bitmap itself:
private Observable<Bitmap> loadBitmap(String url) {
    return Observable
            .create(subscriber -> {
                ImageLoader.getInstance().displayImage(url,  city_image, new ImageLoadingListener() {
                    @Override
                    public void onLoadingStarted(String imageUri,  View view) {

                    }

                    @Override
                    public void onLoadingFailed(String imageUri,  View view, FailReason failReason) {
                        subscriber.onError(failReason.getCause());
                    }

                    @Override
                    public void onLoadingComplete(String imageUri,  View view, Bitmap loadedImage) {
                        subscriber.onNext(loadedImage);
                        subscriber.onCompleted();
                    }

                    @Override
                    public void onLoadingCancelled(String  imageUri, View view) {
                        subscriber.onError(new Throwable("Image  loading cancelled"));
                    }
                });
            });
}
This loadBitmap() Observable can be chained to the previous one and we can, in the end, have a one single smooth Observable for the job:
if (isCityValid(location)) {
    String city = getCity(location, separatorPosition);
    OpenWeatherMapApiManager.getInstance()
            .getForecastByCity(city)
            .filter(response -> response != null)
            .filter(response -> response.getWeather().size() > 0)
            .flatMap(response -> {
                String url = getWeatherIconUrl(response);
                return loadBitmap(url);
            })
            .subscribeOn(Schedulers.io())
            .observeOn(AndroidSchedulers.mainThread())
            .subscribe(new Observer<Bitmap>() {
                @Override
                public void onCompleted() {

                }

                @Override
                public void onError(Throwable e) {
                    App.L.error(e.toString());
                }

                @Override
                public void onNext(Bitmap icon) {
                    city_image.setImageBitmap(icon);
                }
            });
}
After running the code, we will get the new weather icon for every user in the list.

Using the information contained in the user profile, we will create an onClick listener to navigate to the user web page, if present, or to the Stack Overflow profile.
To achieve this, we simply implement Interface in our Activity class, which gets triggered by Android's onClick event in our Adapter.
Our Adapter ViewHolder specifies this Interface:
public interface OpenProfileListener {

    public void open(String url);
}
Our Activity implements it:
[…] implements SoAdapter.ViewHolder.OpenProfileListener { […]

mAdapter.setOpenProfileListener(this);
[…]

@Override
public void open(String url) {
    Intent i = new Intent(Intent.ACTION_VIEW);
    i.setData(Uri.parse(url));
    startActivity(i);
}
Activity receives a URL and navigates to it using the external Android web browser. Our ViewHolder takes care of creating OnClickListener on every card of our list of users and checks whether we are going to open the Stack Overflow user profile or the external personal website:
mView.setOnClickListener(view -> {
    if (mProfileListener != null) {
        String url = user.getWebsiteUrl();
        if (url != null && !url.equals("") &&  !url.contains("search")) {
            mProfileListener.open(url);
        } else {
            mProfileListener.open(user.getLink());
        }
    }
});
The moment we click, we get redirected to the desired website. Working with Android, we can achieve the same result in a more Rx way by using one of the perks of RxAndroid (ViewObservable):
ViewObservable.clicks(mView)
        .subscribe(onClickEvent -> {
            if (mProfileListener != null) {
                String url = user.getWebsiteUrl();
                if (url != null && !url.equals("") &&  !url.contains("search")) {
                    mProfileListener.open(url);
                } else {
                    mProfileListener.open(user.getLink());
                }
            }
        });
The previous couple of code snippets are absolutely equivalent, and you can pick the one you like the most.