
One of the most exciting APIs to come out in recent years is WebRTC (which stand for Web real-time communication). The purpose of this API is to allow users to communicate in real-time streaming audio and video across platforms that support the technology.
WebRTC is made up of several individual APIs and can be broken down into three separate components, namely getUserMedia (which we'll discuss in more depth in the next section), RTCPeerConnection, and RTCDataChannel.
Since we'll discuss getUserMedia in the next section, we'll leave a more involved definition for it when we get there (although the name might give away what the API is intended to do).
RTCPeerConnection is what we use to connect two peers together. Once a connection has been established, we can use RTCDataChannel and transmit any data (including binary data) between the peers. In the context of game development, we can use RTCDataChannel to send a player's state to each peer without the need for a server linking each player.
To get started with RTCPeerConnection, we need some way to tell each peer about the other one. Note that the WebRTC specification deliberately leaves out any specific way in which this data transfer should take place. In other words, we are free to use whatever method we like to manually connect two peers.
The first step to get a RTCPeerConnection is to instantiate RTCPeerConnection object, configuring it with the
STUN servers that you wish to use and other options that are related to the type of connection that you expect:
var pcConfig = {
    iceServers: [{
        url: 'stun:stun.l.google.com:19302'
    }]
};

var pcOptions = {
    optional: [{
        RtpDataChannels: true
    }]
};

var pc = new webkitRTCPeerConnection(pcConfig, pcOptions);
Here, we use a public STUN server that Google provides free of cost. We also use a vendor prefix to be consistent with the other examples in this chapter. As of this writing, every vendor that implements WebRTC in some fashion uses a vendor prefix.
Note
If you're not too familiar with STUN, Interactive Connectivity Establishment (ICE), NAT, TURN, and SDP, don't worry too much about it. While this book won't explain these networking concepts in any depth, you won't really need to know too much about them in order to follow the examples in this chapter and to implement data channels in your own game.
In brief, a STUN server is used to tell a client about its public IP address and whether the client is behind a router's NAT, so another peer can connect to it. Thus, we use one in creating our RTCPeerConnection.
Again, with simplicity and brevity in mind, an ICE candidate allows the browser the reach another browser directly.
Once we have an RTCPeerConnection ready, we connect to a peer by offering to connect with them. The first step is to create an offer, which describes how the other client would connect back to us. Here is where we use a protocol of our choosing to inform the other peer about our offer. Commonly, this would be done using a WebSocket, but in order to demonstrate each step more explicitly, we will use the oldest communication protocol known to man: mouth to mouth:
/**
 *
 */
function makeMessage(msg, user, color) {
    var container = document.createElement('p'),
    var tag = document.createElement('span'),
    var text = document.createElement('span'),

    if (color) {
        tag.classList.add(color);
    } else if (nickColor) {
        tag.classList.add(nickColor);
    }

    tag.textContent = '[' + (user || nick) + '] ';
    text.textContent = msg;

    container.appendChild(tag);
    container.appendChild(text);

    var out = document.getElementById('out'),
    var footer = document.getElementById('outFooter'),
    out.appendChild(container);
    footer.scrollIntoView();
}

/**
 *
 */
function createOffer() {
    pc.createOffer(function (offer) {
        // Note #1
        makeMessage('offer: ' + encodeURIComponent(offer.sdp));

        // Note #2
        pc.setLocalDescription(new RTCSessionDescription(offer),
            // Note #3
            function () {},

            // Note #4
            function (e) {
                console.error(e);
                makeMessage('error creating offer'),
            }
        );
    });
}
In this hello world demonstration of WebRTC's peer-to-peer connection, we'll build a simple chat room with no servers in the middle (except for the STUN server that we need to initiate the peer-to-peer connection).
Given the preceding sample code, we can assume some HTML structure with an input element where we can enter text and commands and use them to drive the WebRTC components.
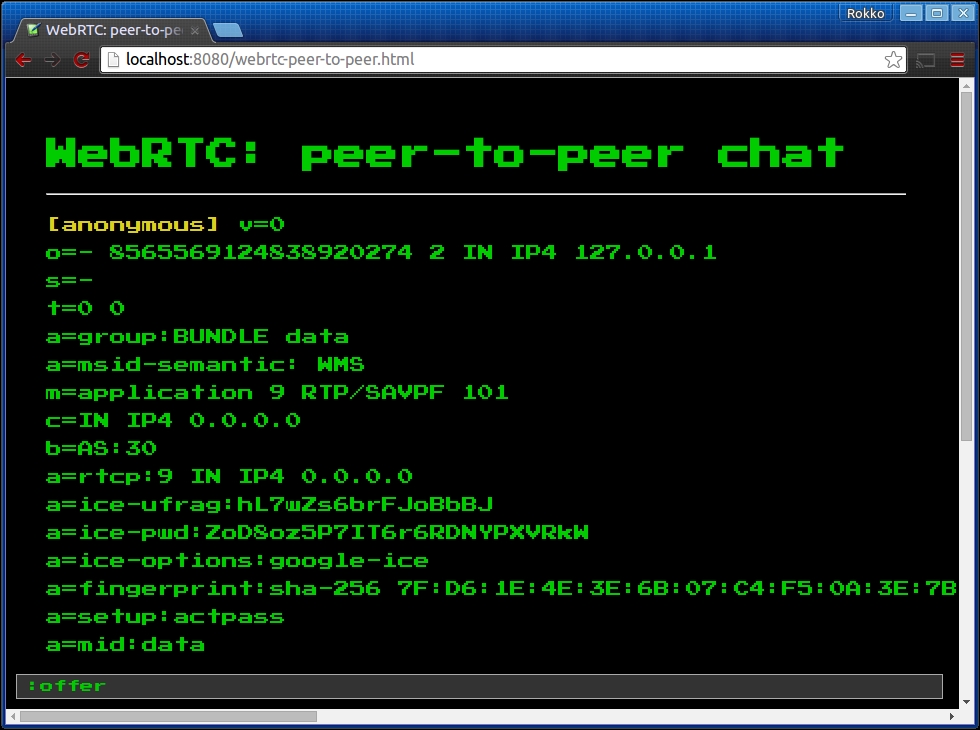
The previous screenshot shows the output once we invoke the createOffer function shown previously. We'll make extensive use of the makeMessage function to help us see messages initiated by the system (meaning the WebRTC API) as well as messages from the other peer with whom we're trying to connect and chat.
Note #1 in the previous code sample is intended to draw your attention to the way we' display the offer's Session Description Protocol (SDP), which is a protocol for negotiating session capabilities between the peers (taken from Suhas Nandakumar article on, SDP for the WebRTC, http://tools.ietf.org/id/draft-nandakumar-rtcweb-sdp-01.html). Since line breaks are meaningful in the protocol, we need to preserve every character in that string. By encoding the string, we guarantee that the string provided to us by the framework is not altered in any way (although it makes it slightly less readable for us humans).
Note #2 shows the second step of this information exchange process that will connect us to another peer. Here, we need to set our own client's session description. You can think of this as you remembering your own home address (or PO box, if you're into engaging in a series of letter communications with a pen pal).
Note #3 and Note #4 are the second and third arguments that we send to the RTCSessionDescription constructor. They are the success and error callback functions respectively, which we are not very concerned with at the moment. Actually, we do care about the error callback function because we wish to be informed about any possible error that might occur when we attempt to reach the STUN server, and so on.
Now that we have an offer object, we just need to let the other peer know what that offer looks like. The two things that make up the offer are the SDP block and the type of session description.
Once our peer knows what the SDP block looks like, he or she can instantiate an RTCSessionDescription object and set the SDP and type properties. Next, the second peer sets that session description as his or her own remote session descriptor. In this case, we just open a new window to represent the second peer and transmit the SDP string via the ever-so-sophisticated copy + paste method.
function setRemoteDesc(sdp, type) {
    var offer = new RTCSessionDescription();
    offer.sdp = decodeURIComponent(sdp);
    offer.type = type;

    makeMessage('remote desc: ' + offer.sdp);

    pc.setRemoteDescription(new RTCSessionDescription(offer),
        function () {
        },
        function (e) {
            console.log(e);
            makeMessage('error setting remote desc'),
        }
    );
}
Here, we manually create an offer object for the other client. We use the SDP data that we obtained from the first client and set the second client's session description type to offer. This offer is set to the second client's remote descriptor. You can think of this, in the example of you writing to a pen pal, as the pen pal writing down your home address so that he or she knows where to send their letters.
After the second peer has made note of your session description, the next step is for that offer to be accepted. In RTC lingo, the second peer needs to answer to this offer. Similar to how we called createOffer() to create the initial offer, we call createAnswer() on the webkitRTCPeerConnection object. The output of this call is also a session description object, except that it contains the second user's SDP, and the session description type is answer instead of offer.
function answerOffer() {
    pc.createAnswer(function (answer) {
        makeMessage('answer: ' + encodeURIComponent(answer.sdp));
        pc.setLocalDescription(new RTCSessionDescription(answer));
    }, function (e) {
        console.log(e);
        makeMessage('error creating answer'),
    });
}
Here, the remote peer first sets its own local description from the SDP that it received from the answer object. Then, we display that to the screen so that we can use that same information as the first peer's (the local peer) remote description. This is representative of your pen pal first remembering their own home address and then letting you have a copy of it so that you now know where to send your letters.
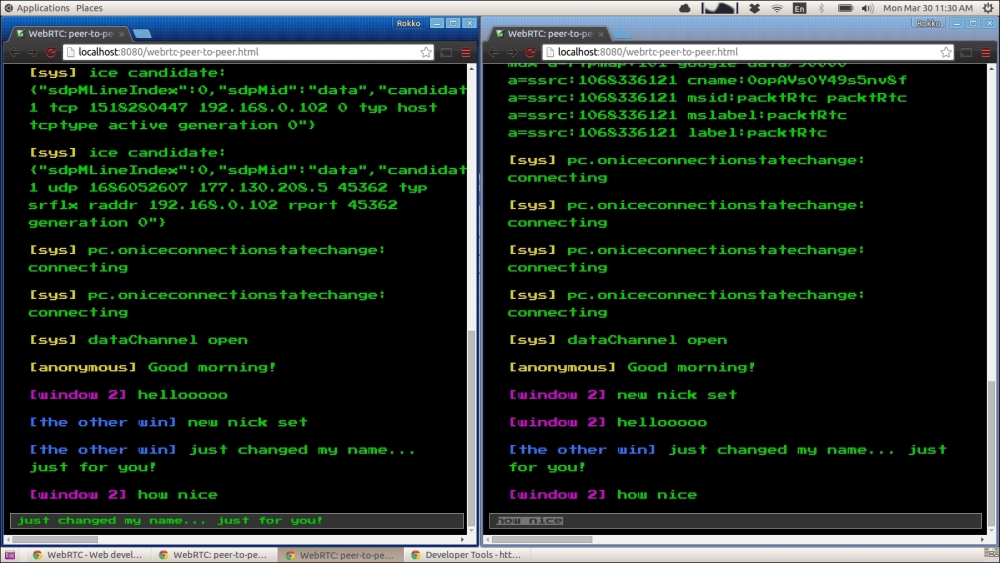
Now that both peers know where the other can be reached, all that is needed is a way to reach the other peer. This level of detail is abstracted away from the data channel. So, before we can use the data channel, we need to add at least one ICE candidate to the peer connection object.
When each peer creates their offer and answer object, the peer connection object receives one or more ICE candidate references. In this demo, we print these out to the screen when we receive them, so that at this point we can copy and paste the data that makes up each ICE candidate, and thus we can recreate them on the opposing peer's machine, and add the ICE candidate to the peer connection object.
pc.onicecandidate = function (event) {
    if (event.candidate) {
        makeMessage('ice candidate: ' + JSON.stringify(event.candidate), 'sys', 'sys'),
    }
};

function addIceCandidate(candidate) {
    pc.addIceCandidate(candidate);
}

addIceCandidate(JSON.parse({
   /* encoded candidate object from onIceCandidate callback */
});
Once each peer has the other peer's session descriptor and there is an ICE candidate to guide the browser to the other peer, we can start sending messages directly from one to the other.
The next step is to simply send and receive messages using the DataChannel object. Here, the API is very similar to WebSocket's API, where we call a send() method on the channel object to send data to the peer, and we register a onmessage event handler from which we receive data from the other side of the peer-to-peer connection. The main difference here is that, unlike the WebSocket scenario, we're now connected directly to the other peer, so sending a message is blazingly fast:
// When creating the RTCPeerConnection object, we also create the DataChannel
var pc = new webkitRTCPeerConnection(pcConfig, pcOptions);
var channelName = 'packtRtc';
var dc = dc = pc.createDataChannel(channelName);

function sendMessage(msg) {
    if (dc.readyState === 'open') {
        var data = {
            msg: msg,
            user: nick,
            color: nickColor
        };

        // Since this is a chat app, we want to see our own message
        makeMessage(msg);

        // The actual send command
        dc.send(JSON.stringify(data));
    } else {
        makeMessage('Could not send message: DataChannel not yet open.'),
    }
}

dc.onmessage = function (event) {
    var data = JSON.parse(event.data);
    makeMessage(data.msg, data.user, data.color);
};

dc.onopen = function () {
    makeMessage('dataChannel open', 'sys', 'sys'),
};

dc.onerror = function (e) {
    makeMessage('dataChannel error: ' + e, 'sys', 'sys'),
};

dc.onclose = function () {
    makeMessage('dataChannel close', 'sys', 'sys'),
};
To summarize, before we can start using our DataChannel to communicate with the other peer, we need to manually (meaning, outside the real of WebRTC APIs) configure each peer relative to each other. Often, you will want to first connect the peers through a WebSocket and use that connection to create and answer the offer from the initiating peer. In addition, data sent through the DataChannel is not limited to text only. We can send binary data, such as video and audio using another WebRTC API, which we'll discuss in the next section.