
So far in this book, we have worked with static data that is hard-coded directly into the TripLog app itself. However, in the real world, it is rare that an app depends purely on local static data—most mobile apps get their data from a remote data source, typically an API. In some cases, an app may talk to a third party API, for example, that of a social network. Alternatively, developers sometimes create their own API to make data available for their apps. In this chapter, we will create a simple API in the cloud that we can connect to and retrieve data from in the TripLog app.
Here is a quick look at what we will cover in this chapter:
- Creating a live, cloud based backend service and API using Microsoft's Azure App Services platform to store and retrieve TripLog data
- Creating a data access service that handles communication with the API for the TripLog mobile app
- Setting up data caching so the TripLog can work offline
Almost all mobile apps communicate with an API to retrieve and store information. In many cases, as a mobile app developer, you might just have to simply consume an API that already exists. However, if you're building your own service, as opposed to consuming someone else's, you will need to create your own API. There are several ways you can create an API, several places you can host it, and certainly many different languages you can develop it in. For the purposes of this book, we are going to create an API in the cloud using Microsoft Azure App Services. Azure App Services contains many products and features, one of which is called Mobile Apps (formally known as Azure Mobile Services).
Azure Mobile Apps provide a very quick and easy way to get a fully functional backend service up and running in a matter of minutes. You can create the backend service using either Node.js or .NET. Because the primary focus of this book is developing a mobile app, I will not spend a lot of time explaining all the granular details of the Azure Mobile Apps Service. So, in this section, we will just cover the basics needed to create a simple, "out-of-the-box" API that we can connect our app to later in this chapter.
In order to follow along with the steps in this chapter, you will need to have an Azure account. If you don't already have an Azure account, you can create one for free at https://azure.microsoft.com/en-us/pricing/free-trial/.
Once you have an Azure account, the first thing you need to do is go to the Azure portal in a web browser.
- Go to https://portal.azure.com in a web browser and log in to the Azure portal using your credentials.
- From the main Azure portal dashboard, click the + New button in the top left corner and select Web + Mobile, and then select Mobile App.
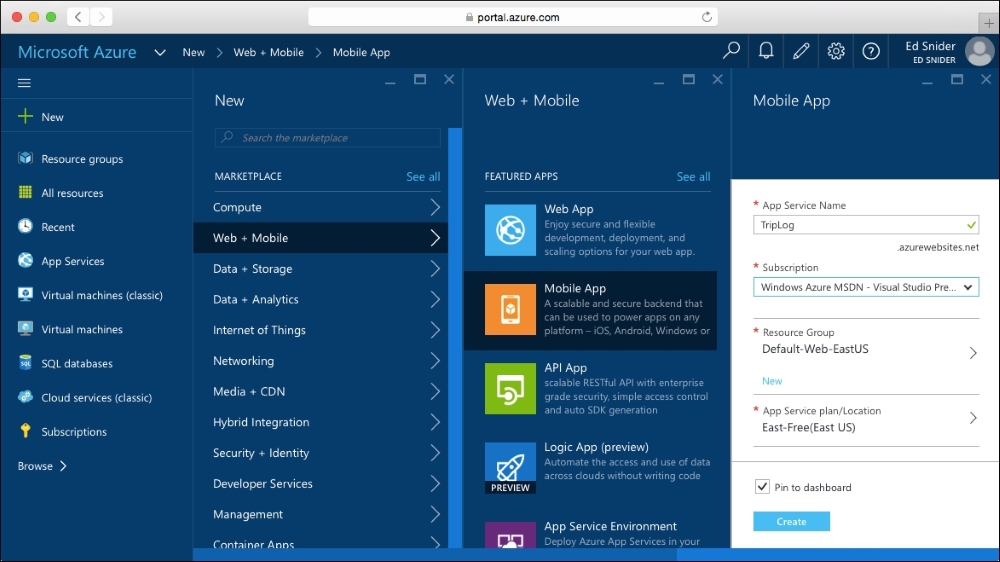
Figure 1: Setting up a new Mobile App Service in the Microsoft Azure portal
- Enter a name for your service in the far right Mobile App pane.
- Select your Subscription, Resource Group, and App Service Plan by taking the defaults or creating new ones.
- Click Create.
- Once your new service has been created, navigate to it from the dashboard.

Figure 2: The Mobile App settings pane in the Microsoft Azure portal
- Next, we need to set up the database that will store the data for the Mobile App Service. Select Data Connnections from the MOBILE section of the Mobile App settings pane, as shown in Figure 2, to set up a new data connection.
Once you have created a new Mobile App in Azure, it will, by default, have no tables or data. Before we can start working with the API, we will need to create a new table that will store our data.
- Select Easy tables from the MOBILE section of the Mobile App settings pane.
- Click the Add button. If this is the first table in the service, you may be prompted to configure the service to use Easy Tables before creating a new table.
Tip
When you configure an App Service to use Easy Tables from within the Azure Portal, it will automatically create a Node.js backend for the service. If you want to use a .NET backend instead, take a look at the documentation at https://azure.microsoft.com/en-us/documentation/articles/app-service-mobile-xamarin-forms-get-started/#configure-the-server-project.
- Name the new table Entry, and make sure all the permissions are set to Allow anonymous access, as shown in Figure 3.
- Click OK and the new Entry table will be added to the list of Easy Tables.

Figure 3: Adding a new data table to the Mobile App in the Microsoft Azure portal
By selecting the Allow anonymous access permission, we are making the API available without providing any specific authentication headers in the HTTP request. In the next chapter, we will add authentication to both the API and the mobile app, but for now, we will simply employ anonymous access.
Now that we have created an API in Azure and set up a data table within the service, we can start making calls to the API and getting responses. Before we start making calls to the API from within the TripLog app, we can test the endpoint by making GET and POST HTTP requests to it using the command line or a REST console.
There are several REST consoles to choose from if you don't already have one installed. I typically use either JaSON (https://github.com/shanebell/JaSON) or Postman (http://www.getpostman.com/). Both are available as Chrome browser apps, making it really easy to install and use them.
- Using either a REST console or the command line, issue a
GETrequest to the API endpoint for the Entry table using the following URL and header:GET https://<your-service-name>.azurewebsites.net/tables/entry --header "zumo-api-version:2.0.0"
- If everything has been set up properly, we should receive back a
200status code and an empty collection in the response body, as follows:[ ]
- Next, add a new record to the backend service by issuing a
POSTrequest to the same API endpoint with anEntryJSON object included in the body of the request. The service will automatically create the appropriate columns within the Entry table when we insert the first object:POST https://<your-service-name>.azurewebsites.net/tables/entry --header "zumo-api-version:2.0.0" --data { "title": "Space Needle", "longitude": 47.6204, "latitude": -122.3491, "date": "2015-07-03T00:00:00.000Z", "rating": 5, "notes": "Wonderful site to see" }We should receive back a
200status code with the new item we added in the response body. - Next, issue another
GETresponse to theEntryendpoint:GET https://<your-service-name>.azurewebsites.net/tables/entry --header "zumo-api-version:2.0.0"
We should receive back a
200status code; however, now the response body has a collection containing the new item we added:[ { "id": "c4a0595d-ac77-4c5b-9d94-f70374e522ab", "createdAt": "2015-07-05T21:37:41.946Z", "updatedAt": "2015-07-05T21:37:41.977Z", "version": "AAAAAAAACBQ=", "deleted": false, "title": "Space Needle", "longitude": 47.6204, "latitude": -122.3491, "date": "2015-07-03T00:00:00.000Z", "rating": 5, "notes": "Wonderful site to see" } ]Notice that after we added the new record to the backend service, it was automatically given an
idproperty, along with a couple of other properties. Theidproperty serves as a unique primary key for the record. We will need to update theTripLogEntrymodel in our TripLog app to account for this new property. - Add a new
stringproperty namedIdto theTripLogEntrymodel class, as follows:public class TripLogEntry { [JsonProperty("id")] public string Id { get; set; } public string Title { get; set; } public double Latitude { get; set; } public double Longitude { get; set; } public DateTime Date { get; set; } public int Rating { get; set; } public string Notes { get; set; } }
Now that we have a live backend service that we can communicate with via HTTP, we will update our TripLog app so that it can send requests to the API to add and retrieve log entries.