In previous chapters, we implemented the different parts of our app using TDD. Now, it is time to put all the the parts together to develop a complete app.
This part of the implementation using TDD is the most exciting one. Usually, when not using TDD, you build and run the app in the simulator all the time to check whether your code works and changes bring the app closer to its final state.
In TDD, most of the development is done without running the app on the simulator or device. The tests guide the implementation. This has one big advantage: you can implement parts of the app that need to talk to a component that has not been implemented yet. For example, you can write and verify the complete data model before a View Controller or view is able to bring the data on the screen.
In this chapter, we will put the different parts of our code together to form the final app. In addition to this, we will take a look at how functional tests can help to find bugs we missed when writing the unit tests.
This chapter covers the following topics:
- Connecting parts
- Serialization and deserialization
- Functional tests
We will now put the different parts together and implement transitions between them. We need tests for the initial view that is shown after the app is started and for the navigation from this view to the other two views. The tests have to ensure that the view controllers are passed the data they need to populate their UIs.
When you build and run the app now on the simulator, you only see a black screen. The reason for that is we haven't specified which screen the app should show after it is started. Let's write a test for this. Because this is a test about the storyboard, add an iOS | Source | Unit Test Case Class to the test target, and call it StoryboardTests. Import the main module using the @testable keyword and remove the two template tests.
Add the following test to StoryboardTests:
func testInitialViewController_IsItemListViewController() {
    let storyboard = UIStoryboard(name: "Main", bundle: nil)

    let navigationController = storyboard.instantiateInitialViewController() as! UINavigationController
    let rootViewController = navigationController.viewControllers[0]

    XCTAssertTrue(rootViewController is ItemListViewController)
}
This test gets a reference to the Main storyboard, instantiates its initial View Controller (which should be a navigation controller), and gets its root View Controller. Then, it asserts that the root View Controller is of the ItemListViewController type.
Run the test. The test crashes with an unexpectedly found nil while unwrapping an Optional value error in the line where we try to initialize the initial View Controller. The reason for this is that we have not told Xcode which the initial View Controller is.
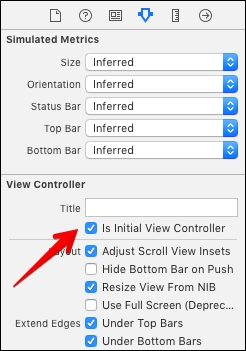
Open Main.storyboard, select the item list View Controller, and open Attribute Inspector. Check the checkbox next to Is Initial View Controller:
With the item list View Controller still selected, go to Editor | Embed In | Navigation Controller. With these changes in the storyboard, the initial View Controller will be a navigation controller with an instance of ItemListViewController as its root View Controller.
Run the tests again. All the tests pass and there is nothing to refactor.
The user should be able to add an item to the list view. As shown in the mock-ups in Chapter 2, Planning and Structuring Your Test-Driven iOS App, there should be an Add button in the navigation bar that presents the input View Controller. We will add the following tests to ItemListViewControllerTests because these are tests about ItemListViewController.
Open ItemListViewControllerTests and add this test:
func testItemListViewController_HasAddBarButtonWithSelfAsTarget() {
XCTAssertEqual(sut.navigationItem.rightBarButtonItem?.target as? UIViewController,
sut)
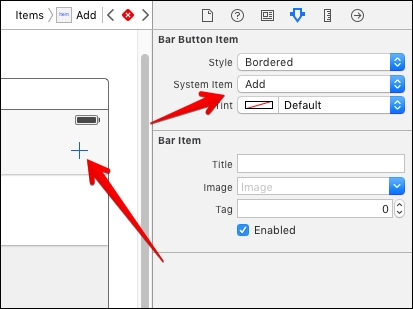
}To make this test pass, we need to add a bar button item to the item list View Controller. Open Main.storyboard, drag a Bar Button Item to the navigation bar of the item list View Controller, and set the value of System Item to Add:
Open ItemListViewController in the Assistant Editor and control-drag from the button to below viewDidLoad():
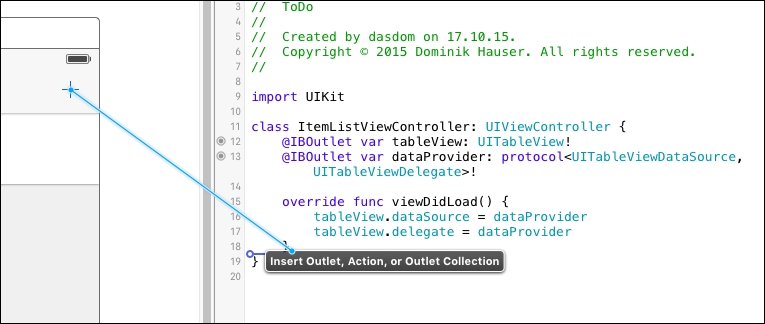
Set the value of Connection to Action, Name to addItem, and Type to UIBarButtonItem.
Run the tests again. The tests pass and there is nothing to refactor.
Next, we want to make sure that the input View Controller is presented when the user taps the Add button. Add the following test to ItemListViewControllerTests:
func testAddItem_PresentsAddItemViewController() {

    XCTAssertNil(sut.presentedViewController)

    guard let addButton = sut.navigationItem.rightBarButtonItem else
        { XCTFail(); return }

    sut.performSelector(addButton.action, withObject: addButton)

    XCTAssertNotNil(sut.presentedViewController)
    XCTAssertTrue(sut.presentedViewController is InputViewController)
}
Before we do anything in the test, we make sure that sut does not present a View Controller on screen. Then, we get a reference to the Add button and perform its selector on sut. This makes sense because from the previous test, we know that sut is the target for this button. Run the test to make sure it fails.
To make the test pass, add the following line to the addItem method:
presentViewController(InputViewController(),
    animated: true,
    completion: nil)
Run the test. It still fails. To figure out what is going on, go to View | Debug Area | Activate Console. You should see a line with information similar to this:
Warning: Attempt to present <ToDo.InputViewController: 0x7b684990> on <ToDo.ItemListViewController: 0x7b882790> whose view is not in the window hierarchy!
The reason for this warning is that we have just instantiated the View Controller, but it is not shown anywhere. It is only possible to present a View Controller from another View Controller whose view is in the view hierarchy. When the app is running outside of the test, this is not an issue because if the user can tap the Add button, the item list View Controller must be visible on the screen and, therefore, its view has to be in the view hierarchy. So, we need to figure out how write a test for this.
In fact, it is quite easy. We can add the view to the view hierarchy by setting the View Controller to the rootViewController property of the key window. Add the following line in testAddItem_PresentsAddItemViewController() right below the guard statement:
UIApplication.sharedApplication().keyWindow?.rootViewController = sut
Run the tests again. Now, all the tests pass. But the code looks strange. We instantiate an instance of InputViewController using its initializer. This bypasses the storyboard. As a result, the outlet connections we created in Chapter 4, A Test-Driven View Controller, are all nil. This means that we wouldn't be able to put in the data for the to-do item we want to add.
So, we need another test to make sure that the implementation code instantiates the input View Controller instance using the storyboard. Add the following code at the end of testAddItem_PresentsAddItemViewController():
let inputViewController = sut.presentedViewController as! InputViewController
XCTAssertNotNil(inputViewController.titleTextField)
Run the test to make sure it is red. To make the test pass, replace the contents of addItem(_:) with the following code:
if let nextViewController = storyboard?.instantiateViewControllerWithIdentifier("InputViewController")
as? InputViewController {
    presentViewController(nextViewController, animated: true, completion: nil)
}
This code instantiates an instance of InputViewController from the storyboard and presents it on the screen. Run the tests. All the tests pass.
To be able to add items to the list, ItemListViewController and InputViewController need to share the same item manager. This is possible because ItemManager is a class and, therefore, both View Controllers can hold a reference to the same instance. If we had used a struct instead, adding an item in InputViewController would not have changed the item manager referenced by ItemListViewController.
Let's write a test to make sure that both view controllers refer to the same object. Add the following test to ItemListViewControllerTests:
func testItemListVC_SharesItemManagerWithInputVC() {

    XCTAssertNil(sut.presentedViewController)

    guard let addButton = sut.navigationItem.rightBarButtonItem else
    { XCTFail(); return }

    UIApplication.sharedApplication().keyWindow?.rootViewController = sut

    sut.performSelector(addButton.action, withObject: addButton)

    XCTAssertNotNil(sut.presentedViewController)
    XCTAssertTrue(sut.presentedViewController is InputViewController)

    let inputViewController = sut.presentedViewController as! InputViewController

    guard let inputItemManager = inputViewController.itemManager else
    { XCTFail(); return }
    XCTAssertTrue(sut.itemManager === inputItemManager)
}
The first part of the test is exactly the same as it was in the earlier test before. The different lines are highlighted. After presenting the input View Controller on the screen, we assert that itemManager in inputViewControler refers to the same object as the sut.
This test does not compile because Value of type 'ItemListViewController' has no member 'itemManger'. Add the following property to make it compile:
let itemManager = ItemManager()
Run the test. It compiles but fails because itemManager of inputViewController is nil. Add the following line in addItem(_:) right before the next View Controller is presented:
nextViewController.itemManager = ItemManager()
Run the test. It still fails, but this time it's because the item manager of sut and input View Controller do not refer to the same object. Replace the line you just added with this one:
nextViewController.itemManager = self.itemManager
Run all the tests. All the tests pass.
If you look at the last two tests, there is a lot of duplicated code. The tests need refactoring. This is left as an exercise for you. You should be able to extract the duplicated code with the knowledge you have gained till now.
Now, let's check whether we can add a to-do item to the list. Build and run the app. Tap the plus (+) button, and put a title into the text field connected to the titleTextField property. Tap the save button (the one that is connected to the save action). Nothing happens. The reason for this is that we did not add the code to dismiss the View Controller when the Save button was tapped. We need a test for this.
Open InputViewControllerTests.swift, and add the following definition of a mock class below the other mock classes:
class MockInputViewController : InputViewController {

    var dismissGotCalled = false

    override func dismissViewControllerAnimated(flag: Bool,
        completion: (() -> Void)?) {

        dismissGotCalled = true
    }
}
The mock class is a subclass of InputViewController. The correct term for such a mock is partial mock
because it only mocks parts of the behavior of its super class. With this in place, we can write the test:
func testSave_DismissesViewController() {
    let mockInputViewController = MockInputViewController()

    mockInputViewController.titleTextField = UITextField()
    mockInputViewController.dateTextField = UITextField()
    mockInputViewController.locationTextField = UITextField()
    mockInputViewController.addressTextField = UITextField()
    mockInputViewController.descriptionTextField = UITextField()

    mockInputViewController.titleTextField.text = "Test Title"
    mockInputViewController.save()

    XCTAssertTrue(mockInputViewController.dismissGotCalled)
}
As we do not instantiate from the storyboard, we need to set the text fields in the test; otherwise, the test would crash because it would try to access text fields that are nil. After this, we set a test title to the title text field and call save. This should dismiss the View Controller.
Run the test. It fails. To make it pass is quite easy to do. Add the following line at the end of save():
dismissViewControllerAnimated(true, completion: nil)
Now, run all the tests. All the test pass.
Let's take a look at what the app looks like now. Build and run the app in the simulator, tap the Add button, put in a title, and hit Save. The input View Controller is dismissed but no item is added to the list. There are two problems concerning this micro feature. Firstly, the item manager defined in ItemListViewController is not shared as an item manager with the data provider. Secondly, after an item has been added to the list, we need to tell the table view to reload its data.
Let's write a test for the first problem:
func testViewDidLoad_SetsItemManagerToDataProvider() {
    XCTAssertTrue(sut.itemManager === sut.dataProvider.itemManager)
}
This test does not compile because the data provider is of the protocol<UITableViewDataSource, UITableViewDelegate> type. The compiler cannot know that it also has a itemManager property. To fix this, add the following protocol to ItemDataProvider.swift outside of the class definition:
@objc protocol ItemManagerSettable {
    var itemManager: ItemManager? { get set }
}
Now, the static analyzer tells us that this property cannot be a member of an @objc protocol because its type cannot be represented in Objective-C. But we need to declare the protocol to be @objc because we've set the data provider from the storyboard. The solution is to make ItemManager a subclass of NSObject:
class ItemManager: NSObject {
    // ….
}
Now, we can make ItemListDataProvider conform to ItemManagerSettable like this:
class ItemListDataProvider: NSObject, UITableViewDataSource, UITableViewDelegate, ItemManagerSettable {
    // ….
}
We can finally add the protocol in the declaration of the data provider in ItemListViewController:
@IBOutlet var dataProvider: protocol<UITableViewDataSource, UITableViewDelegate, ItemManagerSettable>!
Run the test. Finally, the test compiles but it fails. To make it pass, add the following line at the end of viewDidLoad() in ItemListViewController:
dataProvider.itemManager = itemManager
Now, run all the tests. All the tests pass again and there is nothing to refactor.
On to the next problem: we need to make sure that the table view is reloaded when an item is added to the item manager. A perfect place for the reload is viewWillAppear(_:). As an exercise, add this test to ItemListViewControllerTests. You may need a mock for the table view to register when reloadData() is called. A reminder: to trigger viewWillAppear(_:), do this in your test:
sut.beginAppearanceTransition(true, animated: true)
sut.endAppearanceTransition()
Write the test as an exercise.
To make the test pass, add the following code to ItemListViewController:
override func viewWillAppear(animated: Bool) {
super.viewWillAppear(animated)
tableView.reloadData()
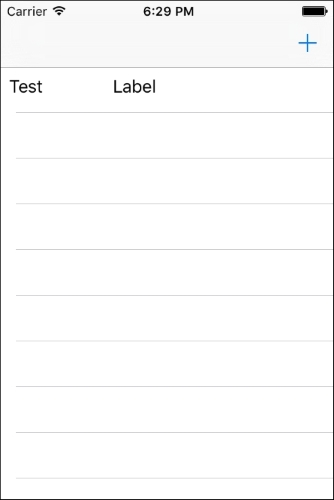
}Finally, build and run the app again and add an item to the list. You should see something like this:
When the user taps a cell, the detail view should be shown on the screen, with the information of the corresponding to-do item. The selection of the cell is managed by the data provider because it is the delegate for the table view. The presentation of the detail View Controller is managed by the item list View Controller. This means that the data provider has to communicate the selection of a cell to the list View Controller. There are several different ways to achieve this. We will use a notification because it will be interesting to take a look at how we can test the sending of notifications.
Communication with notifications has two partners—the sender and the receiver. In our case, the sender is the data provider. Let's write a test that ensures that a notification is sent when the user selects a cell. Open ItemDataProviderTests and add the following test method:
func testSelectingACell_SendsNotification() {
    let item = ToDoItem(title: "First")
    sut.itemManager?.addItem(item)

    expectationForNotification("ItemSelectedNotification",
        object: nil) { (notification) -> Bool in

        guard let index = notification.userInfo?["index"] as? Int else { return false }
        return index == 0
    }

    tableView.delegate?.tableView!(tableView, didSelectRowAtIndexPath: NSIndexPath(forRow: 0, inSection: 0))

    waitForExpectationsWithTimeout(3, handler: nil)
}
First, we add an item to the item manager to create a cell that we can select. Then, we create an expectation for a notification. When a notification with that name is sent, the closure is called. In the closure, we check whether the user information contains an index and the index is equal to 0. If it is, the closure returns true; otherwise it'll return false. A return value of true means that the expectation is fulfilled. Next, we call didSelectRowAtIndexPath on the table view's delegate and wait for the expectation to be fulfilled.
Run the test. It fails. To make the test pass, add the following code to ItemDataProvider:
func tableView(tableView: UITableView, didSelectRowAtIndexPath indexPath: NSIndexPath) {

    guard let itemSection = Section(rawValue: indexPath.section) else
    { fatalError() }

    switch itemSection {
    case .ToDo:
        NSNotificationCenter.defaultCenter().postNotificationName(
            "ItemSelectedNotification",
            object: self,
            userInfo: ["index": indexPath.row])

    default:
        break
    }
}
This code is straightforward. We get the section, and if the tap is in the to-do section, we send the notification with the tapped row in the user info.
Run all the tests. All the tests pass and there is nothing to refactor.
The receiver of the notification should be the item list View Controller, and it'll push the detail View Controller onto the navigation stack when it receives the message. To test this, we need another mock. Add the following code in ItemListViewControllerTests.swift but outside of ItemListViewControllerTests:
extension ItemListViewControllerTests {
    class MockNavigationController : UINavigationController {

        var pushedViewController: UIViewController?

        override func pushViewController(viewController: UIViewController,
            animated: Bool) {
                pushedViewController = viewController
                super.pushViewController(viewController, animated: animated)
        }
    }
}
This is a mock for UINavigationController, and it simply registers when a View Controller is pushed onto the navigation stack.
Add the following test to ItemListViewControllerTests:
func testItemSelectedNotification_PushesDetailVC() {

    let mockNavigationController = MockNavigationController(rootViewController: sut)

    UIApplication.sharedApplication().keyWindow?.rootViewController = mockNavigationController

    _ = sut.view

    NSNotificationCenter.defaultCenter().postNotificationName(
        "ItemSelectedNotification",
        object: self,
        userInfo: ["index": 1])

    guard let detailViewController = mockNavigationController.pushedViewController as? DetailViewController else { XCTFail(); return }

    guard let detailItemManager = detailViewController.itemInfo?.0 else
    { XCTFail(); return }

    guard let index = detailViewController.itemInfo?.1 else
    { XCTFail(); return }

    _ = detailViewController.view

    XCTAssertNotNil(detailViewController.titleLabel)
    XCTAssertTrue(detailItemManager === sut.itemManager)
    XCTAssertEqual(index, 1)
}
These are many lines of code. Let's go through them step by step. Firstly, we create an instance of our navigation controller mock and set its root View Controller to be the sut property. As seen earlier, in order to be able to push a View Controller onto the navigation stack, the view of the pushing View Controller has to be in the view hierarchy. Then, we access the view property of sut to trigger viewDidLoad() because we assume that sut is added as an observer to NSNotificationCenter.defaultCenter() in viewDidLoad(). With this setup, we can send the notification using NSNotificationCenter.defaultCenter(). Next we get the pushed View Controller and assert that it is of the DetailViewController type. Then, we check whether the item info is passed to the pushed View Controller. Finally, we check whether titleLabel of the detail View Controller is not nil and if it shares the item manager with the item list View Controller.
Run the test. The test fails. To make the test pass, we first need to add the ItemListViewController as an observer to NSNotificationCenter.defaultCenter(). Add the following code at the end of viewDidLoad():
NSNotificationCenter.defaultCenter().addObserver(self,
    selector: "showDetails:",
    name: "ItemSelectedNotification",
    object: nil)
Next, we have to implement showDetails(_:). Add the following method to ItemListViewController:
func showDetails(sender: NSNotification) {
    guard let index = sender.userInfo?["index"] as? Int else
    { fatalError() }

    if let nextViewController = storyboard?.instantiateViewControllerWithIdentifier(
        "DetailViewController") as? DetailViewController {

        nextViewController.itemInfo = (itemManager, index)
        navigationController?.pushViewController(nextViewController,
            animated: true)
    }
}
Run all the tests. All the tests pass and there is nothing to refactor.