
Now, we can run the api.py script that launches Tornados's development server to compose and send HTTP requests to our unsecure and simple Web API. Execute the following command:
python api.py
The following lines show the output after we execute the previous command. The Tornado HTTP development server is listening at port 8888:
Listening at port 8888
With the previous command, we will start the Tornado HTTP server and it will listen on every interface on port 8888. Thus, if we want to make HTTP requests to our API from other computers or devices connected to our LAN, we don't need any additional configurations.
Tip
If you decide to compose and send HTTP requests from other computers or devices connected to the LAN, remember that you have to use the development computer's assigned IP address instead of localhost. For example, if the computer's assigned IPv4 IP address is 192.168.1.103, instead of localhost:8888, you should use 192.168.1.103:8888. Of course, you can also use the host name instead of the IP address. The previously explained configurations are very important because mobile devices might be the consumers of our RESTful APIs and we will always want to test the apps that make use of our APIs in our development environments.
The Tornado HTTP server is running on localhost (127.0.0.1), listening on port 8888, and waiting for our HTTP requests. Now, we will compose and send HTTP requests locally in our development computer or from other computer or devices connected to our LAN.
We will start composing and sending HTTP requests with the command-line tools we have introduced in Chapter 1, Developing RESTful APIs with Django, curl and HTTPie. In case you haven't installed HTTPie, make sure you activate the virtual environment and then run the following command in the terminal or Command Prompt to install the HTTPie package:
pip install --upgrade httpie
Open a Cygwin terminal in Windows or a Terminal in macOS or Linux and run the following command. We will compose and send an HTTP request to turn on the hexacopter and set its motor speed to 100 RPMs:
http PATCH :8888/hexacopters/1 motor_speed=100
The following is the equivalent curl command. It is very important to use the -H "Content-Type: application/json" option to indicate curl to send the data specified after the -d option as application/json instead of the default application/x-www-form-urlencoded:
curl -iX PATCH -H "Content-Type: application/json" -d '{"motor_speed":100}'
    :8888/hexacopters/1
The preceding commands will compose and send the following HTTP request, PATCH http://localhost:8888/hexacopters/1, with the following JSON key-value pair:
{
    "motor_speed": 100
}
The request specifies /hexacopters/1, and therefore, Tornado will iterate over the list of tuples with regular expressions and request classes and it will match '/hexacopters/([0-9]+)'. Tornado will create an instance of the HexacopterHandler class and run the HexacopterHandler.patch method with 1 as the value for the id argument. As the HTTP verb for the request is PATCH, Tornado calls the patch method. If the hexacopter's speed is successfully set, the method returns an HTTP 200 OK status code and the key-value pairs with the speed and status for the recently updated hexacopter serialized to JSON in the response body. The following lines show an example response for the HTTP request:
HTTP/1.1 200 OK
Content-Length: 33
Content-Type: application/json; charset=UTF-8
Date: Thu, 08 Sep 2016 02:02:27 GMT
Server: TornadoServer/4.4.1
{
    "speed": 100,
    "turned_on": true
}
We will compose and send an HTTP request to retrieve the status and the motor speed for the hexacopter. Go back to the Cygwin terminal in Windows or the Terminal in macOS or Linux, and run the following command:
http :8888/hexacopters/1
The following is the equivalent curl command:
curl -iX GET -H :8888/hexacopters/1
The preceding commands will compose and send the following HTTP request: GET http://localhost:8888/hexacopters/1. The request specifies /hexacopters/1, and therefore, it will match '/hexacopters/([0-9]+)' and run the HexacopterHandler.get method with 1 as the value for the id argument. As the HTTP verb for the request is GET, Tornado calls the get method. The method retrieves the hexacopter's status and generates a JSON response with the key-value pairs.
The following lines show an example response for the HTTP request. The first lines show the HTTP response headers, including the status (200 OK) and the Content-type as (application/json). After the HTTP response headers, we can see the details of the hexacopter's status in the JSON response:
HTTP/1.1 200 OK
Content-Length: 33
Content-Type: application/json; charset=UTF-8
Date: Thu, 08 Sep 2016 02:26:00 GMT
Etag: "ff152383ca6ebe97e5a136166f433fbe7f9b4434"
Server: TornadoServer/4.4.1
{
    "speed": 100,
    "turned_on": true
}
After we run the three requests, we will see the following lines in the window that is running the Tornado HTTP server. The output shows the results of executing the print statements that describe when the code started setting or retrieving information and when it finished:
I've started setting the hexacopter's motor speed
I've finished setting the hexacopter's motor speed
I've started retrieving hexacopter's status
I've finished retrieving hexacopter's status
The different methods we coded in the request handler classes end up calling time.sleep to simulate it takes some time for the operations with the hexacopter. In this case, our code is running with a synchronous execution, and therefore, each time we compose and send a request, the Tornado server is blocked until the operation with the hexacopter finishes and the method sends the response. We will create a new version of this API that will use asynchronous execution later and we will understand the advantages of Tornado's non-blocking features. However, first, we will understand how the synchronous version of the API works.
The following image shows two Terminal windows side-by-side on macOS. The Terminal window on the left-hand side is running the Tornado HTTP server and displays the messages printed in the methods that process the HTTP requests. The Terminal window on the right-hand side is running http commands to generate the HTTP requests. It is a good idea to use a similar configuration to check the output while we compose and send the HTTP requests:

Now, we will compose and send an HTTP request to retrieve a hexacopter that doesn't exist. Remember that we just have one hexacopter in our drone. Run the following command to try to retrieve the status for an hexacopter with an invalid id. We must make sure that the utilities display the headers as part of the response to see the returned status code:
http :8888/hexacopters/8
The following is the equivalent curl command:
curl -iX GET :8888/hexacopters/8
The previous commands will compose and send the following HTTP request: GET http://localhost:8888/hexacopters/8. The request is the same as the previous one we have analyzed, with a different number for the id parameter. The server will run the HexacopterHandler.get method with 8 as the value for the id argument. The id is not equal to 1, and therefore, the code will return an HTTP 404 Not Found status code. The following lines show an example header response for the HTTP request:
HTTP/1.1 404 Not Found
Content-Length: 0
Content-Type: text/html; charset=UTF-8
Date: Thu, 08 Sep 2016 04:31:53 GMT
Server: TornadoServer/4.4.1
So far, we have been working with two Terminal-based or command-line tools to compose and send HTTP requests to our Tornado HTTP server-cURL and HTTPie. Now, we will work with one of the GUI tools we used when composing and sending HTTP requests to the Django development server and the Flask development server: Postman.
Now, we will use the Builder tab in Postman to easily compose and send HTTP requests to localhost:8888 and test the RESTful API with this GUI tool. Remember that Postman doesn't support curl-like shorthands for localhost, and therefore, we cannot use the same shorthands we have been using when composing requests with curl and HTTPie.
Select GET in the drop-down menu at the left-hand side of the Enter request URL textbox and enter localhost:8888/leds/1 in this textbox at the right-hand side of the dropdown. Now, click on Send and Postman will display the status (200 OK), the time it took for the request to be processed and the response body with all the games formatted as JSON with syntax highlighting (Pretty view).
The following screenshot shows the JSON response body in Postman for the HTTP GET request:

Click on Headers on the right-hand side of Body and Cookies to read the response headers. The following screenshot shows the layout for the response headers that Postman displays for the previous response. Note that Postman displays the Status at the right-hand side of the response and doesn't include it as the first line of the Headers, as it happened when we worked with both the cURL and HTTPie utilities:

Now, we will use the Builder tab in Postman to compose and send an HTTP request to create a new message, specifically, a PATCH request. Follow the next steps:
- Select PATCH from the drop-down menu on the left-hand side of the Enter request URL textbox and enter
localhost:8888/leds/1in this textbox at the right-hand side of the dropdown. - Click on Body on the right-hand side of Authorization and Headers, within the panel that composes the request.
- Activate the raw radio button and select
JSON (application/json)in the dropdown on the right-hand side of the binary radio button. Postman will automatically add aContent-type = application/jsonheader, and therefore, you will notice the Headers tab will be renamed to Headers (1), indicating us that there is one key-value pair specified for the request headers. - Enter the following lines in the textbox below the radio buttons, within the Body tab:
{
   "brightness_level": 128
}
The following screenshot shows the request body in Postman:

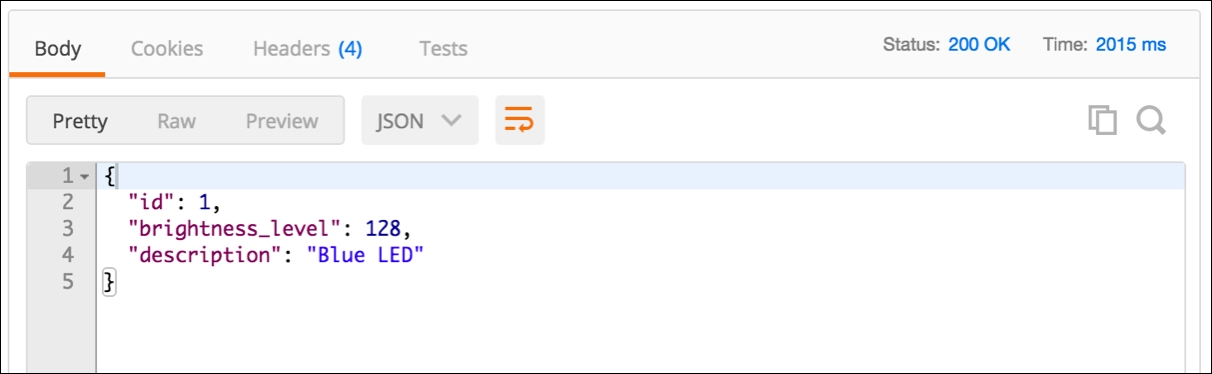
We followed the necessary steps to create an HTTP PATCH request with a JSON body that specifies the necessary key-value pairs to create a new game. Click on Send and Postman will display the Status (200 OK), the time it took for the request to be processed, and the response body with the recently added game formatted as JSON with syntax highlighting (Pretty view). The following screenshot shows the JSON response body in Postman for the HTTP POST request.
The Tornado HTTP server is listening on every interface on port 8888, and therefore, we can also use apps that can compose and send HTTP requests from mobile devices to work with the RESTful API. For example, we can work with the previously introduced iCurlHTTP app on iOS devices such as iPad Pro and iPhone. In Android devices, we can work with the previously introduced HTTP Request App.
The following screenshot shows the results of composing and sending the following HTTP request with the iCurlHTTP appâGET http://192.168.2.3:8888/altimeters/1. Remember that you have to perform the previously explained configurations in your LAN and router to be able to access the Flask development server from other devices connected to your LAN. In this case, the IP assigned to the computer running the Tornado HTTP server is 192.168.2.3, and therefore, you must replace this IP with the IP assigned to your development computer:
