
We start by creating an entirely new Symfony project, running the following console command:
symfony new shop
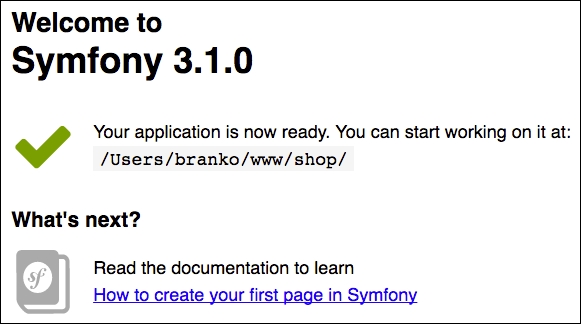
This creates a new shop directory with all of the required files needed to run our application in the browser. Among these files and directories is the src/AppBundle directory, which is actually our core module. Before we can run our application in the browser, we need to map the newly created shop directory to a hostname, let's say shop.app, so we can access it in the browser via http://shop.app URL. Once this is done, if we open http://shop.app, we should see Welcome to Symfony 3.1.0 screen as shown here:
Though we have no need for the database just yet, other modules we will develop later on will assume database connection, so it's worth setting it up right from the start. We do so by configuring app/config/parameters.yml with proper database connection parameters.
We then download Foundation for Sites from http://foundation.zurb.com/sites.html. Once downloaded, we need to unpack it and copy over the /js and /css directories into the Symfony /web directory as shown in the following screenshot:

With Foundation CSS and JavaScript files in place, we edit the app/Resources/views/base.html.twig file as follows:
<!doctype html>
<html class="no-js"lang="en">
  <head>
    <meta charset="utf-8"/>
    <meta http-equiv="x-ua-compatible" content="ie=edge">
    <meta name="viewport" content="width=device-width, initial-scale=1.0"/>
    <title>{% block title %}Welcome!{% endblock %}</title>
    <link rel="stylesheet"href="{{ asset('css/foundation.css') }}"/>
    {% block stylesheets%}{% endblock %}
  </head>
  <body>
    <!-- START BODY -->
    <!-- TOP-MENU -->
    <!-- SYSTEM-WIDE-MESSAGES -->
    <!-- PER-PAGE-BODY -->
    <!-- FOOTER -->
    <!-- START BODY -->
    <script src="{{ asset('js/vendor/jquery.js') }}"></script>
    <script src="{{ asset('js/vendor/what-input.js') }}"></script>
    <script src="{{ asset('js/vendor/foundation.js') }}"></script>
    <script>
      $(document).foundation();
    </script>
    {% block javascripts%}{% endblock %}
  </body>
</html>
Here we are setting the entire head and before body end areas, with all the necessary CSS and JavaScript loading. The Twigs asset tag helps us with building URL paths, where we simply pass on the URL path itself and it builds a complete URL for us. In regard to the actual body of the page, there are several things to consider here. How are we going to build category, customer, and checkout menus? At this point we do not have any of these modules, and neither do we want to make them mandatory for our core module. So how do we solve the challenge of accounting for something that is not there yet?
What we can do for category, customer, and checkout menus is to define global Twig variables for each of those menu items that will then be used to render the menu. These variables will be filed via proper services. Since the core bundle is not aware of future catalog, customer, and checkout modules, we will initially create a few dummy services and hook them to global Twig variables. Later on, when we develop catalog, customer, and checkout modules, those modules will override the appropriate services, thus providing the right values for into menus.
This approach might not fit ideally with the notion of modular application, but it will suffice for our needs, as we are not hard-coding any dependencies as such.
We start off by adding the following entry into the app/config/config.yml file:
twig:
# ...
globals:
category_menu: '@category_menu'
customer_menu: '@customer_menu'
checkout_menu: '@checkout_menu'
products_bestsellers: '@bestsellers'
products_onsale: '@onsale'
The category_menu_items, customer_menu_items, checkout_menu_items, products_bestsellers, and products_onsale variables become global Twig variables that we can use in any Twig template as shown in the following example:
<ul>
  {% for category in category_menu.getItems() %}
  <li>{{ category.name }}</li>
  {% endfor %}
</ul>
The @ character in the Twig global variable config is used to denote a beginning of the service name. This is the service that will provide a value object for our Twig variable. Next, we go ahead and create the actual category_menu, customer_menu, checkout_menu, bestsellers, and onsale services by modifying app/config/services.yml as follows:
services:
category_menu:
  class: AppBundleServiceMenuCategory
customer_menu:
  class: AppBundleServiceMenuCustomer
checkout_menu:
  class: AppBundleServiceMenuCheckout
bestsellers:
  class: AppBundleServiceMenuBestSellers
onsale:
  class: AppBundleServiceMenuOnSale
Furthermore, we create each of the listed service classes under the src/AppBundle/Service/Menu/ directory. We start with the src/AppBundle/Service/Menu/Bestsellers.php file with the following content:
namespace AppBundleServiceMenu;

class BestSellers {
  public function getItems() {
    // Note, this can be arranged as per some "Product"interface, so to know what dummy data to return
    return array(
      ay('path' =>'iphone', 'name' =>'iPhone', 'img' =>'/img/missing-image.png', 'price' => 49.99, 'add_to_cart_url' =>'#'),
      array('path' =>'lg', 'name' =>'LG', 'img' =>
        '/img/missing-image.png', 'price' => 19.99, 'add_to_cart_url' =>'#'),
      array('path' =>'samsung', 'name' =>'Samsung', 'img'=>'/img/missing-image.png', 'price' => 29.99, 'add_to_cart_url' =>'#'),
      array('path' =>'lumia', 'name' =>'Lumia', 'img' =>'/img/missing-image.png', 'price' => 19.99, 'add_to_cart_url' =>'#'),
      array('path' =>'edge', 'name' =>'Edge', 'img' =>'/img/missing-image.png', 'price' => 39.99, 'add_to_cart_url' =>'#'),
    );
  }
}
We then add the src/AppBundle/Service/Menu/Category.php file with content as follows:
class Category {
  public function getItems() {
    return array(
      array('path' =>'women', 'label' =>'Women'),
      array('path' =>'men', 'label' =>'Men'),
      array('path' =>'sport', 'label' =>'Sport'),
    );
  }
}
Following this, we add the src/AppBundle/Service/Menu/Checkout.php file with content as shown here:
class Checkout
{
  public function getItems()
  {
     // Initial dummy menu
     return array(
       array('path' =>'cart', 'label' =>'Cart (3)'),
       array('path' =>'checkout', 'label' =>'Checkout'),
    );
  }
}
Once this is done, we will go on and add the following content to the src/AppBundle/Service/Menu/Customer.php file:
class Customer
{
  public function getItems()
  {
    // Initial dummy menu
    return array(
      array('path' =>'account', 'label' =>'John Doe'),
      array('path' =>'logout', 'label' =>'Logout'),
    );
  }
}
We then add the src/AppBundle/Service/Menu/OnSale.php file with the following content:
class OnSale
{
  public function getItems()
  {
    // Note, this can be arranged as per some "Product" interface, so to know what dummy data to return
    return array(
      array('path' =>'iphone', 'name' =>'iPhone', 'img' =>'/img/missing-image.png', 'price' => 19.99, 'add_to_cart_url' =>'#'),
      array('path' =>'lg', 'name' =>'LG', 'img' =>'/img/missing-image.png', 'price'      => 29.99, 'add_to_cart_url' =>'#'),
      array('path' =>'samsung', 'name' =>'Samsung', 'img'=>'/img/missing-image.png', 'price' => 39.99, 'add_to_cart_url' =>'#'),
      array('path' =>'lumia', 'name' =>'Lumia', 'img' =>'/img/missing-image.png', 'price' => 49.99, 'add_to_cart_url' =>'#'),
      array('path' =>'edge', 'name' =>'Edge', 'img' =>'/img/missing-image.png', 'price' => 69.99, 'add_to_cart_url' =>'#'),
    ;
  }
}
We have now defined five global Twig variables that will be used to build our application menus. Even though variables are now hooked to a dummy service that returns nothing more than a dummy array, we have effectively decoupled menu items into other soon-to-be built modules. When we get to building our category, customer, and checkout modules later on, we will simply write a service override and properly fill the menu items array with real items. This would be the ideal situation.
We can now go back to our app/Resources/views/base.html.twig file and replace <!-- TOP-MENU --> from the preceding code with the following:
<div class="title-bar" data-responsive-toggle="appMenu" data-hide-for="medium">
  <button class="menu-icon" type="button" data-toggle></button>
  <div class="title-bar-title">Menu</div>
</div>

<div class="top-bar" id="appMenu">
  <div class="top-bar-left">
    {# category_menu is global twig var filled from service, and later overriden by another module service #}
    <ul class="menu">
      <li><a href="{{ path('homepage') }}">HOME</a></li>
        {% block category_menu %}
        {% for link in category_menu.getItems() %}
      <li><a href="{{ link.path }}">{{ link.label }}</li></a>
      {% endfor %}
      {% endblock %}
    </ul>
  </div>
  <div class="top-bar-right">
    <ul class="menu">
      {# customer_menu is global twig var filled from service, and later overriden by another module service #}
      {% block customer_menu %}
      {% for link in customer_menu.getItems() %}
      <li><a href="{{ link.path }}">{{ link.label }}</li></a>
      {% endfor %}
      {% endblock %}
      {# checkout_menu is global twig var filled from service, and later overriden by another module service #}
      {% block checkout_menu %}
      {% for link in checkout_menu.getItems() %}
      <li><a href="{{ link.path }}">{{ link.label }}</li></a>
      {% endfor %}
      {% endblock %}
    </ul>
  </div>
</div>
We can then replace <!-- SYSTEM-WIDE-MESSAGES --> with the following:
<div class="row column">
  {% for flash_message in app.session.flashBag.get('alert') %}
  <div class="alert callout">
    {{ flash_message }}
  </div>
  {% endfor %}
  {% for flash_message in app.session.flashBag.get('warning') %}
  <div class="warning callout">
    {{ flash_message }}
  </div>
  {% endfor %}
  {% for flash_message in app.session.flashBag.get('success') %}
  <div class="success callout">
    {{ flash_message }}
  </div>
  {% endfor %}
</div>
We replace <!-- PER-PAGE-BODY --> with the following:
<div class="row column">
  {% block body %}{% endblock %}
</div>
We replace <!-- FOOTER --> with the following:
<div class="row column">
  <ul class="menu">
    <li><a href="{{ path('about') }}">About Us</a></li>
    <li><a href="{{ path('customer_service') }}">Customer Service</a></li>
    <li><a href="{{ path('privacy_cookie') }}">Privacy and Cookie Policy</a></li>
    <li><a href="{{ path('orders_returns') }}">Orders and Returns</a></li>
    <li><a href="{{ path('contact') }}">Contact Us</a></li>
  </ul>
</div>
Now we can go ahead and edit the src/AppBundle/Controller/DefaultController.php file and add the following code to it:
/**
 * @Route("/", name="homepage")
 */
public function indexAction(Request $request)
{
  return $this->render('AppBundle:default:index.html.twig');
}

/**
 * @Route("/about", name="about")
 */
public function aboutAction()
{
  return $this->render('AppBundle:default:about.html.twig');
}

/**
 * @Route("/customer-service", name="customer_service")
 */
public function customerServiceAction()
{
  return $this->render('AppBundle:default:customer-service.html.twig');
}

/**
 * @Route("/orders-and-returns", name="orders_returns")
 */
public function ordersAndReturnsAction()
{
  return $this->render('AppBundle:default:orders-returns.html.twig');
}

/**
 * @Route("/privacy-and-cookie-policy", name="privacy_cookie")
 */
public function privacyAndCookiePolicyAction()
{
  return $this->render('AppBundle:default:privacy-cookie.html.twig');
}
All of the used template files (about.html.twig, customer-service.html.twig, orders-returns.html.twig, privacy-cookie.html.twig) residing within the src/AppBundle/Resources/views/default directory can be similarly defined as follows:
{% extends 'base.html.twig' %}

{% block body %}
<div class="row">
  <h1>About Us</h1>
</div>
<div class="row">
  <p>Loremipsum dolor sit amet, consecteturadipiscingelit...</p>
</div>
{% endblock %}
Here we are merely wrapping header and content into the div elements with the row class, just to give it some structure. The result should be pages similar to those shown here:

The Contact Us page requires a different approach as it will contain a form. To build a form we use Symfony's Form component by adding the following to the src/AppBundle/Controller/DefaultController.php file:
/**
 * @Route("/contact", name="contact")
 */
public function contactAction(Request $request) {

  // Build a form, with validation rules in place
  $form = $this->createFormBuilder()
  ->add('name', TextType::class, array(
    'constraints' => new NotBlank()
  ))
  ->add('email', EmailType::class, array(
    'constraints' => new Email()
  ))
  ->add('message', TextareaType::class, array(
    'constraints' => new Length(array('min' => 3))
  ))
   ->add('save', SubmitType::class, array(
    'label' =>'Reach Out!',
    'attr' => array('class' =>'button'),
  ))
  ->getForm();

  // Check if this is a POST type request and if so, handle form
  if ($request->isMethod('POST')) {
    $form->handleRequest($request);

    if ($form->isSubmitted() && $form->isValid()) {
      $this->addFlash(
        'success',
        'Your form has been submitted. Thank you.'
      );

      // todo: Send an email out...

      return $this->redirect($this->generateUrl('contact'));
    }
  }

  // Render "contact us" page
  return $this->render('AppBundle:default:contact.html.twig', array(
    'form' => $form->createView()
  ));
}
Here we started off by building a form via form builder. The add methods accept both field definitions and field constraints upon which validation can be based. We then added a check for the HTTP POST method, in case of which we feed the form with request parameters and run validation against it.
With the contactAction method in place, we still need a template file to actually render the form. We do so by adding the src/AppBundle/Resources/views/default/contact.html.twig file with content that follows:
{% extends 'base.html.twig' %}

{% block body %}

<div class="row">
  <h1>Contact Us</h1>
</div>

<div class="row">
  {{ form_start(form) }}
  {{ form_widget(form) }}
  {{ form_end(form) }}
</div>
{% endblock %}
Based on these few tags, Twig handles the form rendering for us. The resulting browser output is a page as shown in the following:

We are almost there with getting all of our pages ready. One thing is missing, though, the body area of our home page. Unlike other pages with static content, this one is actually dynamic, as it lists bestsellers and products on sale. This data is expected to come from other modules, which are not available yet. Still, this does not mean we cannot prepare dummy placeholders for them. Let's go ahead and edit the app/Resources/views/default/index.html.twig file as follows:
{% extends 'base.html.twig' %}
{% block body %}
<!--products_bestsellers -->
<!--products_onsale -->
{% endblock %}
Now we need to replace <!-- products_bestsellers --> with the following:
{% if products_bestsellers %}
<h2 class="text-center">Best Sellers</h2>
<div class="row products_bestsellers text-center small-up-1 medium-up-3 large-up-5" data-equalizer data-equalize-by- row="true">
  {% for product in products_bestsellers.getItems() %}
  <div class="column product">
    <img src="{{ asset(product.img) }}" alt="missing image"/>
    <a href="{{ product.path }}">{{ product.name }}</a>
    <div>${{ product.price }}</div>
    <div><a class="small button"href="{{ product.add_to_cart_url }}">Add to Cart</a></div>
  </div>
  {% endfor %}
</div>
{% endif %}
Now we need to replace <!-- products_onsale -->with the following:
{% if products_onsale %}
<h2 class="text-center">On Sale</h2>
<div class="row products_onsale text-center small-up-1 medium-up-3 large-up-5" data-equalizer data-equalize-by-row="true">
  {% for product in products_onsale.getItems() %}
  <div class="column product">
    <img src="{{ asset(product.img) }}" alt="missing image"/>
    <a href="{{ product.path }}">{{ product.name }}</a>
  <div>${{ product.price }}</div>
  <div><a class="small button"href="{{ product.add_to_cart_url }}">Add to Cart</a></div>
  </div>
  {% endfor %}
</div>
{% endif %}
Tip
The http://dummyimage.com enables us to create a placeholder images for our app.
At this point we should be seeing the home page as shown here:

What we are trying to achieve as part of our applicationwide security is to set some basic protection against future customers or any other user being able to access and use future auto-generated CRUD controllers. We do so by modifying the app/config/security.yml file. There are several components to the security.yml file we need to address: Firewalls, access control, providers, and encoders. If we observe the auto-generated CRUD from the previous test app, it becomes clear that we need to protect the following from customer access:
GET|POST /newGET|POST /{id}/editDELETE /{id}
In another words, everything that has /new and /edit in the URL, and everything that is of DELETE method, needs to be protected from the customer. With that in mind, we will use Symfony security features to create an in-memory user of role ROLE_ADMIN. We will then create an access control list that allows only ROLE_ADMIN to access the resources we just mentioned, and a firewall that triggers an HTTP basic authentication login form when we try to access these resources.
Using an in-memory provider means hard-coding users in our security.yml file. For purposes of our application, we will do so for the admin type of users. The actual password, however, does not need to be hard-coded. Assuming we will use 1L6lllW9zXg0 for the password, let's jump to the console and type in the following command:
php bin/console security:encode-password
This will produce an output as follows.

We can now edit security.yml by adding an in-memory provider and copy-paste the generated encoded password into it, as shown here:
security:
    providers:
        in_memory:
            memory:
                users:
                    john:
                        password: $2y$12$DFozWehwPkp14sVXr7.IbusW8ugvmZs9dQMExlggtyEa/TxZUStnO
                        roles: 'ROLE_ADMIN'
Here we defined a user john of role ROLE_ADMIN with an encoded 1L6lllW9zXg0 password.
Once we have the providers in place, we can go ahead and add encoders to our security.yml file. Otherwise Symfony would not know what to make of the current password assigned to john user:
security:
    encoders:
        SymfonyComponentSecurityCoreUserUser:
            algorithm: bcrypt
            cost: 12
Then we add the firewall as follows:
security:
    firewalls:
        guard_new_edit:
            pattern: /(new)|(edit)
            methods: [GET, POST]
            anonymous: ~
            http_basic: ~
       guard_delete:
           pattern: /
           methods: [DELETE]
           anonymous: ~
           http_basic: ~
The guard_new_edit and guard_delete names are freely given names to our two application firewalls. The guard_new_edit firewall will be intercepting all GET and POST requests to any route containing the /new or /edit string in its URL. The guard_delete firewall will be intercepting any HTTP DELETE method on any URL. Once these firewalls kick in, they will show an HTTP basic authentication form, and only allow access if the user is logged in.
Then we add the access control list as follows:
security:
    access_control:
      # protect any possible auto-generated CRUD actions from everyone's access
      - { path: /new, roles: ROLE_ADMIN }
      - { path: /edit, roles: ROLE_ADMIN }
      - { path: /, roles: ROLE_ADMIN, methods: [DELETE] }
With these entries in place, an one who tries to access any URL with any of the patterns defined under access_control will be presented with the browser login as shown here:

The only user that can login is john with the password 1L6lllW9zXg0. Once authenticated, the user can access all the CRUD links. This should be enough for our simple application.