
The information provided in the first chapter should have enabled you to deploy your pfSense router/firewall on your network. In this chapter, we will go beyond this basic functionality and explore some of the features pfSense has that many consumer grade routers do not have, yet you are likely to want to implement. In particular, we will focus on the following topics:
- Dynamic Host Configuration Protocol (DHCP)
- Domain Name System (DNS)
- Dynamic DNS (DDNS)
- Captive portal
- Network Time Protocol (NTP)
- Simple Network Management Protocol (SNMP)
You have probably configured a router to act as a DHCP server at some point. Configuring pfSense to act as a DHCP server is just as easy, and it has a number of features many routers do not have. DHCP configuration can be done either at the console, or within the web GUI, and both possibilities will be covered here.
DHCP configuration at the console can be done with the following steps:
- At the console, select Set interface(s) IP address on the menu.
- Select the interface on which you want to run the pfSense DHCP server (this is usually LAN, but it could be any interface other than the WAN interface). You will be prompted for the interface's IPv4 IP address.
- Type in the address (or leave the line blank for none) and press Enter.
- The next prompt is for the subnet bit count. Type in the correct bit count and press Enter.
- Next, you will be prompted for the upstream gateway address. You do not need to provide this information, so just press Enter. IPv4 address configuration is now complete.
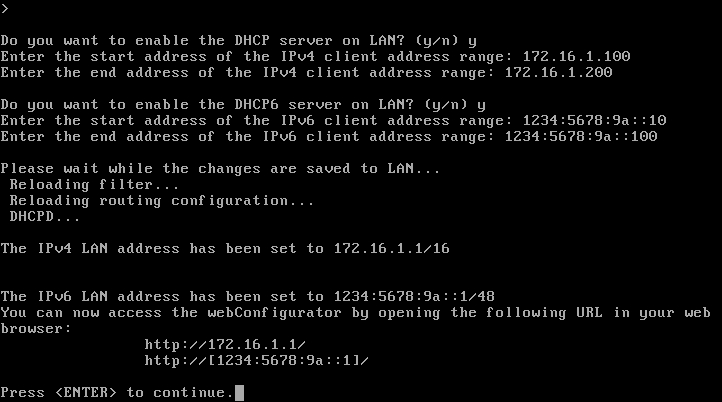
DHCP configuration from the console, with both the DHCP and DHCP6 server enabled.
- The next prompt will be for the IPv6 address. If you have a small network, IPv6 configuration is not necessary, although there are some advantages to IPv6 configuration, such as the ability to assign addresses automatically, enhanced security, and even better mobility features. Enter an IPv6 address if you want to use IPv6 on the interface.
- After you enter the IPv6 address, you will be prompted to enter the subnet bit count, so enter the bit count and press Enter. Since you don't need to specify an upstream gateway, you can press Enter there as well.
- The next two prompts will ask you whether to start the DHCP server on IPv4 and IPv6, respectively. If you specify
yfor either one, you will be prompted to enter the address range for DHCP. Here you can specify any valid address range for your subnet. Keep in mind that you don't have to start the DHCP server for IPv6 unless you want clients to have their IPv6 addresses assigned to them. Instead, you can utilize client address configuration, as described earlier.
Now that you have enabled DHCP at the console and assigned addresses ranges, you should be able to connect to your network via DHCP. Configuring networking on the client for DHCP will be different for each platform, but virtually all modern OSes allow you to select either static IP assignment or DHCP (if it's not explicitly called DHCP, it will likely be called automatic IP assignment or something like that). You may have to reset your network connection, but once you do, the DHCP server should assign you an IP address.
You can also set up your DHCP server in the web GUI, which includes many more options than the console does. Navigate to Services | DHCP Server. There will be a separate tab for each non-WAN interface. Click on the tab for the interface you want to configure. The following screenshot shows the configuration page for the LAN interface:
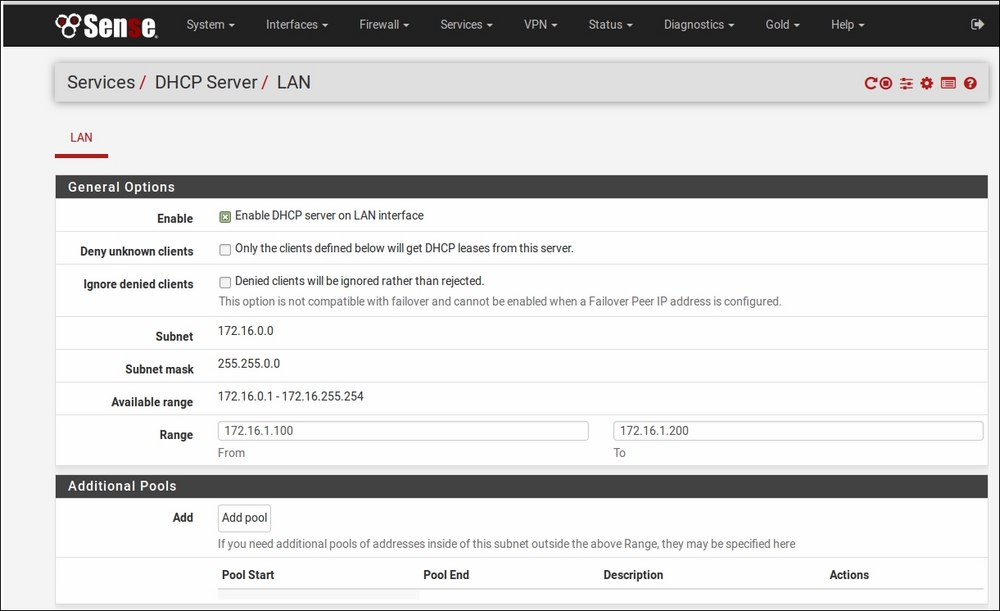
The DHCP configuration page (for IPv4) in pfSense.
In the General Options section, there is an Enable checkbox, which, as you probably guessed, enables the DHCP server on the interface. There are also Range edit boxes where you can define the range of assigned addresses. If this is all you wanted to do, you can click on the Save button at the bottom of the page and the DHCP server will now be up and running.
There are other options available. The Additional Pools section allows you to specify additional pools of addresses outside of the range specified in General Options. You add address pools by clicking on the Add pool button and entering the new range. Once a new pool has been added, it will appear under the Additional Pools section, and you will be able to edit or delete the pool from the DHCP Server page.
You may want to set up your system so that only devices with certain MAC addresses receive DHCP leases. If so, check the Deny unknown clients checkbox. You will then have to scroll down to the Other Options section and click on the Advanced button next to the MAC Address Control section. In the MAC Allow edit box, specify the MAC addresses of the devices (as comma-separated values with no spaces) to which you want to allow access. If you want to deny access to certain devices, you can specify their MAC addresses in the MAC Deny edit box.
Note
Be aware that MAC address control only provides a minimal level of security. A user who relies on auto-configuration to connect to the Internet will be locked out, but a determined hacker can easily resort to MAC address spoofing which, as you probably know, is one of pfSense's capabilities. Therefore, it's not a good idea to rely on MAC address control as a security measure.
There may be devices on your network which need to have the same IP address at all times. For these devices, you can rely on static mappings. If you scroll down to the bottom of the page, you will find a section labeled DHCP Static Mappings for this Interface. Below this heading and to the right, there will be an Add button which will launch a page on which you can add a mapping.
The first setting on this page is MAC controls. Here, you must enter the MAC address of the device which is to receive a static mapping. To the right of the MAC controls edit box, there is a Copy My MAC button that will copy the MAC address of the device currently being used to connect to pfSense; this is provided for your convenience.
The MAC address is the only field you must enter. If this is all you enter, this MAC address will be added to the list of allowed MAC addresses for the DHCP server. To obtain a static mapping for this device, you need to enter an IP address in the IP Address field.
There is also a Hostname field, in which you can specify the hostname, minus the domain. This field is optional, but, if specified, will be forwarded to the DNS server to help identify the client. Another optional field is Description, which just allows you to enter a text description of the static mapping. The Client Identifier field allows you to enter a client identifier string which will then be sent to the DHCP server. If the client identifier is specified, this identifier, along with the assigned network address, will be used by the DHCP server to identify the client, per RFC 2131. The Client Identifier field allows you to enter a client identifier string which, when specified, is used along with the assigned network address by the DHCP server to identify the client, per RFCs 2131 and 6842.
In the Servers section, you can specify both WINS servers and DNS servers. WINS servers provide Windows with a means of mapping NetBIOS names to network addresses. If you don't have a WINS server on your network, you can leave this blank. The DNS Servers fields need not be filled in most cases. If these fields are left blank and the DNS forwarder is enabled, pfSense will automatically assign itself as the DNS server for client PCs. If the DNS forwarder is disabled and these fields are left blank, the default DNS servers specified in System | General Setup will be used. There are, however, circumstances in which you may want to override either the default DNS servers or the DNS forwarder:
The Other Options section is reserved for less frequently used options. The Gateway field can be left blank if pfSense is the gateway for this interface. Otherwise, you can specify a different gateway IP here. When using CARP, you should enter the CARP IP address here. Default Lease Time and Maximum Lease Time control the DHCP lease time. The former is for clients that do not ask for a specific lease time, and the latter is for clients that ask for a specific lease time. If Default Lease Time is left blank, it will be 7,200 seconds; if Maximum Lease Time is left blank, it will be 86,400 seconds.
There is a Failover Peer IP field in which you can specify the failover peer IP address if this system is part of a failover group, such as a CARP cluster. The IP address specified should be the real IP address of the failover system, not the shared CARP address.
The Enable Static ARP entries checkbox works in a similar way to Deny unknown clients in that it will prevent any clients not specified on the MAC allow list from obtaining DHCP leases, but it will go even further than that. If this option is enabled, unknown clients will not even be allowed to communicate with pfSense. This prevents someone from circumventing DHCP restrictions by entering a static IP address.
If you want to register the client with a DDNS server, you can enter this information by scrolling down to Dynamic DNS and clicking on the Advanced button. The Enable registration of DHCP client names in DNS checkbox enables DNS registration. If you want to enable DDNS registration, you must fill in the DDNS Domain field. There are also fields for the primary domain name server IP address, as well as the DDNS key name and key secret.
As with DHCP configuration on IPv4 networks, DHCP configuration on an IPv6 network (DHCPv6) has many options. This section will focus on options that are only available with DHCPv6 rather than options that are present in both DHCP and DHCPv6. To configure DHCPv6, navigate to Services | DHCPv6/RA.

The DHCPv6 Server configuration page.
Under
DHCPv6 Options, there are several useful settings. The purpose of the Prefix Delegation Range option, as the name implies, is to delegate to clients the ability to act as DHCPv6 servers. This is done by assigning portions of the subnet to them. To illustrate this, consider one of the common IPv6 prefix examples: fd12:3456:789a:: with a subnet mask of 48. The remaining bits are available for delegation, so we have an available range of fd12:3456:789a:: to 1234:5678:9a:ffff:ffff:ffff:ffff:ffff. We can delegate any subset of this range. The Prefix Delegation Size indicates the CIDR of the client's subnets. It must be on the boundaries of the range indicated in the Prefix Delegation Size.
In our previous example, we had a ULA with a prefix of fd12:3456:789a::/48. If we wanted our clients to receive portions of the subnet, then we could set a Prefix Delegation Range of fd12:3456:789a:0000:: to fd12:3456:789a:ff00:: with a Prefix Delegation Size of 56. This would provide a maximum of 256 blocks of addresses to be delegated.
There is another tab on this page for Router Advertisements (RA). This enables an IPv6-capable router to advertise its presence to other routers, and keep other nodes informed of any changes in the network.
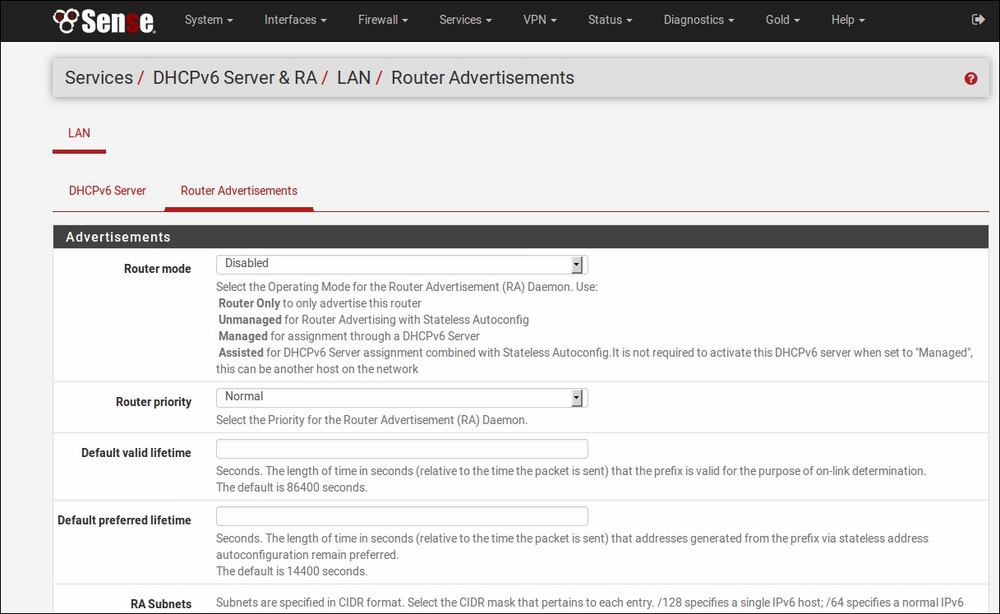
The Router Advertisements tab in pfSense.
On IPv4 networks, the DHCP server makes information about the gateway available. On IPv6 networks, this functionality is performed via RAs. You can set the Router Advertisement mode in the Operating Mode drop-down box. Selecting Router Mode results in the clients having to set their IPv6 addresses statically; they will not be assigned an address by the DHCPv6 server. A setting of Unmanaged results in the clients getting addresses through Stateless Address Auto Configuration (SLAAC). If the setting is Managed, client addresses will be assigned only by DHCPv6. Finally, Assisted is a hybrid mode, assigning client addresses by either DHCPv6, SLAAC, or both.
Most modern operating systems support both SLAAC and DHCPv6, so you should be able to choose either Unmanaged or Managed in most cases. If you are not sure which modes are supported on your systems, you can choose Assisted mode.
The Default valid lifetime field defines the length of time in seconds that the prefix is valid for the purpose of on-link determination. The Default preferred lifetime field defines the length of time in seconds that the addresses generated from the prefix via SLAAC remain preferred. The defaults are 86400 seconds and 14400 seconds, respectively.
The RA Subnets field allows you to specify subnets on which RA will take place. If no subnet is specified, the RA daemon will advertise on the subnet to which the router's interface is assigned. You must specify both the subnet and the CIDR mask. This option allows you to perform RA only on selected subnets.
The DNS Servers section allows you to specify different DNS servers than the default ones (the interface IP if DNS Forwarder or Resolver is enabled, or the servers configured on the General page if neither of these is enabled). In the Domain search list, you can specify an optional list, and there is also a Use same settings as DHCPv6 server if you just want the RA daemon to use the same DNS servers specified on the DHCPv6 tab.
Especially in larger networks, it is possible that you don't want to run the DHCP server on your system, but instead want to pass on DHCP requests to another server. In this case, you can use the pfSense DHCP relay, which can be found by navigating to Services | DHCP Relay. In order to use DHCP Relay, the DHCP server must be disabled on all interfaces. Note, however, that the DHCPv6 server may still be enabled. The converse is also true: in order to use DHCPv6 Relay, you must disable the DHCPv6 server on all interfaces, but you do not have to disable the DHCP server. Also note that if you later enable the DHCP server, the DHCP relay will be automatically disabled, and if you enable the DHCPv6 server, the DHCPv6 relay will be disabled.
To enable the DHCP relay, check the Enable checkbox. There is also an Interface(s) listbox where you can select the interfaces on which the DHCP relay will be enabled. If you want the DHCP relay to append the circuit ID (the pfSense interface number) and the agent ID, you should check the Append circuit ID and agent ID to requests box. The Destination server edit box allows you to specify the IP address of the DHCP server. You can specify more than one IP address; you can use the Add and Delete buttons to add/delete entries.
The DHCPv6 relay can be enabled by navigating to Services | DHCPv6 Relay. The settings for the DHCPv6 relay are identical to the settings for the DHCP relay.
If you want to see what DHCP leases have been issued, navigate to Status | DHCP Leases. This page offers several pieces of information about active and inactive leases:
- The IP address of the lease.
- The MAC address of the client that has received the lease.
- The hostname of the client.
- A description of the client, if one is available.
- The start and end time of the lease.
- Whether the client is online, and the type of lease: static, active, inactive. Static is for statically mapped DHCP leases; active and inactive is for dynamically allocated leases. Active denotes those clients that are using their leases, while inactive is for inactive clients whose DHCP leases have not yet expired.
There are also two actions that can be performed on each lease in the table. The first plus (+) button on the right side of each entry is for Add static mapping. This allows you to easily create a static mapping for this client. What it does is take you to the Edit static mapping page with the MAC address field pre-filled with the MAC address of the client.
The second plus button is for Add WOL mapping. WOL stands for Wake on LAN, which, when invoked, sends a magic packet to the client that can be used to power on the client machine, assuming that the system's BIOS supports WOL. Clicking on this button takes you to the Wake on LAN page with the MAC address filled out with the client's MAC address. To wake the client, you must click on the appropriate MAC address in the Wake-on-LAN-Devices table on the Wake on LAN page.
If the lease type is static, there will also be an option on the right of the column to Edit static mapping. There will also be an option (denoted by an icon that looks like a power button) to Send WOL packet to this client.
The second section of the page, Leases in Use, is a table which shows all the different lease pools that have been defined, as well as the number of leases from each pool in use. The button at the bottom of the page allows us to toggle between showing all configured leases, or showing just the active and static leases.
To find out what DHCPv6 leases have been issued, navigate to Status | DHCPv6 Leases. All of the information about DHCP leases that the DHCP Leases page contains is contained on the DHCPv6 Leases page with respect to DHCPv6 leases. The Leases table also has two additional fields. IAID is each lease's Identity Association ID. An Identity Association (IA) is a collection of addresses assigned to a client, and each IA has its own ID – the IAID. DUID is the DHCP Unique Identifier, which is a globally unique identifier each DHCPv6 client and server has for identification purposes.
There is a second table on this page called Delegated Prefixes. The purpose of this table is to list all prefixes that have been assigned to clients, so they can act as routers. Once again, the IAID and DUID are present in the table, as well the Start and End time of the delegation, and the State of the delegation. Note that a client must request a delegation from pfSense before it appears in this table.