
The third and final pattern we will see in this chapter is the Pipeline pattern. You will use this pattern heavily in your concurrent structures, and we can consider it one of the most useful too.
We already know what a pipeline is. Every time that we write any function that performs some logic, we are writing a pipeline: If this then that, or else something else. Pipelines pattern can be made more complex by using a few functions that call to each other. They can even get looped in their out execution.
The Pipeline pattern in Go works in a similar fashion, but each step in the Pipeline will be in a different Goroutine and communication, and synchronizing will be done using channels.
When creating a Pipeline, we are mainly looking for the following benefits:
- We can create a concurrent structure of a multistep algorithm
- We can exploit the parallelism of multicore machines by decomposing an algorithm in different Goroutines
However, just because we decompose an algorithm in different Goroutines doesn't necessarily mean that it will execute the fastest. We are constantly talking about CPUs, so ideally the algorithm must be CPU-intensive to take advantage of a concurrent structure. The overhead of creating Goroutines and channels could make an algorithm smaller.
We are going to do some math for our example. We are going to generate a list of numbers starting with 1 and ending at some arbitrary number N. Then we will take each number, power it to 2, and sum the resulting numbers to a unique result. So, if N=3, our list will be [1,2,3]. After powering them to 2, our list becomes [1,4,9]. If we sum the resulting list, the resulting value is 14.
Functionally speaking, our Pipeline pattern needs to raise to the power of 2 every number and then sum them all. It will be divided into a number generator and two operations, so:
- Generate a list from 1 to N where N can be any integer number.
- Take each number of this generated list and raise it to the power of 2.
- Sum each resulting number into a final result and return it.
We will create only one function that will manage everything. We will call this function LaunchPipeline to simplify things. It will take an integer as an argument, which will be our N number, the number of items in our list. The declaration in the implementation file looks like this:
package pipelines

func LaunchPipeline(amount int) int {
  return 0
}
In our test file, we will create a table of tests by using a slice of slices:
package pipelines

import "testing"

func TestLaunchPipeline(t *testing.T) {
  tableTest := [][]int{
    {3, 14},
    {5, 55},
  }
  // ...
}
Our table is a slice of slices of integer types. On each slice, the first integer represents the list size and the second position represents the item within the list. It is, effectively, a matrix. When passing 3, it must return 14. When passing 5, it must return 55. Then we have to iterate over the table and pass the first index of each array to the LaunchPipeline function:
  // ...

  var res int
  for _, test := range tableTest {
    res = LaunchPipeline(test[0])
    if res != test[1] {
      t.Fatal()
    }

    t.Logf("%d == %d
", res, test[1])
  }
}
Using range, we get every row in the matrix . Each row is contained in a temporary variable called test. test[0] represents N and test[1] the expected result. We compare the expected result with the returning value of the LaunchPipeline function. If they aren't the same, the test fails:
go test -v .
=== RUN   TestLaunchPipeline
--- FAIL: TestLaunchPipeline (0.00s)
        pipeline_test.go:15:
FAIL
exit status 1
FAIL
The key for our implementation is to separate every operation in a different Goroutine and connect them with channels. The LaunchPipeline function is the one that orchestrates them all, as shown in the following diagram:

The operation consist of three steps: generate a list of numbers, raise them to the power of 2, and add the resulting numbers.
Each step in this Pipeline pattern will have the following structure:
func functionName(in <-chan int) (<-chan int){
  out := make(chan bool, 100)

  go func(){
    for v := range in {
      // Do something with v and send it to channel out
}

close(out)
   }()

  return out
}
This function represents a common step. Let's dissect it in the same order that the Go scheduler will probably take to execute it:
- The
functionNamefunction will commonly receive a channel to take values from (in <-chan int). We call it theinfunction, as in the word incoming. We can't send values through it within the scope of this function; that's why the arrow pointsoutof the keywordchan. - The
functionNamefunction returns a channel (<-chan in) that the function caller will only be allowed to take values from (again, represented by the arrow pointingoutof the keywordchan). This also means that any value that goes through that channel must be generated within the scope of the function. - In the first line of the function, we create a channel called
outthat will be the return of the function (point 2 in this list). - Then, we will launch a new Goroutine. Its scope will enter into play after returning this function, so let's continue.
- We return the previously created
outchannel. - Eventually, after finishing the execution of the function and returning the channel
out, the Goroutine executes. It will take values from theinchannel until it's closed. So the caller of this function is responsible for closing this channel, otherwise the Goroutine will never end! - When the
inchannel is closed, the for loop finishes and we close theoutchannel. Any Goroutine making use of this channel will not receive any new values since the last that was sent.
The only step that doesn't completely fit this approach is the first step that receives a number, representing the upper threshold on the list instead of a channel of incoming values. So, if we code this operation for each step in our pipeline, the final diagram looks more like this:
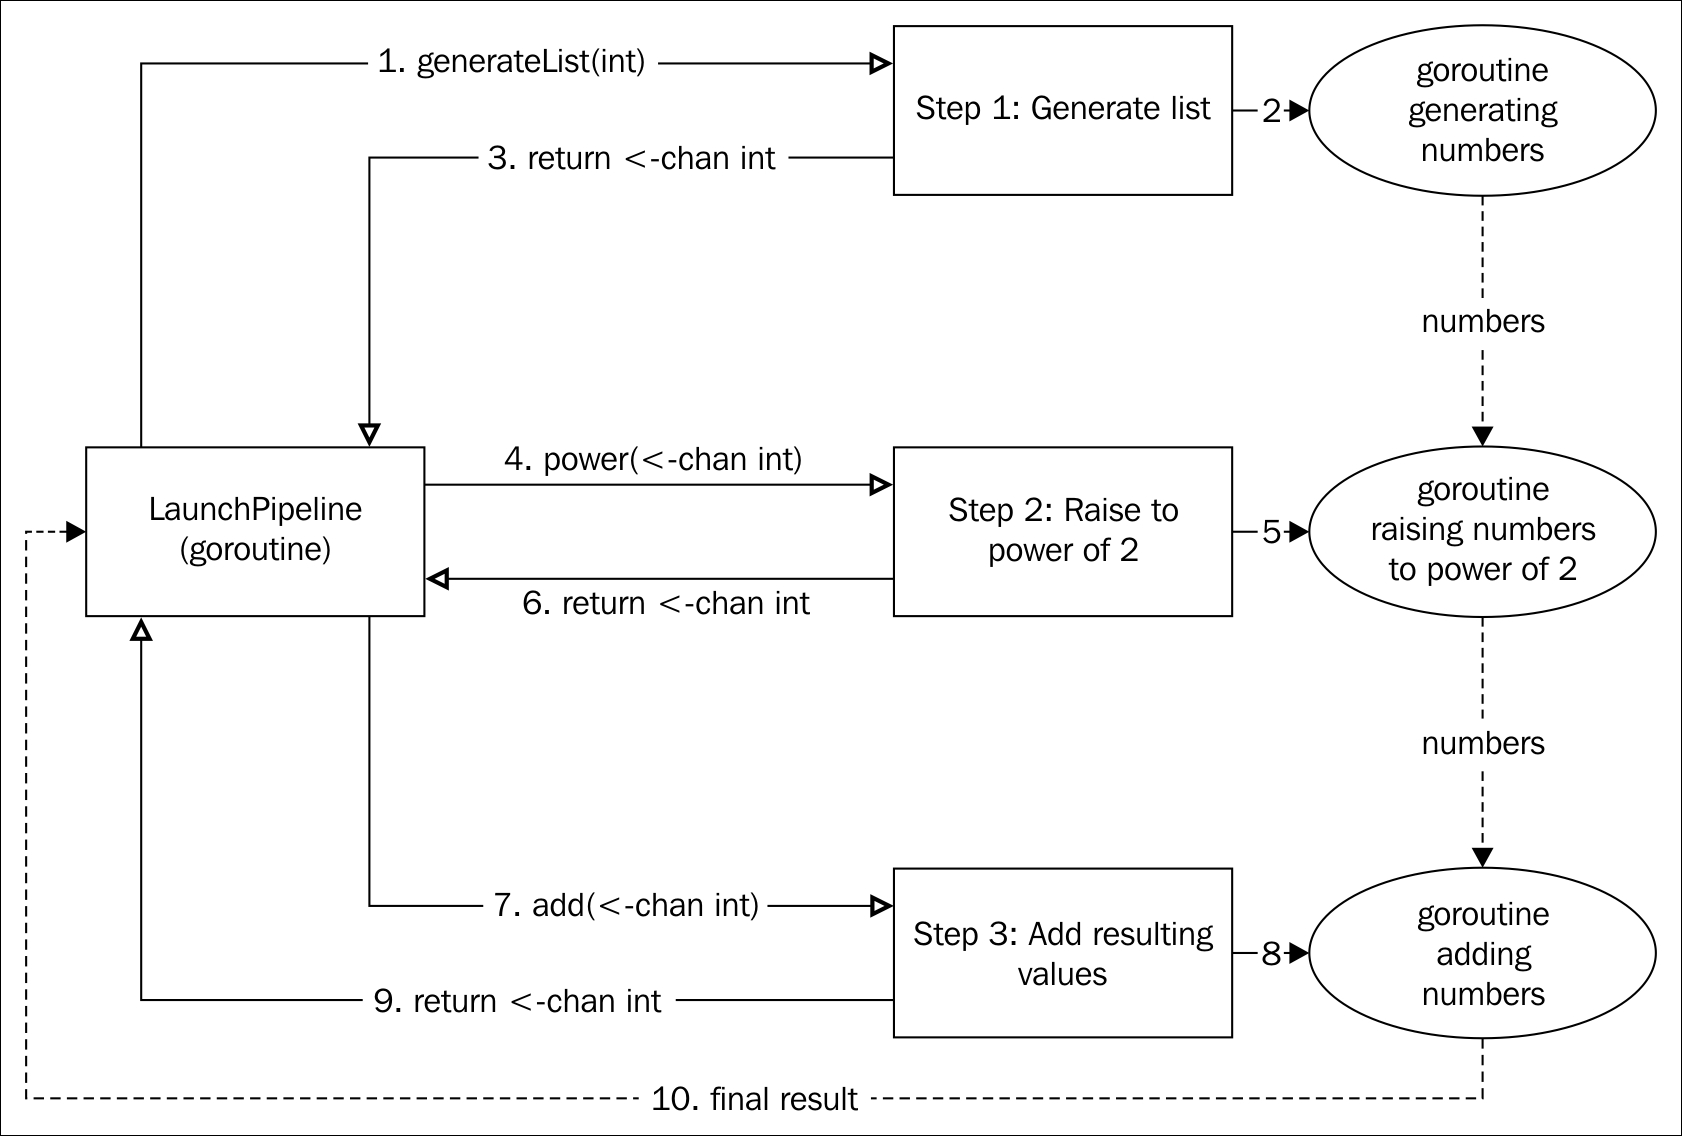
Although the idea is exactly the same, now we can see that it's the function LaunchPipeline that is the one that is going to be receiving channels and sending them back to the next step in the Pipeline. Using this diagram, we can clearly see the flow of the pipeline creation by following the numbers of the arrows. A solid arrow represents a function call and a dashed arrow a channel.
Let's look a little more closely at the code.
The first step in the operation is list generation. The list starts at 1 and we will receive an integer representing the higher threshold. We have to pass each number in the list to the next step:
func generator(max int) <-chan int {
  outChInt := make(chan int, 100)

  go func() {
    for i := 1; i <= max; i++ {
      outChInt <- i
    }

    close(outChInt)
  }()
  return outChInt
}
As we mentioned earlier, this is the pattern that we will follow in each step: create a channel, launch the Goroutine that will send the data through the channel, and immediately return the channel. This Goroutine will iterate from 1 to the max argument, which is the higher threshold for our list, and send each number through the channel. After sending every number, the channel is closed so that no more data can be sent through it, but the data already buffered can be retrieved.
The second step will take every incoming number from the first step's channel (that is taken from the arguments) and raise it to the power of 2. Every result must be sent to the third step using a new channel:
func power(in <-chan int) <-chan int {
  out := make(chan int, 100)

  go func() {
    for v := range in {
      out <- v * v
    }
    close(out)
  }()
  return out
}
We use the same pattern again: create a channel and launch the Goroutine while we return the created channel.
The third and final step receives every number from the second step and keeps adding them to a local value until the connection channel is closed:
func sum(in <-chan int) <-chan int {
  out := make(chan int, 100)
  go func() {
    var sum int

    for v := range in {
      sum += v
    }

    out <- sum
    close(out)
  }()

  return out
}
The function sum also takes a channel as an argument (the one returned from step 2). It also follows the same pattern of creating a channel, launching the Goroutine, and returning a channel. Goroutine keeps adding values to a variable called sum until the in channel is closed. When the in channel is closed, the value of sum is sent to the out channel, and it's immediately closed.
Finally, we can implement the LaunchPipeline function:
func LaunchPipeline(amount int) int {
  firstCh := generator(amount)
  secondCh := power(firstCh)
  thirdCh := sum(secondCh)

  result := <-thirdCh

  return result
}
The function generator first returns the channel that is passed to the power function. The power function returns the second channel that is passed to the sum function. The function sum finally returns the first channel that will receive a unique value, the result. Let's try to test this now:
go test -v .
=== RUN   TestLaunchPipeline
--- PASS: TestLaunchPipeline (0.00s)
        pipeline_test.go:18: 14 == 14
        pipeline_test.go:18: 55 == 55
PASS
ok
Awesome! It's worth mentioning that the LaunchPipeline function doesn't need to allocate every channel, and can be rewritten like this:
func LaunchPipeline(amount int) int {
  return <-sum(power(generator(amount)))
}
The result of the generator function is passed directly to the power function and the result of power to sum functions.
With the Pipeline pattern, we can create really complex concurrent workflows in a very easy way. In our case, we created a linear workflow, but it could also have conditionals, pools, and fan-in and fan-out behavior. We will see some of these in the following chapter.