
From a software architecture perspective, one of the most important steps of testing is at the time the software is developed. The behavior or functionality of a software, which is apparent only to its end users, is an artifact of the implementation details of the software.
Hence, it follows that a system that is tested early and tested often has a higher likelihood to produce a testable and robust system, which provides the required functionality to the end user in a satisfactory manner.
The best way, therefore, to start implementing testing principles is right from the source, that is, where the software is written, and by the developers. Since the source code is visible to the developer, this testing is often called white-box testing.
So, how do we make sure that we can follow the correct testing principles, and perform due diligence while the software is getting developed? Let's take a look at the different types of testing that are involved during the development stage before the software ends up in front of the customer.
Unit testing is the most fundamental type of testing performed by developers. A unit test applies the most basic unit of software code—typically, functions or class methods—by using executable assertions, which check the output of the unit being tested against an expected outcome.
In Python, support for unit testing is provided by the unittest module in the standard library.
The unit test module provides the following high-level objects:
- Test cases: The
unittestmodule provides theTestCaseclass, which provides support for test cases. A new test case class can be set up by inheriting from this class and setting up the test methods. Each test method will implement unit tests by checking the response against an expected outcome. - Test fixtures: Test fixtures represent any setup or preparation required for one or more tests followed by any cleanup actions. For example, this may involve creating temporary or in-memory databases, starting a server, creating a directory tree, and the like. In the
unittestmodule, support for fixtures is provided by thesetUp()andtearDown()methods of theTestCaseclass and the associated class and module methods of theTestSuiteclass. - Test suites: A test suite is an aggregation of related test cases. A test suite can also contain other test suites. A test suite allows to group test cases that perform functionally similar tests on a software system, and whose results should be read or analyzed together. The
unittestmodule provides support for test suites through theTestSuiteclass. - Test runners: A test runner is an object that manages and runs the test cases, and provides the results to the tester. A test runner can use a text interface or a GUI.
- Test results: Test result classes manage the test result output shown to the tester. Test results summarize the number of successful, failed, and erred-out test cases. In the
unittestmodule, this is implemented by theTestResultclass with a concrete, default implementation of theTextTestResultclass.
Other modules that provide support for Unit testing in Python are nose (nose2) and py.test. We will discuss each of these briefly in the following sections.
Let's take a specific unit-testing task and then try to build a few test cases and test suites. Since the unittest module is the most popular, and available by default in the Python standard library, we will start with it first.
For our test purposes, we will create a class that has a few methods, which are used for date/time conversions.
The following code shows our class:
""" Module datetime helper - Contains the class DateTimeHelper providing some helpful methods for working with date and datetime objects """

import datetime
class DateTimeHelper(object):
    """ A class which provides some convenient date/time
    conversion and utility methods """

    def today(self):
        """ Return today's datetime """
        return datetime.datetime.now()

    def date(self):
        """ Return today's date in the form of DD/MM/YYYY """
        return self.today().strftime("%d/%m/%Y")

    def weekday(self):
        """ Return the full week day for today """
        return self.today().strftime("%A")

    def us_to_indian(self, date):
        """ Convert a U.S style date i.e mm/dd/yy to Indian style dd/mm/yyyy """

        # Split it
        mm,dd,yy = date.split('/')
        yy = int(yy)
        # Check if year is >16, else add 2000 to it
        if yy<=16: yy += 2000
        # Create a date object from it
        date_obj = datetime.date(year=yy, month=int(mm), day=int(dd))
        # Retur it in correct format
        return date_obj.strftime("%d/%m/%Y")
Our
DateTimeHelper class has a few methods, which are as follows:
date: Returns the day's timestamp in the dd/mm/yyyy formatweekday: Returns the day's weekday, for example, Sunday, Monday, and so onus_to_indian: Converts a US date format (mm/dd/yy(yy)) into the Indian format (dd/mm/yyyy)
Here is a unittest TestCase class, which implements a test for the last method:
""" Module test_datetimehelper - Unit test module for testing datetimehelper module """
import unittest
import datetimehelper
class DateTimeHelperTestCase(unittest.TestCase):
""" Unit-test testcase class for DateTimeHelper class """
def setUp(self):
print("Setting up...")
self.obj = datetimehelper.DateTimeHelper()
def test_us_india_conversion(self):
""" Test us=>india date format conversion """
# Test a few dates
d1 = '08/12/16'
d2 = '07/11/2014'
d3 = '04/29/00'
self.assertEqual(self.obj.us_to_indian(d1), '12/08/2016')
self.assertEqual(self.obj.us_to_indian(d2), '11/07/2014')
self.assertEqual(self.obj.us_to_indian(d3), '29/04/2000')
if __name__ == "__main__":
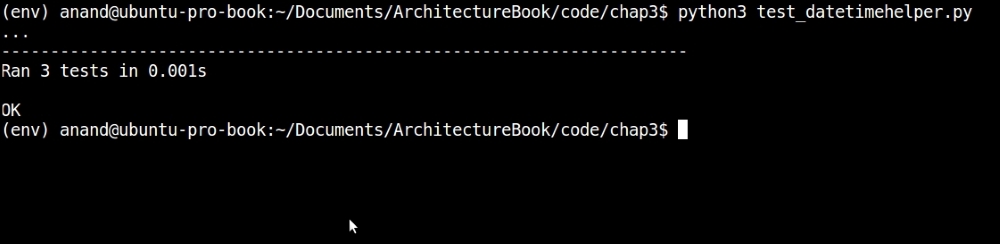
unittest.main()Note that, in the main part of the test case code, we just invoke unittest.main(). This automatically figures out the test cases in the module, and executes them. The following screenshot shows the output of the test run:

Output of the unit-test case for the datetimehelper module—version #1
As we can see from the output, this simple test case passes.
You may have noted that the first version of the unit test case for the datetimehelper module contained a test only for one method, namely, the method that converts the US date format in to the Indian one.
However, what about the other two methods? Shouldn't we write unit tests for them too?
The problem with the other two methods is that they get data from today's date. In other words, the output is dependent on the exact day that the code is run. Hence, it is not possible to write a specific test case for them by feeding in a date value and expecting the result to match an outcome as the code is time dependent. We need a way to control this external dependency.
This is where mocking comes to our rescue. Remember that we discussed mock objects as a way to control external dependencies. We can use the patching support of the unittest.mock library, and patch the method that returns today's date to return a date that we control. This way, we are able to test the methods that depend on it.
Here is the modified test case with support added for the two methods using this technique:
""" Module test_datetimehelper -  Unit test module for testing datetimehelper module """

import unittest
import datetime
import datetimehelper
from unittest.mock import patch

class DateTimeHelperTestCase(unittest.TestCase):
    """ Unit-test testcase class for DateTimeHelper class """

    def setUp(self):
        self.obj = datetimehelper.DateTimeHelper()

    def test_date(self):
        """ Test date() method """

        # Put a specific date to test
        my_date = datetime.datetime(year=2016, month=8, day=16)

        # Patch the 'today' method with a specific return value
        with patch.object(self.obj, 'today', return_value=my_date):
            response = self.obj.date()
            self.assertEqual(response, '16/08/2016')

    def test_weekday(self):
        """ Test weekday() method """

        # Put a specific date to test
        my_date = datetime.datetime(year=2016, month=8, day=21)

        # Patch the 'today' method with a specific return value
        with patch.object(self.obj, 'today', return_value=my_date):
            response = self.obj.weekday()
            self.assertEqual(response, 'Sunday')

    def test_us_india_conversion(self):
        """ Test us=>india date format conversion """

        # Test a few dates
        d1 = '08/12/16'
        d2 = '07/11/2014'
        d3 = '04/29/00'
        self.assertEqual(self.obj.us_to_indian(d1), '12/08/2016')
        self.assertEqual(self.obj.us_to_indian(d2), '11/07/2014')
        self.assertEqual(self.obj.us_to_indian(d3), '29/04/2000')

if __name__ == "__main__":
    unittest.main()
As you can see, we have patched the today method to return a specific date in the two test methods. This allows us to control the method's output and, in turn, compare the result with a specific outcome.
Here is the new output of the test case:
Output of the unit-test case for datetimehelper module with two more tests—version #2
To find out more details of what is happening when the tests are run, we can make the test runner show more information by increasing the verbosity. This can be done either by passing the verbosity argument to unittest.main or by passing the -v option on the command line as follows:
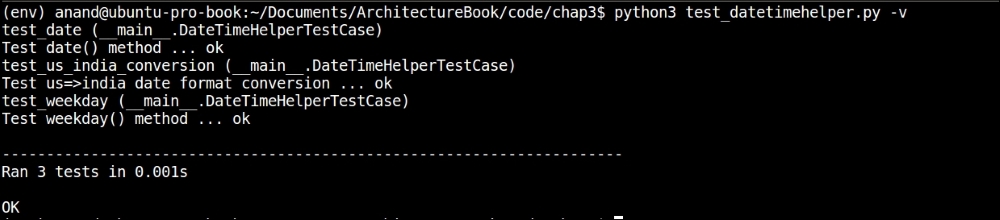
Producing verbose output from the unit-test case by passing the -v argument
There are other unit-testing modules in Python that are not part of the standard library, but are available as third-party packages. We will look at the first one named nose. The most recent version (at the time of writing) is version 2, and the library has been renamed as nose2.
The nose2 package can be installed by using the Python package installer, pip:
$ pip install nose2
Running nose2 is very simple. It automatically detects Python test cases to run in the folder that it is run from by looking for classes derived from unittest.TestCase and functions starting with test.
In the case of our datetimehelper test case, nose2 picks it up automatically. Simply run it from the folder containing the module. Here is the test output:

Running unit tests using nose2
The preceding output doesn't, however, report anything, since, by default, nose2 runs quietly. We can turn on some reporting of tests by using the verbose option (-v):
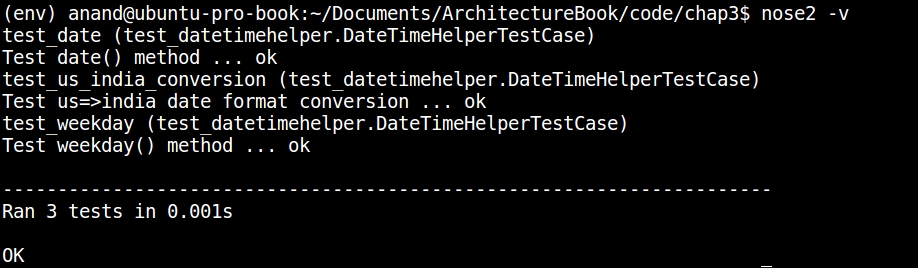
Running unit-tests using nose2 with verbose output
nose2 also supports reporting code coverage by using plugins. We will look at code coverage in a later section.
The py.test package, commonly known as pytest, is a full-featured, mature testing framework for Python. Like nose2, py.test also supports test discovery by looking for files starting with certain patterns.
The py.test can also be installed with pip:
$ pip install pytest
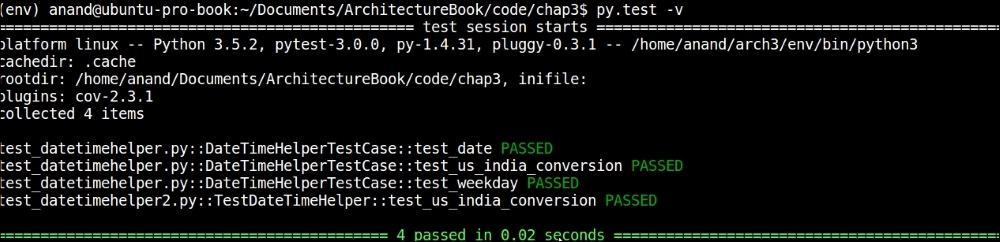
Like nose2, test execution with pytest is also easy. Simply run the pytest executable in the folder containing the test cases:

Test discovery and execution with py.test
Like nose2, pytest also comes with its own plugin support, the most useful among them being the code coverage plugin. We will see examples in a later section.
It is to be noted that pytest doesn't require test cases to be derived formally from the unittest.TestCase module. pytest automatically discovers tests from any modules containing classes prefixed with Test or from functions prefixed with test_.
For example, here is a new test case without any dependency on the unittest module but with the test case class derived from object, the most base type in Python. The new module is called test_datetimehelper_object:
""" Module test_datetimehelper_object - Simple test case with test class derived from object """

import datetimehelper

class TestDateTimeHelper(object):

    def test_us_india_conversion(self):
        """ Test us=>india date format conversion """

        obj = datetimehelper.DateTimeHelper()
        assert obj.us_to_indian('1/1/1') == '01/01/2001'
Note how this class has zero dependency on the unittest module and defines no fixtures. Here is the output of running pytest on the folder now:
Test case discovery and execution without the unittest module support using py.test
The py.test has picked up the test case in this module and executed it automatically as the output shows.
nose2 also has similar capabilities to pick up such test cases. The following screenshot shows the output of nose2 with the new test case defined:

Test case discovery and execution without the unittest module support using nose2
The preceding output shows that the new test has been picked up and executed.
The unittest module, nose2, and py.test packages provide a lot of support for developing and implementing test cases, fixtures, and test suites in a very flexible and customizable manner. Discussing all of the multitude of options of these tools is beyond the scope of this chapter, as our focus is on getting to know these tools to understand how we can use them to satisfy the architectural quality attribute of testability.
So, at this point, we will go on to the next major topic in unit testing, that of code coverage. We will look at these three tools, namely, unittest, nose2, and pytest, and see how they allow the architect to help his/her developers and testers find information about the code coverage in their unit tests.
Code coverage is measured as the degree to which the source code under test is covered by a specific test suite. Ideally, test suites should aim for higher code coverage, as this would expose a larger percentage of the source code to tests and help to uncover bugs.
Code coverage metrics are reported typically as a percentage of Lines of Code (LOC) or a percentage of the subroutines (functions) covered by a test suite.
Let's now look at different tools support for measuring code coverage. We will continue to use our test example (datetimehelper) for these illustrations too.
coverage.py is a third-party Python module, which works with test suites and cases written with the unittest module, and reports their code coverage.
coverage.py can be installed, like other tools shown here so far, using pip:
$ pip install coverage
This last command installs the coverage application, which is used to run and report code coverages.
Coverage.py has two stages: first, where it runs a piece of source code and collects coverage information, and next, where it reports the coverage data.
To run coverage.py, use the following syntax:
$ coverage run <source file1> <source file 2> …
Once the run is complete, report the coverage using this command:
$ coverage report -m
For example, here is the output with our test modules:
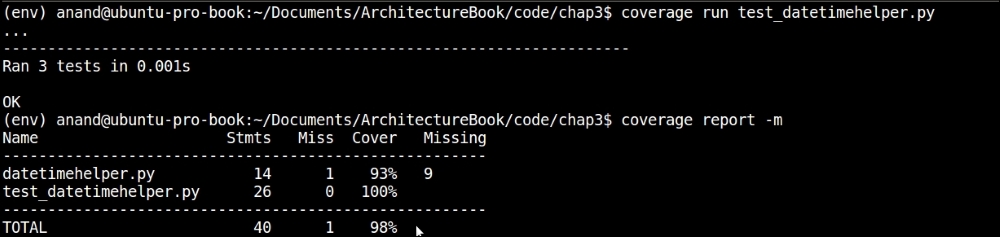
Test coverage report for the datetimehelper module using coverage.py
coverage.py reports that our tests cover 93% of the code in the datetimehelper module, which is pretty good code coverage. (You can ignore the report on the test module itself.)
The nose2 package comes with plugin support for code coverage. This is not installed by default. To install the code coverage plugin for nose2, use this command:
$ pip install cov-core
Now, nose2 can be run with the code coverage option to run the test cases and to report coverage in one shot. This can be done as follows:
$ nose2 -v -C
Here is the output of running test coverage using nose2:
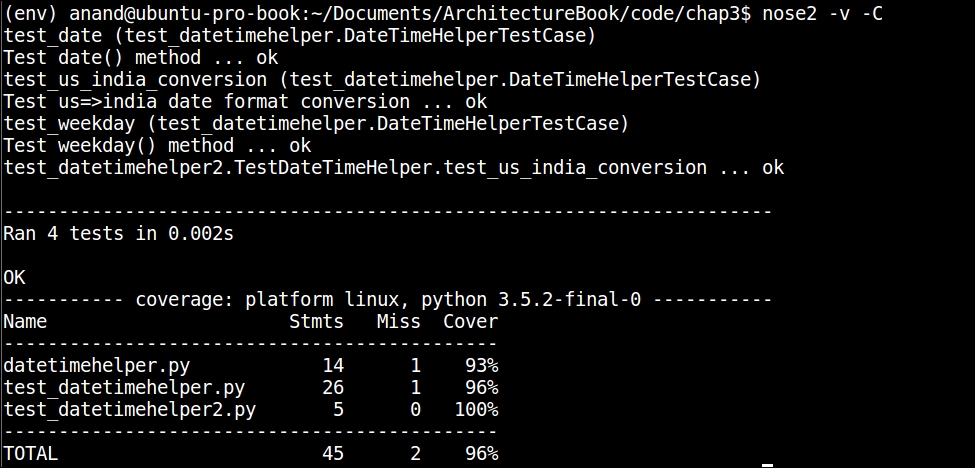
Test coverage report for the datetimehelper module using nose2
By default, the coverage report is written to the console. To produce other forms of output, the –coverage-report option can be used. For example, --coverage-report html will write the coverage report in the HTML format to a subfolder named htmlcov:

Producing HTML coverage output using nose2
Here is how the HTML output looks in the browser:
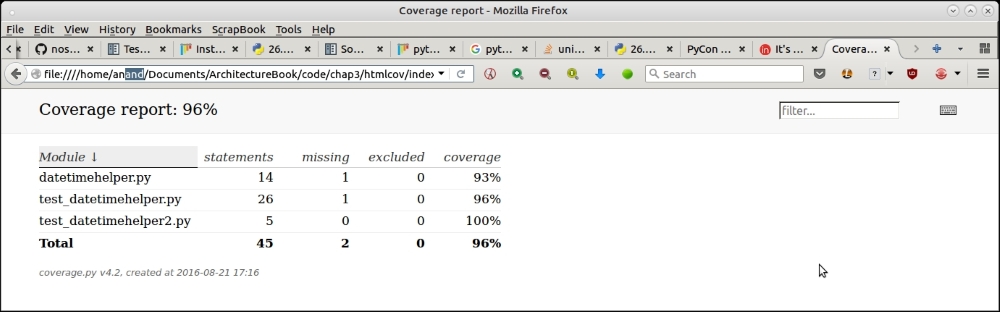
HTML coverage report as viewed in the browser
pytest also comes with its own coverage plugin for reporting code coverage. Like nose2, it utilizes coverage.py behind the scenes to get the work done.
To provide support for code coverage for py.test, the pytest-cov package needs to be installed as follows:
$ pip install pytest-cov
To report code coverage of test cases in the current folder, use the following command:
$ pytest –cov
Here is a sample output of pytest code coverage:
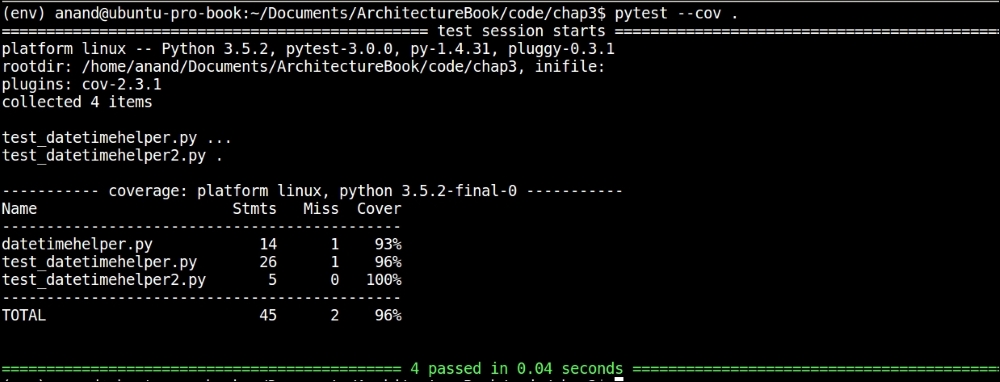
Running code coverage for current folder using py.test
We saw an example of using the patch support of unittest.mock in our test example earlier. However, the mock support provided by unittest is even more powerful than this, so let's look at one more example to understand its power and applicability in writing unit tests.
For the purpose of this illustration, we will consider a class that performs a keyword search on a large dataset and returns the results ordered by weightage. Assume that the dataset is stored in a database, and the results are returned as a list of (sentence, relevance) tuples, where sentence is the original string with a match for the keyword, and relevance is its hit weightage in the result set.
Here is the code:
"""
Module textsearcher - Contains class TextSearcher for performing search on a database and returning results
"""

import operator

class TextSearcher(object):
    """ A class which performs a text search and returns results """

    def __init__(self, db):
        """ Initializer - keyword and database object """

        self.cache = False
        self.cache_dict = {}
        self.db = db
        self.db.connect()

    def setup(self, cache=False, max_items=500):
        """ Setup parameters such as caching """

        self.cache = cache
        # Call configure on the db
        self.db.configure(max_items=max_items)

    def get_results(self, keyword, num=10):
        """ Query keyword on db and get results for given keyword """

        # If results in cache return from there
        if keyword in self.cache_dict:
            print ('From cache')
            return self.cache_dict[keyword]

        results = self.db.query(keyword)
        # Results are list of (string, weightage) tuples
        results = sorted(results, key=operator.itemgetter(1), reverse=True)[:num]
        # Cache it
        if self.cache:
            self.cache_dict[keyword] = results

        return results
The class has the following three methods:
__init__: This is the initializer; it accepts an object that acts as a handle to the data source (database). It also initializes a few attributes and connects to the databasesetup: It sets up the searcher and configures the database objectget_results: It performs a search using the data source (database) and returns the results for a given keyword
We now want to implement a unit test case for this searcher. Since the database is an external dependency, we will virtualize the database object by mocking it. We will test only the searcher's logic, callable signatures, and return data.
We will develop this program step by step so that each step of mocking is clear to you. We will use a Python interactive interpreter session for the same.
First, let's get the mandatory imports:
>>> from unittest.mock import Mock, MagicMock
>>> import textsearcher
>>> import operator
Since we want to mock the DB, the first step is to do that exactly:
>>> db = Mock()
Now let's create the searcher object. We are not going to mock this, as we need to test the calling signature and the return value of its methods:
>>> searcher = textsearcher.TextSearcher(db)
At this point, the database object has been passed to the __init__ method of searcher, and connect has been called on it. Let's verify this expectation:
>>> db.connect.assert_called_with()
No issues, so the assertion has succeeded! Let's now set up searcher:
>>> searcher.setup(cache=True, max_items=100)
Looking at the code of the TextSearcher class, we realize that the preceding call should have called configure on the database object with the max_items parameter set to the value 100. Let's verify this:
>>> searcher.db.configure.assert_called_with(max_items=100)
<Mock name='mock.configure_assert_called_with()' id='139637252379648'>
Bravo! Finally, let's try and test the logic of the get_results method. Since our database is a mock object, it won't be able to do any actual query, so we pass some canned results to its query method, effectively mocking it:
>>> canned_results = [('Python is wonderful', 0.4),
...                       ('I like Python',0.8),
...                       ('Python is easy', 0.5),
...                       ('Python can be learnt in an afternoon!', 0.3)]
>>> db.query = MagicMock(return_value=canned_results)
Now we set up the keyword and the number of results and call get_results using these parameters:
>>> keyword, num = 'python', 3
>>> data = searcher.get_results(python, num=num)
Let's inspect the data:
>>> data
[('I like Python', 0.8), ('Python is easy', 0.5), ('Python is wonderful', 0.4)]
It looks good! In the next step, we verify that get_results has indeed called query with the given keyword:
>>> searcher.db.query.assert_called_with(keyword)
Finally, we verify that the data returned has been sorted right and truncated to the number of results (num) value we passed:
>>> results = sorted(canned_results, key=operator.itemgetter(1), reverse=True)[:num]
>>> assert data == results
True
All good! The example shows how to use mock support in the unittest module in order to mock an external dependency and effectively virtualize it, while at the same time testing the program's logic, control flow, callable arguments, and return values.
Here is a test module combining all of these tests into a single test module and the output of nose2 on it:
"""
Module test_textsearch - Unittest case with mocks for textsearch module
"""

from unittest.mock import Mock, MagicMock
import textsearcher
import operator

def test_search():
    """ Test search via a mock """

    # Mock the database object
    db = Mock()
    searcher = textsearcher.TextSearcher(db)
    # Verify connect has been called with no arguments
    db.connect.assert_called_with()
    # Setup searcher
    searcher.setup(cache=True, max_items=100)
    # Verify configure called on db with correct parameter
    searcher.db.configure.assert_called_with(max_items=100)

    canned_results = [('Python is wonderful', 0.4),
                      ('I like Python',0.8),
                      ('Python is easy', 0.5),
                      ('Python can be learnt in an afternoon!', 0.3)]
    db.query = MagicMock(return_value=canned_results)

    # Mock the results data
    keyword, num = 'python', 3
    data = searcher.get_results(keyword,num=num)
    searcher.db.query.assert_called_with(keyword)

    # Verify data
    results = sorted(canned_results, key=operator.itemgetter(1), reverse=True)[:num]
    assert data == results
Here is the output of nose2 on this test case:
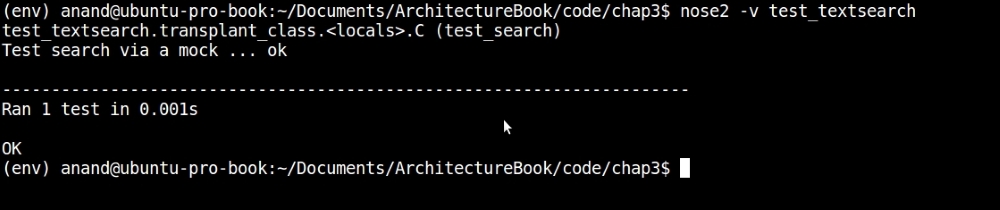
Running testsearcher test-case using nose2
For good measure, let's also look at the coverage of our mock test example, the test_textsearch module, using the py.test coverage plugin:
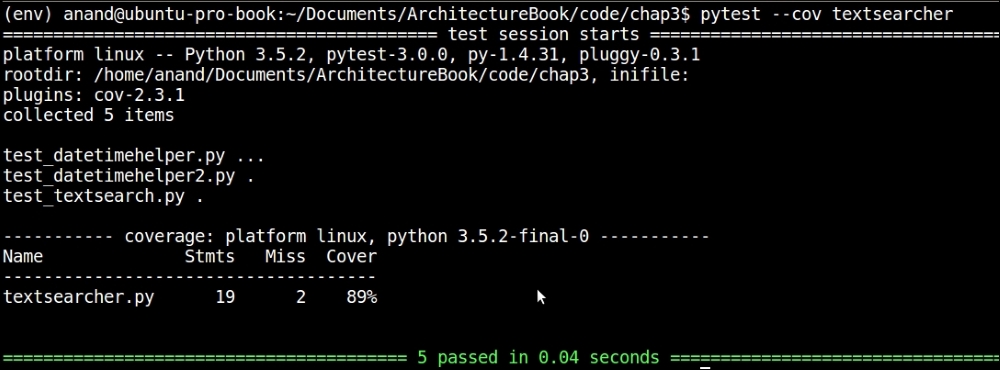
Measuring coverage of the textsearcher module via test_textsearch test case using py.test
So our mock test has a coverage of 89%, missing just two statements out of 20. Not bad!
Python has unique support for another form of inline code tests, which are commonly called doctests. These are inline unit tests in a function, class, or module documentation, which add a lot of value by combining code and tests in one place without having to develop or maintain separate test suites.
The doctest module works by looking for pieces of text in code documentation that look like Python strings, and executing those sessions to verify that they work exactly as found. Any test failures are reported on the console.
Let's look at a code example to see this in action. The following piece of code implements the simple factorial function by using an iterative approach:
"""
Module factorial - Demonstrating an example of writing doctests
"""

import functools
import operator

def factorial(n):
    """ Factorial of a number.

    >>> factorial(0)
    1
    >>> factorial(1)
    1
    >>> factorial(5)
    120
    >>> factorial(10)
    3628800

    """

    return functools.reduce(operator.mul, range(1,n+1))

if __name__ == "__main__":
    import doctest
    doctest.testmod(verbose=True)
Let's look at the output of executing this module:
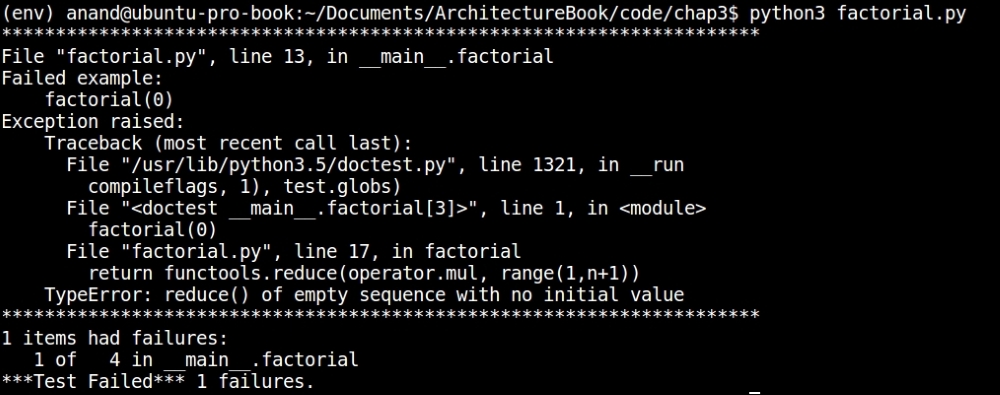
Output of doctest for the factorial module
The doctest reports that one out of four tests failed.
A quick scan of the output tells us that we forgot to code in the special case to compute the factorial for zero. The error occurs because the code tries to compute range(1, 1), which raises an exception with reduce.
The code can be easily rewritten to fix this. Here is the modified code:
"""
Module factorial - Demonstrating an example of writing doctests
"""

import functools
import operator

def factorial(n):
    """ Factorial of a number.

    >>> factorial(0)
    1
    >>> factorial(1)
    1
    >>> factorial(5)
    120
    >>> factorial(10)
    3628800
    """

    # Handle 0 as a special case
    if n == 0:
        return 1

    return functools.reduce(operator.mul, range(1,n+1))

if __name__ == "__main__":
    import doctest
    doctest.testmod(verbose=True)
The next screenshot shows the fresh output of executing the module now:
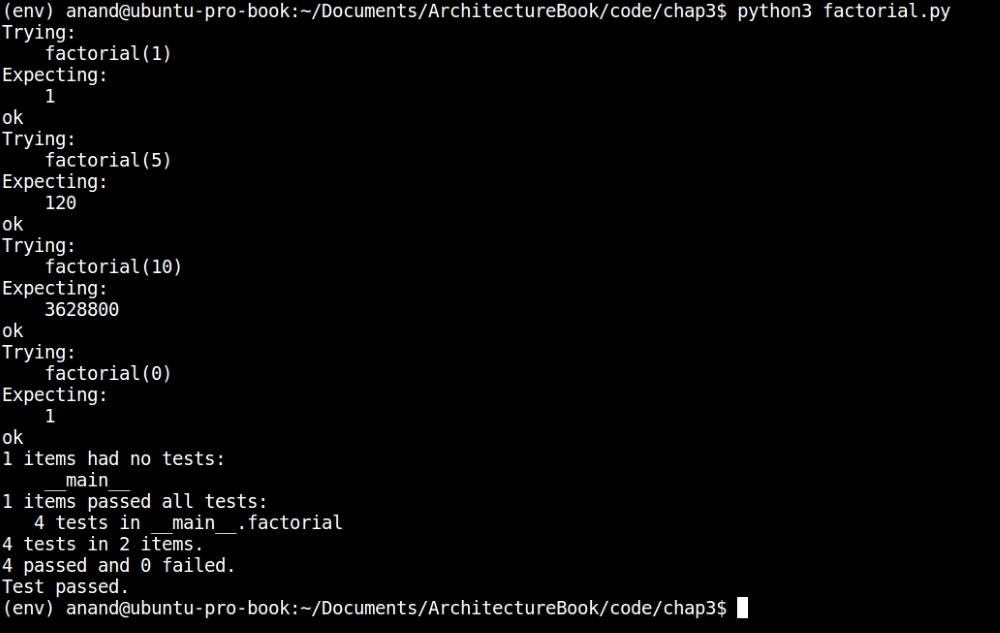
Output of doctest for the factorial module after the fix
Now all of the tests pass.
The doctest module is very versatile. Rather than just Python code, it can also load Python interactive sessions from sources such as text files and execute them as tests.
The doctest module examines all docstrings including function, class, and module docstrings to search for Python interactive sessions.
Unit tests, though very useful to discover and fix bugs during white-box testing early on in the software development life cycle, aren't enough by themselves. A software system is fully functional only if the different components work together in expected ways in order to deliver the required functionality to the end user, satisfying the pre-defined architectural quality attributes. This is where integration tests assume importance.
The purpose of integration tests is to verify the functional, performance, and other quality requirements on the different functional subsystems of a software system, which act as a logical unit, providing certain functionality. Such subsystems deliver some piece of functionality through the cumulative action of their individual units. Though each component may have defined its own unit test, it is also important to verify the combined functionality of the system by writing integration tests.
Integration tests are usually written after unit testing is completed and before validation testing is done.
It would be instructional to list down the advantages provided by integration tests at this point, as this could be useful for any software architect who is at a phase where he/she has designed and implemented his/her unit tests for the different components:
- Testing component interoperability: Each unit in a functional subsystem could be written by different programmers. Though each programmer is aware of how this component should perform, and may have written unit tests for the same, the entire system may have issues working in unison, as there could be errors or misunderstanding in the integration points where components talk to each other. Integration testing would reveal such mistakes.
- Testing for system requirement modifications: The requirements may have changed during the time of implementation. These updated requirements may not have been unit tested, hence, an integration test becomes very useful to reveal issues. Also, some parts of the system may not have implemented the requirements correctly, which can also be revealed by an appropriate integration test.
- Testing external dependencies and APIs: Software components these days use a lot of third-party APIs, which are usually mocked or stubbed during unit tests. Only an integration test would reveal how these APIs would perform and expose any issues either in the calling convention, response data, or performance with them.
- Debugging hardware issues: Integration tests are helpful in getting information about any hardware problems, and debugging such tests gives the developer(s) data about whether an update or change in the hardware configuration is required.
- Uncovering exceptions in code paths: Integration tests can also help developers figure out exceptions that they may not have handled in their code, as unit tests wouldn't have executed paths or conditions which raised such errors. Higher code coverage can identify and fix a lot of such issues. However, a good integration test combining known code paths for each functionality with high coverage is a good formula for making sure most potential errors that may occur during usage are uncovered and executed during testing.
There are three approaches to writing integration tests. These are as follows:
- Bottom-up: In this approach, components at the lower level are tested first, and these test results are used to integrate tests of the higher-level components in the chain. The process repeats until we reach the top of the hierarchy of the components with respect to the control flow. In this approach, critical modules at the top of the hierarchy may be tested inadequately.
If the top-level components are under development, drivers may be required to simulate (mock) them:

Bottom-up strategy of integration testing
- Top-down: Test development and testing happens top-down, following the workflow in the software system. Hence, components at the top level of the hierarchy are tested first and the lower-level modules are tested last. In this approach, critical modules are tested on priority, so we can identify major design or development flaws first and fix them. However, lower-level modules may be tested inadequately.
Lower-level modules can be replaced by stubs which mock their functionality. Early prototypes are possible in this approach, as lower-level module logic can be stubbed out:
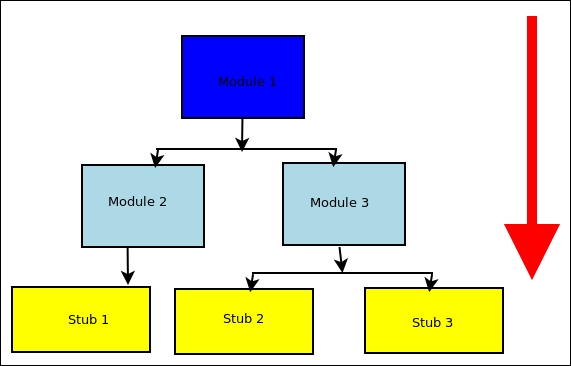
Top-down strategy of integration testing
- Big-bang: This is the approach is one where all of the components are integrated and tested at the very end of development. Since the integration tests come at the end, this approach saves time for development. However, this may not give enough time to test critical modules, as there may not be enough time to spend equally on all of the components.
There is no specific software for general integration testing. A certain class of applications, such as web frameworks, define their own specific integration test frameworks. For example, some web frameworks such as Django, Pyramid, and Flask have some specific testing frameworks developed by their own communities.
Another example is the popular WebTest framework, which is useful for automated testing of the Python WSGI applications. A detailed discussion of such frameworks is outside the scope of this chapter and this book.
There are a number of tools on the internet that are useful for automating integration testing of software applications. We will take a quick look at some of the popular ones here.
Selenium has been a popular choice for automating integration, regression, and validation tests for a number of software applications. Selenium is free and open source and comes with support for most popular web browser engines.
In Selenium, the primary object is a web driver, which is a stateful object on the client side, representing a browser. The web driver can be programmed to visit URLs, perform actions (such as clicking, filling forms, and submitting forms), effectively replacing the human test subject, who usually performs these steps manually.
Selenium provides client driver support for most popular programming languages and runtimes.
To install the Selenium WebDriver in Python, use the following command:
$ pip install selenium
We will look at a small example that uses Selenium along with pytest in order to implement a small automation test, which will test the Python website (http://www.python.org) for some simple test cases.
Here is our test code. The module is named selenium_testcase.py:
"""
Module selenium_testcase - Example of implementing an automated UI test using selenium framework
"""

from selenium import webdriver
import pytest
import contextlib

@contextlib.contextmanager
@pytest.fixture(scope='session')
def setup():
    driver = webdriver.Firefox()
    yield driver
    driver.quit()

def test_python_dotorg():
    """ Test details of python.org website URLs """

    with setup() as driver:
        driver.get('http://www.python.org')
        # Some tests
        assert driver.title == 'Welcome to Python.org'
        # Find out the 'Community' link
        comm_elem = driver.find_elements_by_link_text('Community')[0]
        # Get the URL
        comm_url = comm_elem.get_attribute('href')
        # Visit it
        print ('Community URL=>',comm_url)
        driver.get(comm_url)
        # Assert its title
        assert driver.title == 'Our Community | Python.org'
        assert comm_url == 'https://www.python.org/community/'
Before running the preceding example and showing the output, let's inspect the functions a bit:
- The
setUpfunction is a test fixture, which sets up the main object required for our test, that is, the Selenium WebDriver for Firefox. We convert thesetUpfunction in to a context manager by decorating it with thecontextmanagerdecorator from thecontextlibmodule. At the end of thesetUpfunction, the driver exits, since itsquitmethod is called. - In the
test_python_dot_orgtest function, we set up a rather simple, contrived test for visiting the main Python website URL and checking its title via an assertion. We load the URL for the Python community by locating it on the main page and then visit this URL. We finally assert its title and URL before ending our tests.
Let's see the program in action. We will specifically ask pytest to load only this module and run it. The command line for this is as follows:
$ pytest -s selenium_testcase.py
The Selenium driver will launch the browser (Firefox) and open a window automatically, visiting the Python website URL while running the tests. The console output for the test is shown in the following screenshot:
Selenium can be used for more complex test cases, as it provides a number of methods for inspecting the HTML of pages, locating elements, and interacting with them. There are also plugins for Selenium, which can execute the JavaScript content of the pages to make the testing support complex interactions via JavaScript (such as AJAX requests).
Selenium can also be run on the server. It provides support for remote clients via its remote driver support. Browsers are instantiated on the server (typically, using virtual X sessions), whereas, the tests can be run and controlled from client machines via the network.
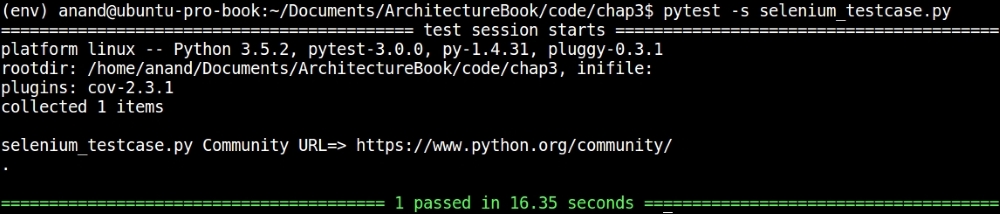
Console output of a simple Selenium test case on the Python programming language website
Test-Driven Development (TDD) is an agile practice of software development, which uses a very short development cycle, where code is written to satisfy an incremental test case.
In TDD, a functional requirement is mapped to a specific test case. Code is written to pass the first test case. Any new requirement is added as a new test case. Code is refactored to support the new test case. The process continues till the code is able to support the entire spectrum of user functionality.
The steps in TDD are as follows:
- Define a few starting test cases as a specification for the program.
- Write code to make the early test cases pass.
- Add a new test case defining new functionality.
- Run all of the tests and see whether the new test fails or passes.
- If the new test fails, write some code for the test to pass.
- Run the tests again.
- Repeat steps 4 to 6 till the new test passes.
- Repeat steps 3 to 7 to add a new functionality via test cases.
In TDD, the focus is on keeping everything simple, including the unit test cases and the new code that is added to support the test cases. TDD practitioners believe that writing tests upfront allows the developer to understand the product requirements better, allowing a focus on software quality from the very beginning of the development lifecycle.
In TDD, often, a final refactoring step is also done after many tests have been added to the system in order to make sure no coding smells or antipatterns are introduced and to maintain code readability and maintainability.
There is no specific software for TDD, rather, it is a methodology and process for software development. Most of the time, TDD uses unit tests, so the toolchain support is mostly the unittest module and the related packages that we've discussed in this chapter.
Let's understand TDD as discussed earlier with a simple example of developing a program in Python that checks whether an input string is a palindrome.
Let us follow the steps of TDD. Initially, we need a test case that defines the basic specification of the program. Our first version of the test code looks like this:
"""
Module test_palindrome - TDD for palindrome module
"""

import palindrome

def test_basic():
    """ Basic test for palindrome """

    # True positives
    for test in ('Rotator','bob','madam','mAlAyAlam', '1'):
        assert palindrome.is_palindrome(test)==True

    # True negatives
    for test in ('xyz','elephant', 'Country'):
        assert palindrome.is_palindrome(test)==False
Note that the preceding code not only gives us a specification for the program in terms of its early functionality, but also gives a function name and signature—in terms of the argument and return value. We can list down the requirements for the first version by looking at the test:
- The function is named is
_palindrome. It should accept a string and returnTrueif it is a palindrome andFalseotherwise. The function sits in thepalindromemodule. - The function should treat strings as case-insensitive.
With these specifications, here is our first version of the palindrome module:
def is_palindrome(in_string):
    """ Returns True whether in_string is palindrome, False otherwise """

    # Case insensitive
    in_string = in_string.lower()
    # Check if string is same as in reverse
    return in_string == in_string[-1::-1]
Let's check whether this passes our test. We will run py.test on the test module to verify this:
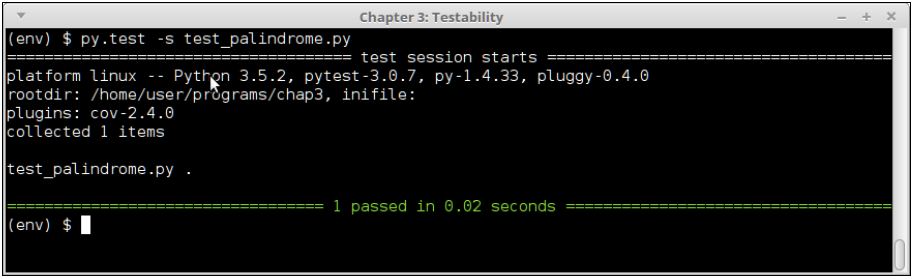
Test output of test_palindrome.py version #1
As you can see in the last image, the basic test passes; so, we've got a first version of the palindrome module, which works and passes its tests.
Now as per the TDD step, let's go to step 3 and add a new test case. This adds a check for testing palindrome strings with spaces. Here is the new test module with this extra test:
"""
Module test_palindrome - TDD for palindrome module
"""

import palindrome

def test_basic():
    """ Basic test for palindrome """

    # True positives
    for test in ('Rotator','bob','madam','mAlAyAlam', '1'):
        assert palindrome.is_palindrome(test)==True

    # True negatives
    for test in ('xyz','elephant', 'Country'):
        assert palindrome.is_palindrome(test)==False

def test_with_spaces():
    """ Testing palindrome strings with extra spaces """

    # True positives
    for test in ('Able was I ere I saw Elba',
                 'Madam Im Adam',
                 'Step on no pets',
                 'Top spot'):
        assert palindrome.is_palindrome(test)==True

    # True negatives
    for test in ('Top post','Wonderful fool','Wild Imagination'):
        assert palindrome.is_palindrome(test)==False
Let's run the updated test and see the results:
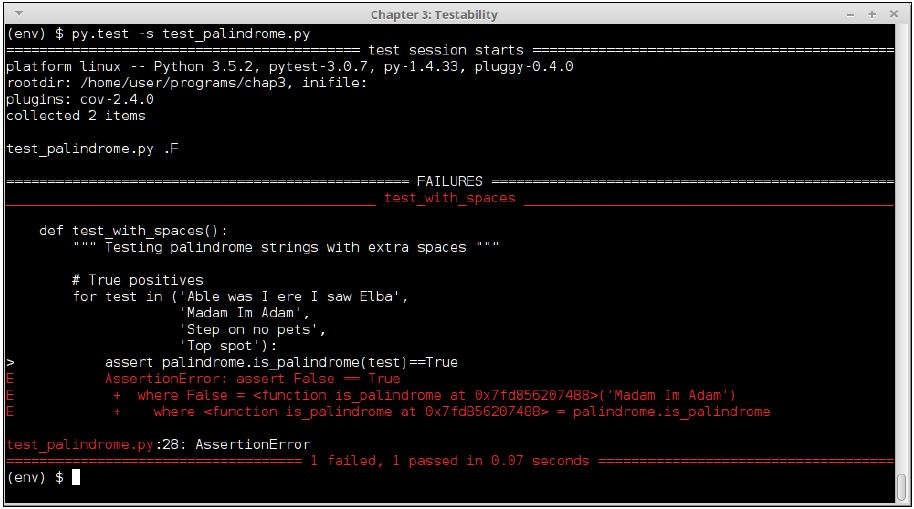
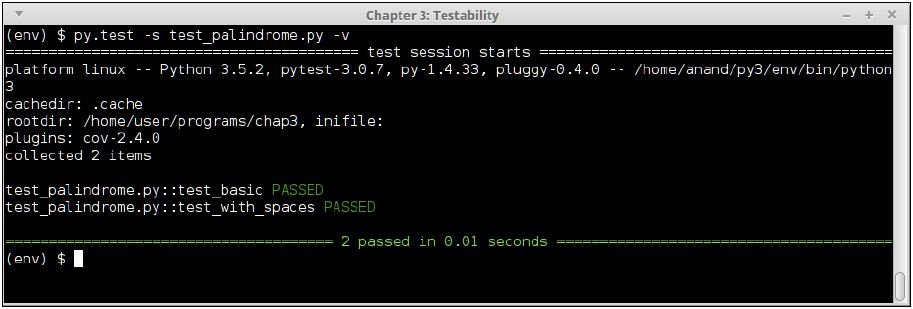
Test output of test_palindrome.py version #2
The test fails, because the code is not enabled to process palindrome strings with spaces in them. So let's do as TDD step 5 says and write some code to make this test pass.
Since it is clear we need to ignore spaces, a quick fix is to purge all spaces from the input string. Here is the modified palindrome module with this simple fix:
"""
Module palindrome - Returns whether an input string is palindrome or not
"""

import re

def is_palindrome(in_string):
    """ Returns True whether in_string is palindrome, False otherwise """

    # Case insensitive
    in_string = in_string.lower()
    # Purge spaces
    in_string = re.sub('s+','', in_string)
    # Check if string is same as in reverse
    return in_string == in_string[-1::-1]
Let's now repeat step 4 of TDD to see whether the updated code makes the test pass:
Console output of test_palindrome.py version #2, after code updates
Surely, the code passes the test now!
What we just saw was an instance of TDD with one update cycle for implementing a module in Python, which checks strings for palindromes. In a similar way, we can keep adding tests and keep updating the code as per step 8 of TDD, thereby adding new functionality while maintaining the updated tests naturally via the process.
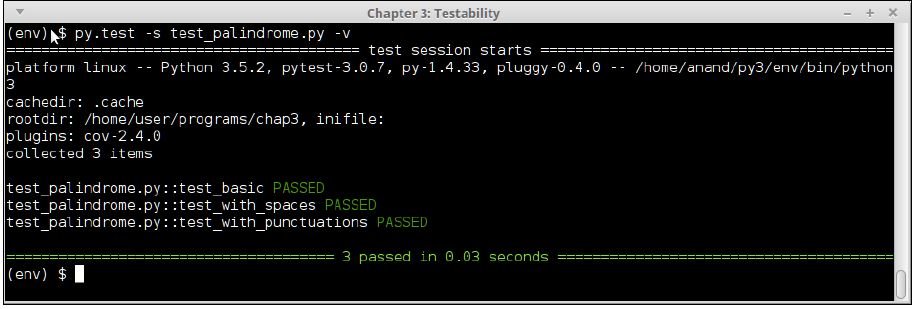
We conclude this section with the final version of our palindrome test case, which adds a test case for checking for strings with extra punctuation marks:
"""
Module test_palindrome - TDD for palindrome module
"""

import palindrome

def test_basic():
    """ Basic test for palindrome """

    # True positives
    for test in ('Rotator','bob','madam','mAlAyAlam', '1'):
        assert palindrome.is_palindrome(test)==True

    # True negatives
    for test in ('xyz','elephant', 'Country'):
        assert palindrome.is_palindrome(test)==False

def test_with_spaces():
    """ Testing palindrome strings with extra spaces """

    # True positives
    for test in ('Able was I ere I saw Elba',
                 'Madam Im Adam',
                 'Step on no pets',
                 'Top spot'):
        assert palindrome.is_palindrome(test)==True

    # True negatives
    for test in ('Top post','Wonderful fool','Wild Imagination'):
        assert palindrome.is_palindrome(test)==False


def test_with_punctuations():
    """ Testing palindrome strings with extra punctuations """

    # True positives
    for test in ('Able was I, ere I saw Elba',
                 "Madam I'm Adam",
                 'Step on no pets.',
                 'Top spot!'):
        assert palindrome.is_palindrome(test)==True

    # True negatives
    for test in ('Top . post','Wonderful-fool','Wild Imagination!!'):
        assert palindrome.is_palindrome(test)==False
And here is the updated palindrome module that makes this test pass:
"""
Module palindrome - Returns whether an input string is palindrome or not
"""

import re
from string import punctuation

def is_palindrome(in_string):
    """ Returns True whether in_string is palindrome, False otherwise """

    # Case insensitive
    in_string = in_string.lower()
    # Purge spaces
    in_string = re.sub('s+','', in_string)
    # Purge all punctuations
    in_string = re.sub('[' + re.escape(punctuation) + ']+', '', in_string)
    # Check if string is same as in reverse
    return in_string == in_string[-1::-1]
Let's inspect the final output of the test_palindrome module on the console:
Console output of test_palindrome.py version #3, with matching code updates