
Custom Lightning Components can make asynchronous calls, which can include calling a third-party API client using an XHR request. Also, you can read the navigation options configured by the admins, and navigate the Flow to the next screen.
The boilerplate code is as follows, and is used to detect all the available actions:
var availableActions = component.get('v.availableActions);
for (var i = 0; i < availableActions.length; i++) {
   if (availableActions[i] == "PAUSE") {

   } else if (availableActions[i] == "BACK") {

   } else if (availableActions[i] == "NEXT") {

   } else if (availableActions[i] == "FINISH") {

   }
 }
To navigate back-and-forth, the boilerplate code is as follows:
 var actionClicked = "NEXT";
 var navigate = component.get('v.navigateFlow');
 navigate(actionClicked);//actionClicked can be one from PAUSE, BACK, NEXT, and FINISH
To make an asynchronous call in Flows, we can use JavaScript XHR client-side calls from the init handler and return the data. To better understand this, let's make a third-party call to an email validator service from the Flow component that we built in the previous section, and navigate to the next screen from the custom Lightning Component.
For this demonstration, sign up for a Mailboxlayer account (https://mailboxlayer.com), which provides an API key to make an HTTPS GET in order to validate an email.
The request payload is as follows, along with an API key. In the payload, replace the API key with the one obtained when you signed up for a mailbox layer account. Refer to the following code:
http://apilayer.net/api/check

    ? access_key = <accessKey>
    & email = msrivastav13@gmail.com
    & smtp = 1
    & format = 1
A valid response returns Boolean flags for a format check, SMTP check, and a score percentage. The response will be similar to the following JSON object:
{
  "email":"[email protected]",
  "did_you_mean":"",
  "user":"msrivastav13",
  "domain":"gmail.com",
  "format_valid":true,
  "mx_found":true,
  "smtp_check":true,
  "catch_all":null,
  "role":false,
  "disposable":false,
  "free":true,
  "score":0.8
}
Let's build a Lightning Component that accepts the input from Flow as email and shows the validity score from the API, and then allows users to navigate for further actions.
The Flow will require a custom Lightning Component that makes a third-party callout. The code for the Lightning Component is as follows:
<aura:component implements="lightning:availableForFlowscreens" access="global">

    <aura:attribute type="String" name="email" />
    <aura:attribute type="Boolean" name="validEmail"/>
    <aura:attribute type="Object" name="serviceResponse" default="{}"/>
    <aura:handler name="init" value="{!this}" action="{!c.init}"/>

    <!--Markup for the checks-->
    <div>
        <b>Valid Format</b>
        <aura:if isTrue="{!v.serviceResponse.format_valid}">
                <lightning:icon iconName="action:update_status" alternativeText="Approved" />
            <aura:set attribute="else">
                <lightning:icon iconName="action:close" alternativeText="Rejected" />
            </aura:set>
        </aura:if>
    </div>

    <br/>
    <br/>

    <div>
        <b>SMTP Check</b>
        <aura:if isTrue="{!v.serviceResponse.smtp_check}">
                <lightning:icon iconName="action:update_status" alternativeText="Approved" />
            <aura:set attribute="else">
                <lightning:icon iconName="action:close" alternativeText="Rejected" />
            </aura:set>
        </aura:if>
    </div>

    <br/>
    <br/>

    <div>
        <b>Score</b>
        <lightning:progressBar value="{!mult(v.serviceResponse.score,100)}" size="large" variant="circular"/>
    </div>

</aura:component>
The client-side controller file is as follows:
({
    init : function(component, event, helper) {
        helper.validateEmailService(component, event);
    }
})
The code to perform an HTTP call using ES6 promises is shown in the following code snippet. Notice that we use the native browser's XMLHttpRequest API to make XHR calls from the client-side:
({
    validateEmailService : function(component, event) {
        this.mailBoxLayerValidateEmail(component, event).then(
            function(response) {
                console.log("Success!", response);
                component.set("v.serviceResponse",response);
            },function(error) {
                console.error("Failed!", error);
            }
        )
    },

    mailBoxLayerValidateEmail : function(component, event){
        return new Promise($A.getCallback(function(resolve, reject) {
            var xhttp = new XMLHttpRequest();
            xhttp.onreadystatechange = $A.getCallback(function() {
                if (this.readyState === 4) { // DONE
                    if (xhttp.status === 200) {
                        var response = JSON.parse(xhttp.responseText);
                        console.log(response);
                        resolve(response);
                    }
                    else {
                        reject();
                    }
                }
            });
            var requestUrl = "http://apilayer.net/api/check?access_key=<accessKeyHere>&email=";
            requestUrl = requestUrl + component.get("v.email") + '&smtp=1' + '&format=1';
            xhttp.open("GET", requestUrl);
            xhttp.send(null);
        }));
    }

})
We can wire the API response lightning to the Flows to make sure that the screen, after the email ID is entered by the user, is a Lightning Component screen that makes a third-party API call.
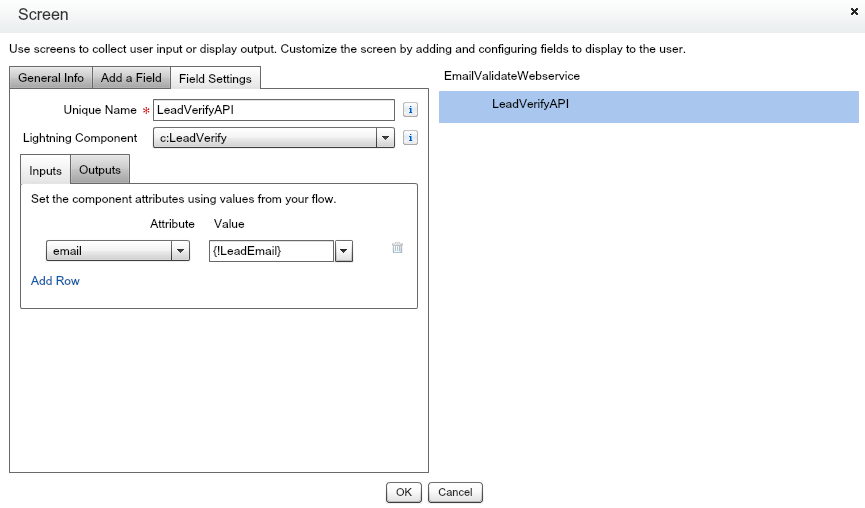
The following screenshot shows the Screen input to the Lightning Component:
The Flow builder should resemble the following screenshot, once we have the Lightning Component screen:

The component screen is as follows, which shows the score and checks:

Now, let's customize the footer by making our own footer and hiding the default ones that the Flow provides. To hide the footer in the Lightning Component screen, in the Flow builder, click on the Lightning Component Flow element and disable the footer, as shown in the following screenshot:

Let's modify our Lightning Component so that we can add our own implementation for the footer buttons. Add the following code to the Lightning Component markup in order to create our own navigation button:
<div class="slds-clearfix">
        <div class="slds-clearfix">
            <div class="slds-float_left">
                <lightning:button label="Previous" aura:id="BACK" onclick="{!c.handleClick}"/>
            </div>
            <div class="slds-float_right">
                <lightning:button label="Next" aura:id="NEXT" onclick="{!c.handleClick}" disabled="{!not(and(v.serviceResponse.format_valid,v.serviceResponse.smtp_check,(v.serviceResponse.score > 0.4)))}" variant="brand"/>
            </div>
        </div>
    </div>
Notice that we disable the Next button if the email is invalid as per the information retrieved from the API, using an expression syntax.
The controller code to invoke the navigation is as follows:
handleClick : function(component, event, helper) {
        // Figure out which action was called
        var actionClicked = event.getSource().getLocalId();
        // Fire that action
         var navigate = component.get('v.navigateFlow');
        navigate(actionClicked);
    }
The following screenshot shows the use case when the email format is invalid and the button is disabled:
