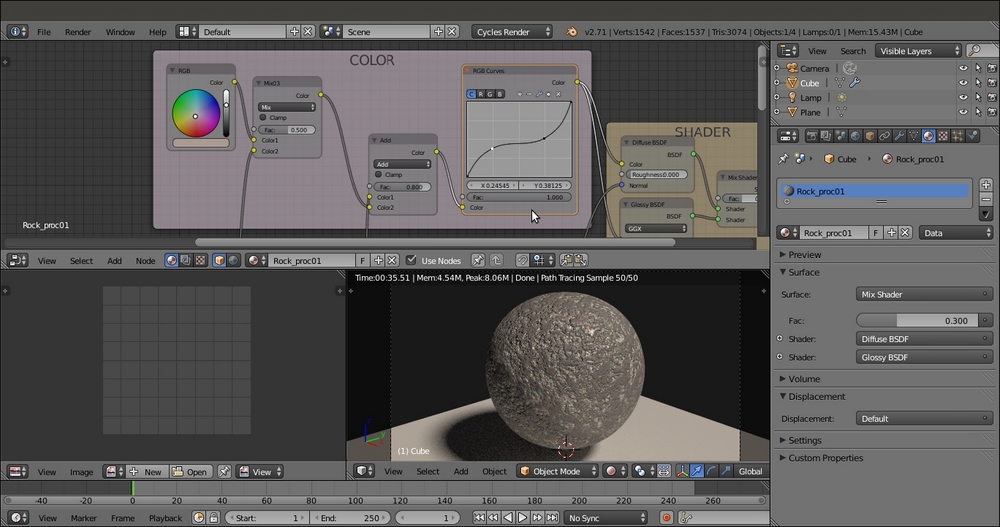
In this recipe, we will try to reach a result similar to the rock material we made through image maps in the previous recipe, but using only procedural textures. The output will look like what is shown in the following screenshot:

The procedural rock material as it appears in the final rendering
Start Blender and load the 9931OS_start.blend file.
- Select the Cube, go to the Object modifiers window, and assign a Subdivision Surface modifier. Set the Subdivisions levels for View and Render to
4. Go back to the Material window. - Press T and in the Tool Shelf, click on the Smooth button under the Shading subpanel. Press T again to get rid of the Tool Shelf.
- Press Tab to go to Edit Mode. If necessary, select all the vertices by pressing the A key and scale everything to double the current size (press S, enter the digit 2, and press Enter). Go out of Edit Mode.
- Save the file as
9931OS_start_smoothed.blend. The customized Default screen will now look as shown in the following screenshot:
The customized Default screen with the subdivided Cube
Now we are going to create the rock material by performing the following steps:
- Select the Spheroid (the smoothed Cube) and click on New in the Material window under the Properties panel or in the Node Editor toolbar. Rename the material
Rock_proc_01. - In the Node Editor window, add a Noise Texture node (press Shift + A and navigate to Texture | Noise Texture). Then press Shift + D to duplicate it three times. Adjust the four Noise Texture nodes in a column, and in the Properties panel to the right (press N key if it is not already present), label them
Noise Texture01,Noise Texture02,Noise Texture03, andNoise Texture04. - Add a Texture Coordinate node (press Shift + A and navigate to Input | Texture Coordinate) and a Mapping node (press Shift + A and navigate to Vector | Mapping). Connect the Object output of the Texture Coordinate node to the blue Vector input of the Mapping node. Then connect the Mapping node's Vector output to the Vector input sockets of the four texture nodes. Set the Mapping node's Location values to
0.100for X and-0.100for Y and Z, as shown in the following screenshot:
The first steps to build the bump effect for the rock material
- Add a MixRGB node (press Shift + A and navigate to Color | MixRGB). Connect the first two Noise Texture nodes' Color output to the Color1 and Color2 input of the MixRGB node. Set Blend Type to Overlay and the Fac value to
1.000. - Connect the Overlay-MixRGB node's output to the Color input socket of the Diffuse BSDF shader node.
- Put the mouse cursor in the Camera view and press Shift + Z to set it to Rendered mode.
- Go to the Noise Texture01 node and set Scale to
4.000and the Distortion value to1.400. Then go to the Noise Texture02 node and set Scale to6.000, Detail to1.000, and the Distortion value to0.700. - Press Shift + D to duplicate the MixRGB node, and paste it between the Overlay-MixRGB and the Diffuse BSDF nodes. Connect the Color output of the Noise Texture03 node to the Color2 input socket and set the Blend Type to Darken. Go to the Noise Texture03 node, and set Scale to
15.000and Detail to3.000. - Add a ColorRamp node (press Shift + A and navigate to Converter | ColorRamp) and paste it between the Darken-MixRGB and the Diffuse BSDF nodes. Label it
ColorRamp01and set Interpolation to Ease, the black cursor's position to0.364, and the white cursor's position to0.632. - Press Shift + D to duplicate the ColorRamp node, and move it close to the Noise Texture04 node. Label the duplicated node
ColorRamp02and set the white cursor's position to0.340and the black cursor's position to0.400. - Set the Noise Texture04 node's Scale value to
45.000, Detail value to0.100, and Distortion to1.000, as shown in the following screenshot:
Starting to mix the different procedurals together
- Connect the Color output of the Noise Texture04 node to the Fac input socket of the ColorRamp02 node. Then add a MixRGB node (press Shift + A and navigate to Color | MixRGB) and label it
Mix01. - Paste the Mix01 node after the ColorRamp01 node. Then connect the Color output of the ColorRamp02 node to the Color2 input socket of the Mix01 node. Also connect the Fac output of the Noise Texture01 node to the Fac input socket of the Mix01 node.
- Add a new MixRGB node (press Shift + A and navigate to Color | MixRGB) and label it
Mix02. Paste it between the ColorRamp02 and the Mix01 nodes. - Add a Bump node (press Shift + A and navigate to Vector | Bump) and connect the Color output of the Mix01 node to the Height input socket of the Bump node. Connect the Normal output of the Bump node to the Normal input socket of the Diffuse BSDF shader node. Click on the Invert item checkbox.
The steps that are detailed after this screenshot will result in the bump effect:

The BUMP frame containing the nodes to build the bump effect
- Add a Glossy BSDF shader node (press Shift + A and navigate to Shader | Glossy BSDF) and a Mix Shader node (press Shift + A and navigate to Shader | Mix Shader). Paste the Mix Shader node between the Diffuse BSDF and the Material Output nodes, and connect the Glossy BSDF output to the second Shader input socket.
- Connect the Normal output of the Bump node to the Normal input socket of the Glossy BSDF shader. Set the Glossy BSDF shader's Roughness to
0.150and the Fac value of the Mix Shader node to0.300. - Add an RGB node (press Shift + A and navigate to Input | RGB) and connect it to the Color input socket of the Diffuse BSDF shader node. Set the color values to
0.407for R,0.323for G, and0.293for B. - Add a MixRGB node, label it
Mix03, and paste it between the RGB and the Diffuse BSDF nodes. Connect the Color output of the Darken-MixRGB node to the Color2 input socket of the Mix03 node. - Add a new MixRGB node. Set Blend Type to Add and the Fac value to
0.800. Connect the Color output of the ColorRamp01 node to the Color1 input socket, and the output of the Mix03 node to the Color2 input socket of the MixRGB node. Connect the Color output of the Add-MixRGB node to the Color input socket of the Diffuse BSDF node. - Add an RGB Curves node (press Shift + A and navigate to Color | RGB Curves) and paste it between the Add-MixRGB and the Diffuse BSDF nodes. Connect its output to the Color input socket of the Glossy BSDF shader node.
- Click on the RGB Curves node's little window to create a new point. Set its position values to
0.24545for X and0.38125for Y. Then create another point and set the position values to0.74545for X and0.51875for Y, as shown in the following screenshot:
Screenshot of the COLOR frame connected to the Diffuse and Glossy shaders
Even if this material looks a bit complex at first sight, you must note that we just mixed four procedural noise textures with different settings and iterations to build the bump effect and create the color pattern to some extent:
- In the first stage, from steps 2 to 15, we built the bump pattern by mixing the output of the noise textures (the Overlay, Darken, Mix01, and Mix02 nodes converging to the input socket of the Bump node) through MixRGB nodes, and in some cases also edited their levels using the ColorRamp nodes to obtain a more random, natural look (ColorRamp1 and ColorRamp2, all the nodes inside the BUMP frame).
- In the second stage, from steps 18 to 22, we built the color pattern by mixing a simple color output with the output of some of the Noise Texture nodes, and then edited the result using an RGB Curves node (nodes inside the COLOR frame).
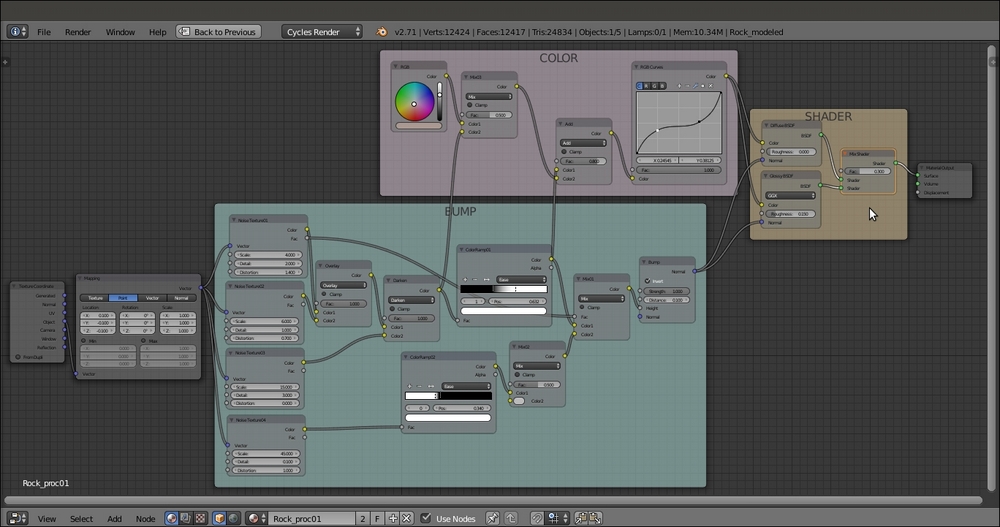
- The results of both the bump and the color patterns were then piped into the appropriate sockets of the nodes inside the SHADER frame, that is, the Diffuse BSDF node was mixed with the Glossy BSDF node to add specularity (steps 16 and 17). The overall material network in the Node Editor window is shown in the following screenshot:

The overall vision of the material network
