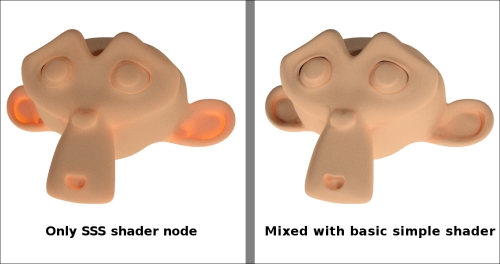
Let's first see how the true Subsurface Scattering node works in Cycles, and an example is given in the following screenshot:

The Cycles SSS node
To see how the true Subsurface Scattering node works, let's first use it as the only component of the shader, and later mix it with a basic diffuse-glossy shader.
Let's start by setting the Plane under Suzanne as a light emitter to enhance the backlight effect of the SSS effect:
- Start Blender and open the
9931OS_07_start.blendfile, where there is an unwrapped Suzanne mesh leaning on a Plane, with two mesh-light emitters and the Camera as shown in the following screenshot:
Screenshot of the provided 9931OS_07_start.blend file
- Go to Outliner and select the Plane object. As you can see in the Node Editor window, it has an already set material called
Plane. - Go to the Material window under the main Properties panel, and in the Surface subpanel, switch the Diffuse BSDF shader with an Emission shader as shown in the following screenshot:

Switching the Diffuse BSDF shader with an Emission shader through the Material window
- Set the Strength value to
5.000. - With the mouse arrow in the viewport, press Shift + Z to go to the Rendered view.
Now let's begin creating the SSS material using the following steps:
- Select Suzanne and click on the New button in the Surface subpanel under the Material window in the main Properties panel, or in the Node Editor window.
- Using only the Material window, replace the Diffuse BSDF shader with a Subsurface Scattering node as shown in the following screenshot:

The Rendered preview of Suzanne with the SSS node as the material
As you can see, the scattering effect is clearly visible in the Rendered preview, but actually, it's so strong that all the facial features of poor Suzanne are confused and result in a jelly-like, muddish material.
By default, the Scale value of the Subsurface Scattering node is set to
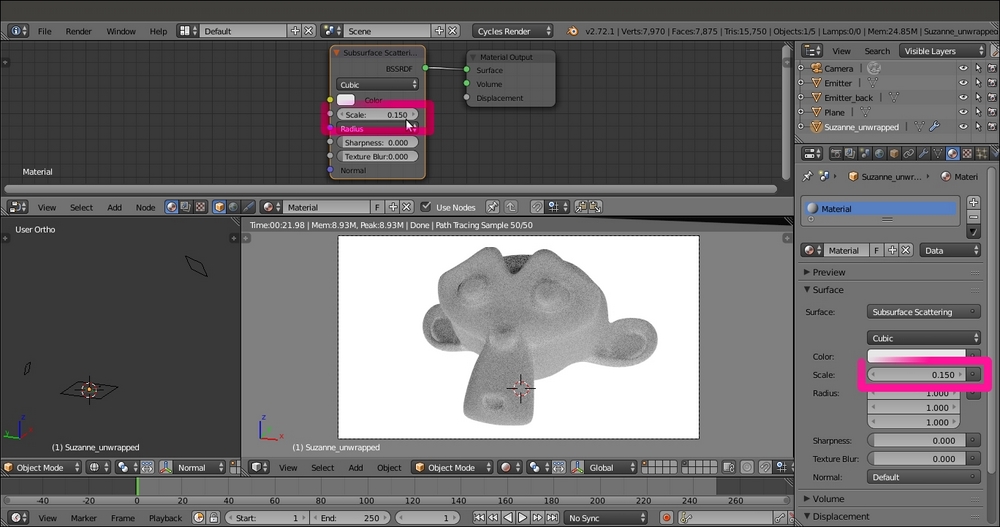
1.000, evidently a bit too high for an object that is supposed to be 2 meters tall (remember that by default, one Blender unit is supposed to be equal to 1 real world meter). - Gradually lower the Scale parameter, either in Node Editor or in the Material window, to select a value in the range of
0.100to0.200. In my case, I arrived at0.150. Now some of Suzanne's facial features are clearly discernible, as shown in the following screenshot:
Modifying the SSS node's Scale value
- Click on the Radius button on the node interface in the Node Editor window (or directly in the Material window), and change the values of R to
4.000, G to2.000, and B to1.000as shown in the following screenshot:
Modifying the SSS node's Radius values
- Lower the Scale value to
0.070; set the Sharpness value to1.000; and click on the Color box to set values of R to1.000, G to0.500, and B to0.250. - Rename the material
SSS_01and save the file asSSS_material, as shown in the following screenshot:
Setting a flesh color for the Suzanne SSS
- Now click on the F icon to the right side of the Material datablock name to enable the fake user. Then click on the number 2 icon and rename the new material
SSS_02. Enable the fake user for this material as well. - Add an Add Shader node (press Shift + A and navigate to Shader | Add Shader) and paste it between the SSS node and the Material Output node.
- Add a Mix Shader node (press Shift + A and navigate to Shader | Mix Shader), and connect it to the first Shader input socket of the Add Shader node so that the previous connection coming from the SSS node automatically switch to the second Shader input socket.
- Add a Diffuse BSDF node and a Glossy BSDF shader node (press Shift + A and navigate to Shader | …), and connect them to the first and to the second Shader input sockets of the Mix Shader node respectively, as shown in the following screenshot:

Adding the SSS node to a Diffuse-Glossy shader
- Add a Layer Weight node (press Shift + A and navigate to Input | Layer Weight) and connect its Facing output to the Fac input socket of the Mix Shader node. Set the Blend value to
0.800. - Add an RGB node (press Shift + A and navigate to Input | RGB) and connect its output to the Color input sockets of the Diffuse BSDF, Glossy BSDF, and SSS nodes. Set the RGB node's Color values for R to
1.000, G to0.500, and B to0.250as shown in the following screenshot:
Setting the same flesh color for all the shader nodes
- Save the file.
Let's try now a slightly different setting, with two sliders for the mixture of SSS and basic shaders. We will also give distinct colors to the Diffuse BSDF, Glossy BSDF, and SSS components of the shader to highlight their distribution on the mesh.
- First, select the Plane object, and in the Material window, switch the Emission shader with a Diffuse BSDF shader node.
- Reselect Suzanne and click on the number 2 button close to the Material datablock name. Rename the new material
SSS_03. Then enable the fake user for this material as well. - Delete the RGB node. Then set the Diffuse BSDF shader node's Color values for R to
0.031, G to0.800, and B to0.000(bright green); and the Glossy BSDF node's Color values for R to0.646, G to0.800, and B to0.267(yellow). Set the Glossy BSDF node's Roughness value to0.200and Distribution to Beckmann. Set the Subsurface Scattering shader node's Color values for R to0.800, G to0.086, and B to0.317(a vivid pink). Change Falloff from Cubic to Gaussian. - Label the Mix Shader node as
Mix Shader1, press Shift + D to duplicate it, and label the duplicate asMix Shader2. Paste it between the Add Shader and Material Output nodes. - Connect the Mix Shader1 node's output to the first Shader input socket of the Mix Shader2 node so that the connection from the Add Shader automatically switches to the second Shader input socket.
- Press Shift + D to duplicate the Mix Shader2 node, label the duplicated node as
Mix Shader3, and paste it between the Mix Shader2 and the Material Output nodes. - Connect the output of the Subsurface Scattering node to the second Shader input socket of the Mix Shader3 node as shown in the following screenshot:

Adding one more Mix Shader node to further tweak the SSS amount
- Save the file as
SSS_material_02.blend.
The scattering amount for the three RGB color channels is set in the Radius item on the node interface, while Scale is to set the dimensions the object would have in the real world. Starting with a default value of 1.000, the Scale value must usually be proportionally inverse lowered. The bigger the object desired in the real world, the lower the Scale value in the node. Otherwise, the scattering effect may become too strong.
The best way to mix the Subsurface Scattering node with the rest of any shader is by using the Add Shader node. However, with this node, it's not possible to establish the amount of influence of the SSS on the shader, so a trick must be performed. The Diffuse-Glossy component of the shader is again mixed with the output of the Add Shader node, through a Mix Shader node.
In the previously explained SSS_03 material, there are two Mix Shader nodes that can be used to tweak the influence of the effect. By raising their Fac values, it's also possible to switch from total absence to full scattering effect, as shown in the following compilation of screenshots:

Different effects of different Fac values of the last Mix Shader node
