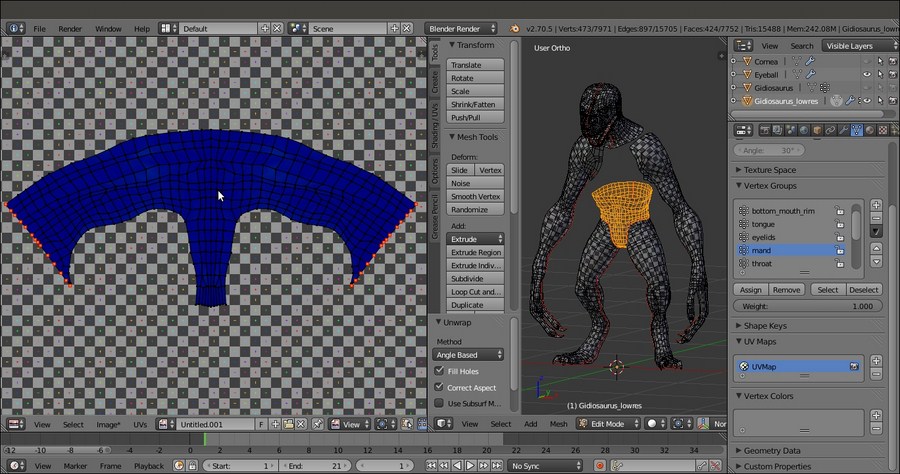
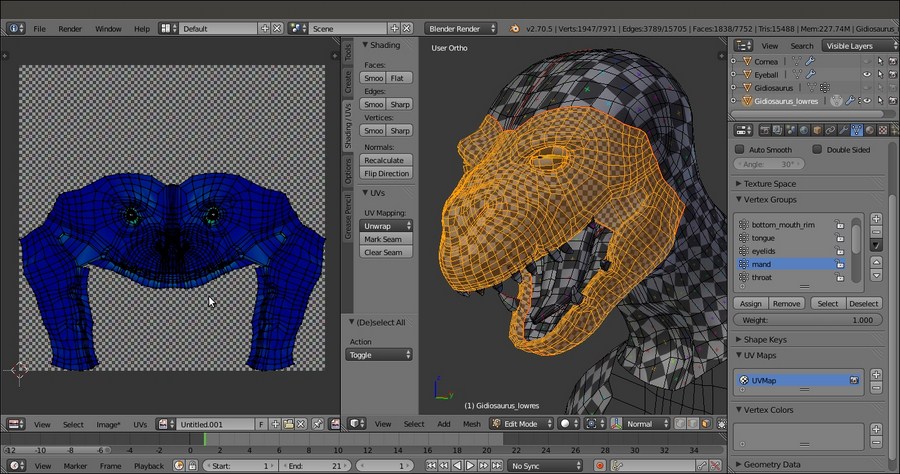
We are now going to join the two UV islands' halves together, in order to improve the final look of the texturing; we are also going to modify, if possible, a little of the island proportions in order to obtain a more regular flow of the UV vertices, and fix the distortions we have seen in the last image of the previous recipe.
We are going to the use the pin tool, which is normally used in conjunction with the Live Unwrap tool.
First, we'll try to recalculate the unwrap of some of the islands by modifying the seams of the mesh.
Before we start though, let's see if we can improve some of the visibility of the UV islands in the UV/Image Editor:
- Put the mouse cursor in the UV/Image Editor window and press the N key.
- In the Properties sidepanel that appears by pressing the N key on the right-hand side of the window, go to the Display subpanel and click on the Black or White button (depending on your preference) under the UV item. Check also the Smooth item box.
- Also, check the Stretch item, which even though it was made for a different purpose, can increase the visibility of the islands a lot.
- Press N again to get rid of the Properties sidepanel.
All these options enabled should make the islands more easily readable in the UV/Image Editor window:

The UV islands made more easily readable by the enabled items
Now we can start with the editing; initially, we are going to freeze the islands that we don't want to modify because their unwrap is either satisfactory, or we will deal with it later. So, perform the following steps:
- Press A to select all the islands, then by putting the mouse pointer on the two pelvis island halves and pressing Shift + L, multi-deselect them; press the P key to pin the remaining selected UV islands and then A to deselect everything:

To the right-hand side, the pinned UV islands
- Zoom in on the islands of the pelvis, select both the left and right outer edge-loops, as shown in the following left image, and press P to pin them.
- Go to the 3D view and clear only the front part of the median seam on the pelvis. To do this, start to clear the seam from the front edges, go down and stop where it crosses the horizontal seam that passes the bottom part of the groin and legs, and leave the back part of the vertical median seam still marked:

Pinning the extreme vertices in the UV/Image Editor, and editing the seam on the mesh
- Go into Face selection mode and select all the faces of the pelvis; put the mouse pointer in the 3D view and press U | Unwrap (alternatively, go into the UV/Image Editor and press E):

Unwrapping again with the pinning and a different seam
The island will keep the previous position because of the pinned edges, and is now unwrapped as one single piece (with the obvious exception of the seam on the back).
- We won't modify the pelvis island any further, so select all its vertices and press P to pin all of them and then deselect them.
- Press A in the 3D view to select all the faces of the mesh and make all the islands visible in the UV/Image Editor. Note that they are all pinned at the moment, so just select the vertices you want to unpin (Alt + P) in the islands of the tongue and inner mouth. Then, clear the median seam in the corresponding pieces on the mesh, and press E again:

Re-unwrapping the tongue and inner mouth areas
- Select the UV vertices of the resulting islands and unpin them all; next, pin just one vertex at the top of the islands and one at the bottom, and unwrap again. This will result in a more organically distributed unwrap of the parts:

Re-unwrapping again with a different pinning
- Select all the faces of the mesh, and then all the islands in the UV/Image Editor window. Press Ctrl + A to average their relative size and adjust their position in the default tile space:

The rearranged UV islands
Now, let's work on the head piece that, as in every character, should be the most important and well-finished piece.
At the moment, the face is made using two separate islands; although this won't be visible in the final textured rendering of our character, it's always better, if possible, to join them in order to have a single piece, especially in the front mesh faces. Due to the elongated snout of the character, if we were to unwrap the head as a single piece simply without the median seam, we wouldn't get a nice evenly mapped result, so we must divide the whole head into more pieces.
Actually, we can take advantage of the fact that the Gidiosaurus is wearing a helmet and that most of the head will be covered by it; this allows us to easily split the face from the rest of the mesh, hiding the seams under the helmet.
- Go into Edge selection mode and mark the seams, dividing the face from the cranium and neck as shown in the following screenshots. Select the crossing edge-loops, and then clear the unnecessary parts:

New seams for the character's head part 1
- Also clear the median seam in the upper face part, and under the seam on the bottom jaw, leaving it only on the front mandible and on the back of the cranium and neck:

New seams for the character's head part 2
- Go in the Face selection mode and select only the face section of the mesh, and then press E to unwrap. The new unwrap comes upside down, so select all the UV vertices and rotate the island by 180 degrees:

The character's face unwrapped
- Select the cranium/neck section on the mesh and repeat the process:

The rest of the head mesh unwrapped as a whole piece
- Now, select all the faces of the mesh and all the islands in the UV/Image Editor, and press Ctrl + A to average their reciprocal size.
- Once again, adjust the position of the islands inside the UV tile (Ctrl + P to automatically pack them inside the available space, and then tweak their position, rotation, and scale):

The character's UV islands packed inside the default U0/V0 tile space
Starting from the UV unwrap in the previous recipe, we improved some of the islands by joining together the halves representing common mesh parts. When doing this, we tried to retain the already good parts of the unwrap by pinning the UV vertices that we didn't want to modify; this way, the new unwrap process was forced to calculate the position of the unpinned vertices using the constraints of the pinned ones (pelvis, tongue, and inner mouth). In other cases, we totally cleared the old seams on the model and marked new ones, in order to have a completely new unwrap of the mesh part (the head), we also used the character furniture (such as the armor) to hide the seams (which in any case, won't be visible at all).
At this point, looking at the UV/Image Editor window containing the islands, it's evident that if we want to keep several parts in proportion to each other, some of the islands are a little too small to give a good amount of detail when texturing; for example, the Gidiosaurus's face.
A technique for a good unwrap that is the current standard in the industry is UDIM UV Mapping, which means U-Dimension; basically, after the usual unwrap, the islands are scaled bigger and placed outside the default U0/V0 tile space.
Look at the following screenshots, showing the Blender UV/Image Editor window:

The default U0/V0 tile space and the possible consecutive other tile spaces
On the left-hand side, you can see, highlighted with red lines, the single UV tile that at present is the standard for Blender, which is identified by the UV coordinates 0 and 0: that is, U (horizontal) = 0 and V (vertical) = 0.
Although not visible in the UV/Image Editor window, all the other possible consecutive tiles can be identified by the corresponding UV coordinates, as shown on the right-hand side of the preceding screenshot (again, highlighted with red lines). So, adjacent to the tile U0/V0, we can have the row with the tiles U1/V0, U2/V0, and so on, but we can also go upwards: U0/V1, U1/V1, U2/V1, and so on.
To help you identify the tiles, Blender will show you the amount of pixels and also the number of tiles you are moving the islands in the toolbar of the UV/Image Editor window. In the following screenshot, the arm islands have been moved horizontally (on the negative x axis) by -3072.000 pixels; this is correct because that's exactly the X size of the grid image we loaded in the previous recipes. In fact, in the toolbar of the UV/Image Editor window, while moving the islands we can read D: -3072.000 (pixels) and (inside brackets) 1.0000 (tile) along X; effectively, 3072 pixels = 1 tile.

Moving the arm islands to the U1/V0 tile space
When moving UV islands from tile to tile, remember to check that the Constrain to Image Bounds item in the UVs menu on the toolbar of the UV/Image Editor window is disabled; also, enabling the Normalized item inside the Display subpanel under the N key Properties sidepanel of the same editor window will display the UV coordinates from 0.0 to 1.0, rather than in pixels. More, pressing the Ctrl key while moving the islands will constrain the movement to intervals, making it easy to translate them to exactly 1 tile space.
Because at the moment Blender doesn't support the UDIM UV Mapping standard, simply moving an island outside the default U0/V0 tile, for example to U1/V0, will repeat the image you loaded in the U0/V0 tile and on the faces associated with the moved islands. To solve this, it's necessary, after moving the islands, to assign a different material, if necessary with its own different image textures, to each group of vertices/faces associated with each tile space. So, if you shared your islands over 4 tiles, you need to assign 4 different materials to your object, and each material must load the proper image texture.
The goal of this process is obviously to obtain bigger islands mapped with bigger texture images, by selecting all the islands, scaling them bigger together using the largest ones as a guide, and then tweaking their position and distribution.
One last thing: it is also better to unwrap the corneas and eyes (which are separate objects from the Gidiosaurus body mesh) and add their islands to the tiles where you put the face, mouth, teeth, and so on (use the Draw Other Objects tool in the View menu of the UV/Image Editor window to also show the UV islands of the other nonjoined unwrapped objects):

UV islands unwrapped, following the UDIM UV Mapping standard
In our case, we assigned the Gidiosaurus body islands to 5 different tiles, U0/V0, U1/V0, U2/V0, U0/V1, and U1/V1, so we'll have to assign 5 different materials. However, we will cover this in a later recipe.
Note that for exposition purposes only, in the preceding screenshot, you can see the cornea and eye islands together with the Gidiosaurus body islands because I temporarily joined the objects; however, it's usually better to maintain the eyes and corneas as separate objects from the main body.
