
Start Visual Studio for Mac.
Navigate to File | New Solution...
In the New Project dialog box, choose Multiplatform | App in the left-hand column.
Choose Xamarin.Forms | Blank Forms App in the middle column, as shown in the following screenshot:

Click on Next.
Enter the App Name
Ch15_MobileApp, and Organization Identifier
com.packt, as shown in the following screenshot:

Click on Next.
Change the Solution Name to Chapter15, and Location to /Users/[user_folder]/Code, as shown in the following screenshot:

Click on Create.
After a few moments, the solution and project will be created, as shown in the following screenshot:

Right-click on the project named Ch15_MobileApp, choose Add | New Folder, and name it Models.
Right-click on the Models folder and choose Add | New File...
In the New File dialog, choose General | Empty Class, enter the name Customer, as shown in the following screenshot, and click on New:

Modify the statements as shown in the following code, and note:
- The class implements
INotifyPropertyChangedso a two-way bound user interface components such asEditorwill update the property and vice versa. There is aPropertyChangedevent that is raised whenever one of the properties is modified. - After loading from the service, the customers will be cached locally in the mobile app using
ObservableCollection. This supports notifications to any bound user interface components, such asListView. - As well as properties for storing values retrieved from the REST service, the class defines a readonly
Locationproperty. This will be used to bind to in a summary list of customers. - For testing purposes, when the REST service is not available, there is a method to populate three sample customers:
    using System.Collections.Generic;
    using System.Collections.ObjectModel;
    using System.ComponentModel;

    namespace Ch15_MobileApp.Models
    {
      public class Customer : INotifyPropertyChanged
      {
        public static IList<Customer> Customers;

        static Customer()
        {
          Customers = new ObservableCollection<Customer>();
        }

        public event PropertyChangedEventHandler PropertyChanged;

        private string customerID;
        private string companyName;
        private string contactName;
        private string city;
        private string country;
        private string phone;

        public string CustomerID
        {
          get { return customerID; }
          set
          {
            customerID = value;
            if (PropertyChanged != null) PropertyChanged(this,
              new PropertyChangedEventArgs("CustomerID"));
          }
        }

        public string CompanyName
        {
          get { return companyName; }
          set
          {
            companyName = value;
            if (PropertyChanged != null) PropertyChanged(this,
            new PropertyChangedEventArgs("CompanyName"));
          }
        }

        public string ContactName
        {
          get { return contactName; }
          set
          {
            contactName = value;
            if (PropertyChanged != null) PropertyChanged(this,
              new PropertyChangedEventArgs("ContactName"));
          }
        }
        public string City
        {
          get { return city; }
          set
          {
            city = value;
            if (PropertyChanged != null) PropertyChanged(this,
            new PropertyChangedEventArgs("City"));
          }
        }

        public string Country
        {
          get { return country; }
          set
          {
            country = value;
            if (PropertyChanged != null) PropertyChanged(this,
              new PropertyChangedEventArgs("Country"));
          }
        }

        public string Phone
        {
          get { return phone; }
          set
          {
            phone = value;
            if (PropertyChanged != null) PropertyChanged(this,
              new PropertyChangedEventArgs("Phone"));
          }
        }

        public string Location
        {
          get
          {
            return string.Format("{0}, {1}", City, Country);
          }
        }

        // for testing before calling web service
        public static void SampleData()
        {
          Customers.Clear();

          Customers.Add(new Customer
          {
            CustomerID = "ALFKI",
            CompanyName = "Alfreds Futterkiste",
            ContactName = "Maria Anders",
            City = "Berlin",
            Country = "Germany",
            Phone = "030-0074321"
          });

          Customers.Add(new Customer
          {
            CustomerID = "FRANK",
            CompanyName = "Frankenversand",
            ContactName = "Peter Franken",
            City = "München",
            Country = "Germany",
            Phone = "089-0877310"
          });

          Customers.Add(new Customer
          {
            CustomerID = "SEVES",
            CompanyName = "Seven Seas Imports",
            ContactName = "Hari Kumar",
            City = "London",
            Country = "UK",
            Phone = "(171) 555-1717"
          });
        }
      }
    }
Right-click on the Ch15_MobileApp folder and choose New File....
Choose General | Empty Interface, name the file IDialer, and click on New, as shown in the following screenshot:

Modify the IDialer contents, as shown in the following code:
    namespace Ch15_MobileApp
    {
      public interface IDialer
      {
        bool Dial(string number);
      }
    }
Right-click on the Ch15_MobileApp.iOS folder and choose New File....
Choose General | Empty Class, name the file PhoneDialer, and click on New.
Modify its contents, as shown in the following code:
    using Foundation;
    using Ch15_MobileApp.iOS;
    using UIKit;
    using Xamarin.Forms;

    [assembly: Dependency(typeof(PhoneDialer))]
    namespace Ch15_MobileApp.iOS
    {
      public class PhoneDialer : IDialer
      {
        public bool Dial(string number)
        {
          return UIApplication.SharedApplication.OpenUrl(
            new NSUrl("tel:" + number));
        }
      }
    }
Right-click on the Ch15_MobileApp.Droid folder and choose New File....
Choose General | Empty Class, name the file PhoneDialer, and click on New.
Modify its contents, as shown in the following code:
    using Android.Content;
    using Android.Telephony;
    using Ch15_MobileApp.Droid;
    using System.Linq;
    using Xamarin.Forms;
    using Uri = Android.Net.Uri;

    [assembly: Dependency(typeof(PhoneDialer))]
    namespace Ch15_MobileApp.Droid
    {
      public class PhoneDialer : IDialer
      {
        public bool Dial(string number)
        {
          var context = Forms.Context;
          if (context == null)
          return false;

          var intent = new Intent(Intent.ActionCall);
          intent.SetData(Uri.Parse("tel:" + number));

          if (IsIntentAvailable(context, intent))
          {
            context.StartActivity(intent);
            return true;
          }

          return false;
       }

       public static bool IsIntentAvailable(Context context, Intent
     intent)
       {
         var packageManager = context.PackageManager;

         var list = packageManager.QueryIntentServices(intent, 0)
           .Union(packageManager.QueryIntentActivities(intent, 0));

         if (list.Any())
         return true;

         var manager = TelephonyManager.FromContext(context);
         return manager.PhoneType != PhoneType.None;
       }
     }
   }
In Ch15_MobileApp.Droid, expand Properties, and open AndroidManifest.xml.
In Required permissions, check the CallPhone permission.
Right-click on Ch15_MobileAppPage.xaml, click on Remove, and then click on Remove from Project, as shown in the following screenshot:

Right-click on the project named Ch15_MobileApp, choose Add | New Folder, and name it Views.
Right-click on the Views folder and choose New File....
Choose Forms | Forms ContentPage Xaml, name the file CustomersList, and click on New, as shown in the following screenshot:

In Ch15_MobileApp, open CustomersList.xaml, and modify its contents, as shown in the following markup, and note:
- Event handlers have been written for: loading the customers when the view appears, a customer being tapped (to show detail), the list being swiped down to refresh, a customer being deleted by swiping left and then clicking a Delete button
- A data template defines how to display each customer: large text for the company name and smaller text for the location underneath
- An Add button is displayed so users can navigate to a detail view to add a new customer
    <?xml version="1.0" encoding="UTF-8"?>
    <ContentPage xmlns="http://xamarin.com/schemas/2014/forms"
      xmlns:x="http://schemas.microsoft.com/winfx/2009/xaml"
      x:Class="Ch15_MobileApp.CustomersList"
      Title="List">
      <ContentPage.Content>
        <ListView ItemsSource="{Binding .}"
          VerticalOptions="Center" HorizontalOptions="Center"
          IsPullToRefreshEnabled="True"
            ItemTapped="Customer_Tapped"
          Refreshing="Customers_Refreshing">
        <ListView.Header>
          <Label Text="Northwind Customers"
               BackgroundColor="Silver" />
        </ListView.Header>
        <ListView.ItemTemplate>
          <DataTemplate>
              <TextCell Text="{Binding CompanyName}"
                    Detail="{Binding Location}">
              <TextCell.ContextActions>
               <MenuItem Clicked="Customer_Phoned" Text="Phone" />
               <MenuItem Clicked="Customer_Deleted"
                        Text="Delete" IsDestructive="True" />
              </TextCell.ContextActions>
            </TextCell>
          </DataTemplate>
        </ListView.ItemTemplate>
        </ListView>
        </ContentPage.Content>
      <ContentPage.ToolbarItems>
       <ToolbarItem Text="Add" Activated="Add_Activated"
                 Order="Primary" Priority="0" />
      </ContentPage.ToolbarItems>
    </ContentPage>
Modify the contents of CustomersList.xaml.cs, as shown in the following code:
    using System.Threading.Tasks;
    using Ch15_MobileApp.Models;
    using Xamarin.Forms;

    namespace Ch15_MobileApp
    {
      public partial class CustomersList : ContentPage
      {
        public CustomersList()
        {
          InitializeComponent();
          Customer.SampleData();
          BindingContext = Customer.Customers;
        }

        async void Customer_Tapped(object sender,
        Xamarin.Forms.ItemTappedEventArgs e)
        {
          Customer c = e.Item as Customer;
          if (c == null) return;
          // navigate to the detail view and show the tapped customer
          await Navigation.PushAsync(new CustomerDetail(c));
        }

        async void Customers_Refreshing(
          object sender, System.EventArgs e)
        {
          ListView listView = sender as ListView;
          listView.IsRefreshing = true;
          // simulate a refresh
          await Task.Delay(1500);
          listView.IsRefreshing = false;
        }

        void Customer_Deleted(object sender, System.EventArgs e)
        {
          MenuItem menuItem = sender as MenuItem;
          Customer c = menuItem.BindingContext as Customer;
          Customer.Customers.Remove(c);
        }

        async void Customer_Phoned(object sender, System.EventArgs e)
        {
          MenuItem menuItem = sender as MenuItem;
          Customer c = menuItem.BindingContext as Customer;
          if (await this.DisplayAlert("Dial a Number",
            "Would you like to call " + c.Phone + "?",
            "Yes", "No"))
          {
            var dialer = DependencyService.Get<IDialer>();
            if (dialer != null)
            dialer.Dial(c.Phone);
          }
        }

        async void Add_Activated(object sender, System.EventArgs e)
        {
          await Navigation.PushAsync(new CustomerDetail());
        }
      }
    }
Add another Forms ContentPage Xaml named CustomerDetails.
Open CustomerDetails.xaml, and modify its contents, as shown in the following markup:
    <?xml version="1.0" encoding="UTF-8"?>
    <ContentPage xmlns="http://xamarin.com/schemas/2014/forms"
    xmlns:x="http://schemas.microsoft.com/winfx/2009/xaml"
    x:Class="Ch15_MobileApp.CustomerDetail" Title="Edit Customer">
      <ContentPage.Content>
        <StackLayout VerticalOptions="Fill"
          HorizontalOptions="Fill">
          <Grid BackgroundColor="Silver">
          <Grid.ColumnDefinitions>
            <ColumnDefinition/>
            <ColumnDefinition/>
          </Grid.ColumnDefinitions>
        <Grid.RowDefinitions>
          <RowDefinition/>
          <RowDefinition/>
          <RowDefinition/>
          <RowDefinition/>
        </Grid.RowDefinitions>
          <Label Text="Customer ID"
            VerticalOptions="Center" Margin="6" />
          <Editor Text="{Binding CustomerID, Mode=TwoWay}"
                  Grid.Column="1" />
          <Label Text="Company Name" Grid.Row="1"
            VerticalOptions="Center" Margin="6" />
          <Editor Text="{Binding CompanyName, Mode=TwoWay}"
            Grid.Column="1" Grid.Row="1" />
          <Label Text="Contact Name" Grid.Row="2"
            VerticalOptions="Center" Margin="6" />
          <Editor Text="{Binding ContactName, Mode=TwoWay}"
            Grid.Column="1" Grid.Row="2" />
          <Label Text="City" Grid.Row="3"
            VerticalOptions="Center" Margin="6" />
          <Editor Text="{Binding City, Mode=TwoWay}"
            Grid.Column="1" Grid.Row="3" />
          <Label Text="Country" Grid.Row="4"
            VerticalOptions="Center" Margin="6" />
          <Editor Text="{Binding Country, Mode=TwoWay}"
            Grid.Column="1" Grid.Row="4" />
          <Label Text="Phone" Grid.Row="5"
            VerticalOptions="Center" Margin="6" />
          <Editor Text="{Binding Phone, Mode=TwoWay}"
            Grid.Column="1" Grid.Row="5" />
         </Grid>
         <Button x:Name="InsertButton" Text="Insert Customer"
              Clicked="InsertButton_Clicked" />
        </StackLayout>
      </ContentPage.Content>
    </ContentPage>
Open CustomerDetail.xaml.cs, and modify its contents, as shown in the following code:
    using Ch15_MobileApp.Models;
    using Xamarin.Forms;

    namespace Ch15_MobileApp
    {
      public partial class CustomerDetail : ContentPage
      {
        private bool newCustomer = false;

        public CustomerDetail()
        {
          InitializeComponent();
          BindingContext = new Customer();
          newCustomer = true;
          Title = "Add Customer";
        }

        public CustomerDetail(Customer customer)
        {
          InitializeComponent();
          BindingContext = customer;
          InsertButton.IsVisible = false;
        }

        async void InsertButton_Clicked(
        object sender, System.EventArgs e)
        {
          if (newCustomer)
          {
            Customer.Customers.Add((Customer)BindingContext);
          }
          await Navigation.PopAsync(animated: true);
        }
      }
    }
Open App.xaml.cs.
Modify the statement that sets MainPage to create an instance of CustomersList wrapped in NavigationPage, as shown in the following code:
MainPage = new NavigationPage(new CustomersList());
Click on the Start button in the toolbar, as shown in the following screenshot, or choose Run | Start Debugging:

After a few moments, the Simulator will show your running mobile app, as shown in the following screenshot:

Click on a customer and modify its Company Name, as shown in the following screenshot:
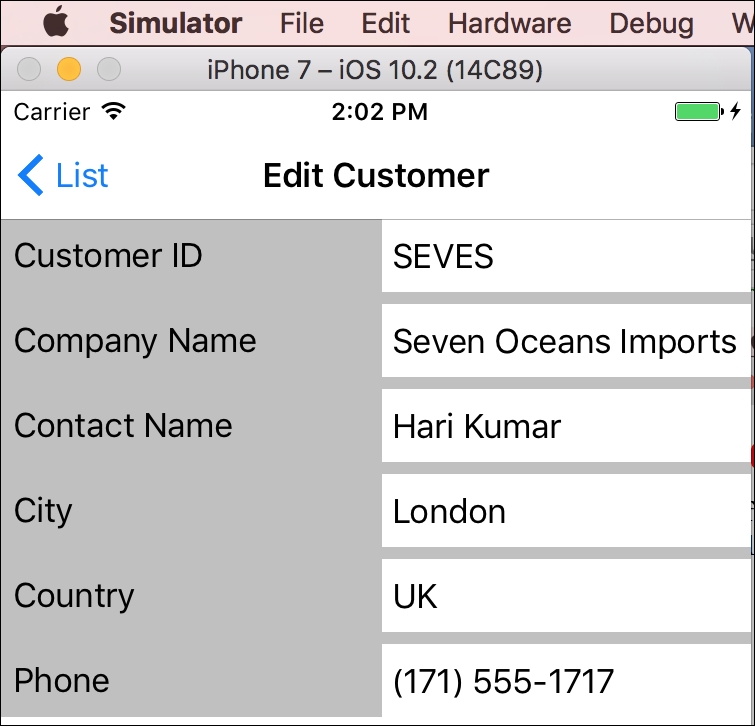
Click on List to return to the list of customers and note that the company name has been updated.
Click on Add.
Fill in the fields for a new customer, as shown in the following screenshot:
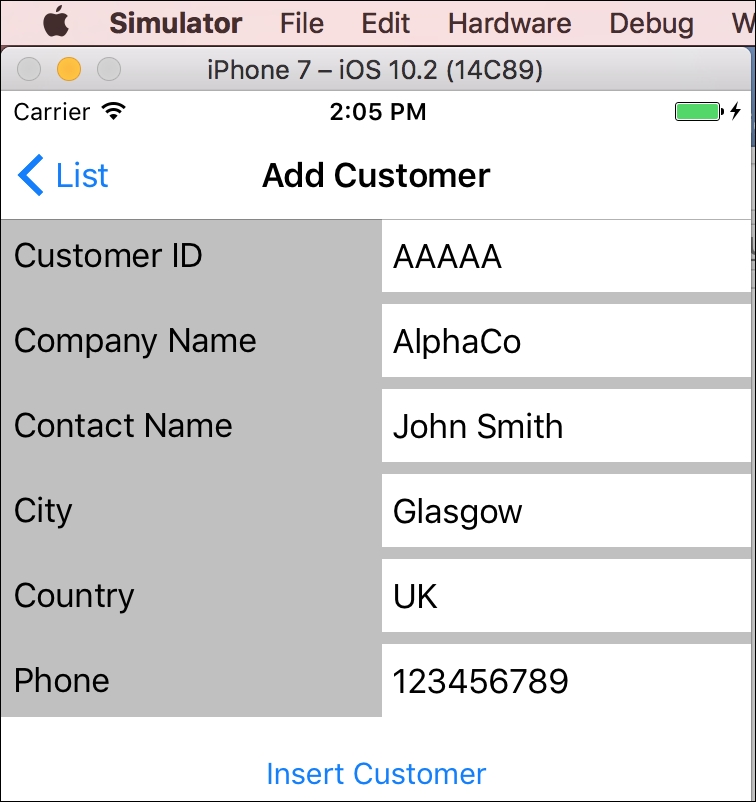
Click on Insert Customer and note that the new customer has been added to the list, as shown in the following screenshot:

Slide one of the customers to the left to reveal two action buttons, Phone and Delete, as shown in the following screenshot:

Click on Phone and note the prompt to the user, as shown in the following screenshot:

Slide one of the customers to the left to reveal two action buttons, Phone and Delete, and click on Delete, and note that the customer is removed.
In the project named Ch15_MobileApp, right-click on the folder named Packages and choose Add Packages....
In the Add Packages dialog box, enter http in the Search box. Select the package named System.Net.Http and click on Add Package, as shown in the following screenshot:

In the License Acceptance dialog box, click on Accept.
In the project named Ch15_MobileApp, right-click on the folder named Packages and choose Add Packages....
In the Add Packages dialog box, enter Json.NET in the Search box. Select the package named Json.NET and click on Add Package.
Open CustomersList.xaml.cs and import the following highlighted namespaces:
    using System.Threading.Tasks;
    using Ch15_MobileApp.Models;
    using Xamarin.Forms;
    using System;
    using System.Linq;
    using System.Collections.Generic;
    using System.Net.Http;
    using System.Net.Http.Headers;
    using Newtonsoft.Json;
Modify the CustomersList constructor to load the list of customers using the service proxy instead of the SampleData method, as shown in the following code:
    public CustomersList()
    {
      InitializeComponent();

      //Customer.SampleData();

      var client = new HttpClient();

      client.BaseAddress = new Uri(
        "http://localhost:5000/api/customers");

      client.DefaultRequestHeaders.Accept.Add(
        new MediaTypeWithQualityHeaderValue("application/json"));

      HttpResponseMessage response = client.GetAsync("").Result;

      response.EnsureSuccessStatusCode();

      string content =
        response.Content.ReadAsStringAsync().Result;

      var customersFromService = JsonConvert.DeserializeObject
      <IEnumerable<Customer>>(content);

        foreach (Customer c in customersFromService
        .OrderBy(customer => customer.CompanyName)
      {
        Customer.Customers.Add(c);
      }

      BindingContext = Customer.Customers;
    }
In Visual Studio Code, run the Ch15_WebApi project.
In Visual Studio for Mac, run the Ch15_MobileApp project, and note that 91 customers are loaded from the web service, as shown in the following screenshot:
