
One of the main objectives of information security is protecting the confidentiality of the data. In a web application, the aim is to ensure that the data exchanged between the user and the application is secure and hidden from any third party. The data, when stored at the server also needs to be secured from hackers. Cryptography is used to protect the confidentiality as well as the integrity of data.
Encryption is the most widely accepted form of cryptography that is used to protect information. It is used to protect sensitive data against threats like sniffing or data being altered during storage and transmission. When the data flows on the network unencrypted, the attacker can tap in and sniff the data. If the sniffed data contains the authentication credentials, the attacker can hijack the session. Hence, we need encryption. When the data is encrypted, the plaintext is converted into cipher text, which can only be decrypted with the help of a secret key.
Attackers always try to find out different ways to defeat the layer of encryption and expose the plain text data. They use different techniques such as exploiting design flaws in the encryption protocol or tricking the user to send data over a non-encrypted channel, circumventing the encryption itself. We will discuss several of these techniques.
The information stored in the database on the server can also be exposed if the underlying operating system is compromised. The data at rest needs to be protected from malicious insiders, administrators, contractors and outsourced service providers. Tokenization can be used to protect the confidentiality of data at rest and is used in conjunction with disk encryption when the data to be protected is very critical, such as credit card and social security numbers. Encrypting the database would only protect the data when at rest and will have no effect on the data in transit. When the data is sent across the network, it should be sent over an encrypted link known as secure socket layer (SSL).
In this chapter, we will talk about SSL and the different ways that attackers try to exploit the encrypted connection:
- Use of SSL
- SSL encryption process
- Types of encryption algorithms
- Identifying weak cipher suites
- SSL man-in-the-middle attacks
Secure socket layer, or SSL as it is more commonly known, is an encryption protocol to secure communications over the network. Netscape developed the SSL protocol in 1994. In 1999, IETF released the transport layer security protocol superseding the SSL protocol Version 3. SSL is considered insecure because of multiple vulnerabilities identified over the years. The POODLE and BEAST vulnerabilities expose flaws in the SSL protocol itself and hence cannot be fixed with a software patch. Upgrading to TLS is the best way to remediate and secure your applications. The most recent version of TLS is Version 1.2. The recommendation is to always use the latest version of TLS.
Most websites have migrated to and started using the TLS protocol, but the encrypted communication is still referred to as an SSL connection. SSL not only provides confidentiality, but also helps to maintain the integrity of the data and achieve non-repudiation.
Securing the communication between the client and the web application is the most common use of TLS/SSL, and it is known as HTTP over SSL or HTTPS. TLS is also used to secure the communication channel used by other protocols in the following ways:
- Used by mail servers to encrypt emails between two mail servers and also between the client and the mail server
- To secure communication between database servers and LDAP authentication servers
- To encrypt virtual private network (VPN) connections known as SSL VPN
- Remote desktop services in Windows operating system uses TLS to encrypt and authenticate the client connecting to the server
There are several other applications and implementations where TLS is used to secure the communication between two parties.
SSL uses the public-private key encryption mechanism to scramble data, which helps protect it from a script kiddie or even an evil attacker. Sniffing the data over the network would only reveal the encrypted information, which is of no use without access to the corresponding key.
The SSL protocol is designed to protect the three facets of the CIA triad:
Web server administrators implement SSL to make sure that sensitive user information shared between the web server and the client is secured. In addition to protecting the confidentiality of the data, SSL also provides non-repudiation by using SSL certificates and digital signatures. This provides an assurance that the message is indeed sent by the party that is claiming to have sent it. This is similar to how a signature works in our day to day life. These certificates are signed, verified, and issued by an independent third-party organisation known as certificate authority. Some of the well-known certificate authorities are listed here:
- VeriSign
- Thawte
- Comodo
- DigiCert
- Entrust
- GlobalSign
If an attacker tries to fake the certificate, the browser displays a warning message to the user informing that an invalid certificate is being used to encrypt the data.
Data integrity is achieved by calculating a message digest using a hashing algorithm which is attached to the message and verified at the other end.
The encryption process is a multistep process but is a seamless experience for end users. To break down the entire process into two parts, the first phase of the encryption is done using the asymmetric encryption technique and the second is done using the symmetric encryption process. Here are the major steps to encrypt and transmit data using SSL:
- The handshake between the client and the server is the initial step during which the client presents the SSL version number and encryption algorithms it supports.
- The server responds back identifying the SSL version and encryption algorithm that it supports and both parties agree on the highest mutual value. The server also responds with the SSL certificate. This certificate contains the server's public key and general information about the server.
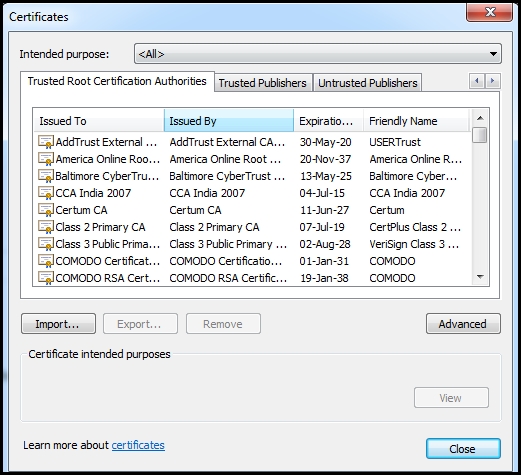
- The client then authenticates the server by verifying the certificate against the list of root certificates stored on the local computer. The client checks if the certificate authority (CA) that undersigned the certificate issued to the website is stored in the list of trusted CAs. In Internet Explorer, the list of trusted CAs can be viewed by navigating to Tools | Internet options | Content | Certificates | Trusted Root Certification Authorities:
- By using the information shared during the handshake, the client can generate a pre-master secret for the session. It then encrypts the secret with the server's public key and sends the encrypted pre-master key back to the server.
- The server decrypts the pre-master key by using the private key (since it was encrypted with the public key). The server and the client both then generate a session key from the pre-master key using a series of steps. This session key encrypts the data during the entire session which is called symmetric encryption. A hash is also calculated and appended to the message which helps test the integrity of the message.
Asymmetric encryption, which uses a combination of public-private keys, is more secure than symmetric encryption. The public key is shared with everyone and the private key is kept stored separately. Encrypted data with one key can only be decrypted with other key, which makes it very secure and efficient to implement on a larger scale.
Symmetric encryption on the other hand uses the same key to encrypt and decrypt the data and you need to find a safe method to share the symmetric key with the other party.
A question that is often asked is why isn't the public-private key pair used to encrypt the data stream and instead a session key is generated, which uses the symmetric encryption. The combination of the public-private key is generated through a complex mathematical process, which is a processor-intensive and time-consuming task. Therefore, it is only used to authenticate the endpoints and to generate and protect the session key which is used in the symmetric encryption that encrypts the bulk data. The combination of the two encryption techniques results in faster and more efficient encryption of data.
The following are the major asymmetric encryption algorithms:
- Diffie-Hellman key exchange: This was the first asymmetric encryption algorithm developed in 1976 that used discrete logarithms in a finite field. It allows two endpoints to swap over with a secret key on an insecure medium without any prior knowledge of each other.
- Rivest Shamir Adleman (RSA): This is the most widely used asymmetric algorithm. The RSA algorithm is used for both encrypting data and signing, providing confidentiality, and non-repudiation. The algorithm uses a series of modular multiplications to encrypt the data.
- Elliptic Curve Cryptography (ECC): This is primarily used in handheld devices such as cell phones, as it requires less computing power for its encryption and decryption process. The functionality of ECC is similar to RSA.
In symmetric encryption, the same key is used to encrypt and decrypt the data. This way of encrypting the data has been used since ages in different forms. It provides an easy way to encrypt and decrypt data, since the keys are identical. Symmetric encryption is simple and easier to implement but comes with the challenge of sharing the key with the users in a secure way.
Symmetric algorithms are divided in two major ways:
- Block cipher: This encrypts a defined block of data at once rather than each bit. This method is used to encrypt the bulk of data on the internet.
- Stream cipher: This encrypts individual bits at a time and therefore requires more processing power. It also requires a lot of randomness as each bit is to be encrypted with a unique key stream. Stream ciphers are more suitable to be implemented at the hardware layer and are used to encrypt steaming communication such as audio and video as it can quickly encrypt and decrypt each bit.
Here are some of the widely used symmetric encryption algorithms:
- Data Encryption Standard (DES): This uses the DEA cipher. DEA is a block cipher which uses a key size of 64 bit. Considering the computing power of the computers today, this encryption algorithm is easily breakable.
- Advance Encryption Standard (AES): This standard was first published in 1998 and is considered to be more secure than other symmetric encryption algorithms. AES uses Rijndael cipher, which was developed by two Belgian cryptographers Joan Daemen and Vincent Rijmen. It replaces the DES. It can be configured to use a variable key size with a minimum size of 128 bits upto a maximum of 256 bits.
- International Data Encryption Algorithm (IDEA): The key size for IDEA is 128 bits long and is faster than DES. It is also a block cipher.
- Rivest Cipher 4 (RC4): RC4 is a widely used stream cipher and has a variable key size of 40 to 2048 bits. RC4 has some design flaws that makes it susceptible to attacks, although they are not practical and require huge computing power. RC4 is widely used in the SSL/TLS protocol. But many organizations have started to move to AES instead of RC4.
The following protocols use RC4 cipher to encrypt data:
- WEP
- TLS/SSL
- Remote desktop
- Secure shell
The hashing function ensures the integrity of the message transmitted. It generates a fixed length value (hash) that represents the actual data. At the receiver end, the data is passed through the hashing function again and the output is compared with the earlier hash generated to identify if the data was tampered in transit. SSL uses hashing to verify the integrity of the received message.
The secure hashing algorithm (SHA), which is a family of hashing functions, is often used to create hashes. Some of the hashing functions are listed in the following table:
|
Hashing function |
Output hash size (bits) |
|---|---|
|
MD5 |
128 |
|
SHA-1 |
160 |
|
SHA-2 |
224 256 384 512 |
SHA-2, as shown in the table, can be used to generate a digest of various sizes from 224 bits to 512. The output hash size denotes the length of the digest generated. The higher the number of bits used, the more secure and immune is the hashing algorithm to collision attacks. A newer version known as SHA-3 has been designed but is not widely used. SHA-2 is only supported in the TLS 1.2 implementation.
TLS makes use of an algorithm known as HMAC to generate the hash value that is appended to the data to be transmitted. HMAC is a modified implementation of the message authentication code algorithm and is considered to be more secure and robust.
As an example when two end points communicate using SSL the following combination of algorithms may be used:
|
Algorithm |
Use in SSL encryption |
|---|---|
|
RSA/Diffie-Hellman |
Key exchange and authentication |
|
AES |
Encryption of bulk data using key generated and shared by DH/RSA |
|
HMAC-SHA2 |
Message integrity |
As we saw in the previous section, SSL is a combination is various encryption algorithms packaged into one to provide confidentiality, integrity, and authentication. In the first step, when two endpoints negotiate for an SSL connection, they identify the common cipher suites supported by them. This allows SSL to support a wide variety of devices which may not have the hardware and software to support the newer ciphers. Supporting older encryption algorithms has a major drawback. Most older cipher suites are found to be easily breakable by cryptanalysts in a reasonable amount of time using the computing power that is available today.
A dedicated attacker would rent cheap computing power from a cloud service provider and use it to break older ciphers and gain access to the clear text information. Thus, using older ciphers provides a false sense of security and should be disabled. The client and the server should only be allowed to negotiate a cipher that is considered secure and is practically very difficult to break.
In order to identify the cipher suites negotiated by the remote web server, we can use the OpenSSL command-line tool that comes pre-installed on all major Linux flavors and is also included in Kali Linux. The tool can be used to test various functions of the OpenSSL library directly from the bash shell without writing any code. It is also used as a troubleshooting tool.
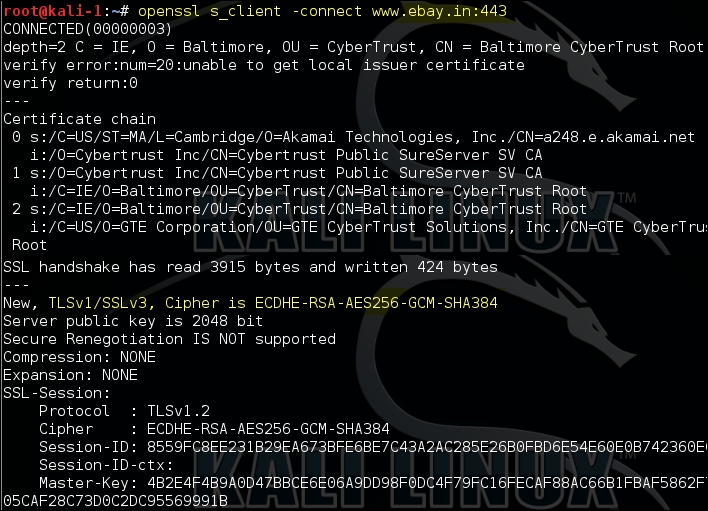
In the following example, we are using the s_client command-line option that establishes a connection to the remote server using SSL/TLS. The output of the command is difficult to interpret for a newbie but is useful to identify the TLS/SSL version and cipher suites agreed between the server and the client:
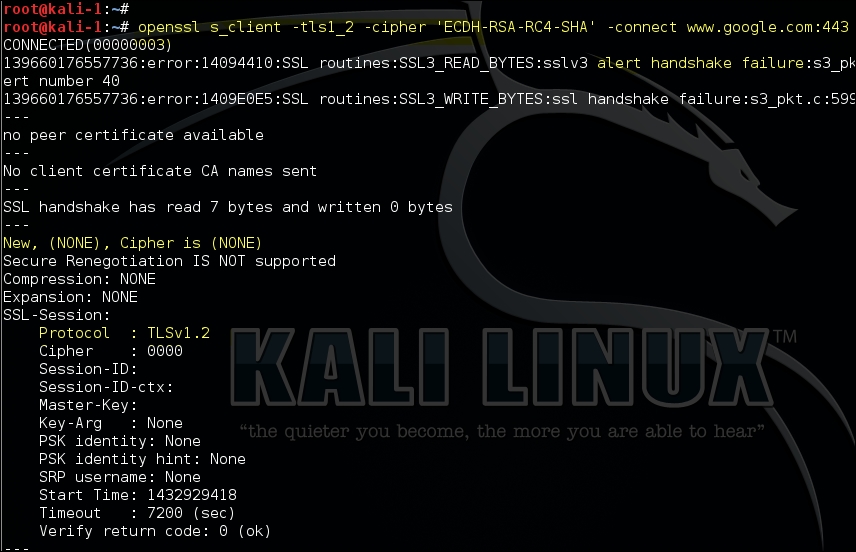
The OpenSSL utility contains various command-line options that can used to test the server using specific SSL versions and cipher suites. In the following example, we are trying to connect using TLS Version 1.2 and a weak algorithm, RC4:
openssl s_client –tls1_2 –cipher 'ECDH-RSA-RC4-SHA' –connect <target>:port
The following screenshot shows the output of the command. Since the client could not negotiate with the ECDH-RSA-RC4-SHA cipher suite, the handshake failed and no cipher was selected:
In the following screenshot, we are trying to negotiate a weak encryption algorithm with the server, and it fails as Google has rightly disabled the weak cipher suites on the server:
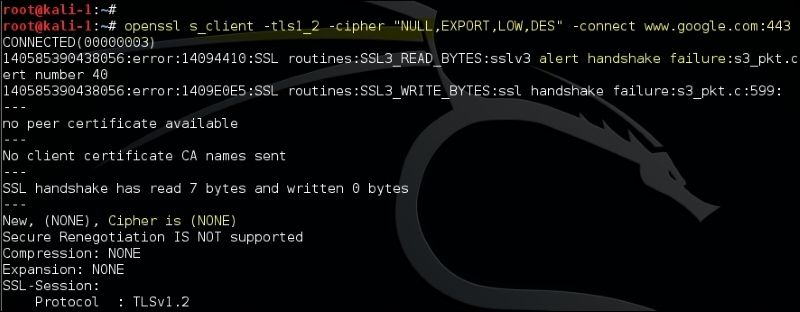
To find out the cipher suites that are easily breakable using the computing power that is available today, type in the command as shown in the following screenshot:
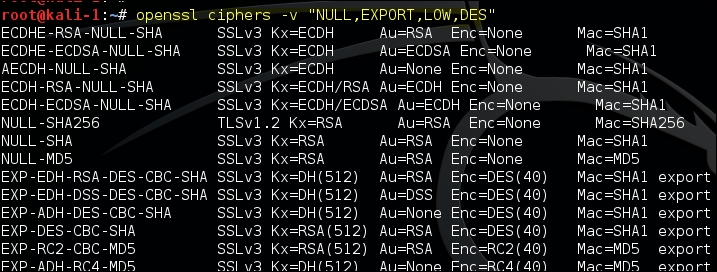
You would often see cipher suites written as ECDHE-RSA-RC4-MD5. The format is broken down into the following parts:
- ECDHE: This is a key exchange algorithm
- RSA: This is an authentication algorithm
- RC4: This is an encryption algorithm
- MD5: This is a hashing algorithm
A comprehensive list of SSL and TLS cipher suites can be found at the following URL:
Although the OpenSSL command-line tool provides many options to test the SSL configuration, the output of the tool is not user friendly. The tool also requires a fair amount of knowledge about the cipher suites that you want to test.
Kali Linux comes with many tools that automate the task of identifying SSL misconfigurations, outdated protocol versions, and weak cipher suites and hashing algorithms. One of the tools is the SSLScan that is found at Applications | Information Gathering | SSL Analysis.
By default the tool checks if the server is vulnerable to the CRIME and heartbleed vulnerabilities. The –tls option will force the SSLScan to only test the cipher suites using the TLS protocol. The output is distributed in various colors, with green indicating that the cipher suite is secure and the sections colored in red and yellow trying to attract your attention:
The cipher suites supported by the client can be identified by running the following command. It will display a long list of supported ciphers by the client:
sslscan –show-ciphers www.example.com:443
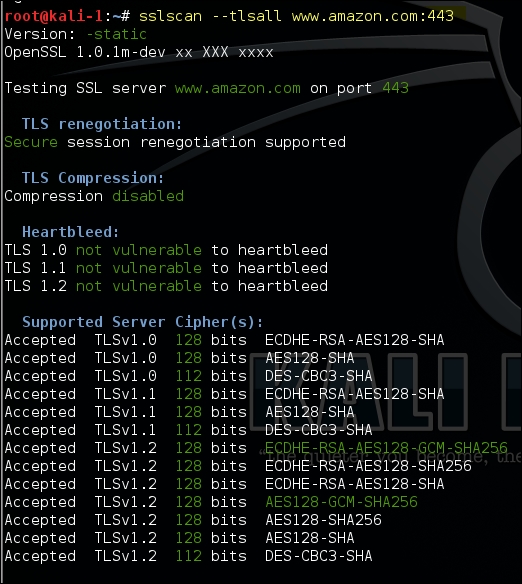
If you want to analyse the certificate-related data, use the following command that would display detailed information of the certificate:
sslscan --show-certificate --no-ciphersuites www.amazon.com:443
The output of the command can be exported in an XML document using the –xml=<filename> option.
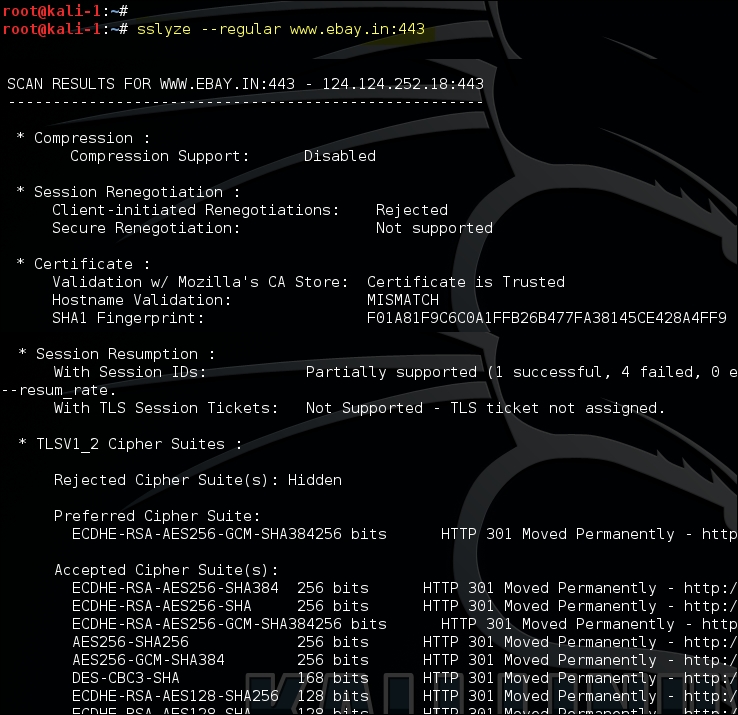
Another interesting tool that comes with Kali Linux that is helpful in analysing the SSL configuration is the SSLyze tool released by iSEC Partners. The tool is hosted on GitHub at https://github.com/iSECPartners/sslyze and can be found in Kali Linux at Applications | Information Gathering | SSL Analysis. SSLyze is written in Python language.
The tool comes with various plugins that help in testing the following:
- Checking for older versions of SSL
- Analysing the cipher suites and identifying weak ciphers
- Scanning multiple servers using an input file
- Checking for session resumption support
Using the –regular option would include all the common options that we are interested in, such as testing of insecure cipher suites, identifying if compression is enabled, and several others.
In the following example, compression is not supported by the server and the certificate issued was found to be issued from a trusted CA. The output also lists the accepted cipher suites:
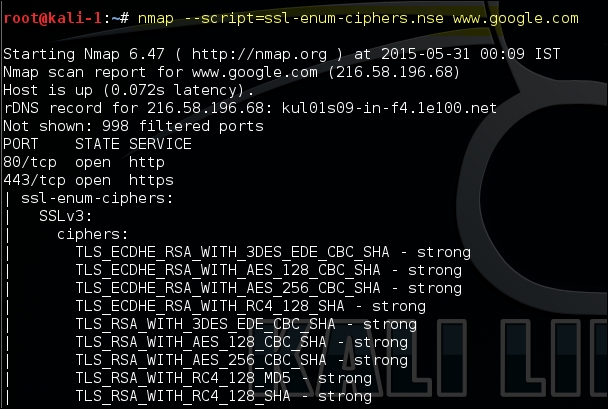
Nmap includes a script known as ssl-enum-ciphers, which can identify the cipher suites supported by the server and also rates them based on the cryptographic strength. It makes multiple connections using SSLv3, TLS 1.1, and TLS 1.2. The script will also highlight if it identifies that the SSL implementation is vulnerable to any previously released vulnerabilities such as CRIME and POODLE:
The SSL Server Test (https://www.ssllabs.com/ssltest/) is an online tool hosted by Qualys that performs deep analysis of the SSL configuration of a website. If you want to test a publicly exposed web server and you are comfortable with a tool hosted by another organisation identifying weakness in your implementation then this free tool is highly recommended.
Exploiting a weak cipher suite can only be done by a dedicated and highly skilled attacker, as it requires multiple things to be lined up together:
- The vulnerable server should be reusing the key for a longer time
- You need the computing power to break the key
- You need to find a client on which you can attempt a man-in-the-middle attack
Although exploiting weak cipher suites is difficult, you should not be complacent and disable it on your web servers because you are only as secure as your weakest link.
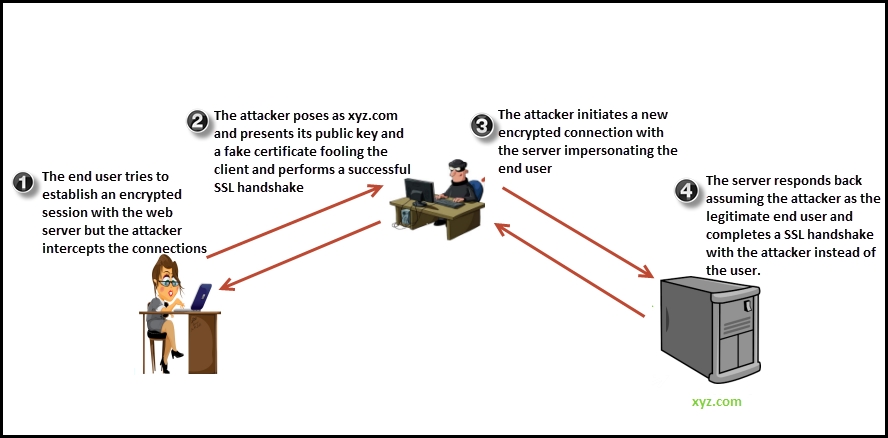
A man-in-the-middle (MITM) attack is an old school trick to redirect the information flow through an attacker controlled machine where the attacker can sniff and manipulate the data before forwarding it to its destination.
If the attacker has access to the communication link between the end user and the web server, a MITM attack is possible. The first question that comes to mind is, how is the attacker able to decrypt the data? Since the client browser encrypts the data before sending it, it can only be decrypted by a private key that is securely stored on the server. In short, the attacker is able to decrypt the data because it sits between the end user and the web application impersonating both. By impersonating the real server, the browser thinks that it is talking to the server on an encrypted channel, but in reality the encrypted channel is terminated at the attacker's machine where the attacker decrypts the data, sniffs sensitive information re-encrypts the data, and forwards it to the server.
The attacker impersonating the real server presents a fake certificate (since it does not have the private keys of the real server) to the end user, the public key of which is used to encrypt data by the client. Since the attacker has the private key to that public key, they are able to decrypt the data.
The attacker then creates a new SSL connection to the real server impersonating the client and authenticates against the legitimate certificate presented by the server.
An illustration of the attack is shown in the following diagram:
The certificate authority system is the missing part of the puzzle that makes tricking the user to initiate an encrypted session with the attacker a bit difficult. When the attacker presents the fake certificate to the user, a warning is displayed on the browser informing the user that the server he is connecting to could possibly be a fake server since the certificate is not signed by a certificate authority trusted by you.
A successful MITM on the SSL is only possible in the following scenarios:
- The client trusts an untrustworthy CA who issued a fake certificate, preventing the warning from appearing on the user's browser. This is possible as the CA system may have been hacked by the attacker.
- The client creates an encrypted session despite the warning appearing on the browser.
- The client system itself may have been hacked and a fake CA root certificate installed on it. Any certificate generated by this CA would not display a warning on the browser.
There are several tools in Kali Linux that can be used to intercept and circumvent an encrypted communication. Three of the well-known tools are listed next. SSLsplit and SSLsniff use a common technique to defeat the encryption while the SSLstrip tool uses a unique way to circumvent the SSL connection:
- SSLsplit
- SSLstrip
- SSLsniff
SSLsplit is a transparent SSL MITM tool. It intercepts the SSL connection and pretends to be the server by generating a certificate on the fly. It is also useful in intercepting encrypted connections of protocols such as SMTP, IMAP, and FTP.
The first requirement to intercept and decrypt the SSL connection is the attacker successfully being able to redirect the traffic from the victim's machine to a system under his control which can be achieved in the following different ways:
- Tricking the user into changing the default gateway of his machine thus redirecting all the traffic
- Using the ARP spoofing technique which would incorrectly map the default gateway to the attacker's machine
- Modifying entries in the host's file and mapping the domain name that you want to intercept the traffic for to the attackers IP address
- Compromising the DNS entries to redirect traffic
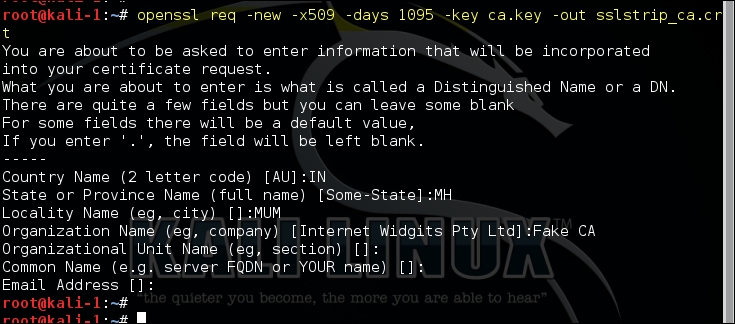
The SSLsplit tool is found at Applications | Sniffing & Spoofing | Spoofing and MITM. This tool requires a self-signed root CA certificate that is used to sign certificates of individual websites on the fly. This root certificate should also be pushed in the certificate trust store of the victim's computer to avoid a warning from appearing on the browser. The self-signed CA certificate and its private key can be generated using the OpenSSL command-line tool that we discussed earlier.
The following command will generate a 2048 bit RSA private key:

The next command will build a certificate using the private key generated in the previous step. It will also ask a number of questions that are typically asked when generating a certificate, as shown in the following screenshot:
Once the victim's machine is redirecting the traffic and the root CA certificate is ready, you need to divert the HTTP data to a port on which the SSLsplit is listening.
Since we are only interested in the SSL traffic, we need to configure a NAT rule for SSL-based traffic, which would redirect it to a port on which SSLsplit is listening instead of directly transferring it to the default gateway. You also need to enable IP forwarding on the attacker's machine, which will divert IP packets that are destined for a different IP address and port to the default gateway configured on the machine:

The NAT table entry can be verified using the following command:
iptables -t nat –list
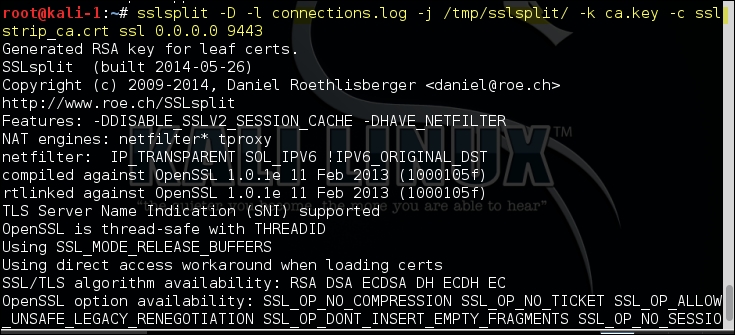
After configuring the redirection of the traffic, we need to start SSLsplit with the relevant options. The most useful options that we use are as follows:
-l: This logs every connection to a file-j: This logs the content of the connection to a chrooted directory-k: This uses the private key specified after this keyword-c: This uses the certificate specified after the keyword
The following screenshot shows the output generated by these commands:
SSL stripping is a technique to defeat the SSL encryption using an MITM attack. While the SSLsplit tool intercepts the traffic and presents a fake certificate to the user, the SSL stripping technique tricks the user into believing that the server accepts unencrypted data. When the user sends the data over an unencrypted channel, the attacker can easily sniff it and then create a legitimate SSL connection to the server pretending to be the user.
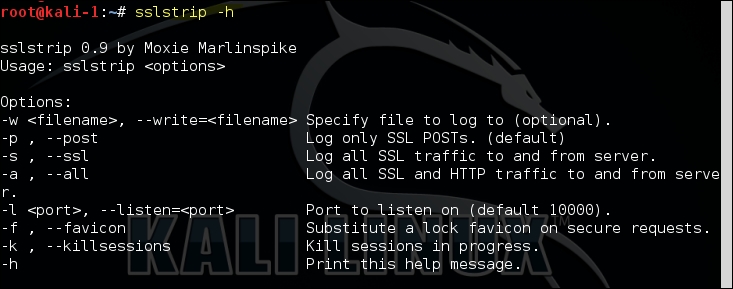
The SSLstrip tool in Kali Linux can perform the SSL stripping attack. It is located at Applications | Sniffing & Spoofing | Spoofing and MITM.
Since this technique relies on a successful MITM attack, the attacker should first be able to redirect the network traffic from the victim's machine to a machine under his control. The attacker can use tools such as arpspoof or Ettercap for MITM. Once this is done, you also need to configure the iptables to redirect the traffic to the port on which SSLstrip is listening as shown in the SSLsplit example. Then, you can start the tool with the –l option:
Sslstrip –l <listen port>
As shown in the following screenshot, you can specify a different port than the default one and redirect the intercepted data to a file:
SSL stripping exposed a fundamental flaw and a fix was needed, which led to a new web security mechanism known as HTTP Strict Transport Security (HSTS). This mitigation technique used an additional header known as Strict-Transport-Security header. The website informs the client, using this header, to connect only using SSL. This was an opt-in security mechanism so it worked only with websites and browsers that supported this header. If the client is using an older browser or the website does not add the header, the SSLstrip tool would still work.
Also, if the client is connecting to the website for the first time, SSLstrip can run a MITM attack and prevent the HSTS header from reaching the client. To mitigate this, websites can be included in a prebuilt list that is stored in a browser that supports HSTS. The chrome browser offers a quick way to check the HSTS status of a domain at the page chrome://net-internals/#hsts.