
In the previous section, we built a very basic RESTful web API by using JAX-RS. In this section, we will enhance this example by introducing more realistic real-life use cases. We will add a department model class to the application and then introduce the REST APIs to perform the CRUD operations on the department object.
We will use the DEPARTMENT table from the HR database schema as the data source for this example. This example uses the Java Persistence API (JPA) for mapping the database table with the Java objects. JPA is a specification for the persistence of Java objects to any relational data store. If you are not familiar with JPA, read the official documentation available at https://docs.oracle.com/javaee/7/tutorial/persistence-intro.htm.
Here are the detailed steps for building a model for the project:
- Open the rest-chapter3-service project that we built in the previous section in the NetBeans IDE (if it is not opened).
- Add a department JPA entity class to the project. To do this, right-click on the rest-chapter3-service project opened in the Projects pane and then navigate to New | Entity Classes from Database from the menu.
- On the Database Table screen, you can choose a data source to which your application wants to connect. We will use the HR schema for this example. If you have not yet created the data source for connecting to the HR database schema, perform the following steps:
- To connect to the HR database schema, click on the Data Source drop-down list and select the New Data Source option.
- In the Create Data Source dialog, enter the JNDI field (for example, HRDS) and then select New Database Connection from the Database Connection drop-down list. You will see a New Connection wizard window now. In the Locate Driver screen, click on the Oracle Thin driver, and add the path to the folder where you have downloaded ojdbc7.jar. Click on Next to continue with the wizard.
-
- On the Customize Connection screen, enter the connection details to connect to your local Oracle XE instance (or any Oracle database, which has the HR schema). This is shown in the following screenshot. The parameter that you enter on this screen depends on your Oracle database settings. Click on the Finish button to create the connection. Once the connection is created, the wizard will take you back to the Database Tables screen:

- On the Database Tables screen, choose the data source that you have created for connecting to the HR database schema (for example, HRDS). Uncheck the Include Related Tables checkbox as we want to generate the model only for the DEPARTMENTS table for this project. Select the DEPARTMENTS table and shuttle it to the right. Click on Next to generate the entity class for the selected table.
- On the Entity Classes creation screen, change the package to com.packtpub.rest.ch3.model and leave all other default values as is; then click on Next to continue.
- On the Mapping Options screen, check Generate Fields for Unresolved Relationships and click on Finish to generate the entity class and standard JPA configuration files such as the persistence.xml file. The IDE now has Departments.java and persistence.xml:
- Departments.java: This file is a JPA entity class mapped to the DEPARTMENTS table.
- persistence.xml: This file is a standard configuration file in JPA. It is located in the META-INF folder of the project source.
In this part of the tutorial, we will convert the DepartmentService POJO class that we created in the first part to a stateless session bean by annotating it with the @javax.ejb.Stateless annotation. A stateless session bean (being an Enterprise JavaBean) offers declarative security, container-managed transactions, and instance-pooling capabilities. Next, add a method that returns a list of departments queried from the DEPARTMENTS table by using the JPA.
With the introduction of the JPA entity into the DepartmentService class, we will need the javax.persistence.EntityManager instance to manage the entities. You can use the @PersistenceContext annotation to inject the EntityManager instance into the stateless session bean. As the last step in this exercise, you should define methods that use the standard JPA APIs to perform the CRUD operations on the Departments entity and expose them as REST APIs. The implementation of DepartmentService now looks like the following:
package com.packtpub.rest.ch3.service;

import com.packtpub.rest.ch3.model.Departments;
import java.util.List;
import javax.ejb.Stateless;
import javax.persistence.EntityManager;
import javax.persistence.PersistenceContext;
import javax.ws.rs.GET;
import javax.ws.rs.Path;
import javax.ws.rs.Produces;
import javax.ws.rs.core.MediaType;

@Path("departments")
@Stateless
public class DepartmentService {
//Inject EntityManager instance
  @PersistenceContext(unitName =
    "com.packtpub_rest-chapter3-service_war_1.0-
       SNAPSHOTPU")
  private EntityManager entityManager;

  //Method that responds to HTTP GET request
  //Returns list of departments
  @GET
  @Produces(MediaType.APPLICATION_JSON)
  public List<Departments> findAllDepartments() {
    //Find all departments from the data store
    javax.persistence.criteria.CriteriaQuery cq =
      entityManager.getCriteriaBuilder()
        .createQuery();
    cq.select(cq.from(Departments.class));
    List<Departments> departments =
      entityManager.createQuery(cq).getResultList();
    return departments;
  }

  //Method that responds to HTTP POST request
  //Creates a new department object
  @POST
  @Consumes(MediaType.APPLICATION_JSON)
  public void createDepartment(Departments entity) {
    entityManager.persist(entity);
  }

  //Method that responds to HTTP PUT request
  //Modifies the department identified by 'id' path param
  @PUT
    @Path("{id}")
  @Consumes(MediaType.APPLICATION_JSON)
  public void editDepartment(@PathParam("id") Short id,
    Departments entity) {
    entityManager.merge(entity);
  }

  //Method that responds to HTTP DELETE request
  //Removes the department identified by 'id' path param
  @DELETE
  @Path("{id}")
  public void removeDepartment(@PathParam("id") Short id)
  {

    Departments entity =
      entityManager.find(Departments.class,
        id);
    entityManager.remove(entityManager.merge(entity));

  }

}
Wow... congratulations! You are done with the implementation.
To deploy and run the web application, you can right-click on the rest-chapter3-service project and click on Run. This will build and deploy the application to the integrated GlassFish server.
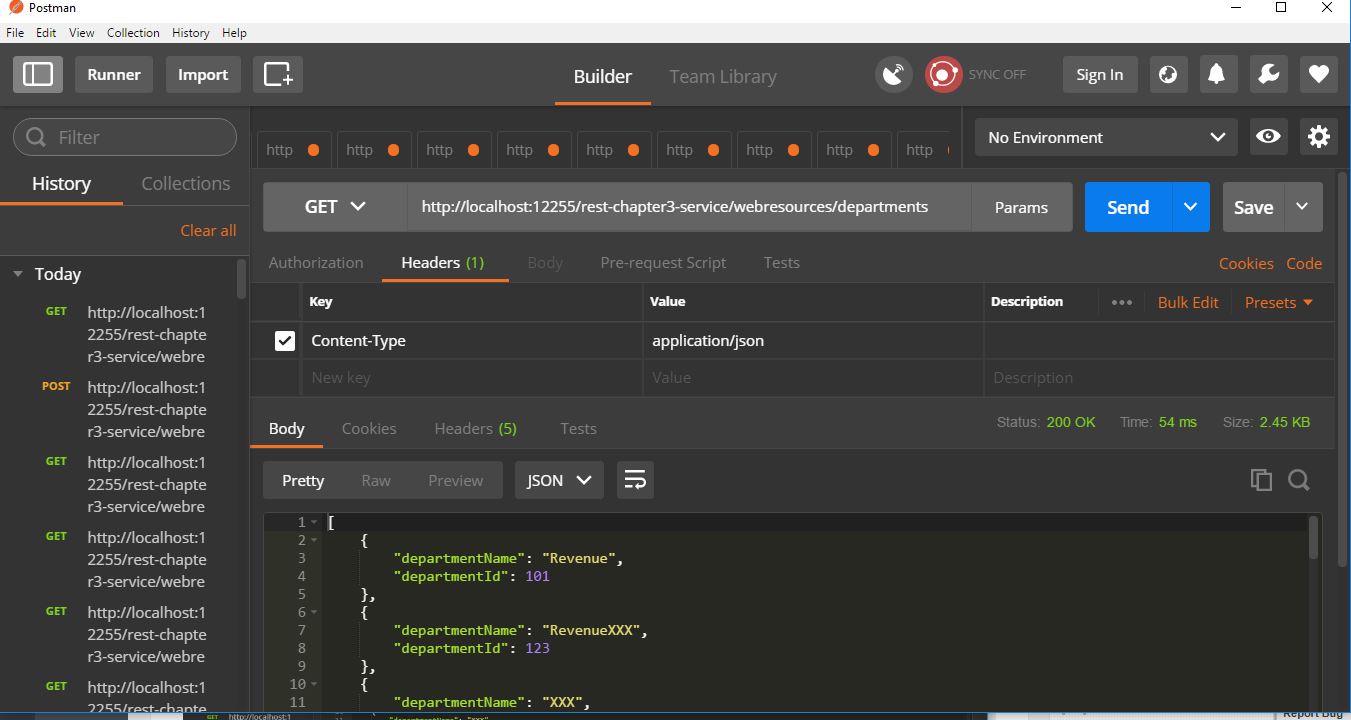
To test the REST API, you can either build a Java client or use one of the many ready-made REST client testing tools available in the industry today. Postman, a REST client, is a popular API testing tool, which comes as a Google Chrome extension. You can learn more about this tool at https://www.getpostman.com/.
The following screenshot demonstrates how you can use the Postman REST client for testing the GET operation on the /departments resource. Similarly, you can use Postman to test the other HTTP methods, such as PUT, DELETE, and POST, on the /departments resource:
The following table will help you to quickly identify the REST URI path for accessing each REST API used in this example. The REST URI paths shown in this table are subject to change on the basis of the actual server name and port used:
|
HTTP method |
Sample URI |
REST resource |
|
GET |
http://localhost:8080/rest-chapter3-service/webresources/departments |
DepartmentService:: findAllDepartments() |
|
POST |
http://localhost:8080/rest-chapter3-service/webresources/departments |
DepartmentService ::createDepartment(Departments) |
|
PUT |
http://localhost:8080/rest-chapter3-service/webresources/departments/300 |
DepartmentService :: editDepartment (Departments) |
|
DELETE |
http://localhost:8080/rest-chapter3-service/webresources/departments/30 |
DepartmentService :: removeDepartment(Short) |
We will look at the JAX-RS client APIs for building the REST API client in the next section.