
When building a VPC according to your requirements, the first step would be to log in to the AWS console and choose the correct region. We have already discussed how to choose a region in Chapter 2, The Fundamentals of Amazon Web Services, under the Choosing availability zones and regions section. After logging in, we can search for VPC and select it. For ease of access to VPC management across regions, we can always remember the naming schema that AWS uses in their URL, which as the follows:
https://{region}.console.aws.amazon.com/vpc/home?region={region}
For example, the US East (Ohio) region is also referred to as us-east-2, so the URL for the Ohio region would be as follows:
https://us-east-2.console.aws.amazon.com/vpc/home?region=us-east-2
On the other hand, the Asia Pacific (Singapore) region is also referred to as ap-southeast-1, so the URL for Singapore would be as follows:
https://ap-southeast-1.console.aws.amazon.com/vpc/home?region=ap-southeast-1
This naming schema will be quite common across all AWS services.
On the VPC Dashboard, you will have the ability to enumerate VPCs, Subnets, Route Tables, Internet Gateways, and so on in all regions, no matter what region you have connected to. This allows us to get a quick overview of the numbers of VPC objects that are created in your whole AWS environment:

To create a VPC, we can either select the Launch VPC Wizard button or create a VPC manually by navigating to each of the sections and creating each VPC object separately. While the VPC wizard is nice and can cover most usage scenarios, it does offer limited configuration options:
- A /16 VPC with a single /24 public subnet
- A /16 VPC with one /24 public and one /24 private subnet connected to the internet via a NAT instance
- A /16 VPC with one /24 public and one /24 private subnet connected to on-premises via VPN
- A /16 VPC with a single /24 private subnet connected to on-premises via VPN:

Although the VPC wizard will create all the required resources for us, we should consider building the VPC ourselves when we require more flexibility with the configuration. The following elements need to be planned and created for a VPC to function properly:
- VPC network CIDR with an IPv4 address range between /16 and /28
- An optional IPv6 block to be provided by Amazon
- Any requirement for a dedicated tenancy for the VPC
- The number and type of subnets and mapping of subnets to AZs
- The CIDRs for the subnets
- Number of public and private subnets
- NAT for private subnets
- Any special routing requirements
- The need for custom DNS, NTP, or NetBIOS settings
- The need for Elastic IPs
- Any needs for VPC endpoints
- Any VPC peering requirements
- VPN connectivity to on-premise or other locations
- Security considerations on NACL and security policy levels
All of these considerations will need to be determined and evaluated when building a custom VPC. This will ensure we have a plan that will allow for the creation of a compliant and reliable network architecture in the AWS cloud. To make your configuration even more reliable, you can consider building a CloudFormation template for your VPCs. We will discuss the concepts of CloudFormation and how to utilize it to build VPCs in one of the upcoming chapters of this book.
For now, let's focus on creating a VPC from the AWS Management Console. Let's navigate to the VPC Dashboard and select Your VPCs. You should notice that the URL to the Your VPCs section has an additional #vpcs: at the end to denote that part of the VPC Dashboard:
https://us-east-2.console.aws.amazon.com/vpc/home?region=us-east-2#vpcs:
Now, let's create a new VPC by clicking on Create VPC:

We will need to give our new VPC a name and a CIDR that we want to use within our VPC. We also have the option of selecting whether we would like to have an IPv6 CIDR added to the VPC and whether the VPC needs to have dedicated tenancy. For our purposes, we will leave these options at their defaults and click Yes, Create:

Once we have created the new VPC, we will need to create the subnets for the VPC. We need to navigate to the Subnets section of the VPC Dashboard and click on Create subnet. Once in the Create Subnet dialogue, we have the option to give the subnet a name and select the VPC in which we will be creating it. Please choose your newly created VPC here. Next, we will select the availability zone and create a new CIDR block for the subnet.
Please create four subnets in your desired region. Please make sure that two of the subnets are in availability zone a – in this example, the AZ is us-east-2a – and two in the availability zone b – in this example, that would be us-east-2b. Make sure you also assign non-overlapping IPv4 CIDR blocks to your AZs. In our example, we will create IP subnets (10.0.1.0/24 and 10.0.2.0/24) for two public subnets in AZs, that is, us-east-2a and 2us-east-b, respectively and CIDRs 10.0.100.0/24 and 10.0.101.0/24 for two private subnets in AZs, us-east-2a and us-east-2b, respectively:

After completing the creation of our subnets, we need to create an Internet Gateway to support internet connectivity to the public subnets. We need to navigate to the Internet Gateways section of the VPC Dashboard and click the Create internet gateway button. Once in the Create internet gateway dialogue, we simply need to name our IGW and click Create:

Once created, the IGW is detached. Now, we need to select the newly created IGW and attach it to our newly created VPC by clicking on Actions and selecting Attach to VPC:

In the Attach to VPC dialogue, we select our VPC and click on Attach:

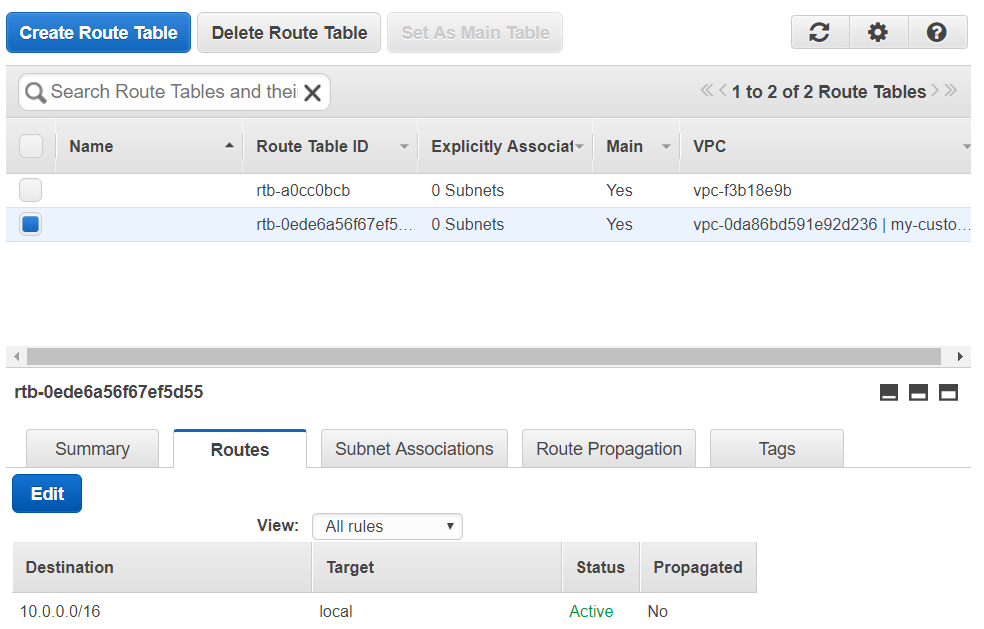
Now that we have attached the IGW to the VPC, we need to create a new route table so that our public subnets can have access to the internet. Navigate to the Route Tables section of the VPC Dashboard and select the route table that was created for your VPC. This route table is also called the main route table. It is predefined to allow all subnets within the 10.0.0.0/16 network to communicate with each other. All of the subnets that are created are associated with this route table by default.
Let's create a new route table by clicking on the Create Route Table button:
In the Create Route Table section, we need to give it a name and select our VPC, and then click Yes, Create:

Once the route has been created, we need to allow access to the internet via this route. Select the newly created route, click on the Routes tab, click Edit, and then click Add another route. We need to select our IGW as the target and 0.0.0.0/0 for the destination – this denotes all routes and is the default CIDR for the internet. Click on the Save button to put the new setting into effect:

Now, we need to associate our public subnets with this newly created route table. Select the Subnet Associations tab and click Edit. Select the subnets you want to make public and click Save:

We will now make sure that the public subnets will get public IPs automatically assigned to the instances that we spin up in the public subnets. This is an optional step, but we will make use of this feature in our future exercises. Navigate to the Subnets section of the VPC Dashboard, select the first one of your public subnets, click on Actions, and click on Modify auto-assign IP settings. We should also note the other options when clicking on Actions. You can see that, here, you are able to edit the subnet associations and tags, delete the subnet, and also create a flow log. Flow logs are very important when diagnosing connectivity issues as they can show the connection results for all the packets going in and out to targets within our subnet. VPC Flow logs do not give any insight into the packet content so if deep packet analysis is required, we would need to use a third-party tool:

Select the check mark next to Auto-assign IPv4 and click on Save. Make sure to repeat this step for the second public subnet:

We have now created the basic setup for a custom VPC that will provide the ability to spin up instances in two separate availability zones and thus provide high availability to our application. We have also created a public and private subnet in each region allowing, for hiding services such as databases and application servers that don't need to be accessible from the internet. We have multiple other options within the VPC configuration and you should take a look at the other options in the VPC Dashboard. For example, take a look at the option to create a DHCP options set. Here, we have the ability to create a custom setup with a custom domain name and custom DNS, NTP, and NetBIOS servers:

We also have the ability to allocate Elastic IPs if required in advance. When requiring an unchangeable IP address for any of our services, you can choose to allocate an Elastic IP for it. In the Allocate new address dialogue, we also have a nice feature that shows us the AWS CLI command for requesting a new EIP. Please note that, by default, all AWS accounts are limited to five Elastic IP addresses per region:

You can navigate to the Endpoints section to see how a service or other VPC endpoint can be created. Note the ease of configuring these features within the VPC Dashboard:

You are encouraged to explore all the features of the VPC endpoint at this stage and familiarize yourself with the options that the VPC Dashboard provides.