
Let's start out with facial detection. In our example, I'm going to use my friendly little French Bulldog, Frenchie, as our assistant. Tried to get my beautiful wife to do the honors but makeup, hair; well, I'm sure you know that story! Frenchie the Bulldog, however, had no complaints.
Before I start, please re-read the chapter title. No matter how many times you read it, you'll probably miss the key point here, and it's so very important. Notice it says facial detection and not facial recognition. This is so very important that I needed to stop and re-stress it. We are not trying to identify Joe, Bob, or Sally. We are trying to identify that, out of everything we see via our camera, we can detect a face. We are not concerned with whose face it is, just the fact that it is a face! It is so important that we understand this before moving on! Otherwise, your expectations will be so incorrectly biased (another buzzword for your checklist) that you'll make yourself confused and upset, and we don't want that!
Facial detection, as I will stress again later, is the first part of facial recognition, a much more complicated beast. If you can't identify that there are one or more faces out of all the things on the screen, then you'll never be able to recognize whose face that is!
Let's start things off by taking a quick look at our application:

As you can see, we have a very simple screen. In our case, the laptop camera is our video capture device. Frenchie is kindly posing in front of the camera for us, just standing there enjoying life. But, as soon as we enable facial tracking, watch what happens:

The facial features of Frenchie are now being tracked. What you see surrounding Frenchie are the tracking containers (white boxes), which tell us we know that there is a face and where it is, and our angle detector (red line), which provides some insight into the horizontal aspect of our face .
As we move Frenchie around, the tracking container and angle detector will track him. That's all well and good, but what happens if we enable facial tracking on a real human face? As you see here, the tracking containers and angles are tracking the facial figures of our guest poser, just like they did for Frenchie:

As our poser moves his head from side to side, the camera tracks this and you can see the angle detectors adjusting to what it recognizes as the horizontal angle of the face. In this case, you will notice that the Color space is in black and white and not color. This is a histogram back projection and is an option that you can change:

Even as we move farther away from the camera, where other objects come into view, the facial detector can keep track of our face among the noise, as shown in the following screenshot. This is exactly how the facial recognition systems you see in movies work, albeit more advanced; and, using the code and samples we'll show you shortly, you too can be up and running with your own facial recognition application in minutes! We'll provide the detection; you provide the recognition:

Now that we've seen how our application appears from the outside, let's look under the hood at what is going on.
Let's start by asking ourselves exactly what the problem is that we are trying to solve here. As we mentioned in previous sections, we are trying to detect (notice again I did not say recognize) facial images. While this is easy for a human, a computer needs very detailed instruction sets to accomplish this feat.
Luckily, there is a very famous algorithm called the Viola-Jones algorithm that will do the heavy lifting for us. Why did we pick this algorithm?
- It has very high detection rates and very low false positives.
- It is very good at real-time processing.
- It is very good at detecting faces from non-faces. Detecting faces is the first step in facial recognition!
This algorithm requires that the camera has a full frontal, upright view of the face. To be detected, the face will need to point straight towards the camera, not tilted and not looking up or down. Remember again; for the moment, we are just interested in facial detection!
To delve into the technical side of things, our algorithm will require four stages to accomplish its job. They are:
- Haar feature selection
- Creating an integral image
- AdaBoost training
- Cascading classifiers
Let's think about what facial detection actually accomplished. All faces, be it human, animal, or otherwise, share some similar properties. For example, the eye is darker than the upper cheeks, the nose bridge is brighter than the eyes, and your forehead may be lighter than the rest of your face. Our algorithm matches these intuitions up by using what is known as Haar features. We can come up with matchable facial features by looking at the location and size of the eyes, mouth, bridge of the nose, and so forth. However, we do have an obstacle.
In a 24x24 pixel window, there are a total of 162,336 possible features. Obviously, to try and evaluate them all would be prohibitively expensive in both time and computation, if it works at all. So, we are going to work with a technique known as adaptive boosting, or more commonly, AdaBoost. It's another one for your buzzword-compliant list. If you have delved into or researched machine learning, I'm sure you've heard about a technique called boosting. That's exactly what AdaBoost is. Our learning algorithm will use AdaBoost to select the best features and train classifiers to use them.
AdaBoost can be used with many types of learning algorithms and is considered the best out-of-the-box algorithm for many tasks where boosting is required. You usually won't notice how good and fast it is until you switch to a different algorithm and benchmark it. I have done this countless number of times, and I can tell you that the difference is very noticeable.
Let's give a little more definition to boosting before we continue.
Boosting takes the output from other weak-learning algorithms and combines them with a weighted sum that is the final output of the boosted classifier. The adaptive part of AdaBoost comes from the fact that subsequent learners are tweaked in favor of those instances that have been incorrectly classified by previous classifiers. We must be careful with our data preparation though, as AdaBoost is sensitive to noisy data and outliers (remember how we stressed those in Chapter 1, Machine Learning Basics). The algorithm tends to overfit the data more than other algorithms, which is why, in our earlier chapters, we stressed on data preparation for missing data and outliers. In the end, if weak learning algorithms are better than random guessing, AdaBoost can be a valuable addition to our process.
With that brief description behind us, let's look under the covers at what's happening. For this example, we will again use the Accord framework and we will work with the vision face tracking sample.
We start by creating a FaceHaarCascade object. This object holds a collection of Haar-like features' weak classification stages. There will be many stages provided, each containing a set of classifier trees which will be used in the decision-making process. We are now technically working with a decision tree. The beauty of the Accord framework is that FaceHaarCascade automatically creates all these stages and trees for us without exposing us to the details.
Let's see what a particular stage might look like:
 List<HaarCascadeStage> stages = new List<HaarCascadeStage>();
 List<HaarFeatureNode[]> nodes;
 HaarCascadeStage stage;
 stage = new HaarCascadeStage(0.822689414024353);
 nodes = new List<HaarFeatureNode[]>();
 nodes.Add(new[] { new HaarFeatureNode(0.004014195874333382,
   0.0337941907346249, 0.8378106951713562,
   new int[] { 3, 7, 14, 4, -1 },
   new int[] { 3, 9, 14, 2, 2 }) });
 nodes.Add(new[] { new HaarFeatureNode(0.0151513395830989,
   0.1514132022857666, 0.7488812208175659,
   new int[] { 1, 2, 18, 4, -1 },
   new int[] { 7, 2, 6, 4, 3 }) });
 nodes.Add(new[] { new HaarFeatureNode(0.004210993181914091,
   0.0900492817163467, 0.6374819874763489,
   new int[] { 1, 7, 15, 9, -1 },
   new int[] { 1, 10, 15, 3, 3 })
  });
 stage.Trees = nodes.ToArray(); stages.Add(stage);
Now don't let that scare you off. As you can see, we are building a decision tree underneath the hood by providing the nodes for each stage with the numeric values for each feature.
Once created, we can use our cascade object to create our HaarObjectDetector, which is what we will use for our detection. It takes:
- Our facial cascade objects
- The minimum window size to use when searching for objects
- Our search mode, given that we are searching for only a single object
- The re-scaling factor to use when re-scaling our search window during the search
HaarCascade cascade = new FaceHaarCascade();
detector = new HaarObjectDetector(cascade, 25,
  ObjectDetectorSearchMode.Single, 1.2f,
  ObjectDetectorScalingMode.GreaterToSmaller);
Now we are ready to tackle the topic of our video collection source. In our examples, we will simply use the local camera to capture all images. However, the Accord.NET framework makes it easy to use other sources for image capture, such as a .avi files, animated .jpg files, and so forth.
We connect to the camera, select the resolution, and are then ready to go:
VideoCaptureDevice videoSource = new
  VideoCaptureDevice(form.VideoDevice);
foreach (var cap in device.VideoCapabilities)
{

  if (cap.FrameSize.Height == 240)
  return cap;
  if (cap.FrameSize.Width == 320)
  return cap;
}
return device.VideoCapabilities.Last();
With the application now running and our video source selected, our application will look like this. Once again, enter Frenchie the Bulldog! Please excuse the mess; Frenchie is not the tidiest of assistants and he even left his empty cup of coffee on my table!
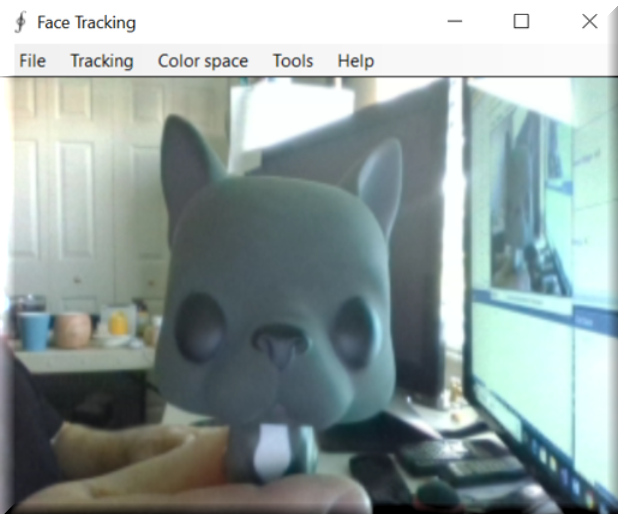
For this demonstration, you will notice that Frenchie is facing the camera, and in the background, we have two 55" monitors as well as many other items my wife likes to refer to as junk. I myself prefer to think of it as stochastic noise! This is done to show how the face detection algorithm can distinguish Frenchie's face amongst everything else. If our detector cannot handle this, it is going to get lost in the noise and be of little use to us.
With our video source now coming in, we need to be notified when a new frame is received so that we can process it, apply our markers, and so on. We do this by attaching to the NewFrameReceived event handler of the video source player. As a C# developer I am assuming that you are familiar with events such as this:
this.videoSourcePlayer.NewFrameReceived += new
  Accord.Video.NewFrameEventHandler
  (this.videoSourcePlayer_NewFrame);
Now that we have a video source and video coming in, let's look at what happens each time we are notified that a new video frame is available.
The first thing that we need to do is downsample the image to make it easier to work with:
ResizeNearestNeighbor resize = new ResizeNearestNeighbor(160, 120);
UnmanagedImage downsample = resize.Apply(im);
With the image in a more manageable size, we will process the frame. If we have not found a facial region, we will stay in tracking mode waiting for a frame that has a detectable face. Once we have found a facial region, we will reset our tracker, locate the face, reduce its size in order to flush away any background noise, initialize the tracker, and apply the marker window to the image. All of this is accomplished with the following code:
Rectangle[] regions = detector?.ProcessFrame(downsample);
if (regions != null && regions.Length > 0)
{
  tracker?.Reset();
  // Will track the first face found
  Rectangle face = regions[0];
  // Reduce the face size to avoid tracking background
  Rectangle window = new Rectangle(
    (int)((regions[0].X + regions[0].Width / 2f) * xscale),
    (int)((regions[0].Y + regions[0].Height / 2f) *
    yscale), 1, 1);
  window.Inflate((int)(0.2f * regions[0].Width * xscale),
    (int)(0.4f * regions[0].Height * yscale));
  // Initialize tracker
  if (tracker != null)
  {
    tracker.SearchWindow = window;
    tracker.ProcessFrame(im);
  }
marker = new RectanglesMarker(window);
marker.ApplyInPlace(im);
args.Frame = im.ToManagedImage();
tracking = true;
}
  else
  {
    detecting = true;
  }
Once a face is detected, our image frame looks like this:

If Frenchie tilts his head to the side, our image now looks like this:
