
Burp is primarily used to intercept HTTP(S) traffic; however, it is part of a larger suite of tools that has several additional functions, including the following:
- An application-aware spider that crawls the site
- A vulnerability scanner, including a sequencer to test the randomness of session tokens, and a repeater to manipulate and resend requests between the client and the website (the vulnerability scanner is not included with the free version of Burp Proxy that is packaged in Kali)
- An intruder tool that can be used to launch customized attacks (there are speed limitations in the free version of the tool included with Kali; these are removed if you purchase the commercial version of the software)
- The ability to edit existing plugins or write new ones in order to extend the number and type of attacks that can be used
To use Burp, ensure that your web browser is configured to use a local proxy; usually, you will have to adjust the network settings to specify that HTTP and HTTPS traffic must use the localhost (127.0.0.1) at port 8080.
After setting up the browser, open the proxy tool by running burpsuite in the Terminal and manually map the application in the Target tab. This is accomplished by turning off proxy interception, and then browsing the entire application. Follow every link, submit the forms, and log in to as many areas of the site as possible. Additional content will be inferred from various responses.
The site map will populate an area under the Target tab. Automated crawling can also be used by right-clicking on the site and selecting Spider This Host; however, the manual technique gives the tester the opportunity to become more familiar with the target, and it may identify areas to be avoided, such as /.bak files or .svn files, which penetration testers often overlook during assessment.
Once the target is mapped, define the Target - Scope by selecting branches within the site map and using the Add to Scope command. Once this is completed, you can hide items that are not of interest on the site map using display filters. A site map created of a target website is shown in the following screenshot:

Once spidering has been completed, manually review the directory and file list for any structures that do not appear to be part of the public website, or that appear to be unintentionally disclosed. For example, directories titled admin, backup, documentation, or notes should be manually reviewed.
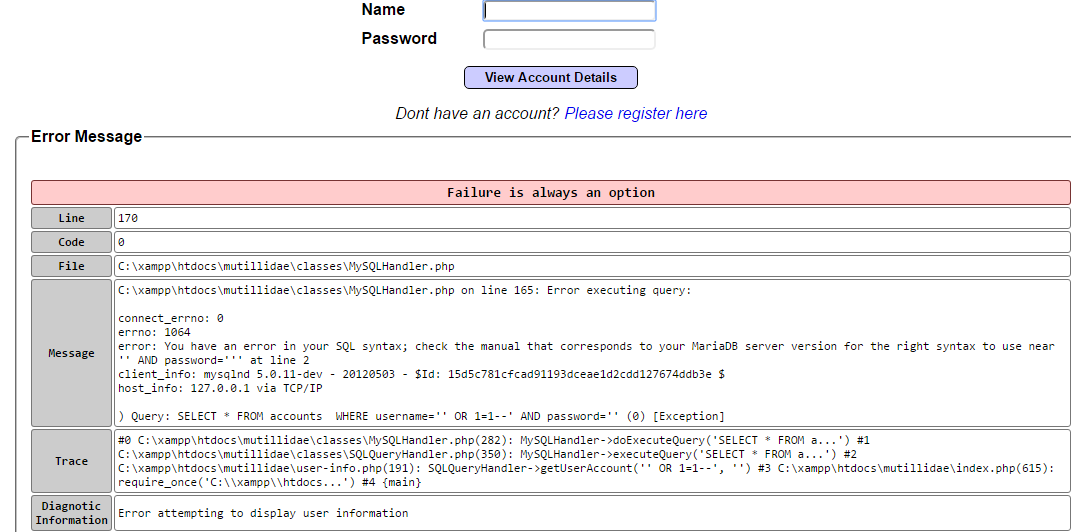
Manual testing of the login page using a single quote as the input produces an error code suggesting that it may be vulnerable to an SQL injection attack; a sample return of the error code is shown in the following screenshot:
The real strength of a proxy is its ability to intercept and modify commands. For this particular example, we'll use Mutillidae, the web application that we installed when building our virtual lab in Chapter 1, Goal-Based Penetration Testing, to perform an attack is to bypass SQL injection authentication.
To launch this attack, ensure that Burp Proxy is configured to intercept communications by going to the Proxy tab and selecting the Intercept subtab. Make sure that Intercept is on, as shown in the next screenshot. When this is completed, open a browser window and access the Mutillidae logon page by entering <IP address>/mutillidae/index.php?page=login.php. Enter variables in the Name and Password fields, and then click on the Login button.
If you return to Burp Proxy, you will see that the information that the user entered into the form on the webpage was intercepted:

Click on the Action button and select the Send to Intruder option. Open the main Intruder tab, and you will see four subtabs, Target, Positions, Payloads, and Options, as shown in the following screenshot:
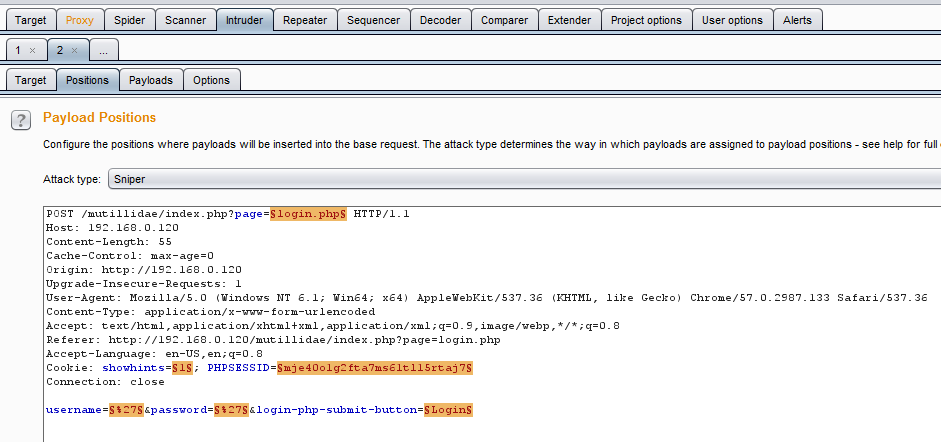
If you select Positions, you will see that five payload positions were identified from the intercepted information.
This attack will use Burp Proxy's sniper mode, which takes a single input from a list provided by the tester and sends this input to a single payload position at a time. For this example, we will target the username field, which we suspect is vulnerable based on the returned error message.
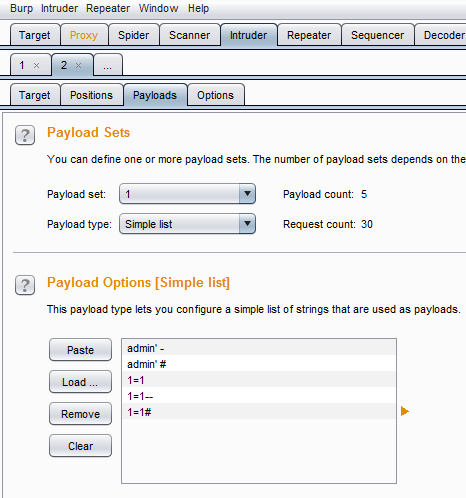
To define the payload position, we select the Payloads subtab:
To launch the attack, select Intruder from the top menu, and then select Start Attack. The proxy will iterate the word list against the selected payload positions as legitimate HTTP requests, and it will return the server's status codes.
As you can see in the following screenshot, most options produce a status code of 200 (request succeeded); however, some of the data returns a status code of 302 (request found; indicating that the requested resource is presently located under a different URI):

The 302 status indicates successful attacks, and the data obtained can be used to successfully log in to the target site.
Unfortunately, this is too brief of an overview of Burp Proxy and its capabilities. The free version included with Kali will suffice for many testing tasks; however, serious testers (and attackers) should consider purchasing the commercial version that provides the option of an automated scanner with reporting capabilities and plugins for automating tasks.