
In this section, we will be exploring the two important tools that are utilized by the attackers to maintain anonymity on the network. We will be focusing on Tor and Privoxy in this section.
Tor (www.torproject.org) is an open source implementation of the third-generation onion routing that provides free access to an anonymous proxy network. Onion routing enables online anonymity by encrypting user traffic and then transmitting it through a series of onion routers. At each router, a layer of encryption is removed to obtain routing information, and the message is then transmitted to the next node. It has been likened to the process of gradually peeling an onion, hence the name. It protects against traffic analysis attacks by guarding the source and destination of a user's IP traffic.
In this example, Tor will be used with Privoxy, a noncaching web proxy that sits in the middle of an application that communicates with the internet and uses advanced filtering to ensure privacy and remove ads and potentially hostile data being sent to the tester.
To install Tor, perform the following steps:
- Issue the apt-get update and apt-get upgrade commands, and then use the following command:
apt-get install tor
- Once Tor is installed, edit the proxychains.conf file located in the /etc directory. This file dictates the number and order of proxies that the test system will use on the way to the Tor network. Proxy servers may be down, or they may be experiencing a heavy load (causing slow or latent connections); if this occurs, a defined or strict ProxyChain will fail because an expected link is missing. Therefore, disable the use of strict_chain and enable dynamic_chain, which ensures that the connection will be routed, as shown in the following screenshot:

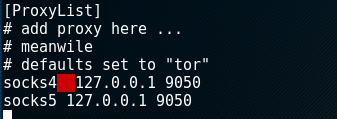
- Edit the [ProxyList] section to ensure that the socks5 proxy is present, as shown in the following screenshot:
Open proxies can be easily found online (an example would be https://www.proxynova.com/proxy-server-list/) and added to the proxychains.conf file. Testers can take advantage of this to further obfuscate their identity. For example, if there are reports that a certain country or block of IP addresses has been responsible for recent online attacks, look for open proxies from that location and add them to your list or a separate configuration file.
- To start the Tor service from a Terminal window, enter the following command:
# service tor start
- Verify that Tor has started by using the following command:
# service tor status
It is important to verify that the Tor network is working and providing anonymous connectivity.
- Verify your source IP address first. From a Terminal, enter the following command:
# firefox www.whatismyip.com
This will start the Iceweasel browser and open it to a site that provides the source IP address connected with that web page.
- Note the IP address, and then invoke Tor routing using the following ProxyChains command:
# proxychains firefox www.whatismyip.com
In this particular instance, the IP address was identified as xx.xx.xx.xx. A whois lookup of that IP address from a Terminal window indicates that the transmission is now exiting from a Tor exit node, as shown in the following screenshot:

Although communications are now protected using the Tor network, it is possible for a DNS leak to occur, which occurs when your system makes a DNS request to provide your identity to an ISP. You can check for DNS leaks at: www.dnsleaktest.com.
Most command lines can be run from the console using proxychains to access the Tor network.
When using Tor, some considerations to be kept in mind are as follows:
- Tor provides an anonymizing service, but it does not guarantee privacy. Owners of the exit nodes are able to sniff traffic and may be able to access user credentials.
- Vulnerabilities in the Tor browser bundle have reportedly been used by law enforcement to exploit systems and gain user information.
- ProxyChains do not handle UDP (User Datagram Protocol) traffic.
- Some applications and services cannot run over this environment—in particular, Metasploit and nmap may break. The stealth SYN scan of nmap breaks out of ProxyChains and the connect scan is invoked instead; this can leak information to the target.
- Some browser applications (ActiveX, Adobe's PDF applications, Flash, Java, RealPlay, and QuickTime) can be used to obtain your IP address.
- Attackers can also use random chaining. With this option, ProxyChains will randomly choose IP addresses from the our list (local Ethernet IP, for example, 127.0.0.1, 192.168.x.x or 172.16.x.x) and use them for creating our ProxyChain. This means that each time we use ProxyChains, the chain of proxies will look different to the target, making it harder to track our traffic from its source.
- To do so, in a similar fashion, edit the /etc/proxychains.conf file and comment out dynamic chains and uncomment random_chain, since we can only use one of these options at a time.
- In addition, attackers can uncomment the line with chain_len, which will then determine the number of IP address in the chain while creating a random proxy chain.
This technique can be engaged by attackers to establish a qualified anonymity and then remain anonymous over the network.