
Chapter 8: Attacking Wi-Fi, Bluetooth, and BLE
In this chapter, we will learn how to peek and poke into the network connection of an embedded system. Embedded systems use more diverse network types and media in addition to their usual IP/Ethernet/Wi-Fi. We will peek into the most usual types (Ethernet, TCP/IP, HTTPS, Bluetooth, Wi-Fi, and USB) and look into the solutions available for the more custom types, such as unknown radio links, sound, and so on. Networking is usually a very interesting field to look into since developers tend to make mistakes here too, which allows us to peek into the internal workings of the systems and their relationship with the digital world.
In this chapter, we will cover the following topics:
- Basics of networking
- Networking in embedded systems using Wi-Fi
- Networking in embedded systems using Bluetooth
Let's get started!
Technical requirements
For this chapter, we will need the following:
- A Linux laptop with a Wi-Fi card and an Ethernet card to act as a Wi-Fi gateway. Depending on your requirements, it is possible that the Wi-Fi card that is embedded in your laptop has not been adapted for the test. You need a card that supports raw injection (for example, based on an Atheros AR9271, Ralink RT3070, or Realtek 8187L, though you will have to search on your own to find an adequate one. Alfacards sell adapters that are usually targeted at injection).
- Hardware capable of sniffing Bluetooth traffic (I use an Ubertooth One), with a Bluetooth 4.0 capable dongle and BBlueZ installed.
Check out the following link to see the Code in Action video:
Basics of networking
Networking relies on a few basic concepts:
- Encapsulation: Just like a matryoshka doll, network packets behave like a box in a box in a box in a... you get the point. The OSI model describes the seven classics layers of encapsulation that are potentially present in all communications. For example, it is possible to change the physical layer of a packer without impacting the upper layer (that is what happens when you send an ethernet frame over Wi-Fi, for example).
- Routing: Routing allows a packet to reach its destination without the sender knowing exactly how to get to it or the destination knowing exactly how to send the response to the sender. This boils down, in a very oversimplified fashion, to each machine knowing how to reach a given number of networks (or groups of networks) and having a machine to give packets to when it doesn't know how to reach the destination network.
- Connection: A connection is a logical link that's established between two devices, where both are aware of the other system being connected to another and of the state of data transfer between the two. A well-known protocol that behaves in a connected way is TCP (as opposed to UDP, where the connection state is not kept by the systems).
Now, let's look at networking in embedded systems using Wi-Fi.
Networking in embedded systems using Wi-Fi
Wi-Fi is a well-known radio network that is used by a lot of embedded systems. We will learn how to intercept traffic by mounting our own access point and listening and changing the traffic that goes through it. The methodology we will use is common to most Wi-Fi traffic analysis (phone apps, connected devices, and so on).
Selecting Wi-Fi hardware
Just like for Wi-Fi attacks, not every Wi-Fi chipset is capable of doing everything we need. Depending on your device requirements, it is possible that you may have to buy some specific hardware:
- Check that your hardware is compatible with the Wi-Fi band used by your device (a/b/g/n).
- Check that your device supports injection: https://www.aircrack-ng.org/doku.php?id=compatible_cards.
- Check that your hardware driver supports Access Point (AP) mode. You can check if the following command outputs something:
$sudo iw list|sed -n -r '/ace modes/,/^ [^ ]/p'
If the output is empty, you should get another device that supports injection:
$airmon-ng start wlan0 # sets it in monitor mode
$aireplay-ng --test wlan0mon
If the output say 0%, you should get another device.
Creating our access point
We will create an access point for the device to connect to.
In terms of Wi-Fi, the device must want/offer the following:
- The device offers a Wi-Fi network of its own
- The device joins a network that we can control
- The device looks for a specific network to join
In terms of functionality, the device needs, at the very least, the following:
- DHCP
- DNS
- Routing
Some other services may be needed, depending on the specific device.
Control on the joined network
To create our access point, we will use hostapd (a piece of software that will allow us to easily create and manage the access point). Before we create our network, we will need to know which cipher the device supports (WEP or the WPA family) in order to create a network it can connect to. Depending on the country the system comes from and your country of residence, you may have to tweak the country code of your Wi-Fi for it to work.
Creating the access point and the basic network services
First, set up your machine's own local network and routing. Then, create your hostapd configuration file like so (you should adapt it to your needs; that is, change your country, the needed cipher family, and so on. Type man 5 hostpad.conf into a Terminal to get an explanation of the different directives):
#Wifi interface, the names appears in the command : ip addr
interface=wlx00c0ca1a03ef
#Name of the AP
ssid=hostile_wifi_do_not_connect
#Channel
channel=8
#mode (g is 2.4GHz, 54Mbps)
hw_mode=g
driver=nl80211
#where you live
country_code=BE
# 3 is wep and wpa
auth_algs=3
#wpa2
wpa=2
#preshared keys
wpa_key_mgmt=WPA-PSK
rsn_pairwise=CCMP
#the password
wpa_passphrase=TestPass
Now, we are going to create the configuration file for dnsmasq. This will allow us to provide DNS and DHCP services to the newly created network (type man 8 dnsmasq for the details of the configuration. There is a lot there, but you should only need to change non-obvious values). The following is the contents of the dnsmasq.conf file:
#dhcp
#listen on the wifi interface, the names appears in the command : ip addr
interface=wlx00c0ca1a03ef
dhcp-authoritative
#we will give adresses in this range, for 24 hours
dhcp-range=192.168.254.2,192.168.254.3,24h
# Log DHCP transactions.
log-dhcp
#dhcp add services
#gateway
dhcp-option=option:router,192.168.254.1
#subnet
dhcp-option=option:netmask,255.255.255.252
#dns server
dhcp-option=option:dns-server,192.168.254.1
#dns
listen-address=192.168.254.1
#spoofed DNS entries
addn-hosts=./spoof.hosts
# log dns
log-queries
Let's create a shell script that launches the access point, gives it an IP, launches dnsmasq, and tells our machine to act as an IPV4 NATting router. The following is the code from the ap.sh file:
#! /bin/bash
#change to the name of your device
WIFIIFACE=wlx00c0ca1a03ef
#change to the name of your output interface
OUTIFACE=eth0
#enables ipv4 routing
echo 1 > /proc/sys/net/ipv4/ip_forward
hostapd ./hostapd.conf &
ip addr flush dev $WIFIIFACE
ip addr add 192.168.254.1/24 dev $WIFIIFACE
dnsmasq --no-daemon --log-queries -C dnsmasq.conf
iptables -t nat -A POSTROUTING -o $OUTIFACE -j MASQUERADE
At this point, when you launch this script, a Wi-Fi AP with the name hostile_wifi_do_not_connect should appear. You should be able to connect to it and navigate normally.
However, at this point, we cannot access the traffic with an attack proxy (for example, ZAP from OWASP) or by redirecting the traffic to our custom services. We can achieve this by having the attack proxy listening on a reachable interface (here, 192.168.0.2 is on the eth0 side of the capturing access point, on ports 8080 and 8443) and modifying our script so that it redirects all the traffic over ports 80 and 443 to the proxy with firewall rules (or by providing a proxy in the DHCP settings (for more information, read about the Web Proxy Auto-Discovery (WPAD) protocol and pac files; you can add it to the dnsmasq configuration file with dhcp-option 252)):
ATK_PROXY_IP=192.168.0.2
iptables -t nat -A PREROUTING -i $WIFIIFACE -j DNAT -p tcp --dport 80 --to-destination $ATK_PROXY_IP:8080
iptables -t nat -A PREROUTING -i $WIFIIFACE -j DNAT -p tcp --dport 443 --to-destination $ATK_PROXY_IP:8443
You can redirect any connection like this – just change the ports to a server that's adequate for the protocol (ZAP will work for HTTP/S, but you may need to write your own for more specific services).
At this point, you should be able to log all the traffic from the device and tamper with it with "normal" network tools (ettercap, ZAP proxy, nmap, and so on) that are very well-documented all over the internet.
Other Wi-Fi attacks
Some other attacks exists, but they usually target the Wi-Fi infrastructure, not the device. An excellent introduction book is Vivek Ramachandran's Wireless Penetration Testing Beginner's Guide.
Networking in embedded systems using Bluetooth
Many devices have Bluetooth connectivity available, from phones to headsets to input devices. Let's see what we can look at with this interface.
Bluetooth basics
Bluetooth is a radio protocol that operates between 2.4 and 2.48 GHz. It is not easy to sniff because it is transmitted by hopping on multiple frequencies pseudorandomly (depending on the address of the master device) and has several variants:
- BT/1.x (2000), also known as the ancestor: This has not been deployed in new products for a long time. It had privacy problems since it was sending a unique ID over the air.
- BT/2.x (2004), also known as classic Bluetooth: This has been around for years and is "kind of" kept in the hands of the big players of the market. This is the doing of Apple since, to be able to be used by iPhones, you have to send an entry ticket to them (called the MFi). It is faster than BT1 and introduces a better pairing system and effort in terms of energy consumption.
- BT/3.x (2009), also known as "high speed" (HS): This comes with some (optional) hi-speed transfers over Wi-Fi and introduces connection less low latency data transfer and some more effort in terms of consumption.
- BTLE/4.x (2010), also known as "Low Energy" or "smart": This actually adds a Bluetooth Low Energy (BLE) on top of classic and HS, with a very large reduction in terms of power consumption for the BLE part.
- BT5.x (2018): This is the latest version, but it is only supported by some flagship phones and a few devices at the moment. Adoption will probably be larger in the future.
Bluetooth, of course, supports addressing, and the addresses look like ethernet MAC addresses:
- 6 bytes
- 2 vendor IEEE-assigned OUI bytes (NAP)
- 1 IEEE-assigned Upper Address Part (UAP), not directly present in the traffic but deductible from the data
- 3 Lower address parts (LAPs) in the sent packets
If we can find the full address, we can deduce the channel hopping sequence and sniff the communication (more on that later).
Bluetooth, in addition to a physical (PHY) layer that acts as the radio link, implements other layers in the protocol. Each layer is managed by a different part of the protocol and managed by the layer above it (from the IEEE Bluetooth proposal):
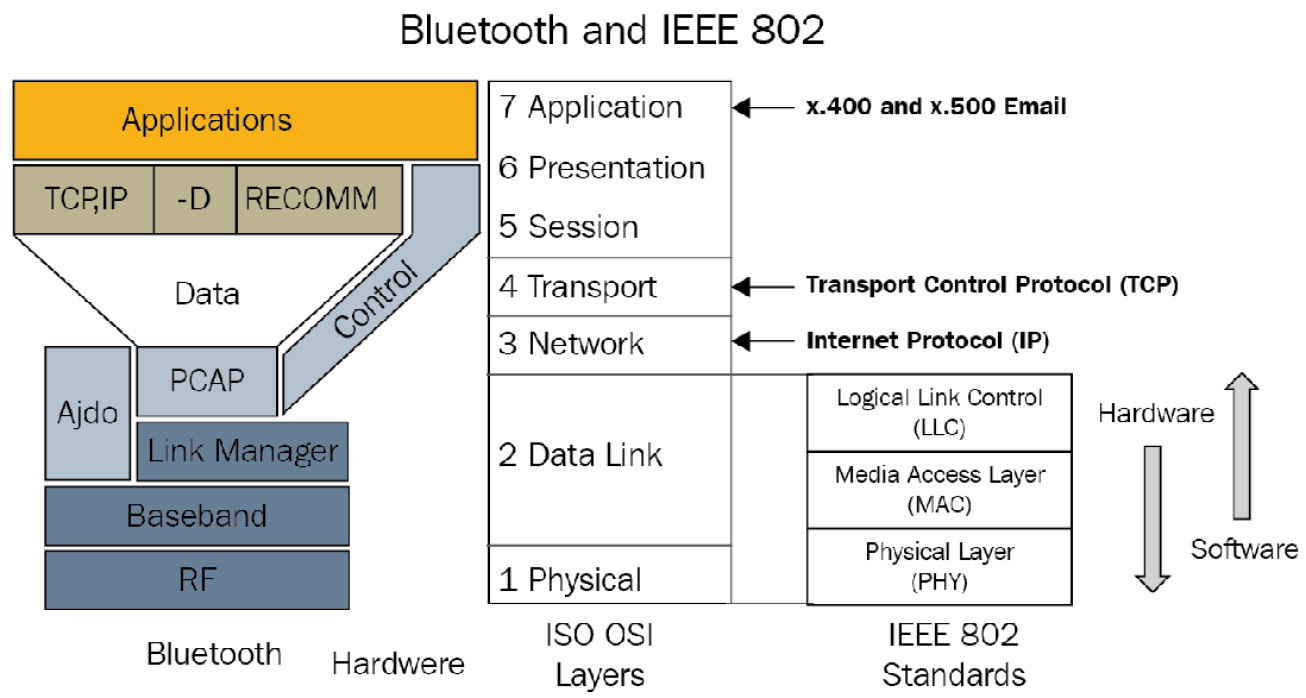
Figure 8.1 – Bluetooth protocol stack model
Now that we've looked into the protocol stack, let's get familiar with the tools we will be using.
Discovering Bluetooth
In this section, we will learn how to discover Bluetooth devices and work with them. First, find out the name of your Bluetooth device by using the following command:
$hcitool dev
Devices:
hci0 00:1A:7D:DA:71:13
My Bluetooth device is hci0 with a hardware address of 00:11:67:2E:B3:5D.
Let's find out what it can do:
$hciconfig hci0 -a
hci0: Type: Primary Bus: USB
BD Address: 00:1A:7D:DA:71:13 ACL MTU: 310:10 SCO
MTU: 64:8
UP RUNNING
RX bytes:304197 acl:0 sco:0 events:867 errors:0
TX bytes:16504 acl:0 sco:0 commands:369 errors:0
Features: 0xff 0xff 0x8f 0xfe 0xdb 0xff 0x5b 0x87
Packet type: DM1 DM3 DM5 DH1 DH3 DH5 HV1 HV2 HV3
Link policy: RSWITCH HOLD SNIFF PARK * can "sniff",i means receive only
Link mode: SLAVE ACCEPT
Name: 'xxx'
Class: 0x100104
Service Classes: Object Transfer
Device Class: Computer, Desktop workstation
HCI Version: 4.0 (0x6) Revision: 0x22bb *< accepts BT4.0
LMP Version: 4.0 (0x6) Subversion: 0x22bb
Manufacturer: Cambridge Silicon Radio (10) * manufacturer of the radio
BlueZ (the official Linux BT stack) can provide you with a lot of information, such as the following:
- The hciconfig hci0 commands list supported commands.
- sudo bccmd -d hci0 pslist lists adapter settings (psread will dump them, psget will get one, and psset will change one).
- bt-adapter -i lists more general adapter information but shows the BLE GATT characteristics of our adapter.
I usually have five Bluetooth devices around my desk:
- A headset
- A joystick
- My work phone (a fruity, expensive device that has been forced on me)
- My testing phone (which I use for security things, a bit "saltier")
- My watch (which doesn't have a discoverable mode; I have to use the Wear OS application to connect my phone to it)
Let's put them all into discoverable mode and scan for discoverable devices:
$hcitool scan
Scanning ...
70:26:05:AC:09:37 WH-1000XM2 * This is my bluetooth headset
D5:24:02:10:01:17 MOCUTE-032S_A02-24D5 * This is a Bluetooth joystick
14:C2:13:D6:95:EF Fruity * The fruity one
C0:EE:FB:21:9B:2D Salty * My testing phone
bt-adapter -d provides more information when scanning, such as the device class.
As expected, the watch is missing. Also, we had to put everything in discoverable mode manually. Using the BlueZ tool can help with "normally" manipulating the devices (associating with them, forgetting them, and so on) but not discovering devices that are not advertising themselves. Now, let's learn how to get to know a BT classic device better:
$sudo hcitool -i hci0 info C0:EE:FB:21:9B:2D
Requesting information ...
BD Address: C0:EE:FB:21:9B:2D
OUI Company: OnePlus Tech (Shenzhen) Ltd (C0-EE-FB)
Device Name: Salty
LMP Version: 4.0 (0x6) LMP Subversion: 0x7d3
Manufacturer: Qualcomm (29)
Features page 0: 0xff 0xfe 0x8f 0xfe 0xd8 0x3f 0x5b 0x87
<3-slot packets> <5-slot packets> <encryption> <slot offset>
<timing accuracy> <role switch> <hold mode> <sniff mode>
<RSSI> <channel quality> <SCO link> <HV2 packets>
<HV3 packets> <u-law log> <A-law log> <CVSD> <paging scheme>
<power control> <transparent SCO> <broadcast encrypt>
<EDR ACL 2 Mbps> <EDR ACL 3 Mbps> <enhanced iscan>
<interlaced iscan> <interlaced pscan> <inquiry with RSSI>
<extended SCO> <AFH cap. slave> <AFH class. slave>
<LE support> <3-slot EDR ACL> <5-slot EDR ACL>
<sniff subrating> <pause encryption> <AFH cap. master>
<AFH class. master> <EDR eSCO 2 Mbps> <extended inquiry>
<LE and BR/EDR> <simple pairing> <encapsulated PDU>
<non-flush flag> <LSTO> <inquiry TX power> <EPC>
<extended features>
Features page 1: 0x07 0x00 0x00 0x00 0x00 0x00 0x00 0x00
So, this phone supports encryption, RSSI (the quality of the radio link), and simple pairing (it can work in different modes, depending on the other party, in terms of comparing numbers or PIN mode). Let's compare it to fruity:
$sudo hcitool -i hci0 info C0:EE:FB:21:9B:2D >
hci_tool_info_salty
$ sudo hcitool -i hci0 info 14:C2:13:D6:95:EF >
hci_tool_info_fruity
$ comm -3 <(cat hci_tool_info_salty |grep -P '^ '|tr -d ' ' |sed 's/> /> /g'|sort) <(cat hci_tool_info_fruity |grep -P '^ '|tr -d ' ' |sed 's/> /> /g'|sort)
<3-slot EDR eSCO>
<EDR eSCO 3 Mbps>
<err. data report>
<EV4 packets>
<EV5 packets>
<hold mode>
Salty supports hold mode (while fruity does not), while fruity supports EDR, EV4, and EV5 (when it comes to voice packets, fruity is a bit more modern). This tidbit is useful for comparing new versions of a device, for example.
Let's see how we can enumerate the services available on a device. Let's use our joystick, which should be presented as an HID device:
$ sdptool -i hci0 browse D5:24:02:10:01:17
Browsing D5:24:02:10:01:17 ...
Service Name: Gamepad
Service Description: Bluetooth KB
Service Provider: MOCUTE
Service RecHandle: 0x10002
Service Class ID List:
"Human Interface Device" (0x1124)
Protocol Descriptor List:
"L2CAP" (0x0100)
PSM: 17
"HIDP" (0x0011)
Language Base Attr List:
code_ISO639: 0x656e
encoding: 0x6a
base_offset: 0x100
Profile Descriptor List:
"Human Interface Device" (0x1124)
Version: 0x0100
Browsing D5:24:02:10:01:17 ...
Service Search failed: Connection timed out
Service Name: Port
Service RecHandle: 0x10001
Service Class ID List:
"Serial Port" (0x1101)
Protocol Descriptor List:
"L2CAP" (0x0100)
"RFCOMM" (0x0003)
Channel: 1
Here, we can see that the joystick times out when we browse the services and actually crashes.
Native Linux Bluetooth tools – looking into the joystick crash
This crash is a perfect example of something that happens when devices are not very well-programmed. Normal Bluetooth activity such as browsing the service should never crash the joystick (you have to press the reset button to make it react again). This will be the perfect opportunity for us to look into the core of the Linux Bluetooth userland tool.
Let's see exactly when it crashes.
Investigating the crash with a high-level interface to BlueZ/libbluetooth
Let's start by installing pyBlueZ. You can do this by running the following command on a Linux Terminal:
sudo pip3 install pyBlueZ
pyBlueZ is a very quick way to interact with libbluetooth and offers very nice, high-level access to the library. It will allow you to find devices and services, explore devices, connect to services, and so on. I strongly encourage you to read the documentation (https://github.com/pyBlueZ/pyBlueZ) and try out the examples provided.
Let's scan the visible devices in Python with the pyBlueZ example:
ipython3
Python 3.7.3 (default, Apr 3 2019, 05:39:12)
[snip]
In [1]: import bluetooth
...:
...: nearby_devices = bluetooth.discover_devices(lookup_names=True)
...: print("found %d devices" % len(nearby_devices))
...:
...: for addr, name in nearby_devices:
...: print(" %s - %s" % (addr, name))
...:
found 3 devices
FC:45:96:C1:4C:99 - Grayson 9915
C0:EE:FB:21:9B:2D - Salty
D5:24:02:10:01:17 - MOCUTE-032S_A02-24D5
When we run the pyBlueZ service enumeration example (pybuez/exemples/sdp-browse.py D5:24:02:10:01:17), the services get enumerated at a lower level of detail than with sdptool, and the joystick doesn't crash!
Let's look a little bit more into the device with BlueZ. Let's enumerate the RFCOMM services (we can normally connect with the RFCOMM services to look for trouble):
// on the joystick
$./rfcomm_enum_services.py D5:24:02:10:01:17
found 2 services on D5:24:02:10:01:17
found RFCOM service:
Service Name: Port
channel/PSM: 1
svc classes: 0x1101
// on salty, a lot more since it is a phone
$./rfcomm_enum_services.py C0:EE:FB:21:9B:2D
found 15 services on C0:EE:FB:21:9B:2D
found RFCOM service:
Service Name: Headset Gateway
channel/PSM: 2
svc classes: 0x1112
svc classes: 0x1203
found RFCOM service:
[...snip...]
Service Name: OBEX File Transfer
channel/PSM: 20
svc classes: 0x1106
Let's connect to the joystick RFCOMM:
$./rfcomm_enum_port.py D5:24:02:10:01:17 0x1101
found 1 port(s)
service 'Port' available on port(s): [1]
connected. type stuff
At this point, the device-specific search starts, which means you can try to type in certain commands, such as modem-style AT commands. The accepted commands depend on the device (you will have to search the device manual or look into the device's BT profile definition, and maybe even sniff the connection or the activity of an application to find out more about how the device is used), but you can now connect to an arbitrary RFCOMM service from your device.
BlueZ – getting down and dirty with libbluetooth
So, what is sdptool doing differently? Let's clone the BlueZ source tree:
git clone https://git.kernel.org/pub/scm/bluetooth/bluez.git
Let's git checkout to the adequate version (the one installed on your system so that you don't have any issues with tools and libraries) and build it but don't install it:
./bootstrap && ./configure --enable-testing --enable-experimental --enable-deprecated && make
Now, let's have a look at sdptool.
By slightly patching sdptool, we can see that the device is crashing when it looks into a service sublevel with a sublevel ID of 0.
Now, let's patch it a bit more, like so:
// if (sdp_get_group_id(rec, &sub_context.group) != -1) {
if (sdp_get_group_id(rec, &sub_context.group) > 0) {
Now, the device doesn't crash anymore! This indicates that not only the records in SDP are returned by the device incorrectly, but that it crashes on this particular value! Now, let's see if it crashes on any unused values. Let's patch sdptool again:
if (sdp_get_group_id(rec, &sub_context.group) != -1) {
// patch start
if(sub_context.group.value.uuid16 == 0) {
sub_context.group.value.uuid16 = 0x1003; // patched value
}
// patch end
As we can see, the device crashes (on multiple values, such as 0x1003, 0xabab, and so on).
With that, we've found that the device crashes (DoS) if you try to enumerate SDP services that don't exist on the device! The main goal here was to show that we can instrument legitimate tools (in this example, by adding a few printf calls and changing some tests) so that we can look at our devices and find problems.
Sniffing the BT activity on your host
We can use btmon to trace what is happening on our machine when we are connecting to the device.
Let's run btmon and associate it with the joystick (btmon is very verbose and you can write a trace to a file with -w). The trace file can be opened with Wireshark:

Figure 8.2 – Trace file opened in Wireshark
Use bthci_acl.dst.bd_addr and bthci_acl.src.bd_addr as display filters (in Wireshark, this is the line on top of the packet list) to remove what you don't need.
But how is this useful to me? you will say...:
- If your device is conforming to normal profiles, it will allow you to look into how it works.
- If it doesn't, this means that you will need an app or a driver to snoop on. Since most devices that need an app to interact with will be available on Android, we can leverage the fact that all Android phones are Linux devices that rely on BlueZ (until KitKat) and can produce btmon style files with the Bluetooth HCI Snoop Log (I'll let you search the internet about how to enable and retrieve it with adb).
Sniffing raw BT
Let's plug in our Ubertooth ONE, install the host tools and then update it to the correct firmware to it (that is, bluetooth_rxtx; the dfu process is described in the Ubertooth documentation here: https://github.com/greatscottgadgets/ubertooth/wiki/Firmware).
Ubertooth comes with a variety of command-line tools (the manuals for them can be found at https://github.com/greatscottgadgets/ubertooth/tree/master/host/doc; we will be using ubertooth-rx) to receive Ubertooth frames. Let's try it out:
$sudo ubertooth-rx
systime=1563641019 ch=62 LAP=d695ef err=0 clkn=60351 clk_offset=5001 s=-42 n=-55 snr=13
systime=1563641019 ch=62 LAP=d695ef err=0 clkn=60383 clk_offset=4995 s=-42 n=-55 snr=13
systime=1563641019 ch=34 LAP=d695ef err=0 clkn=61554 clk_offset=1826 s=-42 n=-55 snr=13
systime=1563641019 ch=66 LAP=d695ef err=0 clkn=61602 clk_offset=1829 s=-40 n=-55 snr=15
<turning on Fruity>
systime=1563641085 ch=69 LAP=9e8b33 err=0 clkn=6929 clk_offset=4937 s=-31 n=-55 snr=24
systime=1563641085 ch=69 LAP=9e8b33 err=0 clkn=6961 clk_offset=4946 s=-35 n=-55 snr=20
systime=1563641085 ch=69 LAP=9e8b33 err=2 clkn=7025 clk_offset=4938 s=-35 n=-55 snr=20
systime=1563641085 ch=39 LAP=9e8b33 err=2 clkn=7548 clk_offset=1822 s=-30 n=-55 snr=25
systime=1563641085 ch=71 LAP=9e8b33 err=1 clkn=7577 clk_offset=4949 s=-31 n=-55 snr=24
<turning Fruity off and Salty on>
systime=1563641212 ch=31 LAP=9e8b33 err=2 clkn=35228 clk_offset=1810 s=-44 n=-55 snr=11
systime=1563641212 ch=31 LAP=9e8b33 err=1 clkn=35260 clk_offset=1812 s=-44 n=-55 snr=11
systime=1563641212 ch=31 LAP=9e8b33 err=1 clkn=35292 clk_offset=1802 s=-43 n=-55 snr=12
systime=1563641212 ch=31 LAP=9e8b33 err=1 clkn=35324 clk_offset=1807 s=-43 n=-55 snr=12
systime=1563641212 ch=37 LAP=9e8b33 err=0 clkn=37140 clk_offset=1811 s=-42 n=-55 snr=13
systime=1563641212 ch=37 LAP=9e8b33 err=0 clkn=37236 clk_offset=1811 s=-42 n=-55 snr=13
systime=1563641213 ch=28 LAP=f5a32f err=1 clkn=39324 clk_offset=1820 s=-41 n=-55 snr=14
systime=1563641213 ch=28 LAP=f5a32f err=0 clkn=39356 clk_offset=1823 s=-41 n=-55 snr=14
systime=1563641213 ch=28 LAP=f5a32f err=1 clkn=39420 clk_offset=1829 s=-40 n=-55 snr=15
systime=1563641213 ch=60 LAP=f5a32f err=0 clkn=39448 clk_offset=1821 s=-43 n=-55 snr=12
First, the joystick (which is paired to Fruity) is looking for its master (the LAP 0xd695ef is pretty recognizable – look at the lower bytes of Fruity's address). Then, Fruity sends packets with a LAP of 0x9e8b33, but there is nothing like that we are aware of. This is normal and this is the General Inquiry Access Code, which is used by all devices to search for other devices. After a few attempts, Fruity will try to connect to another device it has in memory, which means we can look into a connection in a more specific way. Let's try to spy on the watch connection.
Let's turn on the Bluetooth on Fruity and try to connect to the watch while dumping the traffic. However, we will see nothing! bluetooth-rx only sees BT3, and the connection with the watch happens to be on BLE. We will come back to this later when we look at BLE.
Let's have a look at the connection between the joystick and Salty:
$sudo ubertooth-rx -l 219b2d
systime=1563643388 ch=34 LAP=219b2d err=0 clkn=790 clk_offset=1908 s=-48 n=-55 snr=7
offset < CLK_TUNE_TIME
CLK100ns Trim: 5908
systime=1563643391 ch=43 LAP=219b2d err=1 clkn=8818 clk_offset=2321 s=-40 n=-55 snr=15
[...]
systime=1563643394 ch=51 LAP=219b2d err=1 clkn=21418 clk_offset=2616 s=-63 n=-55 snr=-8
offset > CLK_TUNE_TIME
CLK100ns Trim: 366
Clock drifted 366 in 6.446250 s. 5 PPM too fast.
systime=1563643396 ch=78 LAP=219b2d err=0 clkn=24984 clk_offset=2250 s=-42 n=-55 snr=13
[...]
systime=1563643400 ch=15 LAP=219b2d err=0 clkn=40282 clk_offset=2175 s=-44 n=-55 snr=11
UAP = 0xfb found after 12 total packets.
Here, we can see that, even though Ubertooth only knew the LAP, it has been able to find the UAP (UAP = 0xfb, which was found after 12 total packets):
$sudo ubertooth-rx -l 219b2d -u fb
Calculating complete hopping sequence.
Hopping sequence calculated.
26446 initial CLK1-27 candidates
[...]
systime=1563644251 ch=50 LAP=219b2d err=0 clkn=56554 clk_offset=2276 s=-39 n=-55 snr=16
[Snip...hugely random time it is luck dependent, sometimes it's seconds, sometimes 10min, the more traffic the better, sometimes unplugging the Ubertooth and relaunching helps]
Acquired CLK1-27 = 0x05d95a7
Now, we are capturing a lot more! However, most of the information has been cyphered (and the link key is stored on the device you're associated with; for example, with an Android device, it is available in the developer tools).
Ubertooth One is very practical if you wish to view BT traffic that is not directly visible with higher-level tools. When it comes to attacking lower-level Bluetooth signals, the documentation is sometimes a little bit terse – but again, read and learn!
BLE
Now, let's have a look at BT 4.x (low energy /smart). The main introduction, from a security point of view, is the Generic ATTributes (GATT) profile. These GATTs are key/value stores that allow us to interact with the device very easily.
Scanning for BLE
To find BLE devices, we can use hcitool lescan:
$sudo hcitool lescan
LE Scan ...
FC:45:96:C1:4C:99 Grayson 9915 /*my watch*/
D9:F2:25:36:4C:76 (unknown)
72:35:46:95:30:89 (unknown)
72:35:46:95:30:89 (unknown)
D9:F2:25:36:4C:76 Braceli5-9574 * interesting, that's my girlfriend's activity tracker and she D9:F2:25:36:4C:76 (unknown) * turned her phone off, let's look into it
D9:F2:25:36:4C:76 Braceli5-9574
D9:F2:25:36:4C:76 Braceli5-9574
As you can see, we found a few different devices from the scan.
Enumerating BLE GATTs
Now that we have found some devices (my watch and an activity tracker), let's look at their attributes and services:
$sudo gatttool -i hci0 -t random -b D9:F2:25:36:4C:76 --primary
attr handle = 0x0001, end grp handle = 0x0007 uuid: 00001800-0000-1000-8000-00805f9b34fb
attr handle = 0x0008, end grp handle = 0x0008 uuid: 00001801-0000-1000-8000-00805f9b34fb
attr handle = 0x0009, end grp handle = 0x000f uuid: 0000ff20-0000-1000-8000-00805f9b34fb
attr handle = 0x0010, end grp handle = 0xffff uuid: 0000fee7-0000-1000-8000-00805f9b34fb
Since there are thousands of different UUIDs available, we must look at the Bluetooth website or at the GATT identification tools to find their meanings. (I made a small script that builds a CSV from a folder with XML GATT characteristics and services descriptions – bgparser2csv.py can be found in this book›s GitHub repository. There is also the excellent nRF mobile connect application for Android that has a pretty good database of UUIDs.)
attr handle and end grp handle define handle groups per service.
Let's identify our services:
$sudo gatttool -i hci0 -t random -b D9:F2:25:36:4C:76 --primary |cut -d' ' -f 11 | while read -r line; do echo -n "$line ";grep $line gatt_uuid
.csv;echo; done
00001800-0000-1000-8000-00805f9b34fb "00001800-0000-1000-800[...],"Generic Access'
00001801-0000-1000-8000-00805f9b34fb "00001801-0000-1000-800[...],"Generic Attribute'
0000ff20-0000-1000-8000-00805f9b34fb *unknown in our db
0000fee7-0000-1000-8000-00805f9b34fb *unknown in our db
Let's identify their characteristics:
$sudo gatttool -i hci0 -t random -b D9:F2:25:36:4C:76 --characteristics
handle = 0x0002, char properties = 0x0a, char value handle = 0x0003, uuid = 00002a00-0000-1000-8000-00805f9b34fb
handle = 0x0004, char properties = 0x02, char value handle = 0x0005, uuid = 00002a01-0000-1000-8000-00805f9b34fb
handle = 0x0006, char properties = 0x02, char value handle = 0x0007, uuid = 00002a04-0000-1000-8000-00805f9b34fb
handle = 0x000a, char properties = 0x84, char value handle = 0x000b, uuid = 0000ff21-0000-1000-8000-00805f9b34fb
handle = 0x000d, char properties = 0x10, char value handle = 0x000e, uuid = 0000ff22-0000-1000-8000-00805f9b34fb
handle = 0x0011, char properties = 0x12, char value handle = 0x0012, uuid = 0000fea1-0000-1000-8000-00805f9b34fb
handle = 0x0014, char properties = 0x02, char value handle = 0x0015, uuid = 0000fec9-0000-1000-8000-00805f9b34fb
Here, we can see the following:
- There are two handles by characteristics (the first contains the value attributes listed here, while the second contains its value)
- The characteristics have properties in that they have bit fields (that is, values can be ORed) that describe the operations supported (described in the BLE core 4.2 specification).
Here are the values of the characteristic bitfield:

Let's identify the characteristics:
$sudo gatttool -i hci0 -t random -b D9:F2:25:36:4C:76 --characteristics|cut -d ' ' -f 15|while read -r uuid;do echo -n "$uuid ->";grep $uuid gatt_uuid.csv|cut -d ',' -f 4 |tr -d ' ' ;echo;done
00002a00-0000-1000-8000-00805f9b34fb ->"Device Name'
00002a01-0000-1000-8000-00805f9b34fb ->"Appearance'
00002a04-0000-1000-8000-00805f9b34fb ->"Peripheral Preferred Connection Parameters'
0000ff21-0000-1000-8000-00805f9b34fb ->
0000ff22-0000-1000-8000-00805f9b34fb ->
0000fea1-0000-1000-8000-00805f9b34fb ->
0000fec9-0000-1000-8000-00805f9b34fb ->
With that, we have identified the services and the characteristics we can use to communicate with the joystick.
Interacting with BLE GATTs
At this point, we don't know what the characteristics do, nor how we can interact with them. Let's read and write some values so that we can make educated guesses about what they do:
#the handle of device name
$sudo gatttool -i hci0 -t random -b D9:F2:25:36:4C:76 --char-read -a 3
Characteristic value/descriptor: 42 72 61 63 65 6c 69 35 2d 39 35 37 34
#the long uuid of device name
$sudo gatttool -i hci0 -t random -b D9:F2:25:36:4C:76 --char-read -u 00002a00-0000-1000-8000-00805f9b34fb
handle: 0x0003 value: 42 72 61 63 65 6c 69 35 2d 39 35 37 34
#the short id of device name
$sudo gatttool -i hci0 -t random -b D9:F2:25:36:4C:76 --char-read -u 2a00
handle: 0x0003 value: 42 72 61 63 65 6c 69 35 2d 39 35 37 34
#all the handles listed in characteristics, the characteristic and the value handle
$sudo gatttool -i hci0 -t random -b D9:F2:25:36:4C:76 --characteristics|tr ' ' ' '|tr -d ','|egrep '^0x[0-9a-f]{4}'|while read -r handle; do echo -n "$handle -> "; sudo gatttool -i hci0 -t random -b D9:F2:25:36:4C:76 --char-read -a $handle;done
0x0002 -> Characteristic value/descriptor: 0a 03 00 00 2a
0x0003 -> Characteristic value/descriptor: 42 72 61 63 65 6c 69 35 2d 39 35 37 34 *Braceli5-9574*
0x0004 -> Characteristic value/descriptor: 02 05 00 01 2a
0x0005 -> Characteristic value/descriptor: 40 14
0x0006 -> Characteristic value/descriptor: 02 07 00 04 2a
0x0007 -> Characteristic value/descriptor: 28 00 20 03 00 00 f4 01
0x000a -> Characteristic value/descriptor: 84* 0b 00 21 ff * read will fail, extended, write
0x000b -> Characteristic value/descriptor read failed: Attribute can't be read
0x000d -> Characteristic value/descriptor: 10* 0e 00 22 ff * read will fail, notify
0x000e -> Characteristic value/descriptor read failed: Attribute can't be read
0x0011 -> Characteristic value/descriptor: 12 12 00 a1 fe
0x0012 -> Characteristic value/descriptor: 07 00 00 00 00 00 00 00 00 00
0x0014 -> Characteristic value/descriptor: 02 15 00 c9 fe
0x0015 -> Characteristic value/descriptor: d9 f2 25 36 4c 76
Now that we can read them, let's delve a bit deeper into reading the descriptors of the services and their characteristics.
Services basically only show a short UUID (2, 4, or 16 bytes); for example:
handle 01 value is 00 18 for 00001800-0000-1000-8000-00805f9b34fb.
handle 03 value is 2a 00 for 00002a00-0000-1000-8000-00805f9b34fb.
Characteristics are a bit more interesting since they hold their attributes, the descriptor number for their value, and their UUID (see the values in bold in the preceding code block).
Let's read a value, change it, and then read it back to see if the writing went wrong:
$sudo gatttool -i hci0 -t random -b D9:F2:25:36:4C:76 --char-read -a 3
Characteristic value/descriptor: 42 72 61 63 65 6c 69 35 2d 39 35 37 34
$sudo gatttool -i hci0 -t random -b D9:F2:25:36:4C:76 --char-write-req -a 3 -n 0x4242424242
Characteristic value was written successfully
$sudo gatttool -i hci0 -t random -b D9:F2:25:36:4C:76 --char-read -a 3
Characteristic value/descriptor: 00 42 42 42 42 42
Well, that was a lot to learn about Bluetooth LE! Now, it's your turn to play with some Bluetooth devices. Try out the following to test your BLE devices:
- Try to write to attributes you are not supposed to
- Write values you are not supposed to (and link your writes to the behavior of the device, along with the different attributes and anything interesting you may have found)
- Check if you can find values that are damaging to the user's privacy
- And a lot of other things – get creative!
BLE connection security
Just like BL classic, BLE supports pairing and connection cyphering. As for many devices in a classic that lack input for the user, a large number of BLE devices don't implement anything. This gives an attacker free rein to connect to and interact with the device.
This lack of BLE security should already be a finding in itself, and I encourage you to read more about the BLE security modes, levels, and pairing/bonding possibilities so that you can propose adequate remediations.
Summary
In this chapter, we looked into the two main wireless networking protocols that are used by embedded systems and how to attack them. Probing network activity is always very interesting and can point you toward some relevant security elements, such as keys and certificates that were identified during the S.T.R.I.D.E. exercise (Chapter 4, Approaching and Planning the Test). This is also a good starting point when your interactions with the system are limited because you cannot damage the system, or you only have a very limited number of test systems. In the next chapter, we will look into attacking other radio interfaces that can't easily be reached with common tools.
Questions
- What is the DHCP configuration directive for giving a proxy to the test system?
- Do you think that other DHCP parameters could be leveraged for security testing? Can you think of some examples?
- In the DNS part of the netmasq config, I added a list of DNS "spoofed" hosts. What do you think they can be used for?
- In the DNS part of the netmasq config, I added logging for the queries. What do you think this can be used for?
- What does GATT stand for?
- What is the main security problem with the common implementation of BLE?