Chapter 8: Gatsby and GraphQL
In this chapter, we'll begin to bring content into Gatsby through GraphQL. GraphQL is a good starting point for learning about how Gatsby works, since Gatsby sources content using GraphQL. As we learned in Chapter 6, Sanity's GraphQL Playground, Sanity exposes its information through a GraphQL Application Programming Interface (API), so Gatsby can easily use Sanity's content through GraphQL.
These are the main topics that we will cover in this chapter:
- GraphQL in GatsbyJS
- GraphiQL, a GraphQL navigator
Technical requirements
For this chapter, the Gatsby application needs to be installed and a Terminal program is needed. Additionally, a web browser is needed.
GraphQL in GatsbyJS
In this section, we'll learn about how GraphQL is used in the context of Gatsby. We will learn what the major difference is between how GraphQL is used by Gatsby and how it is exposed by Sanity's GraphQL API.
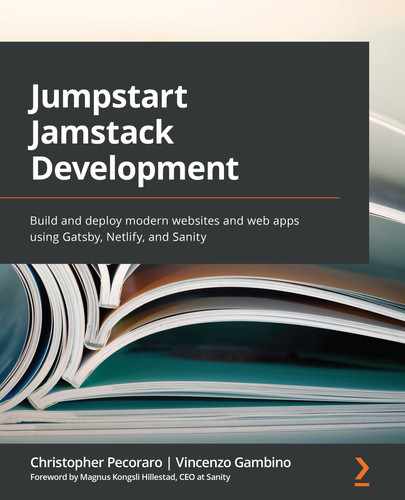
Gatsby's use of GraphQL is different from Sanity's since it uses the concept of a graph to formulate its GraphQL queries. Let's learn what a graph is.
In the following diagram, the figure consists of nodes and edges:
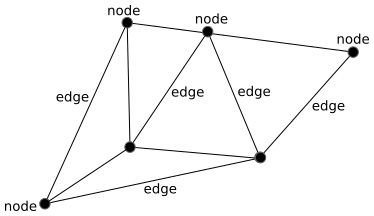
Figure 8.1 – A graph
In Gatsby's implementation of GraphQL, in reference to the graph, each Sanity document is represented as a node. Recalling the GraphQL query that was used in Chapter 6, Sanity's GraphQL Playground, to return all events, this query was quite simple, as highlighted in the following code snippet:
{
allEvent {
name
}
}
In Gatsby, we find that the corresponding query to return all events has two main differences, as follows:
- allSanityEvent is used in place of allEvent. Sanity's developers created and officially maintain the gatsby-source-sanity plugin. They have chosen to add this prefix to differentiate Sanity documents from others, a technique sometimes called namespacing. Gatsby endorses this as a good practice. Obviously, using GraphQL Playground on the Sanity side means that only Sanity's content is being sourced, whereas in Gatsby it is possible to use many different content sources at the same time.
- The query needs to specify the edges and node parts to be able to return each event, as shown in the following code example:
query MyQuery {
allSanityEvent {
edges {
node {
name
}
}
}
}
Likewise, since GraphQL is specifying not only the request format but also the result format, results are returned encapsulated in an array of edges and a node for each document, as follows:
{
"data": {
"allSanityEvent": {
Likewise, the results of the query also contain the edges and nodes, as shown in the following code snippet:
{
"data": {
"allSanityEvent": {
"edges": [
{
"node": {
"name": "The Appleseed Cast"
}
},
{
"node": {
"name": "Friday Drinks"
}
}
],
}
}
}
Now that we've seen the basic difference between how GraphQL is used in both Sanity and Gatsby, we will introduce another application similar to GraphQL Playground, called GraphiQL, to explore and work with GraphQL queries.
GraphiQL, a GraphQL navigator
GraphiQL (pronounced graphical) is similar to GraphQL Playground, which we learned about in Chapter 6, Sanity's GraphQL Playground. GraphQL Playground uses components of GraphiQL, and in fact, at the time of writing, the two projects are merging and will become one.
As mentioned in Chapter 7, Gatsby - An Introduction, by typing the following command from the command line, Gatsby will start an instance of GraphiQL at http://localhost:8000/graphql:
gatsby develop
In the text output from the command, Gatsby will provide the Uniform Resource Locator (URL). Here is an excerpt of the output:
...
View GraphiQL, an in-browser IDE, to explore your site's data and schema
http://localhost:8000/___graphql
...
By clicking on the http://localhost:8000/graphql URL if possible or, optionally, simply typing the URL into the browser, the GraphiQL GraphQL Integrated Development Environment (IDE) will appear. Notice that there are three underscores after the front slash in the URL. The following screenshot is an example of how the web-based application will appear upon startup. The interface is composed of several distinct areas:

Figure 8.2 – GraphiQL
On the left-hand side, we can see the GraphQL Explorer. This helps us to automatically create GraphQL queries by providing the user with a view of all of schemas available for use. So, by expanding each of the schemas, options for filtering and sorting are shown, along with the fields (including their nest elements) that are available to be returned as the query result. Let's look, in detail, at an example similar to what was previously discussed in Chapter 6, Sanity's GraphQL Playground.
Clicking on the desired starting query—for example, allSanityEvent—the various entity fields that may be used for filter options will be seen, and the basic query will be created in the middle section. As the various fields are chosen, GraphiQL will automatically add those fields to the graphql query.
Next, let's examine the following screenshot of the expanded allSanityEvent section:
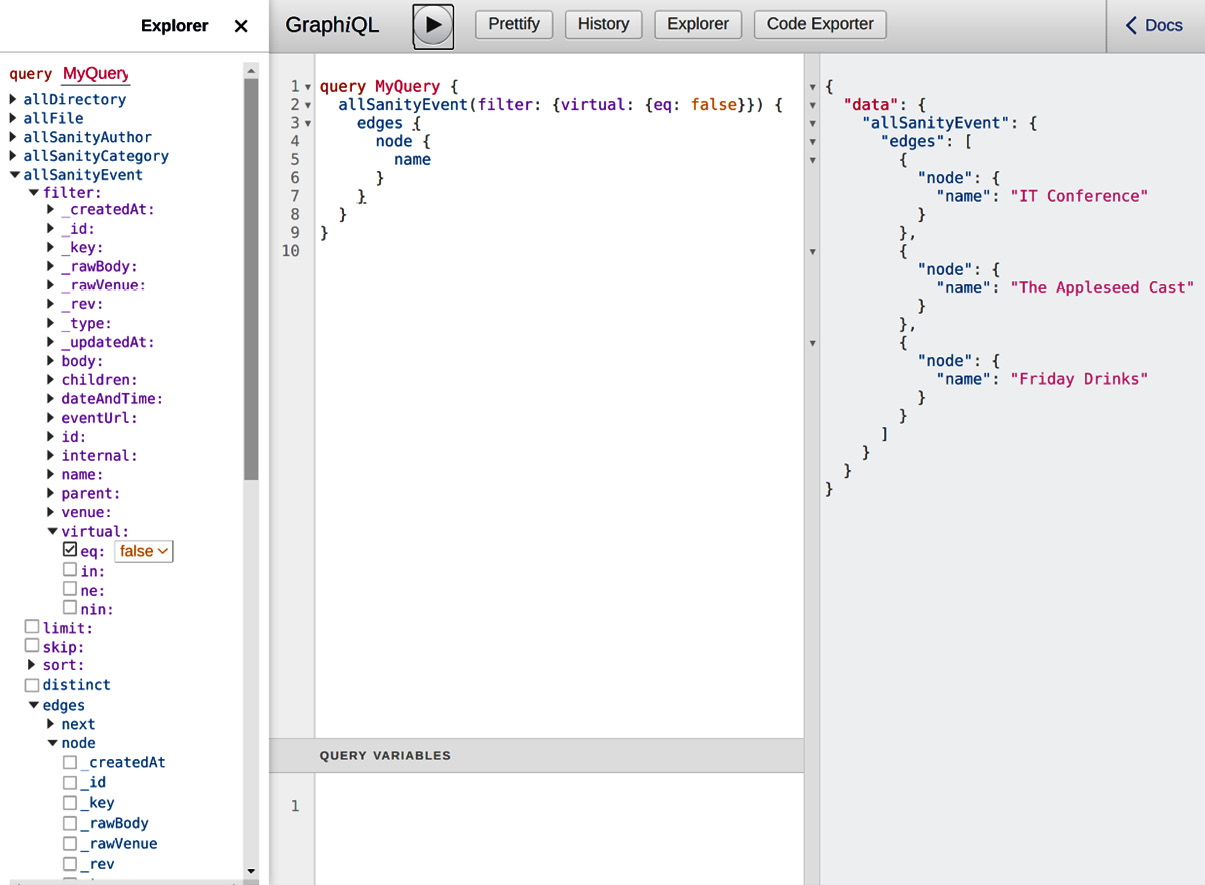
Figure 8.3 – GraphiQL with an example query
As the allSanityEvent section is expanded, followed by filter, the filter options are shown. virtual eq false filters results based on the following criteria: only the events that are not virtual (eq false) are selected. The following screenshot shows details of the left-side navigation that allows for the filtering and selection of fields to return from the query:
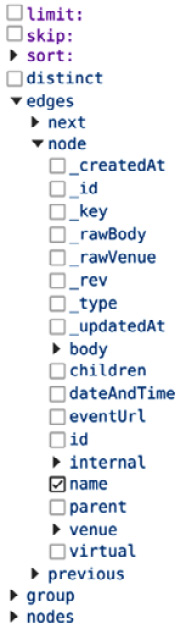
Figure 8.4 – Query options
Then, name is chosen from the list of node fields after expanding edges.
The query is automatically created, as follows:
query MyQuery {
allSanityEvent(filter: {virtual: {eq: false}}) {
edges {
node {
name
}
}
}
}
To execute the query, click on the Play button.
The results are shown in the third panel, on the right-hand side. Two other features are History and Prettify. Prettify is used to properly format the code.
The History feature, as the name entails, is used to be able to recall a previous query, as shown in the following screenshot:

Figure 8.5 – GraphiQL's GraphQL query history panel
Possibly the most useful and time-saving feature of GraphiQL, however, is the Code Exporter. This feature may be accessed by the Code Exporter button, as shown in the following screenshot:
FIgure 8.6 – The GraphiQL button panel
By clicking the Code Exporter button, source code will be automatically produced that can be exported and used in a Gatsby project. The following code lines that are produced create a minimal React component for use with Gatsby, based on the content of the query:
import React from "react"
import { graphql } from "gatsby"
const ComponentName = ({ data }) => <pre>{JSON.stringify(data, null, 4)}</pre>
export const query = graphql`
{ allSanityEvent {
edges {
node {
name
}
}
}
}
`export default ComponentName
Let's examine the code that is generated. The first line imports React. The second line imports graphql from gatsby, needed to perform the query. Next, we define the component called ComponentName, by creating an anonymous function and assigning it to a constant, since the function will not change. In this case, ComponentName is a valid name but is meant to be a placeholder that should be changed.
Next, let's examine what a single event query would look like. Instead of allSanityEvent, which would return all events from the Sanity side to Gatsby, we will use the single sanityEvent event query for GraphQL, which will return just one record, accepting the id of the event from the Sanity side, denoted by an underscore. The following code snippet shows an example of this concept:
query MyQuery {
sanityEvent(_id: {eq: "6ddd2730-9aca-46dd-a7fd-850ab306f7fb"}) {
name
}
}
Next, let's examine the results. Notice in the following code snippet that the results are wrapped in a data object:
{
"data": {
"sanityEvent": {
"name": "IT Conference"
}
}
}
Similarly, we can query an event using the venue name, as shown in the following code snippet. This is similar to the example shown in Chapter 6, Sanity's GraphQL Playground:
query MyQuery {
sanityEvent( venue: {name: {eq: "Will's Pub"}}) {
name
}
}
Similarly, the results will be as shown with the name of the event, as requested in the name field from the preceding code snippet, as follows:
"data": {
"sanityEvent": {
"name": "The Appleseed Cast"
"venue": {
"name": "Will's Pub"
}
}
}
}
These two examples show clearly how GraphQL is used within Gatsby, providing an easy way to query a Sanity source via GraphQL.
Summary
In this chapter, we learned about the Gatsby Sanity source plugin and how it uses GraphQL to interact with and import content from Sanity. We learned how to use GraphQL to test and write GraphQL queries in the context of Gatsby, using the GraphiQL web-based application. We also learned how GraphQL obtains Sanity's content through its GraphQL API.
In the next chapter, we'll learn about how Gatsby can source additional content from sources such as the filesystem and Content Management Systems (CMS), as we move closer to building a website using Gatsby.