Chapter 12: APIs – Alexa Skills
Alexa is the Amazon Virtual Assistant that can perform tasks or services for an individual, and it uses natural language processing and machine learning to convert voice input to an executable command. Alexa can provide a wide variety of services, from music playback to creating to-do lists, playing audiobooks, and providing weather, traffic, and news. Alexa is also capable of controlling many smart devices, allowing you to build an automation system for your home. An Amazon user can install skills, which are functionalities, similar to apps, that are available in the Alexa Skills Store to extend Alexa's capabilities.
In this chapter, we will build the Jumpstart Jamstack Alexa skill. A user would be able to ask for the upcoming five events. Through this example, you will be able to extend the current skill by retrieving past events, or all events, and you will also be able to create a new skill for any other application you have.
We will cover the following topics in this chapter:
- Alexa skill life cycle
- Creating the skill
Technical requirements
To develop an Alexa skill, you must have access to the Alexa Developer Console by creating an account at https://developer.amazon.com/alexa. In addition to this, you need Sanity Studio installed on your system.
The code for this chapter is available at https://github.com/PacktPublishing/Jumpstart-Jamstack-Development/tree/chapter_twelve.
Alexa skill life cycle
A user activates a particular skill by saying the trigger word Alexa followed by the skill name and the intent (command) to be executed. For example, Alexa, ask jumpstart jamstack to tell me my upcoming events.
The Amazon Echo device will send the request to the Alexa console, which will then process the request by contacting our Sanity application and will send the results back to the Amazon Echo device, prompting a message to the user.
To build an Alexa skill, we will use the Alexa Developer console. The two components of an Alexa skill are the skill interface and the skill service.
Skill interface
The Skill interface is the software provided by Amazon where the user can develop an Alexa skill through a nice and clean UI. We will use the skill interface to create and modify each component of the skill.
Skill service
The Skill service is where the business logic of an Alexa skill resides. The code will execute the intent and return a JSON response to the interface that will give the user an understandable human sentence as a response.
In this chapter, our service will be executed in Node.js inside an AWS Lambda function.
Now that we know what the skill interface and skill service are, we will move on to creating the skill for Alexa.
Creating the skill
As mentioned earlier, we are going to create a skill through the Alexa Developer Console, which will retrieve five upcoming events from our event website.
From the interface, we will create a new intent with a simple utterance:
- Log in to the Amazon Developer Console and click on the Alexa link as shown:

Figure 12.1 – Amazon Developer Console
- Now, from the top menu, click on the Skill Builders link and then the Developer Console link, as shown:
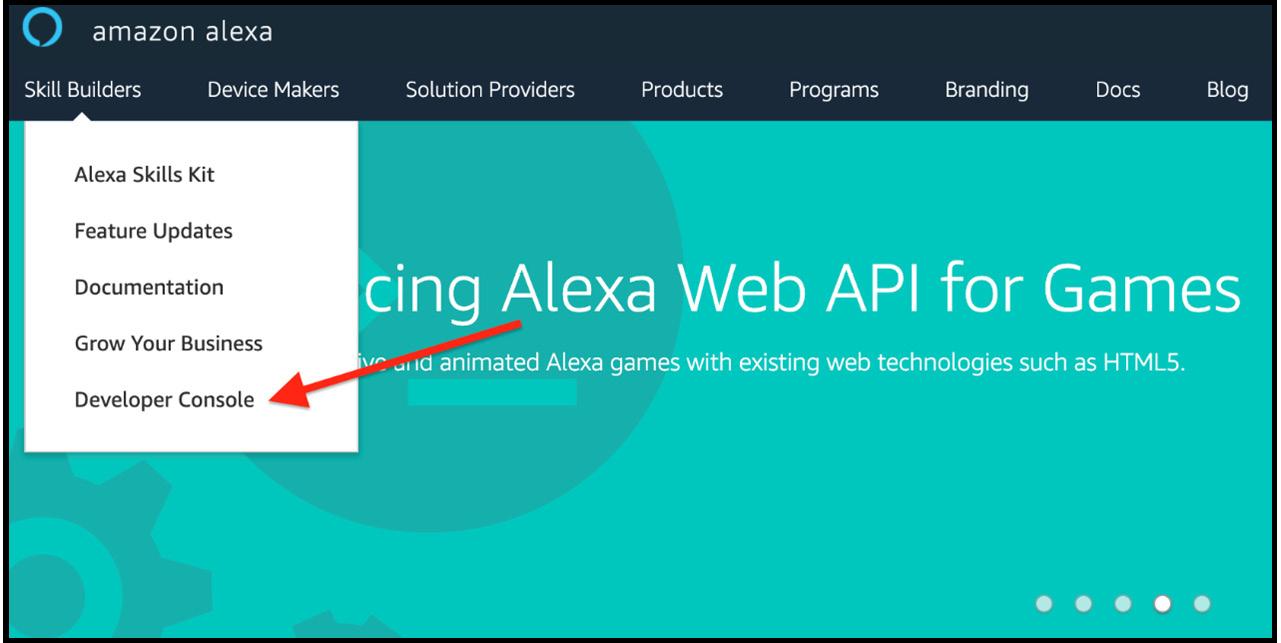
Figure 12.2 – Amazon Alexa console
The Alexa Developer Console will show all the skills you have created, along with revenue that you are earning through Skills, Earnings, Payments, and Hosting.
- Click on the blue button that says Create Skill:

Figure 12.3 – Amazon Alexa Skills overview
- Choose a skill name that will also be your invocation name. For this example, we will write jumpstart jamstack:
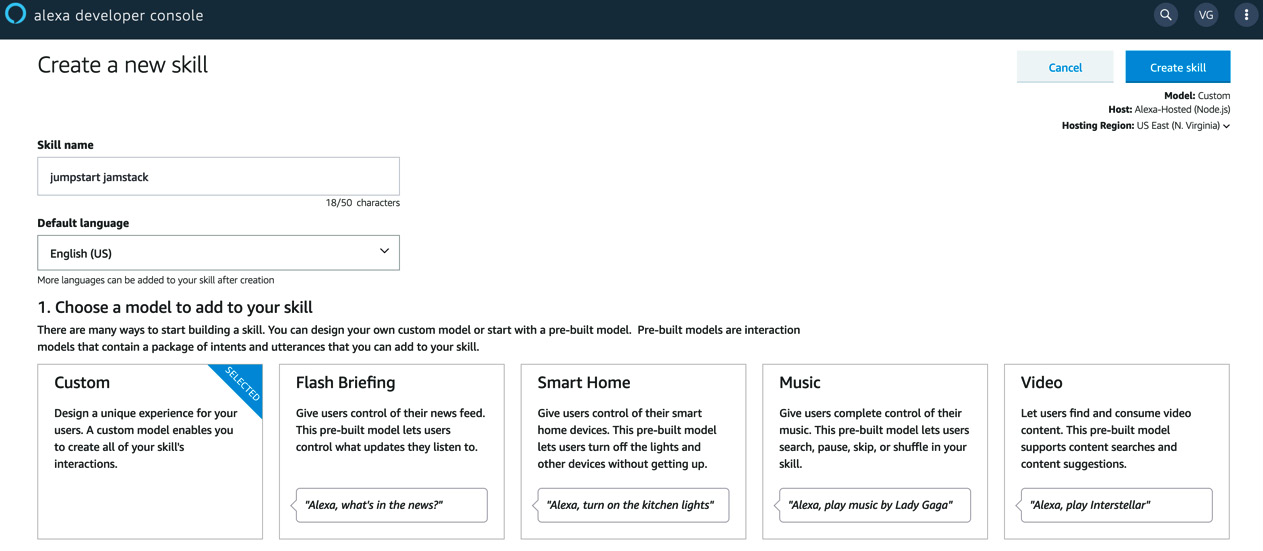
Figure 12.4 – Amazon Alexa Skills creation page
Models in the Alexa paradigm are sets of intents and utterances that define the usage of your skill. In this example, we will use the Custom model.
- As mentioned previously, we will use the Alexa-hosted host, so use the default selected Alexa-Hosted (Node.js):
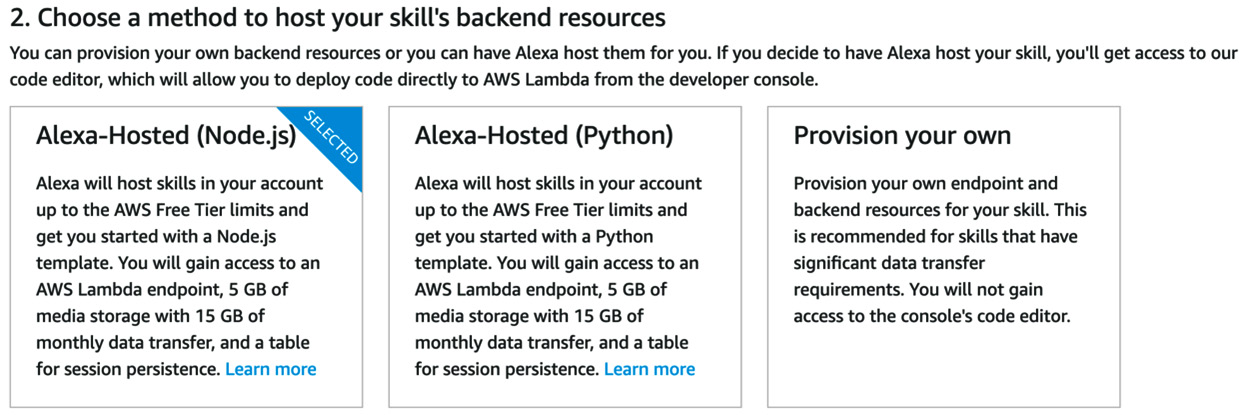
Figure 12.5 – Amazon Alexa Skills creation page
In the top-right corner, if you want, you can change the region where the skill is hosted. I left it as the default US East (N. Virginia).
- Then, click on the Create skill blue button in the top-right corner to create the skill:
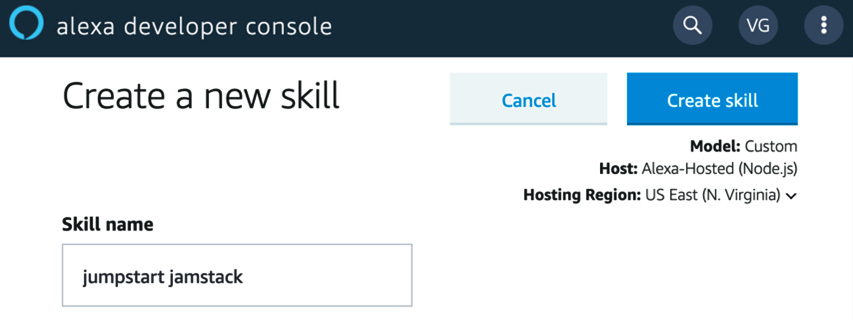
Figure 12.6 – Amazon Alexa Skills creation page
- Choose the default selected Hello World Skill template and click on the blue button in the top-right corner labeled Continue with template:
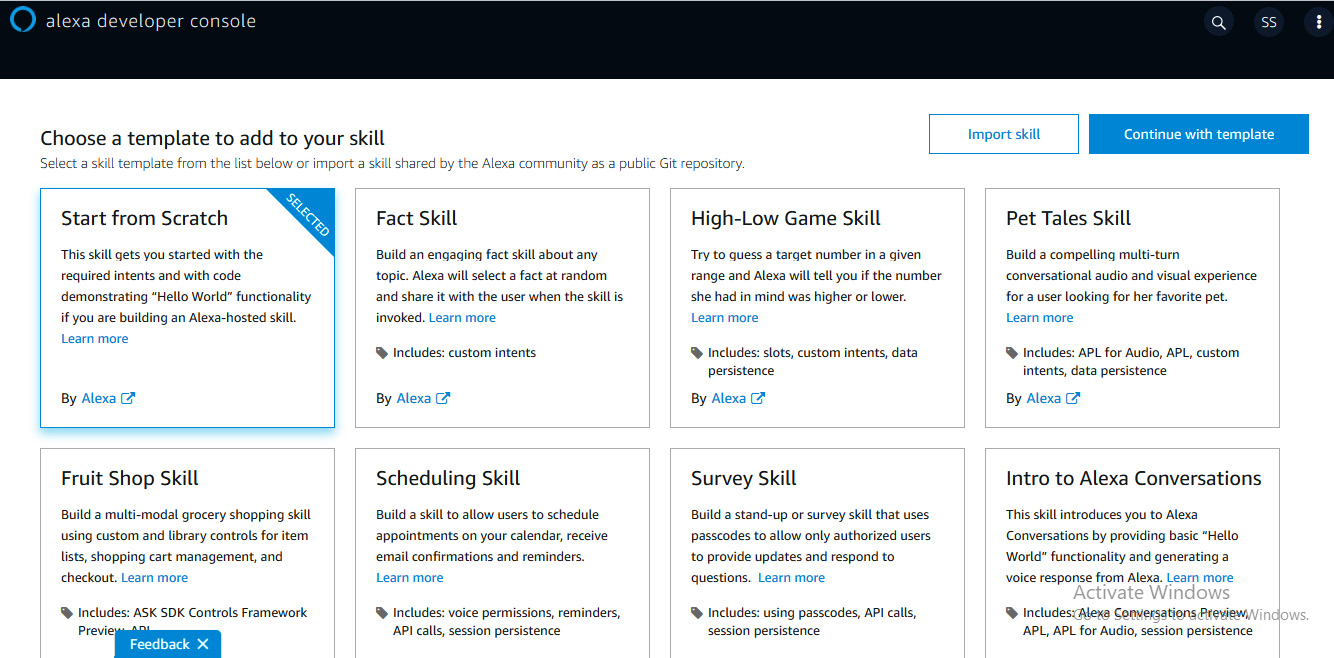
Figure 12.7 – Amazon Alexa Skills creation page
Now that we have created a new Alexa skill, we are ready to configure it through the skill interface.
Configuring the skill through the skill interface
Once the skill has been created, we land on our skill interface. In the top menu, we have the following six options, as shown in the screenshot:
- Build
- Code
- Test
- Distribution
- Certification
- Analytics

Figure 12.8 – Alexa skill interface top menu
Since this is an example skill, we will be exploring Build, Code, and Test in this chapter. The Distribution, Certification, and Analytics tabs are used when the skill is added to the marketplace.
Build
The Build section is where we can set the invocation name, configure the interaction model, set slots, and set the endpoint:
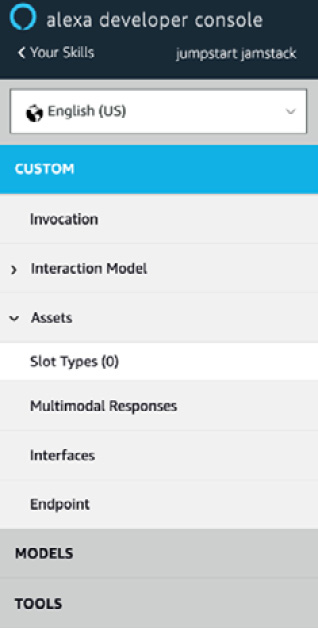
Figure 12.9 – Alexa skill interface build menu
Invocation
The invocation name is the keyword we need to interact with our skill. Our invocation name is jumpstart jamstack, so we can say Alexa, open jumpstart jamstack:

Figure 12.10 – Alexa skill interface: Invocation tab
Interaction model
In the interaction model, we can set out intents and utterances. The following four default built-in intents are created with any Alexa skill:
- CancelIntent
- HelpIntent
- StopIntent
- NavigateHomeIntent
CancelIntent and StopIntent are similar and are called when you want to stop an interaction. For example, when Alexa is reading a set of news for you, you can say, Alexa stop and Alexa will stop reading the news, or while you are listening to music through Alexa, StopIntent and CancelIntent are called when you want to stop the playback.
HelpIntent is used when you would like to know more about a skill and what utterances are available.
NavigateHomeIntent is used when you are using a multi-level skill and you would like to go back to the top menu of the skill.
In our list of intent, we also have our default HelloWorldIntent, which contains seven utterances. Let's now add GetUpcomingEventsIntent:
- Click on the Add Intent blue button above the intent list:
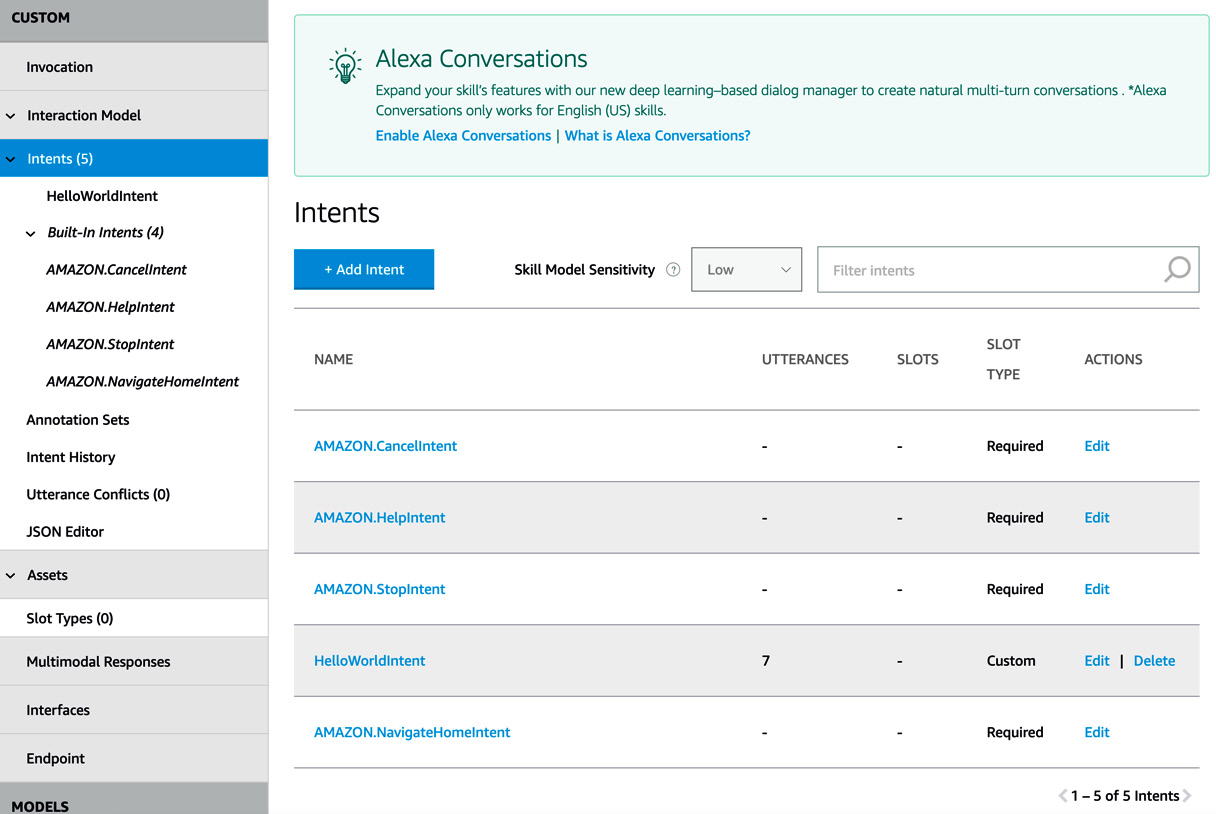
Figure 12.11 – Alexa skill interface Intents tab
- In our Create custom intent section, add the name of the intent as GetUpcomingEventsIntent. Then, click the blue Create custom intent button:

Figure 12.12 – Alexa skill interface Add Intent page
Amazon also provides a set of intents that can be used for certain skills such as weather, video, and audio.
Now that we have created our custom intent, we can start adding our utterances.
A user may ask, Alexa, ask jumpstart jamstack for the upcoming events, or Alexa, ask jumpstart jamstack to tell me the upcoming events.
We can add as many utterances as we would like. For this example, let's add the following utterances:
- list me the upcoming events
- tell me the upcoming events
- what are the upcoming events
To add an utterance, execute the following steps:
- Write it in the Sample Utterances textbox and then press the + button on the right of the textbox. If you don't click on the + button, the utterance will not be added:
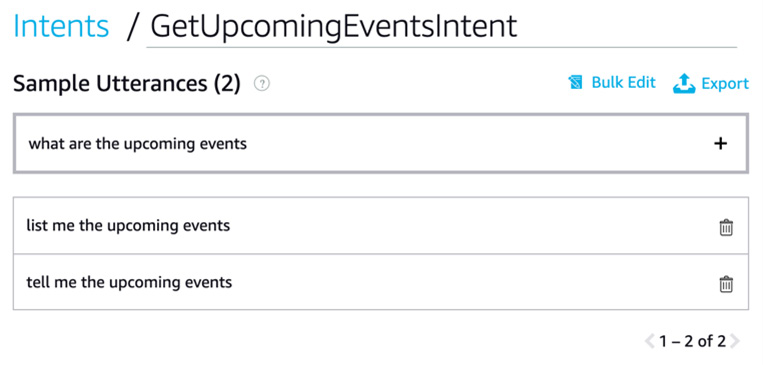
Figure 12.13 – Alexa skill interface Intents page
Now you should have three utterances added to your intent.
- Click on the Save Model button above the Intents form and then click on Build Model beside the Save Model button:
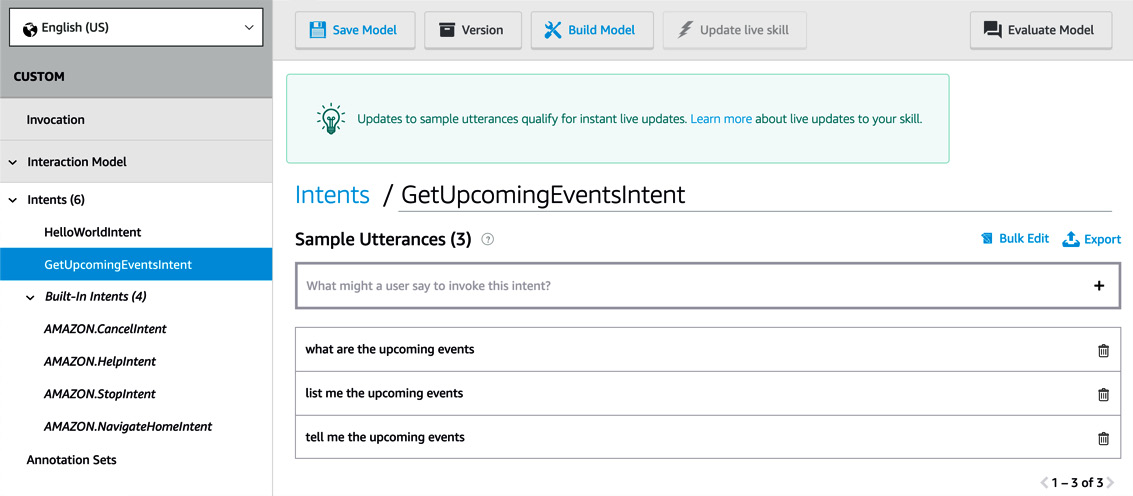
Figure 12.14 – Alexa skill interface Intents page
Now our Intent has been added and the model has been built and is ready to be used in our Alexa service.
In this section, we have created a new intent to retrieve our events and we have rebuilt the model to activate the new intent. In the next section, we will check the intent history.
Intent history
Clicking on the Intent History link on the left-hand side menu, you can check all the frequent intent requests done to your skill in the last 30 days. You can check Unresolved Utterances and Resolved Utterances. From here, you can improve your intent utterances:
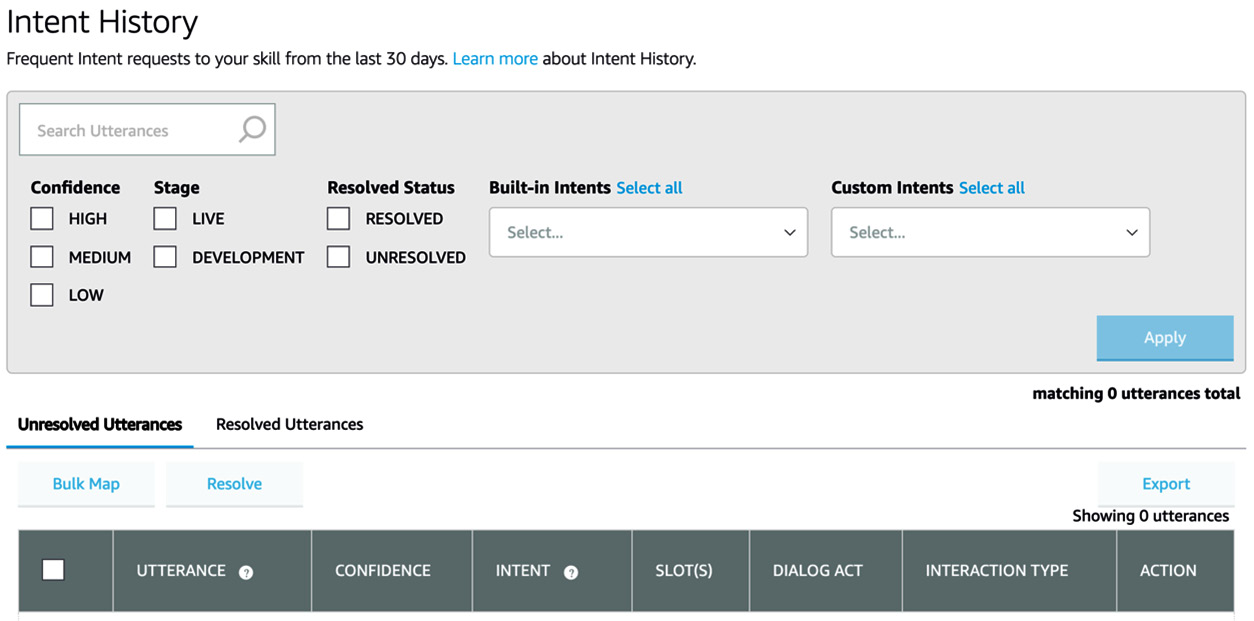
Figure 12.15 – Alexa skill Intent History page
Utterance conflicts
Clicking on Utterance Conflicts on the left-hand side menu, you can see whether there are conflicting utterances between intentions:
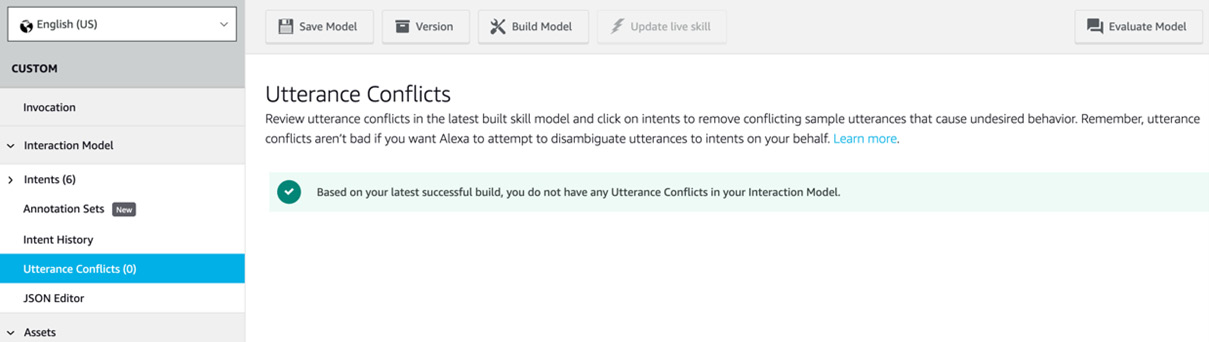
Figure 12.16 – Alexa skill Utterance Conflicts page
JSON Editor
Clicking on JSON Editor on the left-hand side menu, you can also create intents via JSON code. This is useful when you want to import an existing intent quickly from another skill:

Figure 12.17 – Alexa Skill JSON Editor page
Slot types
Slots can see a variable passed via an utterance. By default, Amazon provides many slot types, such as number, city, and country, that are recognized by Alexa. You can also create a custom slot type and process it at your convenience.
An example of a slot type can be found in a weather skill when you enquire about the weather in a particular city.
In your WeatherByCity intents, you don't need to add an utterance for each city in the world, and you can pass it as a variable:
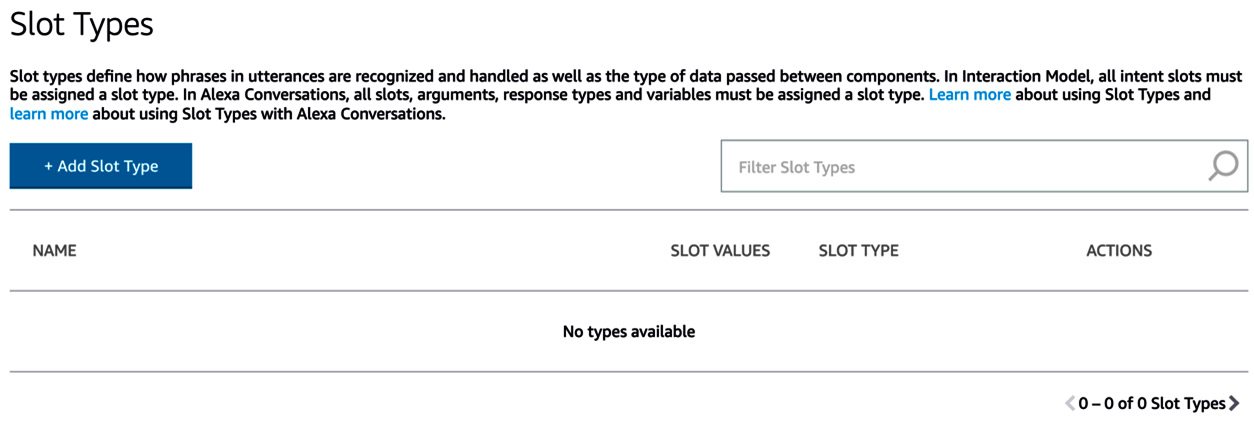
Figure 12.18 – Alexa skill Slot Types page
Endpoint
Endpoint will receive the JSON payload request. We can leave the default here as we are using an AWS Lambda function.
If you want to host your Alexa service somewhere other than AWS, you can select the HTTPS option:

Figure 12.19 – Alexa skill Endpoint page
Code
Now that we have explored the Build section, let's jump to the Alexa service part, which is our Node.js code:
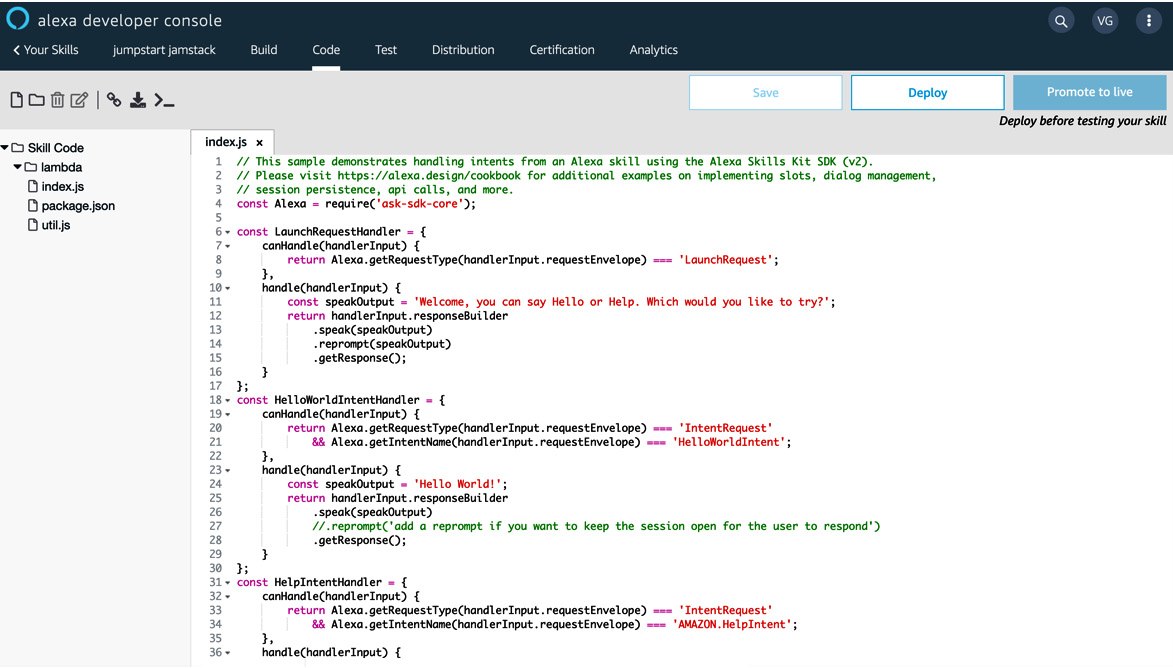
Figure 12.20 – Alexa skill Code page
As you can see, the interface provides a code editor where we can implement our Alexa service.
In our index.js file, we can create the handlers for our intent. Any new intent we add can be implemented here. Alexa provides an API to handle the request. It's called the ask-sdk-core API. The requests are inside the handlerInput JSON object.
The handler will process our intent and, from here, will make the Sanity call to our Sanity dataset.
At the top of our index.js file, we require ask-sdk-core:
const Alexa = require('ask-sdk-core');
The handler includes two functions: the canHandle() function checks whether this handler can process this request by checking the type of request, and the handle() function will process the request and return a response:
const MyCustomHandler = {
canHandle(handlerInput) {
return Alexa.getRequestType(handlerInput.requestEnvelope) === 'MyRequestType' && Alexa.getIntentName(handlerInput.requestEnvelope) === 'MyIntent';
}
};
In our canHandle() function, we get the request type and the request name using the ask-sdk-core API.
If both conditions are true, it means that this handler can handle the request, so we implement the handle() function:
const MyCustomHandler = {
canHandle(handlerInput) {
return Alexa.getRequestType(handlerInput.requestEnvelope) === 'MyRequestType' && Alexa.getIntentName(handlerInput.requestEnvelope) === 'MyIntent';
},
handle(handlerInput) {
const speakOutput = 'This is my custom text response';
return handlerInput.responseBuilder
.speak(speakOutput)
.getResponse();
}
};
In this simple example, we are just returning a text. The response we built using the responseBuilder() function passes the text to the speak() function and the getResponse() function will build the response.
The first handler we found in our file is LaunchRequestHandler. This handler is called when you open the skill with the command Alexa, open jumpstart jamstack:
const LaunchRequestHandler = {
canHandle(handlerInput) {
return Alexa.getRequestType(handlerInput.requestEnvelope) === 'LaunchRequest';
},
handle(handlerInput) {
const speakOutput = 'Welcome, you can say Hello or Help. Which would you like to try?';
return handlerInput.responseBuilder
.speak(speakOutput)
.reprompt(speakOutput)
.getResponse();
}
};
It will return the message, Welcome, you can say Hello or Help. Which would you like to try?
Let's change the message to make it related to our skill. Replace it with Welcome to the jumpstart jamstack skill, and you can say, tell me the upcoming events or Help. Which would you like to try?
So, our LaunchRequest handler will be as follows:
const LaunchRequestHandler = {
canHandle(handlerInput) {
return Alexa.getRequestType(handlerInput.requestEnvelope) === 'LaunchRequest';
},
handle(handlerInput) {
const speakOutput = 'Welcome to the jumpstart jamstack skill, you can say tell me the upcoming events or Help. Which would you like to try?';
return handlerInput.responseBuilder
.speak(speakOutput)
.reprompt(speakOutput)
.getResponse();
}
};
Press the Save button above the editor:
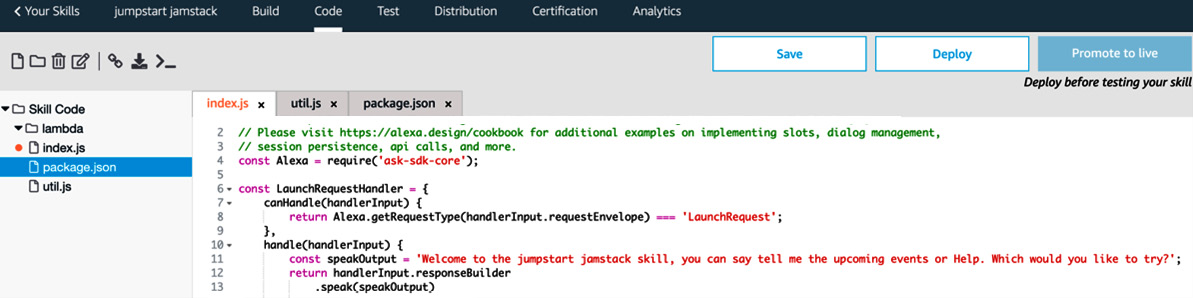
Figure 12.21 – Alexa skill Code page
After that, we find HelloWorldIntentHandler. This is the custom handler that handles HelloWorldIntent, which is included in our skill by default:
const HelloWorldIntentHandler = {
canHandle(handlerInput) {
return Alexa.getRequestType(handlerInput.requestEnvelope) === 'IntentRequest'
&& Alexa.getIntentName(handlerInput.requestEnvelope) === 'HelloWorldIntent';
},
handle(handlerInput) {
const speakOutput = 'Hello World!';
return handlerInput.responseBuilder
.speak(speakOutput)
//.reprompt('add a reprompt if you want to keep the session open for the user to respond')
.getResponse();
}
};
HelpIntentHandler provides a description of the skill to the user:
const HelpIntentHandler = {
canHandle(handlerInput) {
return Alexa.getRequestType(handlerInput.requestEnvelope) === 'IntentRequest'
&& Alexa.getIntentName(handlerInput.requestEnvelope) === 'AMAZON.HelpIntent';
},
handle(handlerInput) {
const speakOutput = 'You can say hello to me! How can I help?';
return handlerInput.responseBuilder
.speak(speakOutput)
.reprompt(speakOutput)
.getResponse();
}
};
CancelAndStopIntent stops the skill. In this example, both intents are handled in the same way, but you can separate them into two separate handlers if you need to retrieve a different message back:
const CancelAndStopIntentHandler = {
canHandle(handlerInput) {
return Alexa.getRequestType(handlerInput.requestEnvelope) === 'IntentRequest'
&& (Alexa.getIntentName(handlerInput.requestEnvelope) === 'AMAZON.CancelIntent'
|| Alexa.getIntentName(handlerInput.requestEnvelope) === 'AMAZON.StopIntent');
},
handle(handlerInput) {
const speakOutput = 'Goodbye!';
return handlerInput.responseBuilder
.speak(speakOutput)
.getResponse();
}
};
SessionEndedRequestHandler is called when the intent is fulfilled and there is no reprompt() function in the response. It does not return any message:
const SessionEndedRequestHandler = {
canHandle(handlerInput) {
return Alexa.getRequestType(handlerInput.requestEnvelope) === 'SessionEndedRequest';
},
handle(handlerInput) {
// Any cleanup logic goes here.
return handlerInput.responseBuilder.getResponse();
}
};
ErrorHandler is called when an error occurs within your skill. It notifies the user with a message:
// Generic error handling to capture any syntax or routing errors. If you receive an error
// stating the request handler chain is not found, you have not implemented a handler for
// the intent being invoked or included it in the skill builder below.
const ErrorHandler = {
canHandle() {
return true;
},
handle(handlerInput, error) {
console.log(`~~~~ Error handled: ${error.stack}`);
const speakOutput = `Sorry, I had trouble doing what you asked. Please try again.`;
return handlerInput.responseBuilder
.speak(speakOutput)
.reprompt(speakOutput)
.getResponse();
}
};
At the end of the file, we export the handler using the ask-sdk-core API:
// The SkillBuilder acts as the entry point for your skill, routing all request and response
// payloads to the handlers above. Make sure any new handlers or interceptors you've
// defined are included below. The order matters - they're processed top to bottom.
exports.handler = Alexa.SkillBuilders.custom()
.addRequestHandlers(
LaunchRequestHandler,
HelloWorldIntentHandler,
HelpIntentHandler,
CancelAndStopIntentHandler,
SessionEndedRequestHandler,
)
.addErrorHandlers(
ErrorHandler,
)
.lambda();
Now, press the Deploy button above the editor to deploy our changes:

Figure 12.22 – Alexa skill Code page
Building our handler
Now we need to build our handler to get events from our Sanity Studio dataset. We will use the Sanity Client npm plugin as we did in Chapter 11, APIs - Extending Gatsby:
- Go to npm to get the latest version of the package: https://www.npmjs.com/package/@sanity/client. You can see the version on the right-hand side of the page. At the time of writing this book, the latest stable version is 1.150.1:
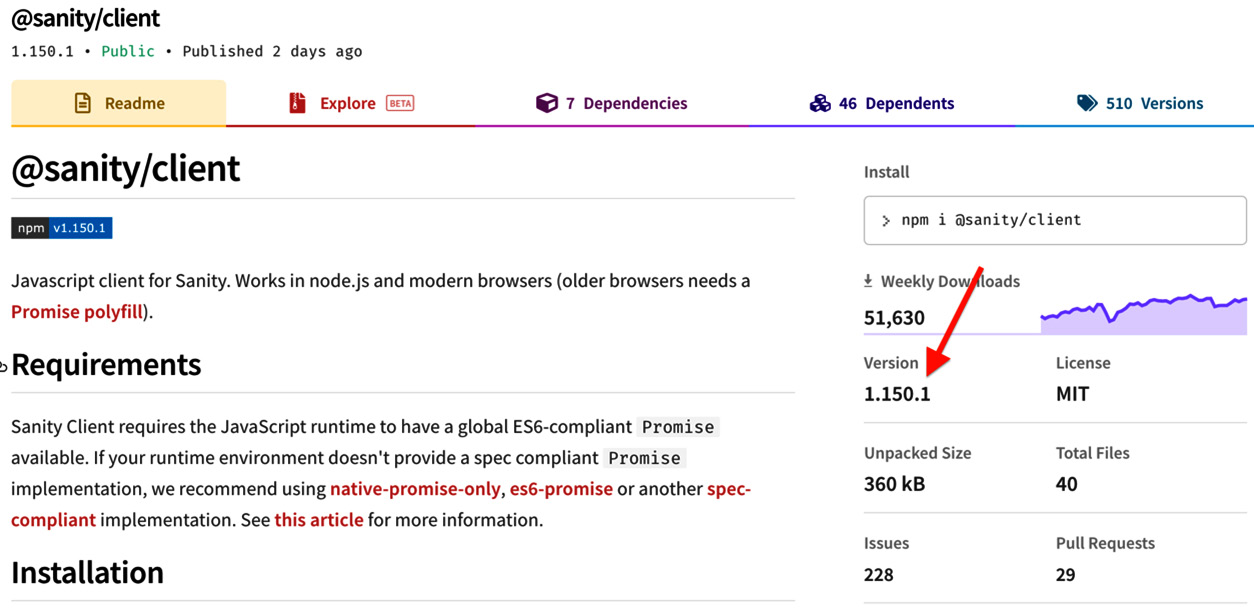
Figure 12.23 – NPM Sanity Client page
- In our Code editor in our Alexa console, open the package.json file and add the Sanity Client npm plugin to the dependencies array:

Figure 12.24 – Alexa skill Code page
- Now, click on the Save button and then the Deploy button. Our package will be added automatically.
- In the index.js page, after HelloWorldIntentHandler, we can add GetUpcomingEventsIntentHandler:
- Let's start from the canHandle() function. We know that the request type must be an IntentRequest and that our intent name is GetUpcomingEventsIntent, so we write the following:
const GetUpcomingEventsIntentHandler = {
canHandle(handlerInput) {
return Alexa.getRequestType(handlerInput.requestEnvelope) === 'IntentRequest'
&& Alexa.getIntentName(handlerInput.requestEnvelope) === 'GetUpcomingEventsIntent';
},
};
- Now we can implement the handle() function. Because the Sanity Client returns a Promise, the handle() function must be asynchronous.
The first step is to initialize the Sanity Client:
const GetUpcomingEventsIntentHandler = {
canHandle(handlerInput) {
...
}
async handle(handlerInput) {
const sanityClient = require('@sanity/client')
const client = sanityClient({
projectId: 'your-project-id',
dataset: 'your-dataset',
useCdn: true
});
}
};
- Now we can fetch the data using the fetch() function from the Sanity Client API.
The fetch() function requires a Graph Oriented Query (GROQ). In our case, we want five documents of the event type where the event date is greater than the current date. We also prepare the list array where we can add our results and the speakOutput variable, where we can add the message. Then we use the fetch() function to get the results:
const GetUpcomingEventsIntentHandler = {
canHandle(handlerInput) {
...
}
async handle(handlerInput) {
const sanityClient = require('@sanity/client')
const client = sanityClient({
projectId: 'your-project-id',
dataset: 'your-dataset',
useCdn: true
});
const query = '*[_type == "event"]'
let speakOutput
let list = [];
await client.fetch(query).then(events => {
events.forEach(event => {
list.push(event.name)
})
})
}
};
Now, if there are upcoming events, they will be added to the list array.
- We can now build the response:
const GetUpcomingEventsIntentHandler = {
canHandle(handlerInput) {
...
}
async handle(handlerInput) {
const sanityClient = require('@sanity/client')
const client = sanityClient({
projectId: 'your-project-id',
dataset: 'your-dataset',
useCdn: true
});
. . .
if (list.length > 0) {
speakOutput = `I have found ${list.length} events: ${list.join(', ')}`;
}
else {
speakOutput = ` I am sorry, there are not upcoming events`;
}
return handlerInput.responseBuilder
.speak(speakOutput)
.getResponse();
}
}
};
- The last part is to export our new handler, GetUpcomingEventsIntentHandler, to exports.handler at the bottom of the file:
exports.handler = Alexa.SkillBuilders.custom()
.addRequestHandlers(
...
GetUpcomingEventsIntentHandler,
...
)
.addErrorHandlers(
ErrorHandler,
)
.lambda();
- Now, press the Save and Deploy buttons above the editor.
At this point, we have created a new skill, configured the intents, and created the handler for the intent. We are now ready to test our skill.
Test
If you want to test your skill, click on the Test link on the top menu:
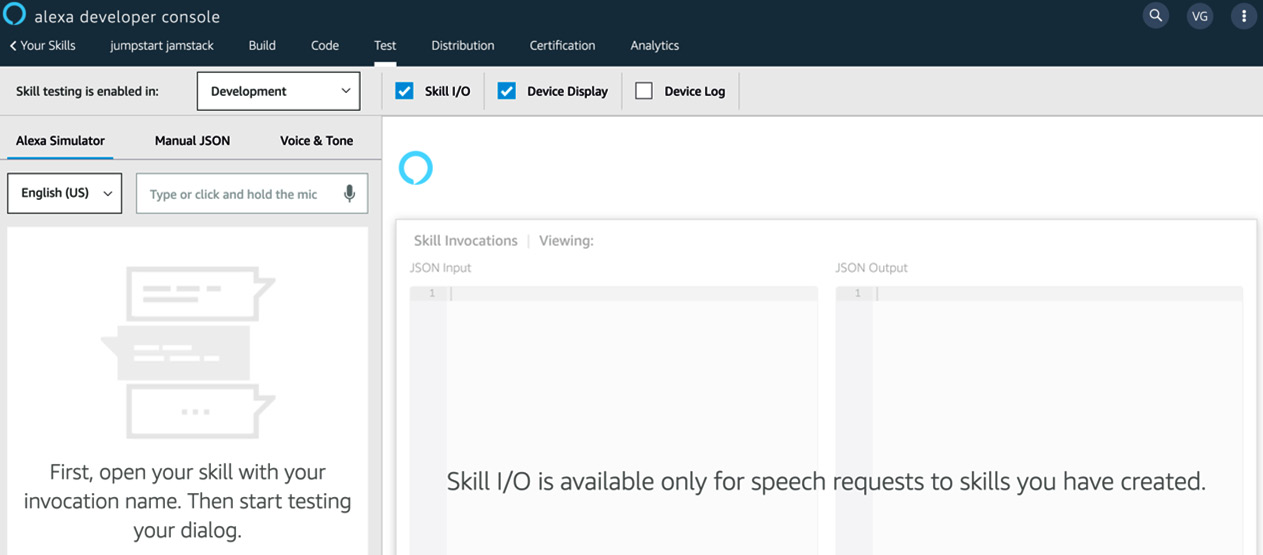
Figure 12.25 – Alexa skill Test page
From the left-hand side of the Alexa Simulator tab, you can speak or type your intent. Every skill has a launch request that can be called with the command Alexa, open invocationName. In our case, this will be Alexa, open jumpstart jamstack:
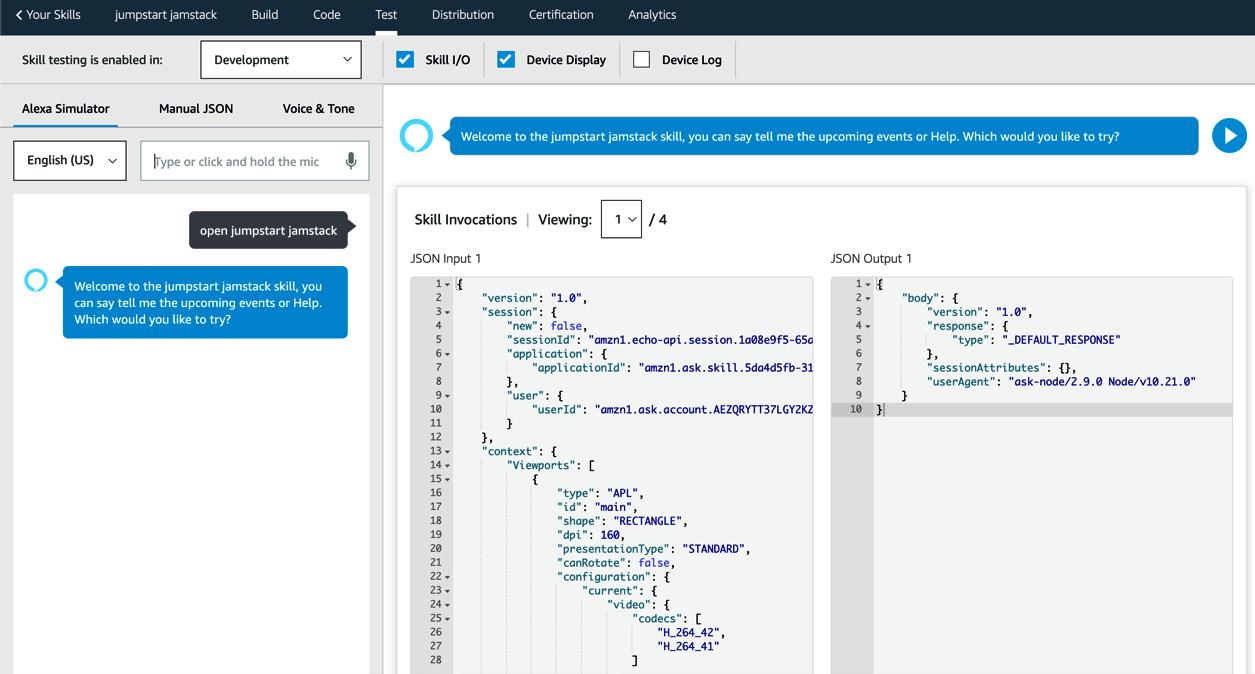
Figure 12.26 – Alexa skill Test page
As shown, we received a response from the launch request. In the Skill Invocations section, you can see the JSON input from the skill interface to the skill service.
Now, type the voice command in this way: ask jumpstart jamstack to tell me the upcoming events and examine the response.
Alexa will prompt the message containing five upcoming events:

Figure 12.27 – Alexa skill Test page
Summary
In this chapter, we went through the creation of an Alexa skill. We saw the difference between the skill interface and the skill service. We went through the component of an Alexa skill, and we have extended its functionality with a new command. We have also integrated our skill with our Sanity Studio. This means that our events are now reachable via a web application and via Alexa!
In the next chapter, we will return to our Gatsby application and explore the Tailwind CSS framework, which will help us to improve the visual aspect of our application.