
Proper data fetching goes through some of the most common patterns to make a child and parent communicate using callbacks. We'll learn how we can use a common parent to share data across components that are not directly connected. We will then start learning about the new React Context API and React Suspense.
We will cover the following topics in this chapter:
- React Context API
- How to consume a context with useContext
- How to use React Suspense with SWR
Technical requirements
To complete this chapter, you will need the following:
- Node.js 12+
- Visual Studio Code
You can find the code for this chapter in the book's GitHub repository: https://github.com/PacktPublishing/React-17-Design-Patterns-and-Best-Practices-Third-Edition/tree/main/Chapter06.
Introducing the React Context API
The React Context API has been officially added since version 16.3.0; before it was just experimental. The new Context API is a game-changer. A lot of people are moving away from Redux in order to use the new Context API. Context provides a way to share data between components without passing a prop to all the child components.
Let's see a basic example where we can use the new Context API. We will do the same example we did in Chapter 3, React Hooks, where we fetched some GitHub issues, but now using the Context API.
Creating our first context
The first thing you need to do is to create the issue context. For this, you can create a folder called contexts inside your src folder and then inside that, add the Issue.tsx file.
Then, you need to import some functions from React and axios:
import { FC, createContext, useState, useEffect, ReactElement, useCallback } from 'react'
import axios from 'axios'
At this point, it is clear that you should install axios. If you still don't have it, just do the following:
npm install axios
npm install --save-dev @types/axios
Then we need to declare our interfaces:
export type Issue = {
  number: number
  title: string
  url: string
  state: string
}

interface Issue_Context {
  issues: Issue[]
  url: string
}

interface Props {
  url: string
}
The first thing we need to do after this is to create our context by using the createContext function and define the value we want to export:
export const IssueContext = createContext<Issue_Context>({
  issues: [],
  url: ''
})
Once we have IssueContext, we need to create a component where we can receive props, set some states, and perform the fetch by using useEffect, and then we render IssueContext.Provider where we specify the context (value) we will export:
const IssueProvider: FC<Props> = ({ children, url }) => {
  // State
  const [issues, setIssues] = useState<Issue[]>([])

  const fetchIssues = useCallback(async () => {
    const response = await axios(url)

    if (response) {
      setIssues(response.data)
    }
  }, [url])

  // Effects
  useEffect(() => {
    fetchIssues()
  }, [fetchIssues])

  const context = {
    issues,
    url
  }

  return <IssueContext.Provider value={context}>{children}</IssueContext.Provider>
}

export default IssueProvider
As you know, every time you want to use a function inside the useEffect Hook, you need to wrap your function with the useCallback Hook. A good practice if you want to use async/await is to have it in a separate function and not directly in useEffect.
Once we perform the fetch and get the data in our issues state, then we add all the values we want to export as context, then when we render IssueContext.Provider, we pass the context on the value prop, and finally, we render the children of the component.
Wrapping our components with the provider
The way you consume a context is divided into two parts. The first one is where you wrap your app with your context provider, so this code can be added to App.tsx (normally all the providers are defined in parent components).
Notice that here we are importing the IssueProvider component:
// Providers
import IssueProvider from '../contexts/Issue'

// Components
import Issues from './Issues'

const App = () => {
  return (
    <IssueProvider url=
      "https://api.github.com/repos/ContentPI/ContentPI/issues">
      <Issues />
    </IssueProvider>
  )
}

export default App;
As you can see we are wrapping the Issues component with IssueProvider, which means inside the Issues component we can consume our context and get the issues value.
Consuming context with useContext
If you've already placed IssueProvider in App.tsx, now you can consume your context in your Issues component by using the useContext Hook.
Notice that here we are importing the IssueContext context (between { }):
// Dependencies
import { FC, useContext } from 'react'

// Contexts
import { IssueContext, Issue } from '../contexts/Issue'

const Issues: FC = () => {
  // Here you consume your Context, and you can grab the issues value.
  const { issues, url } = useContext(IssueContext)

  return (
    <>
      <h1>ContentPI Issues from Context</h1>

      {issues.map((issue: Issue) => (
        <p key={`issue-${issue.number}`}>
          <strong>#{issue.number}</strong> {' '}
          <a href={`${url}/${issue.number}`}>{issue.title}</a> {' '}
          {issue.state}
        </p>
      ))}
    </>
  )
}

export default Issues
If you did everything correctly, you should be able to see the issues list:

The Context API is super useful when you want to separate your application from your data and do all the fetching in there. Of course, there are multiple uses for the Context API, which can also be used for theming or to pass functions; it all depends on your application.
In the next section, we are going to learn how to implement React Suspense using the SWR library.
Introducing React Suspense with SWR
React Suspense was introduced in React 16.6. Right now (April 2021) this feature is still experimental and you should not use it in your production applications. Suspense lets you suspend component rendering until a condition is met. You can render a loading component or anything you want as a fallback of Suspense. Right now there are only two use cases for this:
- Code splitting: When you split your application and you're waiting to download a chunk of your app when a user wants to access it
- Data fetching: When you're fetching data
In both scenarios, you can render a fallback, which can normally be a loading spinner, some loading text, or even better, a placeholder skeleton.
Introducing SWR
Stale-While-Revalidate (SWR) is a React Hook for data fetching; it is an HTTP cache invalidation strategy. SWR is a strategy to first return the data from cache (stale), then send the fetch request (revalidate), and finally, return with up-to-date data, and was developed by Vercel, the company that created Next.js.
Building a Pokedex!
I could not find a better example to explain React Suspense and SWR than building a Pokedex. We will use a public Pokemon API (https://pokeapi.co); gotta catch 'em all!
The first thing you need to do is to install some packages:
npm install swr react-loading-skeleton styled-components
For this example, you will need to create the Pokemon directory at src/components/Pokemon. The first thing we need to do to work with SWR is to create a fetcher file where we will perform our requests.
This file should be created at src/components/Pokemon/fetcher.ts:
const fetcher = (url: string) => {
  return fetch(url).then((response) => {
    if (response.ok) {
      return response.json()
    }

    return {
      error: true
    }
  })
}

export default fetcher
If you notice, we are returning an object with an error if the response is not successful. This is because sometimes we can get a 404 error from the API that can cause the app to break.
Once you have created your fetcher, let's modify App.tsx to configure SWRConfig and enable Suspense:
// Dependencies
import { SWRConfig } from 'swr'

// Components
import PokeContainer from './Pokemon/PokeContainer'
import fetcher from './Pokemon/fetcher'

// Styles
import { StyledPokedex, StyledTitle } from './Pokemon/Pokemon.styled'

const App = () => {
  return (
    <>
      <StyledTitle>Pokedex</StyledTitle>

      <SWRConfig
        value={{
          fetcher,
          suspense: true,
        }}
      >
        <StyledPokedex>
          <PokeContainer />
        </StyledPokedex>
      </SWRConfig>
    </>
  )
}

export default App
As you can see, we need to wrap our PokeContainer component inside SWRConfig to be able to fetch the data. The PokeContainer component will be our parent component where we will add our first Suspense. This file exists at src/components/Pokemon/PokeContainer.tsx:
import { FC, Suspense } from 'react'

import Pokedex from './Pokedex'

const PokeContainer: FC = () => {
  return (
    <Suspense fallback={<h2>Loading Pokedex...</h2>}>
      <Pokedex />
    </Suspense>
  )
}

export default PokeContainer
As you can see, we are defining a fallback for our first Suspense, which is just Loading Pokedex... text. You can render whatever you want in there, React components or plain text. Then, we have our Pokedex component inside Suspense.
Now let's take a look at our Pokedex component where we are going to fetch data for the first time by using the useSWR Hook:
// Dependencies
import { FC, Suspense } from 'react'
import useSWR from 'swr'

// Components
import LoadingSkeleton from './LoadingSkeleton'
import Pokemon from './Pokemon'

import { StyledGrid } from './Pokemon.styled'

const Pokedex: FC = () => {
  const { data: { results } } =
    useSWR('https://pokeapi.co/api/v2/pokemon?limit=150')

  return (
    <>
      {results.map((pokemon: { name: string }) => (
        <Suspense fallback={<StyledGrid><LoadingSkeleton /></StyledGrid>}>
          <Pokemon key={pokemon.name} pokemonName={pokemon.name} />
        </Suspense>
      ))}
    </>
  )
}

export default Pokedex
As you can see, we are fetching the first 150 Pokemon because I'm old school and those were the first generation. Right now I don't know how many Pokemon exist. Also, if you notice, we are grabbing the results variable that comes from the data (this is the actual response from the API). Then we map our results to render each Pokemon but we add a Suspense component to each one with a <LoadingSkeleton /> fallback (<StyledGrid /> has some CSS styles to make it look nicer), and finally, we pass pokemonName to our <Pokemon> component, and this is because the first fetch just brings us the name of the Pokemon but we need to do another fetch to bring the actual Pokemon data (name, types, power, and so on).
Then, finally, our Pokemon component will perform a specific fetch by the Pokemon name and will render the data:
// Dependencies
import { FC } from 'react'
import useSWR from 'swr'

// Styles
import { StyledCard, StyledTypes, StyledType, StyledHeader } from './Pokemon.styled'

type Props = {
  pokemonName: string
}

const Pokemon: FC<Props> = ({ pokemonName }) => {
  const { data, error } =
    useSWR(`https://pokeapi.co/api/v2/pokemon/${pokemonName}`)

  // Do you remember the error we set on the fetcher?
  if (error || data.error) {
    return <div />
  }

  if (!data) {
    return <div>Loading...</div>
  }

  const { id, name, sprites, types } = data
  const pokemonTypes = types.map((pokemonType: any) =>
    pokemonType.type.name)

  return (
    <StyledCard pokemonType={pokemonTypes[0]}>
      <StyledHeader>
        <h2>{name}</h2>
        <div>#{id}</div>
      </StyledHeader>

      <img alt={name} src={sprites.front_default} />

      <StyledTypes>
        {pokemonTypes.map((pokemonType: string) => (
          <StyledType key={pokemonType}>{pokemonType}</StyledType>
        ))}
      </StyledTypes>
    </StyledCard>
  )
}

export default Pokemon
Basically, in this component, we put together all the Pokemon data (id, name, sprites, and types) and we render the information. As you have seen, I'm using styled components, which are amazing, so if you want to know the styles I'm using for Pokedex, here is the Pokemon.styled.ts file:
import styled from 'styled-components'

// Type colors
const type: any = {
  bug: '#2ADAB1',
  dark: '#636363',
  dragon: '#E9B057',
  electric: '#ffeb5b',
  fairy: '#ffdbdb',
  fighting: '#90a4b5',
  fire: '#F7786B',
  flying: '#E8DCB3',
  ghost: '#755097',
  grass: '#2ADAB1',
  ground: '#dbd3a2',
  ice: '#C8DDEA',
  normal: '#ccc',
  poison: '#cc89ff',
  psychic: '#705548',
  rock: '#b7b7b7',
  steel: '#999',
  water: '#58ABF6'
}

export const StyledPokedex = styled.div`
  display: flex;
  flex-wrap: wrap;
  flex-flow: row wrap;
  margin: 0 auto;
  width: 90%;

  &::after {
    content: '';
    flex: auto;
  }
`

type Props = {
  pokemonType: string
}

export const StyledCard = styled.div<Props>`
  position: relative;
  ${({ pokemonType }) => `
    background: ${type[pokemonType]} url(./pokeball.png) no-repeat;
    background-size: 65%;
    background-position: center;
  `}
  color: #000;
  font-size: 13px;
  border-radius: 20px;
  margin: 5px;
  width: 200px;

  img {
    margin-left: auto;
    margin-right: auto;
    display: block;
  }
`

export const StyledTypes = styled.div`
  display: flex;
  margin-left: 6px;
  margin-bottom: 8px;
`

export const StyledType = styled.span`
  display: inline-block;
  background-color: black;
  border-radius: 20px;
  font-weight: bold;
  padding: 6px;
  color: white;
  margin-right: 3px;
  opacity: 0.4;
  text-transform: capitalize;
`

export const StyledHeader = styled.div`
  display: flex;
  justify-content: space-between;
  width: 90%;

  h2 {
    margin-left: 10px;
    margin-top: 5px;
    color: white;
    text-transform: capitalize;
  }

  div {
    color: white;
    font-size: 20px;
    font-weight: bold;
    margin-top: 5px;
  }
`

export const StyledTitle = styled.h1`
  text-align: center;
`

export const StyledGrid = styled.div`
  display: flex;
  flex-wrap: wrap;
  flex-flow: row wrap;
  div {
    margin-right: 5px;
    margin-bottom: 5px;
  }
`
Finally, our LoadingSkeleton component should be like this:
import { FC } from 'react'
import Skeleton from 'react-loading-skeleton'

const LoadingSkeleton: FC = () => (
  <div>
    <Skeleton height={200} width={200} />
  </div>
)

export default LoadingSkeleton
This library is amazing. It lets you create skeleton placeholders to wait for the data. Of course, you can build as many forms as you want. You have probably seen this effect on sites such as LinkedIn or YouTube.
Testing our React Suspense
Once you have all the pieces of the code working, there is a trick you can do in order to see all the Suspense fallbacks. Normally, if you have a high-speed connection, it is hard to see it, but you can slow down your connection to see how everything is being rendered. You can do this by selecting Slow 3G connection in your Network tab on your Chrome inspector:

Once you set the Slow 3G preset and you run your project, the first fallback you will see is Loading Pokedex...:

Then, you will see the Pokemon fallbacks that are rendering SkeletonLoading for each Pokemon that is being loaded:

Normally those loaders have animation but you won't see that in this book, of course! And then you will start seeing how the data is rendering and some images start appearing:

If you wait until all the data has downloaded correctly, you should now see the Pokedex with all the Pokemon:

Pretty nice, huh? But there is something else to mention; as I mentioned before, SWR will bring the data from the cache first and then will revalidate the data all the time to see whether there are new updates. This means that any time the data changes, SWR will perform another fetch to re-validate whether the old data is still valid or needs to be replaced by new ones. You can see this effect even if you move out from the Pokedex tab to another and then you come back. You'll see that your Network terminal for the first time should look like this:

As you can see, we performed 151 initial requests (1 for the Pokemon lists and 150 others, 1 for each Pokemon), but if you change the tab and you come back, you will see how SWR is fetching again:
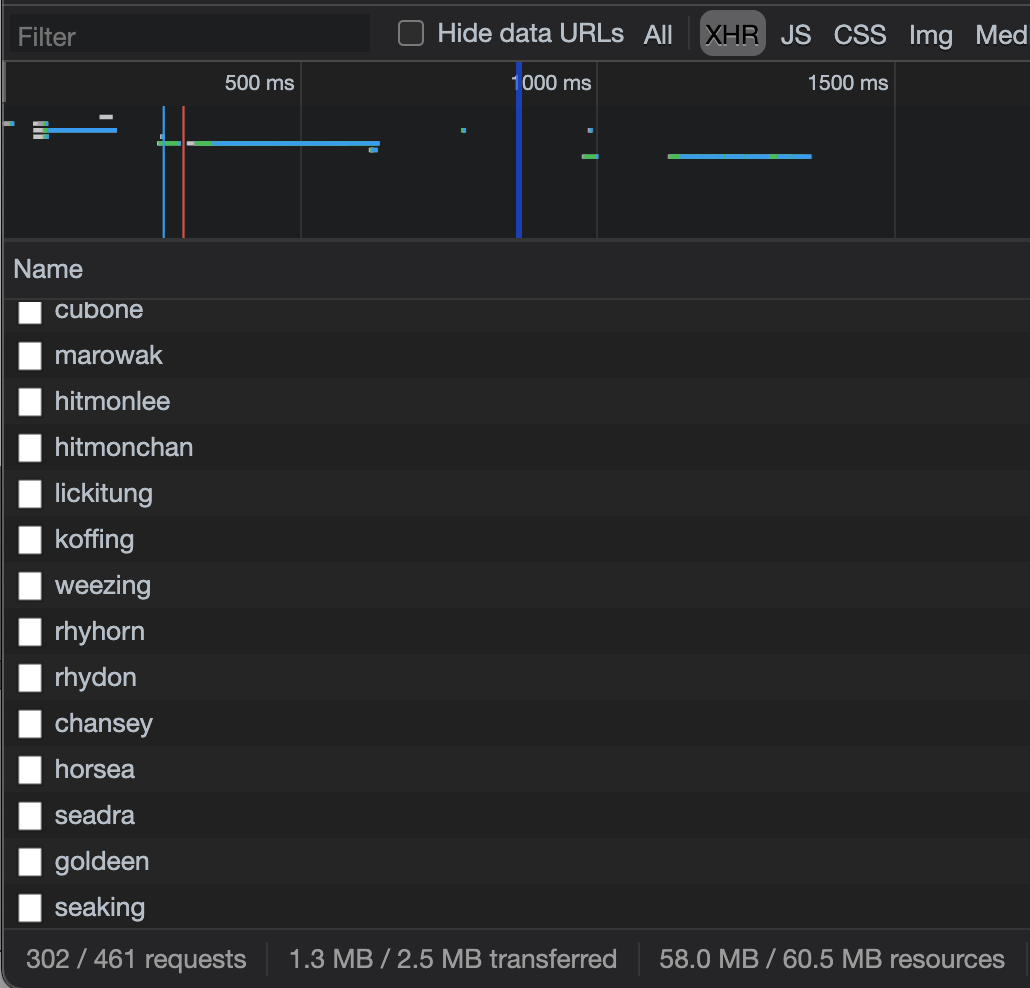
Now you can see that it is performing 302 requests (another 151). This is very useful when you have real-time data that you want to fetch every second or every minute.
Right now, React Suspense does not have a defined pattern of use, which means you can find different ways to use it and there are not yet some good practices defined for this. I found SWR is the easiest and most understandable way of playing with React Suspense and I think it is a very powerful library that can be used even without Suspense.
Summary
I really hope you enjoyed reading this chapter, which contains a lot of information about the React Context API and how to implement React Suspense with SWR.
In the next chapter, we will learn how to handle forms and animations.