Chapter 9: Bringing Your Admins into the AWS Administrative Backplane
In the previous chapter, we took the time to put some thought into how we would like to administrate our AWS environments. Now that we know how our AWS accounts will be structured, and the criteria for separating each environment, we can begin bridging our example organization's IAM infrastructure to AWS.
The next two chapters will focus on implementing administrative access to the AWS backplane. First, we will address getting our organization's identity information into AWS SSO. This will entail connecting our AWS SSO service to our organization's identity provider. With our organization's IDP set as the external identity provider, we will then look at a couple of strategies for account management within AWS SSO when using an external IDP. The first will be manual account linking. The second will be automated provisioning and life cycle management through the System for Cross-domain Identity Management protocol, or SCIM. Finally, we will define the conditions for provisioning administrative users into the backplanes for their appropriate AWS accounts using groups.
In this chapter, we will be covering the following topics:
- Defining our organization's identity source
- Provisioning administrative accounts in AWS – account linking
- Provisioning administrative accounts in AWS – SCIM provisioning
Technical requirements
To get the most out of this chapter, you will need the following:
- An AWS account
- An SAML2 and SCIM compliant identity provider, such as Okta Identity Cloud, PingOne, or Azure Active Directory
- A populated user directory to act as the user store for that identity provider
Defining our organization's identity source
In the previous chapter, we were introduced to the Redbeard Identity organization. Based upon that organization's business requirements, organizational structure, current identity capabilities, and account attribute schema, we designed an administrative model for our AWS organization:

Figure 9.1 – The Redbeard Identity AWS organization admin model
Now that we know how we want AWS accounts to be created and managed, it is time to connect the existing identity provider to the AWS SSO service so that we can bring our administrators into their respective AWS administrative backplanes. Though we won't dive into the details of administrative user authentication and authorization until Chapter 10, Administrative Single Sign-On to the AWS Backplane, connecting an external identity provider to the AWS SSO service is a prerequisite for either a just-in-time provisioning and account linking model or for using SCIM.
Tip
The examples used in this book will be shown using the Okta Identity Cloud. Whereas the configuration within AWS will be the same regardless the IDP technology used within an organization, be advised that the requirements, steps, and options available for user account administration from within the IDP may be different, depending on your IDP platform.
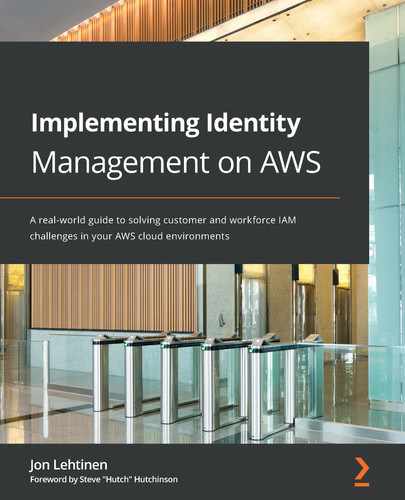
The last time we worked within AWS SSO, we configured AWS SSO itself to be its own identity source. AWS SSO became our own SAML2 IDP, and we could provision the accounts that we created and managed within its own directory. This way, AWS SSO could act as the IDP for managed AWS accounts within our AWS organization. It could also be the IDP for our SaaS apps and any other SAML2 compliant service providers (SPs) where we wanted to use those identities:
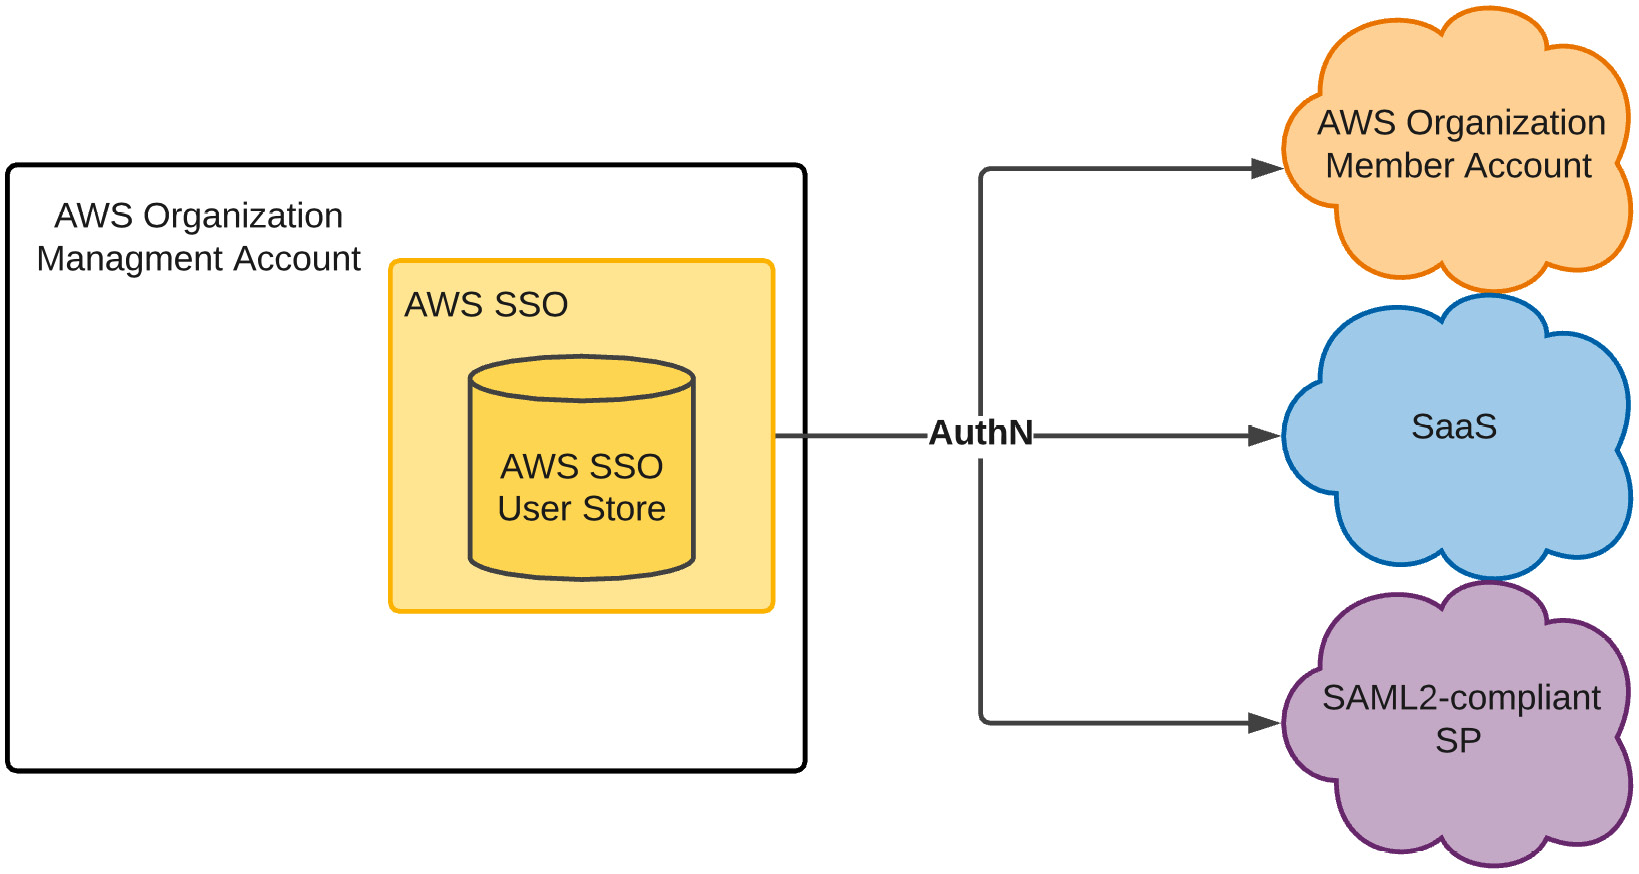
Figure 9.2 – AWS SSO as an IDP and user store with users created and managed within AWS SSO
Our use case is different this time. While AWS SSO remains the IDP and user store for administrative accounts for member accounts within our AWS organization, AWS SSO is no longer the authoritative source for that identity information – at least as far as our example Redbeard Identity company is concerned. AWS SSO will issue authentication tokens to each connected AWS account, but only upon receiving a successful authentication token from an external IDP:

Figure 9.3 – AWS SSO configured to use an external IDP
The preceding diagram shows how the external IDP can synchronize accounts from the external IDP's user store into AWS SSO's user store through SCIM. In addition to SCIM provisioning, AWS SSO can populate its local directory with an organization's Active Directory (AD) accounts through either an AD Connector, or through an AWS Managed AD instance. For organizations that use Active Directory as the user store for their identity provider, both these methods will allow AWS SSO to match the authenticated user from the external IDP's SAML2 assertion to its corresponding record in AWS SSO. It is not a requirement that accounts be directly synchronized from the IDP's user store; Redbeard Identity does not use Active Directory, but it could still match accounts that are manually provisioned with matching values from its IDP's directory. That said, doing so would introduce significant administrative overhead. We will investigate the advantages of using a directory synchronization strategy such as SCIM or an AD Connector over manual provisioning as we move through this chapter.
Connecting our IDP to AWS SSO
Let's connect our IDP to AWS SSO:
- From the AWS Management Console, we go to the AWS SSO service and select Settings.
- Assuming our configuration remains the same from the activities we did in Chapter 6, Introduction to AWS Organizations and AWS Single Sign-On, we may already have values defined for our Identity source similar to what can be seen in the following screenshot:

Figure 9.4 – Identity source settings in AWS SSO
- The preexisting configuration will not impact anything we need to do; however, if we want to start fresh, we can click the Delete AWS SSO configuration button at the bottom of the page to clear out all the settings. Regardless, once the settings have been cleared, we will return to this page and click Change next to Identity source.
- This takes us to a wizard where we can define where our identities are sourced. As we intend to use an external IDP for our Redbeard Identity example, we will select the radial button next to External Identity Provider.
- This populates some URLs required to configure the SAML2 relationship with the external IDP. It also provides a link to download the AWS SSO SAML metadata:

Figure 9.5 – Configuration values for AWS SSO to become a service provider in our IDP
- From our IDP, we will build the connection to our AWS Single-Sign On service by populating that connection information. We also need to define our Application username format. AWS SSO uses Email as its unique identifier, so we must set that as the unique identifier to be sent by the IDP. This process will look different depending on the IDP we use, but the basic details will be the same across each one:
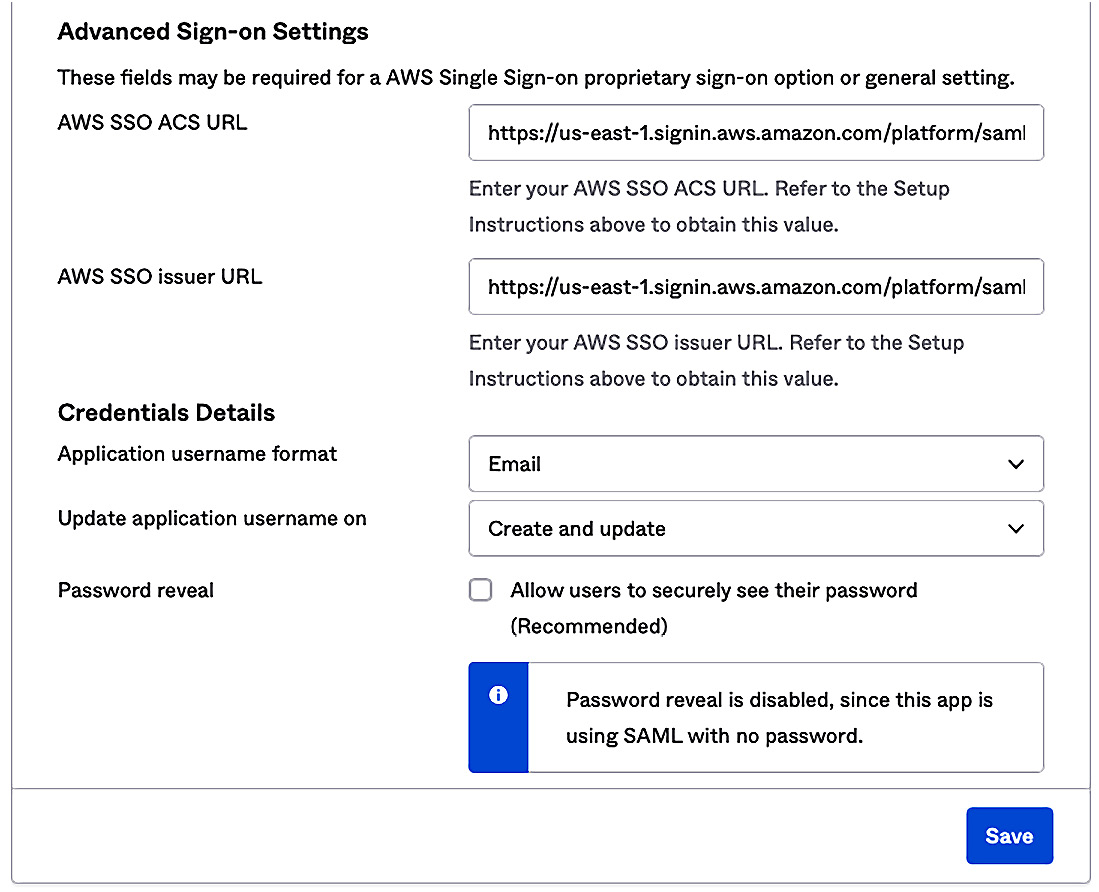
Figure 9.6 – The IDP side configuration for AWS SSO
- Once we save the connection information inside our IDP, we can download our IDP's metadata file. This metadata file provides the IDP's endpoints, username identifier format information, and most importantly, the public signing key that AWS SSO can use to validate that an incoming assertion is genuinely from the IDP. Once we have the IDP's metadata, we can go back to AWS SSO and upload it in the Change identity source wizard. Alternatively, we could also populate the values directly in AWS SSO if our IDP did not support metadata:

Figure 9.7 – Uploading the external IDP metadata into AWS SSO
- Next, we are prompted to confirm that we want to change our identity source for AWS SSO. This page details several warnings about the additional responsibilities we will take on by doing so. Type ACCEPT and move on:
Figure 9.8 – Confirming the change of our identity source
- AWS SSO processes the information and confirms the change:
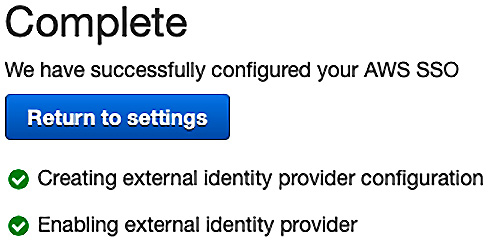
Figure 9.9 – New identity source configured
- With the IDP configured, our AWS organization will now use our external IDP for user authentication. However, we must still manage the accounts that will be used with the AWS accounts:

Figure 9.10 – Our provisioning option is currently set to manual
Now that we have an external IDP configured, we need to populate AWS SSO's user store with our administrative accounts. First, we will manually provision some accounts to demonstrate account linking functionality.
Provisioning administrative accounts in AWS – account linking
Account linking is when a service provider correlates a locally managed account with the subject of an external IDP's federated token. The local account may get created in a just-in-time fashion from the information contained within the IDP's authentication token, or the account may have been created earlier and was correlated by matching on a unique identifier, such as an email address. Arguably, when both AWS SSO and the IDP use Active Directory as their account stores, but the IDP itself does not manage the accounts, this is also an example of account linking. Though all the data ultimately stems from the same Active Directory instance, there is no explicit link between the account, as presented by the IDP, and the account stored within the AWS user store.
However, our example company is not using Active Directory. As such, we need to manually create some matching user records inside AWS SSO for our administrators. The AWS CLI does not have a function for bulk importing accounts, so administrating accounts in this fashion can be tedious. Let's create an account for our Iam Dev user:
- From the AWS SSO service, under the Users section, we start by hitting the Add user button. This takes us to a wizard where we can enter various attribute values for our user:

Figure 9.11 – The AWS SSO Add user wizard
- There are several sections available for us to populate information. However, only the first section is required to make a fully functional AWS SSO user record. We can reference the values inside our external IDP's directory for Iam Dev and populate the required attributes:
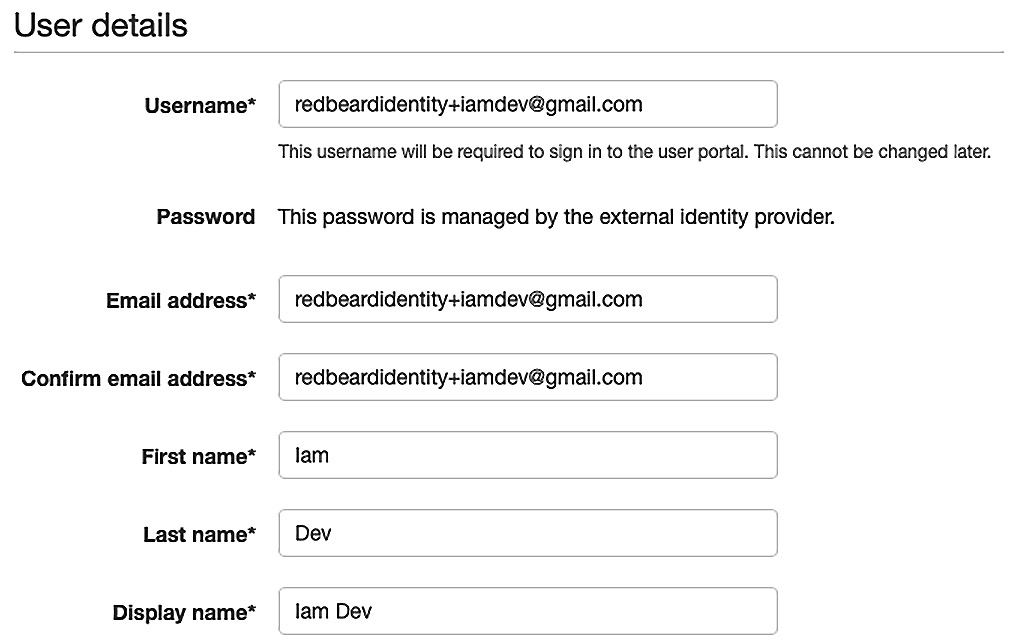
Figure 9.12 – Populating essential attributes for our user record
- While it is not required that we fully populate the record with the remaining attributes from our external IDP's user store, we will go ahead and do it in the interest of keeping our data consistent across data stores. Strictly speaking, we could populate these attributes with distinct values compared to those found inside our external IDP; so long as the username value and any other attributes that are sent from the external IDP are the same, the remaining attributes do not need to match. That said, we do not have any need to change our attribute values, so we will keep them consistent and fill in the rest of the record. Once this is completed, we will be ready to proceed.
- Next, we are asked to add the user to some groups. Our AWS SSO has not been configured with any groups, but we are using groups to manage access to AWS SSO within our external IDP. We will continue that pattern within AWS SSO, so we will click Create group:
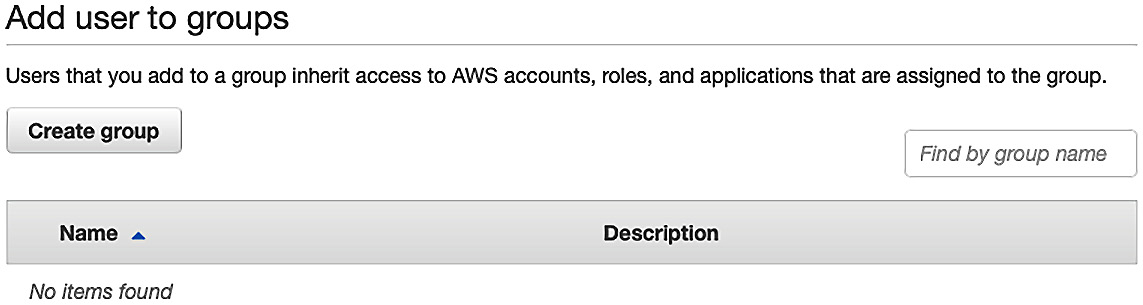
Figure 9.13 – The Create group option in AWS SSO
- The Iam Dev user is a member of two groups inside our external IDP. The first is AWS_IT_IAM_Dev, while the second is AWS_Sandbox. We must enter the group's name and a description to create the first group and then repeat this for the second:

Figure 9.14 – Creating groups in AWS SSO
- Now that we have two groups available to select, and they are the two groups we want Iam Dev to be a member of, we can tick the boxes shown in the following screenshot and click Create user:

Figure 9.15 – Adding the groups to Iam Dev
- Once processing is complete, we can return to our Users section in AWS SSO. There, we will find our Iam Dev user record, identical to how it exists in our external IDP. We can also verify that it is a member of the two groups that we created:
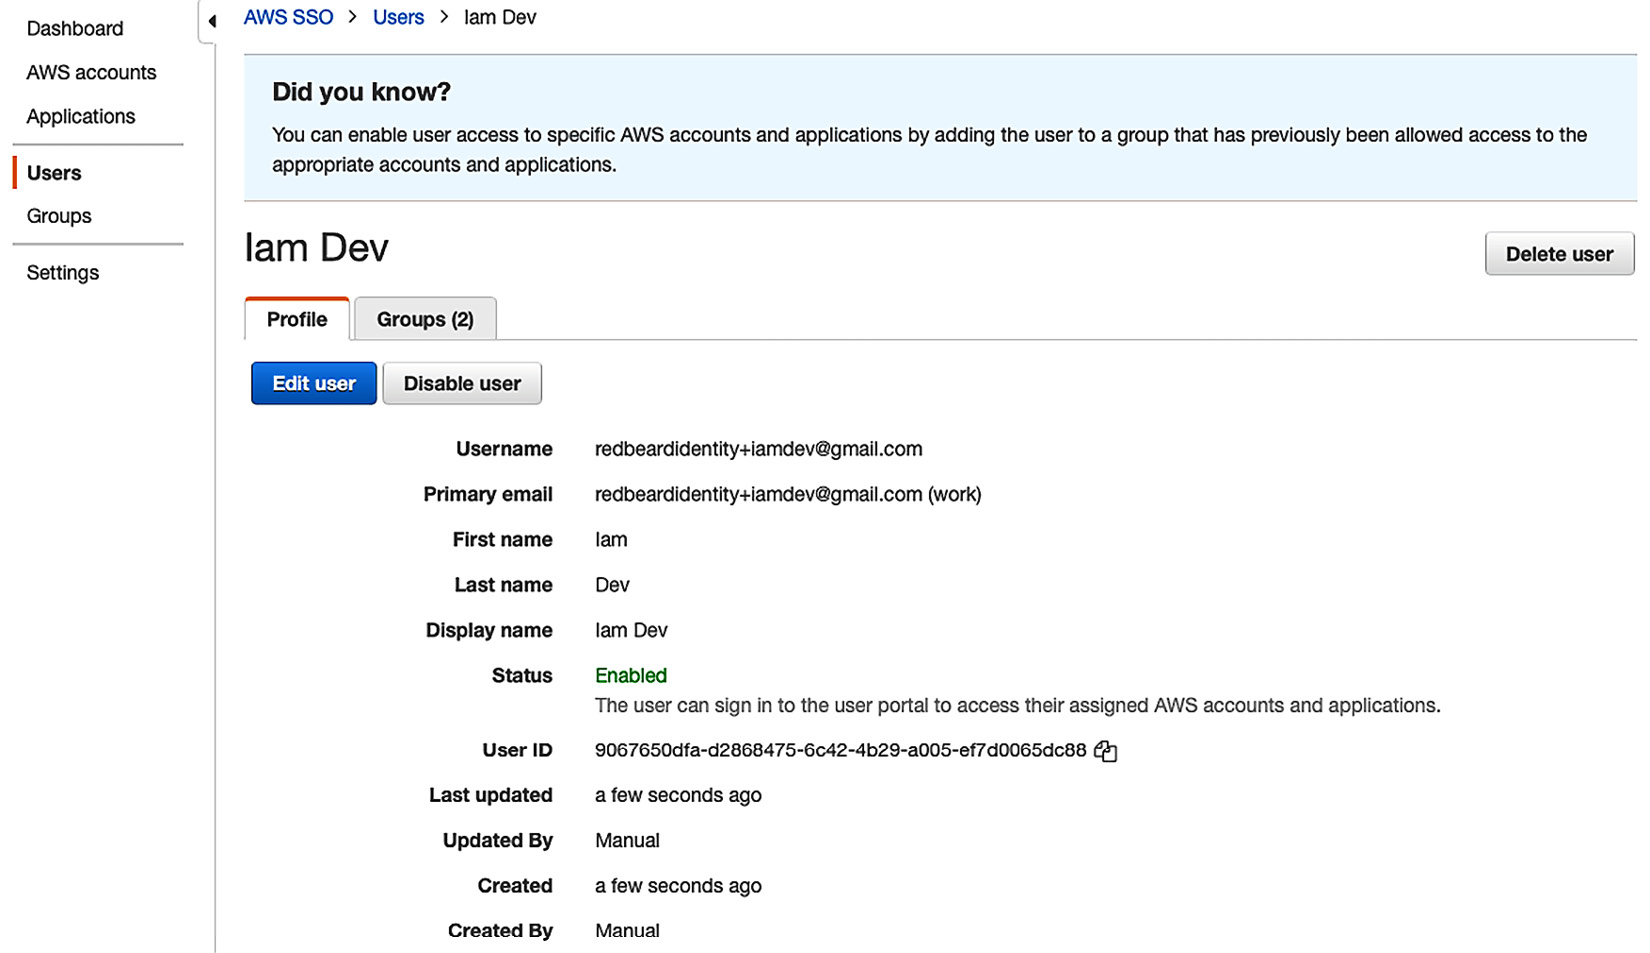
Figure 9.16 – Iam Dev user record and group membership in AWS SSO
With Iam Dev complete, the next step is to repeat this process for every AWS admin that we want to bring over from the Redbeard Identity IDP. This would be a tedious undertaking, though, since we only have a handful of accounts that exist within that user store. Rather, we'll focus on the better administrative method for the Redbeard Identity use case, before we begin using these accounts and groups for authentication and authorization in the next chapter.
Limitations of manual provisioning and account linking
Setting aside the tedium of manually creating those accounts, manual provisioning has other significant drawbacks. We are focusing on getting our administrators into the administrative backplane, but auditors are much more interested in evidence showing that terminated administrators have been removed from critical systems within a reasonable timeframe. Whereas an organization could build a manual process around joiner, mover, and leaver flows that ensure all compliance requirements are met, it would be costly to operate and prone to human error.
Fortunately, most enterprise deployments will not use manual provisioning. Active Directory connectors to on-premises deployments ensure that terminated accounts are also disabled in the AWS SSO user store. More modern organizations can also leverage the IDP as its provisioner through SCIM, which will ensure that any status change on a user record or group will be immediately updated to AWS SSO. Let's look at a SCIM implementation for Redbeard Identity's use case.
Provisioning administrative accounts in AWS – SCIM provisioning
System for Cross-domain Identity (SCIM) provisioning is a standards-based RESTful account provisioning service that sends account information in a standardized JSON format. When we enable automatic provisioning with SCIM, the directory objects that we specify for our IDP to synchronize in the user store for our AWS SSO service will automatically be created, updated, and deleted, in tandem with their counterparts inside the user store of our external IDP.
How SCIM works
Before we enable SCIM for our example use case, let's take a quick look at how SCIM operates:
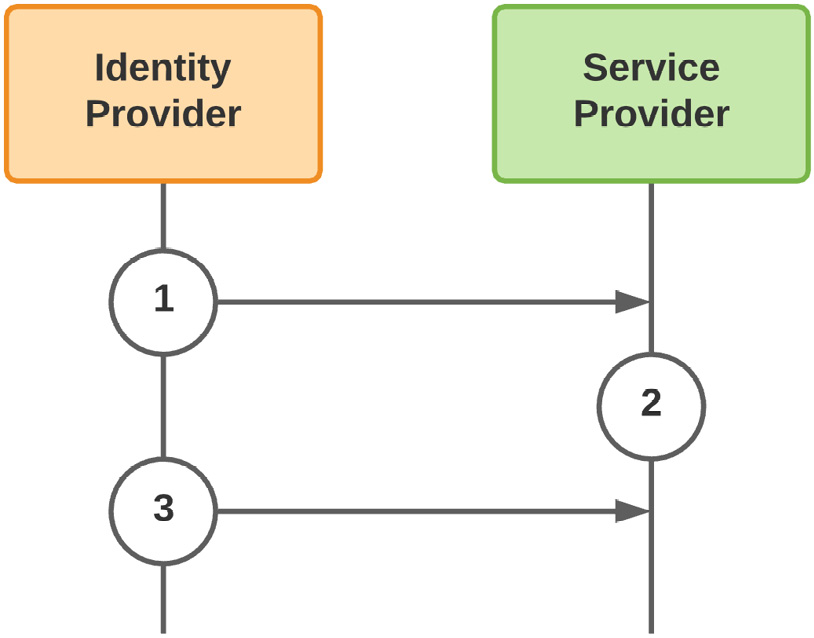
Figure 9.17 – SCIM create and update flows
The SCIM provisioning flows for creating and updating accounts are rather straightforward:
- The IDP that acts as the authoritative source for provisioning in the service provider's user store pushes the accounts and attributes based on that service provider's predefined account schema. This is where things such as attribute transformation can occur to manipulate the data between the IDP and SP to accommodate the SP's specific attribute requirements.
- With the accounts and groups now provisioned in the SP's user store, the service provider will be able to link the subject of the authentication token it receives from the IDP with up-to-date directory information from that same IDP's authoritative user store.
- As attributes are updated or group memberships change, the IDP intermittently pushes the changes to the affected objects to maintain synchronization. This includes account deprovisioning.
SCIM is mostly a push-based process from the IDP to the service provider. That said, there are flows where the trigger for synchronizing a directory object is predicated on a request from the service provider. This trigger could be something such as an SP-initiated authentication request to the IDP for an account that hasn't been found yet within the SP's user store. This is a common practice, where the aim is to minimize the proliferation of identity data across providers:
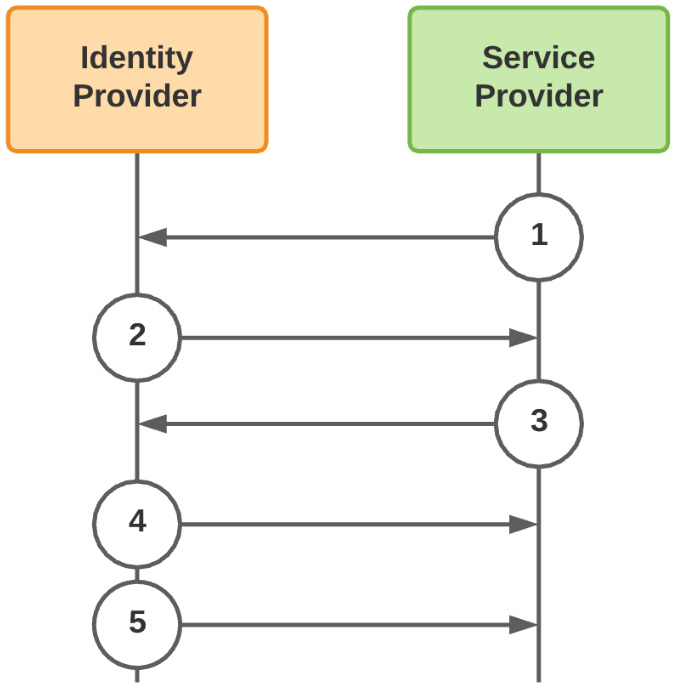
Figure 9.18 – SSO-triggered SCIM provisioning event
- The service provider reaches out to the IDP to authenticate a user.
- The IDP sends the authentication token to the service provider.
- Upon not finding a corresponding account within its local user store, the SP makes a request to the IDP to provision that account in its user store.
- The IDP responds by provisioning the account in the SP's user store.
- Now that the account has been added to the SP's user store, the IDP will push any changes to that account into the SP's user store.
Compared to the administrative overhead of manual account administration, SCIM is a good way to ensure our existing organization's joiner, mover, and leaver flows are quickly reflected in downstream third-party applications.
Enabling automatic provisioning in AWS SSO
Let's connect the Redbeard Identity organization's external IDP to our AWS SSO service's user store using SCIM:
- First, from the AWS Administrative Control Panel, we must go to our AWS SSO service and select the Settings menu.
- Under Identity source, click the link that says Enable automatic provisioning. This opens the Inbound automatic provisioning wizard.
- We will be presented two values: our SCIM endpoint and Access token. We will use these to configure the SCIM connection inside our IDP. Similar to other secrets issued inside AWS, this will be the one opportunity we will have to capture the access token value, so we must make sure to document it someplace safe:

Figure 9.19 – Our AWS SSO SCIM endpoint and access token
- Now, we will go to the AWS SSO app configuration inside our IDP. For the Redbeard Identity organization's IDP, this can be found under the Provisioning tab. There, we must click the button labeled Configure API Integration:
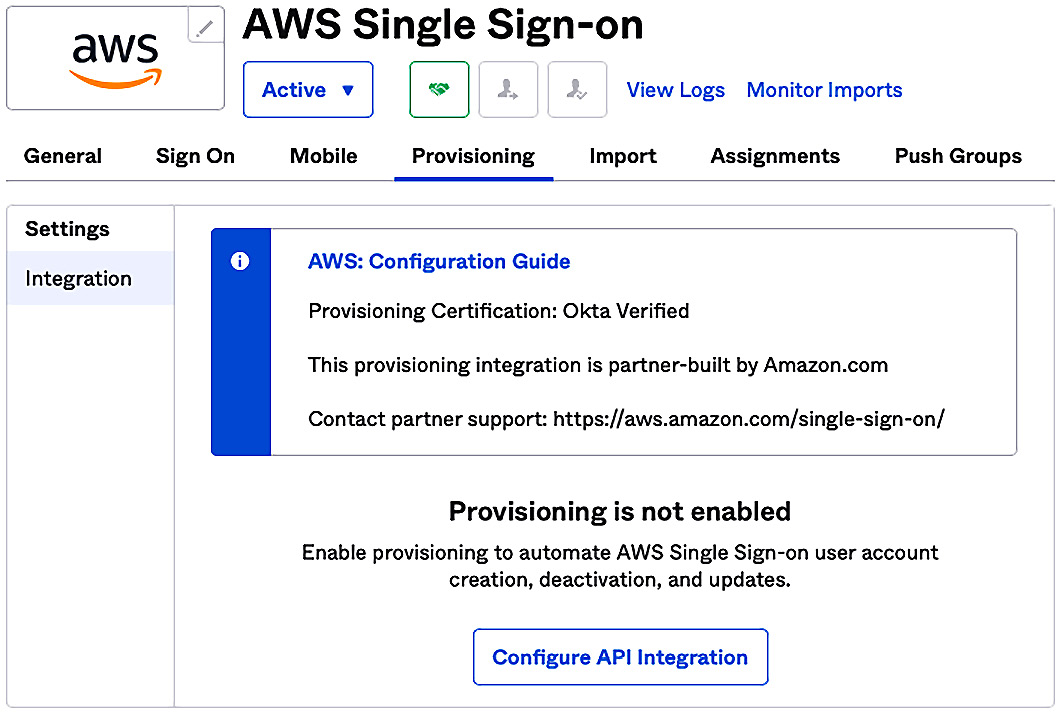
Figure 9.20 – Configuring the Redbeard Identity IDP for SCIM to AWS SSO
- From there, we must tick the box to enable API integration, which will present us with the fields we need to populate with our SCIM endpoint and API token values. We will drop the values we got from AWS SSO into the field and test the connection. If all is well, we will see a confirmation message stating that the connection was verified successfully:

Figure 9.21 – The Redbeard Identity IDP is now connected to the AWS SSO user store via SCIM
- Now that our external IDP and AWS SSO's user store are connected, we have some additional options inside our IDP for what operations we wish to allow, and how we want to map our IDP's attributes to the user store schema of AWS SSO. We'll click Edit and make sure that we are configured to create our users, update user attributes, and deactivate users inside AWS SSO when there is a change inside our IDP. Fortunately, our IDP is natively supported by AWS SSO, so a preconfigured mapping of attributes has already been configured for us. If we want to customize our IDP's user schema, or want to adjust mappings, this is where we could make those changes. Once satisfied with the settings, we can click on Save and move on:
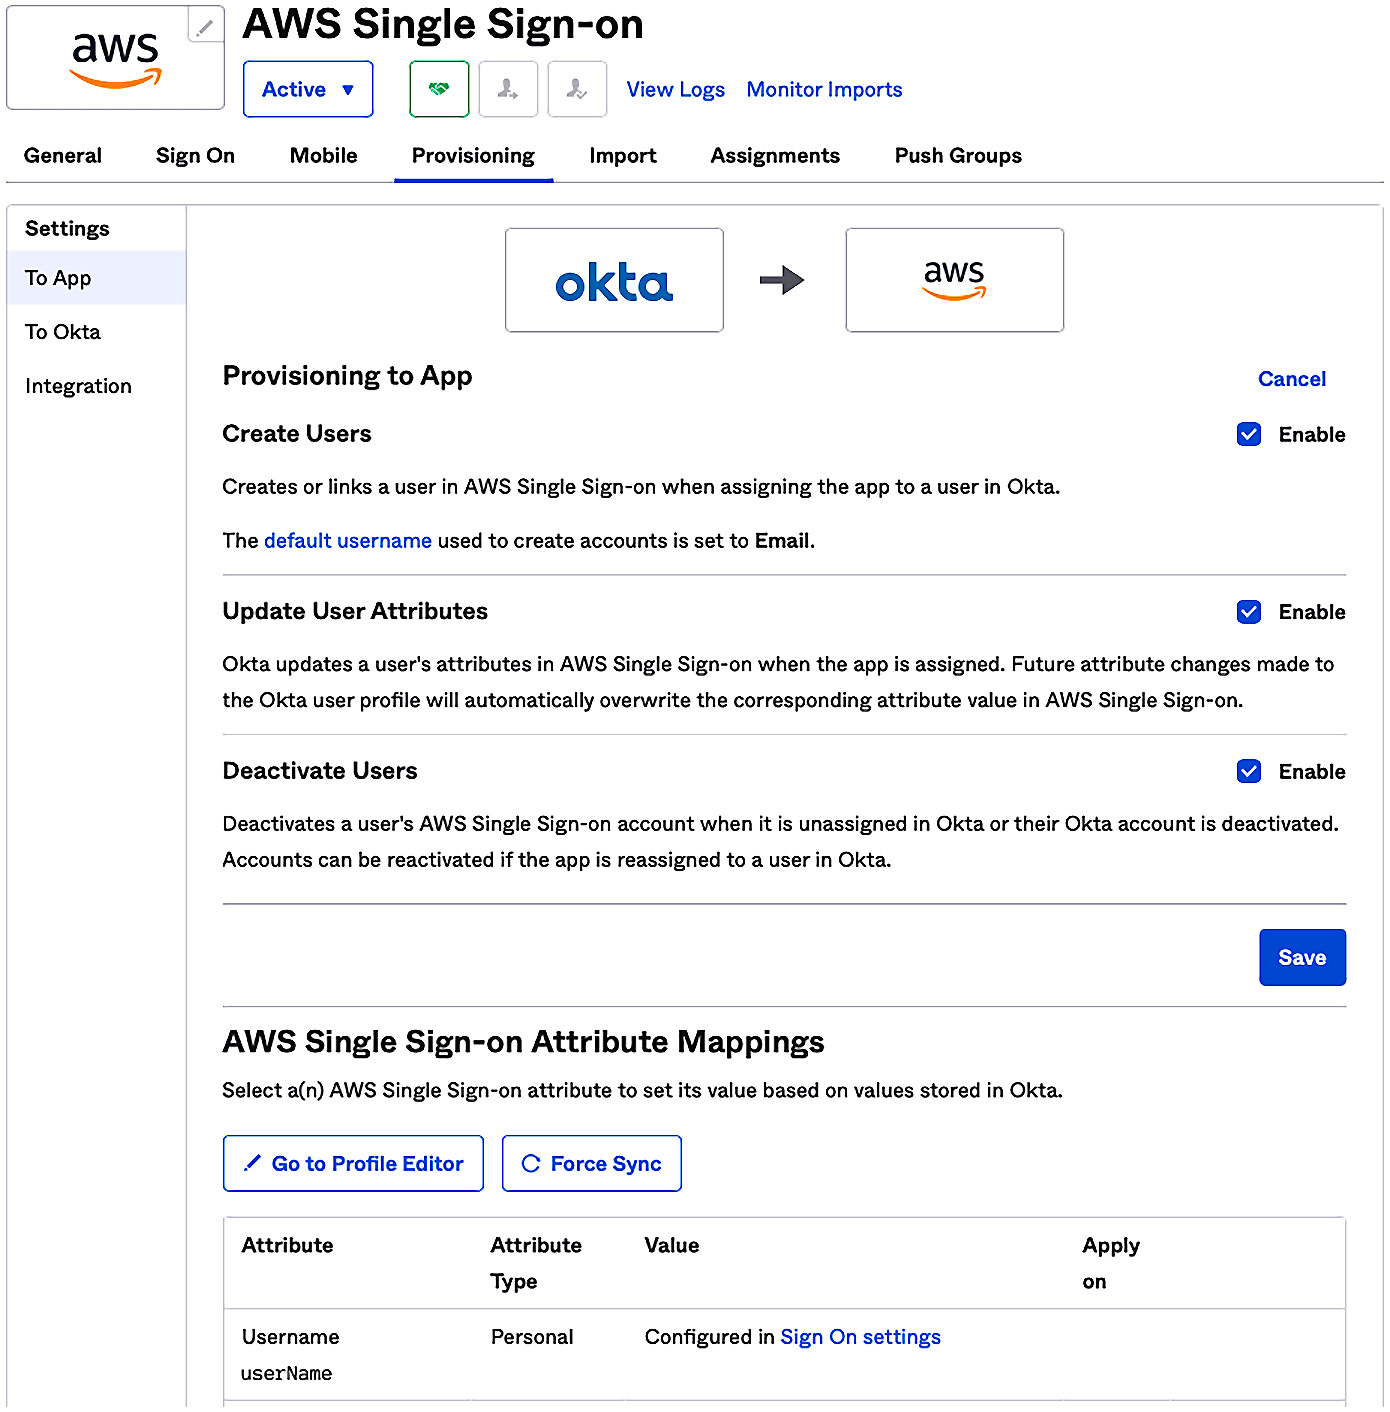
Figure 9.22 – Enabling provisioning and syncing in the AWS SSO user store
- Now that our users have been assigned to groups inside our IDP's directory, we will assign access to AWS SSO through membership to those groups from our IDP. Whereas only a handful of users are found in each one of these groups based upon their job function, every individual user who is a member of one of those groups is now in scope for provisioning in AWS SSO's user store:

Figure 9.23 – Group-based access control used to control provisioning in AWS SSO from the IDP
- We can confirm that this logic is working by refreshing the user list inside AWS SSO. Within seconds, our users will be provisioned:

Figure 9.24 – SCIM-provisioned users appearing within the AWS SSO user store
- We may optionally choose to also push specific groups from our IDP into AWS SSO. This will provide us with additional options for authorization, so we will do so. Similarly, those groups and their memberships will be populated within the AWS SSO directory moments later:

Figure 9.25 – SCIM-provisioned groups in the AWS SSO directory
With that, we can now manage AWS SSO users and groups centrally using our organization's authoritative identity system.
TIP
The specifics of the IDP configuration will vary, basedpon the IDP used. The Redbeard Identity IDP is built upon the Okta platform, which is available for free for developer use cases. Please review the Further reading section for references on using other major identity platforms.
SCIM in action
Let's observe how SCIM works with AWS SSO by creating a new user within the Redbeard Identity IDP and adding it to the AWS_Sandbox group. We will call this new user New User, and it will be a contractor reporting to Sales Dev within the Sales organization. We will bootstrap this user by updating the CSV file we used in Chapter 8, An Ounce of Prevention – Planning Your Administrative Model. This will quickly create a richly featured account while leaving existing ones untouched (unless we want them to be updated):
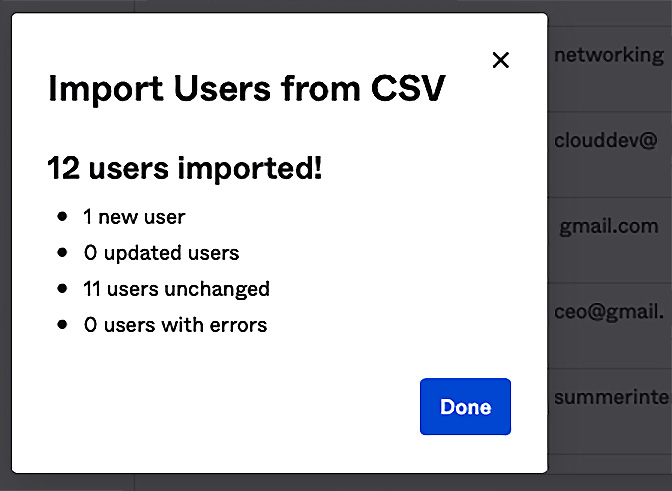
Figure 9.26 – Adding a new user to the Redbeard Identity user store
Once New User has activated their account, they become live in our IDP's directory, but they won't be found inside AWS SSO's user store:

Figure 9.27 – RBI's user store on the left; AWS SSO's user store on the right
This is because the Redbeard Identity organization assigns AWS SSO access to group membership. To get New User into AWS SSO, we will need to assign it to a group that governs access in AWS SSO on the IDP side. As everyone within Redbeard Identity is allowed to access the sandbox accounts, we will place New User in the AWS_Sandbox group, within the IDP, and refresh our AWS SSO user store. If we select that group to view its membership, we will see New User:

Figure 9.28 – New User inside the AWS_Sandbox group
Whereas automatic provisioning is convenient, the bulk of the security and compliance value that SCIM offers comes from automatic deprovisioning. Let's deactivate New User from our IDP and watch what happens.
First, he is deactivated within our IDP's user store and automatically loses access to the applications he is assigned from his group memberships. This means he loses access to AWS SSO at the IDP:

Figure 9.29 – New User is now cut off from AWS SSO access
Checking the AWS SSO user store, we can now see that the corresponding account for New User has been disabled there as well. It has also been cut off from the AWS SSO side:
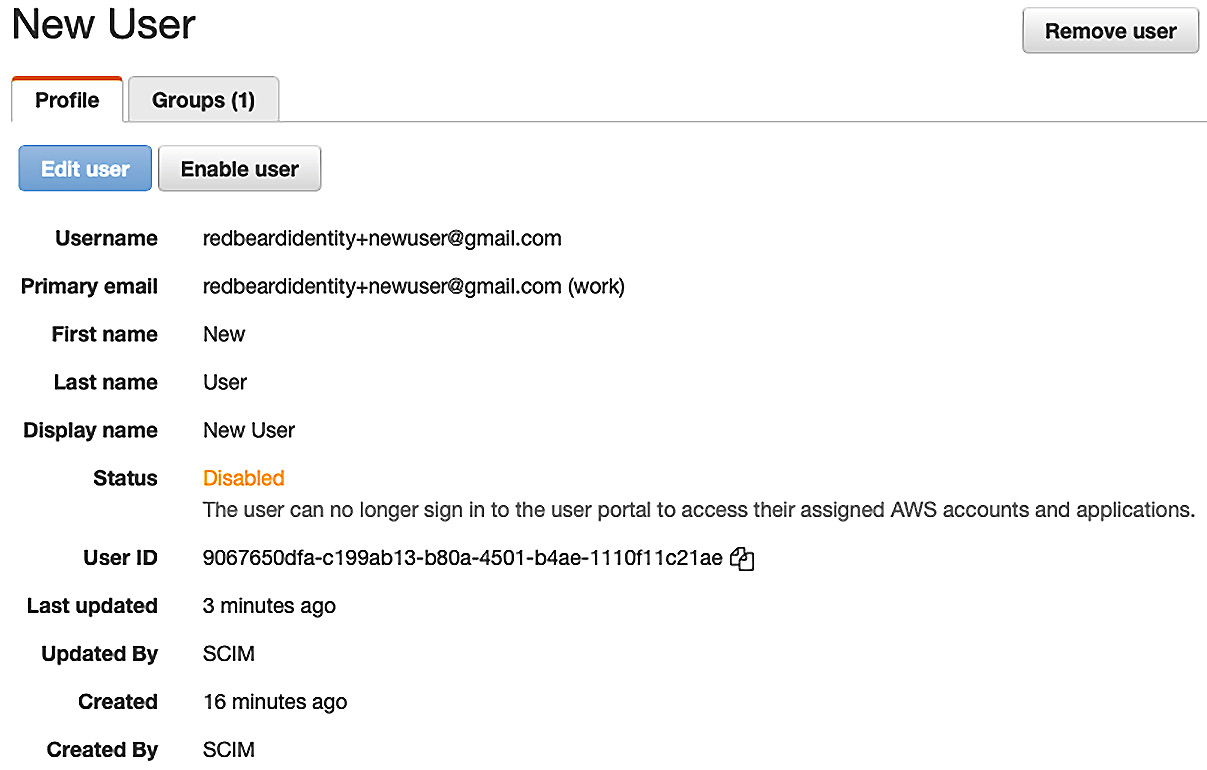
Figure 9.30 – New User is disabled in AWS SSO
Depending on our organization's account management and compliance policies, we may optionally delete the record entirely from AWS SSO at this point.
SCIM provides powerful and automated account management capabilities when leveraging an external IDP. For organizations that either do not use Active Directory as their user store or would prefer not to extend their AD footprint into the cloud, SCIM provides modern, API-driven identity life cycle management capabilities to ensure that only the right accounts and groups are provisioned in AWS for administrative access.
Summary
In this chapter, we looked at how we can bring our administrative accounts into the AWS administrative backplane. First, we connected our external identity provider to our AWS SSO service. Then, we looked at two different methods to manage administrative accounts. The first was manual account linking, where an administrator must provision, deprovision, and monitor account and group membership for changes inside the external IDP's user store, to then mimic those changes inside AWS SSO's own user store. The second was SCIM, a RESTful, API-based identity provisioning protocol that automatically synchronizes accounts, attributes, and groups between the external IDP and AWS SSO.
Now that we have our user stores synchronized using SCIM, we are positioned to leverage those accounts and groups, along with their attributes, to address administrative authentication and authorization to AWS resources. We will explore that topic in detail in the following chapter.
Questions
- What are manual provisioning and account linking?
- What is SCIM?
- What are some of the advantages of SCIM over manual provisioning?
Further reading
Take a look at the following link to find out more about the supported identity providers and configuration instructions for AWS SSO SCIM: https://docs.aws.amazon.com/singlesignon/latest/userguide/supported-idps.html.
Code samples
The following is the updated Redbeard Identity CSV file for this chapter: https://github.com/jonlehtinen/ImplementingAWSIdentity/blob/main/RedbeardIdentity_csv_template_new_scim_user.csv.