Chapter 10: Zoho Forms
Zoho Forms is a powerful yet intuitive web-form builder application that requires no development or website builder plugins. Zoho Forms can be used to replace emails and spreadsheets for collecting data and, once integrated with Zoho CRM, can trigger workflows, thus unlocking the potential for more automation and saving your team a huge amount of time and effort.
In this chapter, you will learn how to create a form and integrate it with your CRM. You will also gain insight from fantastic, real, working examples from a networking business and a training company.
We will cover the following topics in this chapter:
- Getting started with Zoho Forms
- Integrating your form with Zoho CRM
- Transforming the feedback gathered from members of a business networking (membership) company
- Transforming the feedback and certification processes of a training company
By the end of this chapter, you will have knowledge and experience of what Zoho Forms does and gain inspiration as to ways it can potentially add value to your CRM and business.
Getting started with Zoho Forms
If we had to summarize what Zoho Forms does in a few words, it would be electronic data capture. Throughout the customer journey within our business process, there is a lot of data that we must capture. Let's consider several examples of ways in which we can utilize Zoho Forms within our businesses:
- Lead capture: We can replace our Contact forms on the website with a Zoho form to easily capture inbound inquiries/leads.
- Lead generation: We can use Forms as a sign-up process. For example, a prospect wanting to download a report or receive some exclusive content can complete a short web form, which will add them as a lead in Zoho CRM and automatically provide them with an email with an attachment or redirect them to a hidden page on your website.
- Discovery/needs analysis meeting: Our internal sales team can use a form to ask all the questions needed to fully understand the customer's needs. Very useful for professional services, consultants, software development agencies, and medical services.
- Onsite survey: Often in many businesses, a surveyor or engineer needs to attend a site to complete a survey before any work is agreed and/or estimated.
- Application forms: We can use forms for prospective or existing members or students to complete.
- Fact finding: Especially for financial services, claims, and insurance – completed by or on behalf of the client/claimant/insuree.
- Customer signup: We can use this to help onboard new clients, capturing additional information that is needed by other departments including operations and finance.
- Customer feedback: As an alternative to Zoho Survey, we can use Forms to capture feedback if we need to share those results in PDF format with any party/parties.
- Engineer report: We may need our onsite engineers to capture information, photos, and client signatures upon completion of the job.
This is by no means an exhaustive list, so please use this as a starting point for your own brainstorming.
Many of the web forms may save your business material costs, including paper, ink, and postage, while also reducing labor costs, not only in the sending of the forms but also in the data entry once completed.
Better still, we can send a link to a form automatically based on where we are up to in the customer journey (linked to Zoho CRM workflows) and also capture some/all of the data within our CRM. This saves even more labor costs and speeds up the process at the same time. Finally, once a form has been completed by a prospect, customer, partner, engineer, or salesperson, we can use the form data to trigger workflows within our CRM. This makes us more efficient and allows us to respond faster, which will improve the service to our customers.
So, now that we understand the when and why, let's consider how to create a Zoho form.
Creating a Zoho form
Zoho Forms linked to Zoho CRM will save your business time and money while increasing efficiency and improving customer service. When we think in these terms, it really should be a compelling reason to use and integrate Zoho Forms. To use Zoho Forms, we first need to create a form. Let's see how to do it:
- Open Forms by navigating to forms.zoho.com.
- Click on New Form (located in the top-right corner).
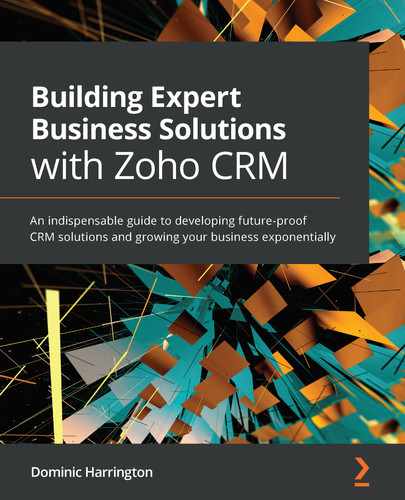
- Choose whether to create a blank form or use a form template. In this example, we shall use a blank form and complete the fields as shown in Figure 10.1, and then click on Create:
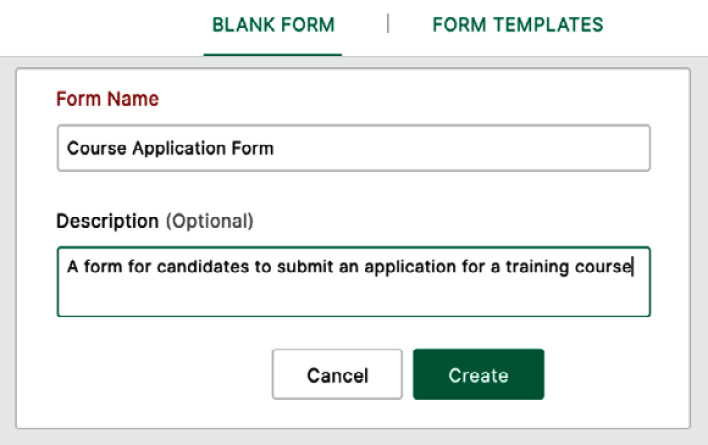
Figure 10.1 – Creating a new form from a blank template
Now you are presented with a drag and drop form builder with a selection of Basic and Advanced fields. A glossary of these field types can be found at https://www.zoho.com/forms/help/tools/field-types.html.
- Starting with the basics, we will need to capture the candidate's first name, so drag and drop a Single Line field into our form area from the left to the right of the screen:

Figure 10.2 – Adding a single line field onto the form
- Now click on this Single Line field on your form to display the Properties popup and complete it as shown in Figure 10.3. Note that once you have clicked Save, it is necessary to click on X (top right) to return to the form:
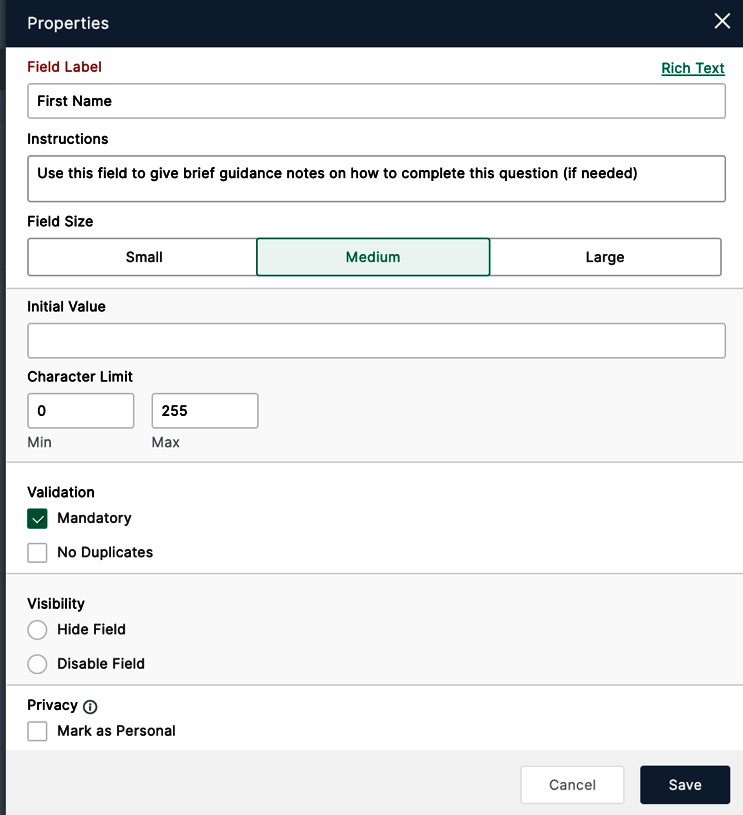
Figure 10.3 – Completing the properties of your field
In this case, we have added an example instruction and made the field mandatory.
The main ways we can validate the fields include the following:
Mandatory: When checked, this will force the user to complete the field.
No Duplicates: When checked, this will not allow the same value to be entered by more than one person completing a form, for example, an email address.
Allow Negative Value (numerical/currency datatypes): When checked, this will allow a person to add a negative value to a field of this type.
Tip
The properties available will change depending on the type of data, and the other options presented here will be very useful as/when we are integrating the form with the CRM.
- Now let's add a second Single Line field to capture the last name.
- Next, we shall add a Dropdown field type to our form to enable us to capture the actual course the prospective candidate is interested in. The drop-down form is preferred here over the Radio or Checkbox datatype in case we need to integrate the form at a later date:
Figure 10.4 – Adding a drop-down field to our form
- When selecting the properties of the drop-down field, the main difference compared to the single line is the process of defining the dropdown (picklist values). This can be achieved in one of two ways:
a) Adding the values manually by replacing the First Choice, Second Choice, and Third Choice values with your own and clicking on + to add more as shown here:

Figure 10.5 – Adding drop-down values manually
b) Alternatively, if we have multiple options to add, we can import them from another source – such as an Excel sheet. You even have some pre-configured, commonly used list values that Zoho has included by clicking on the Advanced label seen in the top-right corner of Figure 10.4. To use this shortcut, navigate to Advanced | Import, then add your values using one of the options provided on the left of the screen:

Figure 10.6 – Importing drop-down values
Now add the remaining fields to your form by using the same drag and drop method and setting the properties for each one. In this example, we have added a few more fields for personal and contact details, so our completed form is now as follows:
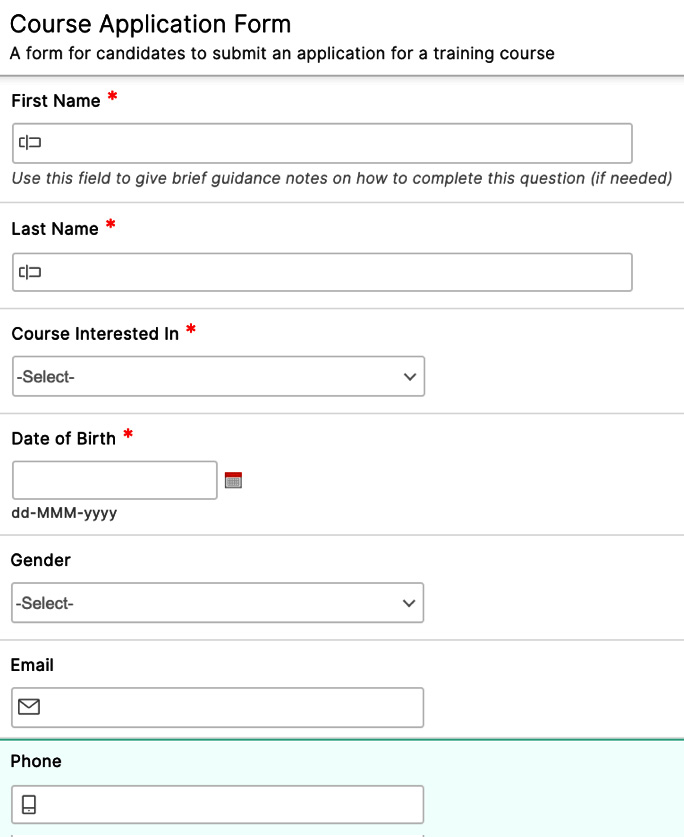
Figure 10.7 – A sample form designed and ready for sharing
Once you have finished building your form, the next step is to share the form so that it can be completed.
Sharing your form
There are two main ways we can share our form so that it can be completed by our prospects, partners, clients, or employees (our network) as required by our business process:
- To share your form, navigate to the main menu across the top of the screen and click on Share as shown here:

Figure 10.8 – Accessing the Share feature from the main menu
- You will be presented with one of the main ways of sharing access to your form using a link. This link can be used in the body of an email so if the lead/contact already exists in Zoho CRM, we can send them a link to our form to complete the application form within an email template in Zoho CRM. (See Chapter 7, Essential Systems Administration, for information on email templates.) This link can be seen in the following figure:

Figure 10.9 – Sharing access to the form using a link
- Another typical scenario would be where the applicant did not already exist in Zoho CRM, in which case you can embed the form within your website. To select this option, click on Embed on the left-hand menu as shown here:

Figure 10.10 – Embedding the form within your website
- There are five different ways to embed a form within your website. Speak to your website developer and ask them which one will work the best within your current website:
- iframe
- JavaScript
- A hyperlink
- A QR code
- HTML and CSS
- Website builders (plugin)
Congratulations, you have just built your first form and shared it; this is such a key milestone when it comes to capturing data. You will be improving the customer and CRM user experience as well as becoming more efficient with each form that you implement.
So, now that we understand how to create a form and share/embed it within our network, this will allow us to capture data in real time in a variety of ways. Let's look at how we integrate the form with Zoho CRM.
Integrating your form with Zoho CRM
The ability to integrate our form with Zoho CRM is one of the best ways to gain value from Zoho Forms. We are automating what would have been a manual process and also speeding up the process by allowing our team to view and act upon new information immediately.
There are three ways we may integrate a form with Zoho CRM:
- Adding a CRM lookup field: This is a method of pushing data from the CRM to a form where the form is being completed by a Zoho user.
- Pre-populate fields using a field alias: This is an alternative way to push data from the CRM to a form, where the form is completed by a contact or lead that exists in Zoho.
- By pushing the values of a completed form back into Zoho CRM upon completion.
Let's take a look at each of these in turn.
Adding a CRM lookup field
Adding a CRM lookup field will allow you to pre-populate fields when a form is being completed by one of your Zoho users. The following steps guide you to create a lookup field:
- Within Forms, locate your form and click Edit – this will open the Builder menu.
- Click on Advanced Fields.
- Drag and drop the Zoho CRM field to the top of your form.
- Now complete the Properties pop-up window that appears. Set the module, layout, and the field you wish to use as the lookup reference as shown here:

Figure10.11 – Adding a Zoho CRM lookup field mapping the Last Name field in the lead record
- Check the box next to Map fields to prefill values from Zoho CRM to Zoho Forms?.
- Complete the field mapping table by selecting the fields you want to pre-populate in Forms from Zoho CRM. This will improve the user experience and save time. It is important to note that the data types need to match across both systems:

Figure 10.12 – Mapping fields that we wish to pre-populate in a form
- Click Save.
- Next, you will need to obtain the internal link for the form by navigating to Access Form.
- Copy the URL from your internet browser window as shown here:

Figure 10.13 – Copying the forms URL to use in a link
- Open Zoho CRM and navigate to Setup | Customization | Modules and Fields | Leads (or the module you are linking the form to) | Links and Buttons.
- Click on the New Link button (top-right corner).
- Give your link a label, paste the link copied in step 9, and select the profile(s) you wish to access the link as shown here, then click on Save:
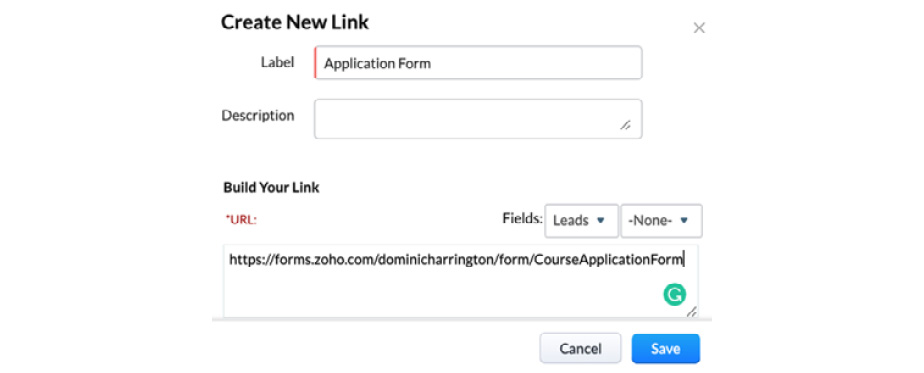
Figure 10.14 – Creating a new link to our form for a CRM user to complete
- When you open a lead record, you will now see a link with the label name provided in Step 12 beneath Related List under the Links sub-heading as shown here:

Figure 10.15 – Accessing your form from within the CRM record
- When the user accesses the form, they must first complete the Zoho CRM lookup and that will pre-populate the fields that you mapped earlier.
Note that if your users are onsite/without the use of the Zoho CRM desktop application, they must access the form directly from within the Zoho Forms mobile application.
This approach works well, provided that the form is being completed by one of your Zoho users. However, there are many occasions where the form will be completed by external network contacts such as prospects, customers, or partners. In this case, we can use an alternative method to pre-populate fields, as we will see in the next section.
Using a field alias to populate forms
This method is extremely useful when we wish to pre-fill fields in a form that will be completed by a lead or contact. We must share an email containing a link to a form that will be sent from within Zoho CRM.
This method is a two-stage process. First, we must add the field alias within Forms and then we reference this alias within CRM Workflow Email Alert:
- Open Forms, find the form you wish to integrate with, and select Settings.
- Select Field Alias from the menu on the left and then click Set Alias.
- Now select the field you wish to map, which in this example is First Name, and then input first in the Field Alias textbox.
- Click on + and then select Last Name for Field Label, then input last for Field Alias.
- Click on + and then select Email for Field Label, then input email for Field Alias.
- Click on + and then select Phone for Field Label, then input phone for Field Alias.
- Click Save.
An example of the field alias mapping screen is shown in the following screenshot:

Figure 10.16 – Setting the field alias values
- Next, we need to insert the link into CRM Workflow Email Template by navigating to Setup | Customization | Templates | New Template.
- Select the module using which you wish to pre-populate the form, in this example, Leads.
- Within the body of an email, you need to insert a link following this syntax:
https://forms.zohopublic.com/.../?<fieldalias1>=<fieldvalue>&<fieldalias2>=<fieldvalue>
In this example, ours would be as follows:
https://zfrmz.com/rzvKvFisLKn0cwVJZx2L/?email=${Leads.Email}&first=${Leads.First Name}&last=${Leads.Last Name}&phone=${Leads.Phone}
This link can be constructed by completing the following steps:
a) Add the public link to the form, https://zfrmz.com/rzvKvFisLKn0cwVJZx2L/?.
b) Input ?email= followed by #, then select the Email field to add ${Leads.Email} (which is the CRM field name inserted as a merge tag).
c) Input &first= followed by #, then select the First Name field to add ${Leads.First Name}.
d) Input &last= followed by #, then select the Last Name field to add ${Leads.Last Name}.
e) Input &phone= followed by #, then select the Phone field to add ${Leads.Phone}.
The preceding steps will result in a similar mail being sent:

Figure 10.17 – The email that will be sent containing a link that includes all our components to pre-fill fields
Upon the recipient clicking on the link within the email, they will be taken to the form, and the first name, last name, email, and phone fields will be pre-filled with the values in the associated CRM record. This is an extremely valuable integration and will reduce the time it takes to complete a form and improve the user experience.
Additional information on this can be found at https://www.zoho.com/forms/help/settings/field-alias.html.
So, now that we have looked at the two ways to pre-fill fields in a Zoho form, we shall now look at how we push the values of a completed form back into Zoho CRM.
Pushing the values of a form into Zoho CRM
One of the most frequently used and most beneficial ways of integrating a form with Zoho CRM is to push the values from a completed form into a new or existing record within a CRM module. This can be achieved as follow:
- Build your form, ensuring that your form contains all the mandatory fields that you have within Zoho CRM. Most probably, you will need to add a hidden field for Lead Source and pre-select the drop-down value of this for it to identify where the lead (or record) came from.
- Add your hidden field(s) as required using the values shown here:

Figure 10.18 – Adding a hidden field for Lead Source, pre-selecting Webform as the option
- Navigate to Integrations | Zoho CRM | Integrate.
- Set Module and Layout, complete the field mapping, and check the box for Automation and Process Management.
- Click Integrate.
Once you have completed these steps, when the form has been completed it will either create a new record in your CRM module or it may update (upsert) an existing record with the values from the form. Either way, the time and resource savings here just for one form are great, and when multiplied by the number of times the form is completed, this is one of the most time-saving tools that you can utilize in the whole Zoho ecosystem.
To gain further insight and inspiration as to how you can utilize this within your business, it is instructive to consider our first use case.
Transforming the feedback gathered from members of a business networking (membership) company
In this section, we will look at how a well-established business networking (membership) company utilized Zoho CRM and Forms to fully automate business processes that would have needed at least one full-time resource to administer manually.
This example could be adapted by any business that wishes to obtain customer feedback on a regular basis and share the results instantly with a group of people.
The requirements comprise the following two elements: seven-month check-in and rate your experience.
Seven-month check-in
The objectives seven months into the membership were as follows:
- To notify the team that it's time to contact a specific member and conduct a seven-month check-in (questionnaire/interview).
- The results of this interview need to be shared instantly with a committee consisting of a few other members.
- One of the questions asked respondents to rate on a scale from 1-10 how likely they were to renew if asked today, and the management team needed to be alerted if the answer fell within certain thresholds.
Rate your experience
There was a requirement to automate the capturing of feedback from each member, as follows:
- An email needed to be sent automatically to each member every two months asking them to rate their experience with the business networking organization (on a scale of one to five stars).
- While the capture of the results was to remain anonymous, the business networking management team needed to be able to report on the percentage of respondents, average score per networking group, and average score overall, and then to monitor trend changes over time.
Solution
It was identified that the solution would entail the use of Zoho CRM and Zoho Forms.
Seven-month check-in
- The Zoho CRM Contacts module was renamed to Members.
- Each member record held contact and renewal date details.
- A workflow rule would be triggered 152 days before the annual renewal date (7 months in) to send an automated email to a member contact containing a link to the Zoho form. This form would have the member contact fields pre-filled using a field alias (as per the Using a field alias to pre-populate forms section earlier in this chapter).
- Upon completion of the form (using the unique member link), a workflow rule inside Zoho Forms was set up to send a PDF document to a small group of members so they could instantly view the results of the completed questionnaire. See https://www.zoho.com/forms/help/create-pdfs.html for details on how to complete this step.
- This form was also integrated with Zoho CRM by pushing completed forms into a custom module named 7 Month Review, which was created as a related list of contacts (members). This provided the management team with visibility of reviews completed, along with information on by whom, with whom, and when. The renewal rating question was also mapped in addition to a CRM workflow to create a task if the results fell within certain thresholds.
Rate your experience
- A Zoho form named Ratings was set up that held the question as a picklist (one to five stars) and a multiline text field to capture any feedback.
- A date field in Zoho CRM was added to the Member (contact) record named Ratings Start Date, which was bulk updated across all member records on a specific date of choosing.
- This triggered a Zoho CRM workflow to send an email as an instant action to all members on that date containing a link to the Zoho form.
- This form was integrated with Zoho CRM so that completed entries would create a record in a custom module named Ratings.
- The name of the group the member belonged to was pre-populated using a field alias and then integrated back to Zoho CRM.
- Reports/dashboards were created in Zoho CRM that displayed and summarized the results.
- The workflow also contained five more scheduled actions 60 days apart, which made sure that, overall, there would be six forms sent to each member during the year.
- A second workflow was created that would update the rating's start date for all members by pushing it forward 12 months once it had cycled through the six cycles. This workflow will continue running indefinitely, gathering feedback from members and collating results with zero human input.
Results
The project continues to be a success. 2 years since adoption, the business is gaining more, better-quality, and more regular feedback from members than it ever received previously. It can identify the likelihood of renewals much earlier and is gaining insight into any potential issues while having the time to take action to remedy adverse situations. The renewal rate of first-year members has increased, and generally, the feedback from all parties involved – management, the committee, and members – has been positive.
There are several steps involved in this example that can be adapted for many different types of businesses, so hopefully, you will be inspired to try something similar for your business in the near future.
Let's have a look at a second use case now.
Transforming the feedback and certification processes of a training company
In this example, we will look at how a global training provider in a niche sector took advantage of Zoho CRM and Forms to automate the process of gaining feedback and issuing certificates to all delegates who attended its courses.
The requirement was to specifically resolve the following two key challenges or issues: delegate feedback and certificates.
Delegate feedback
Firstly, the feedback forms were printed out and provided by the trainer at the end of each session. Some would be completed on the day at the end of the session, but not everybody completed them and left them with the trainer. It was then a manual process to collate and report this information, which could take hours to complete manually. In many cases, this would not be completed until several days later – which may be too slow for the trainer to react if there was anything that needed to be dealt with quickly.
Certificates
Secondly, the training certificates were being printed and posted manually. This was expensive as sometimes there could be 20-40 delegates on a single course. The cost of ink, paper, postage, and labor was an overhead that the business owners wanted to eliminate.
Solution
Zoho CRM and Forms were identified as the solution, and how they were set up and implemented can be summarized as follows:
- Zoho CRM was used to support the process of responding to inquiries, sending quotes, and managing bookings – all using the standard modules tailored for the business.
- A custom module named Delegates was created to capture the contact details of the attending delegates, details that were unknown to the training company until the day of the training.
- This module was used to drive both the feedback and certificate-issuing processes.
- On the day of a course, each trainer had a Zoho form named Registration to complete. As part of their setup routine, they simply had to pre-populate the name of the course, the location, and the booking reference within the form builder.
- Upon the arrival of delegates at the start of a session, a tablet computer was passed around for each of them to enter their full name and email address into the registration form.
- The form was integrated with Zoho CRM and as such pushed all the completed entries and completed a delegate record for each delegate – which included all the course details entered by the trainer (at the start of the day) and the contact details of each delegate. This was also linked back to the Bookings module within Zoho CRM.
- A workflow was triggered within the Delegates module upon record creation that sent an email to each delegate containing a link to complete the feedback form (after the course). This email could have been timed to be sent any number of hours after record creation, but the business chose to send it immediately.
- As mobile phone internet or Wi-Fi could not be guaranteed at each location, the ability to use Forms offline enabled 100% data capture with or without an internet connection.
- When the delegate completed the Feedback form, this triggered a workflow in Zoho Forms, which sent a PDF certificate automatically to each delegate as well as updating the Delegate CRM record status to Feedback received, Certificate issued.
- The answers to key questions were also mapped from Forms to Zoho CRM, triggering a workflow to notify the trainer of any adverse responses to one or more key questions.
Results
The project was a resounding success. Due to the nature of the setup and timings, several changes needed to be made during testing and the soft launch, but once these were identified and resolved, these business processes were completely transformed; the key results are summarized as follows:
- Feedback was received from 100% of the delegates.
- Certificates were automatically produced and sent by email as PDFs.
- The business saved time and money previously spent on producing and collating feedback forms.
- The business saved time on collating feedback.
- The business was able to report upon and react to feedback from delegates much more quickly and efficiently.
- The business saved time and money on the production and postage of the certificates.
- Delegates were also opting in to receive marketing communications, so the business started building a quality mailing list to help promote refresher and other courses in the future.
So, in both of these examples, the Zoho user saved time, saved money, and provided a better service, using a scalable solution that will support future sustainable growth. Let's now have a quick recap of the chapter!
Summary
In this chapter, you have learned how to create and share forms with both internal and external users. You have gained an understanding of the three different ways of achieving a two-way integration between Zoho CRM and Forms. You have gained insights from how globally successful businesses have significantly transformed business processes by using Zoho Forms and Zoho CRM together.
The knowledge and insights gained from this chapter should either inspire you to transform existing processes or allow you to create new value-adding processes that would have been previously unattainable due to a lack of resources.
In the next chapter, you will learn about Zoho Survey, how it works, and the value it can add to your business process by integrating it with Zoho CRM.